2m electric glider one day build. Impossible?!

CapnBry

Elite member
I'm always impressed with how quickly the Flite Test team can put together the giant projects they do for their youtube channel. Giant flying battleships, a big ole cargo plane, a paper airplane bigger than any room I could build it in. Today is my last day off before starting a new job where I may not see daylight for a few weeks (crunch mode software development) and I want to make the most of it. When I checked the weather last night, it said today was going to be a perfect day for flying a glider. Partly cloudy, high approaching 80F, maximum wind gusts 4 knots. I decided to put all these conditions together and challenge myself to scratch build a new design and have it in the air before the sun goes down.

I don't have enough time to come up with my own original idea, so I just stole one-- the Volantex Phoenix V2 2000.
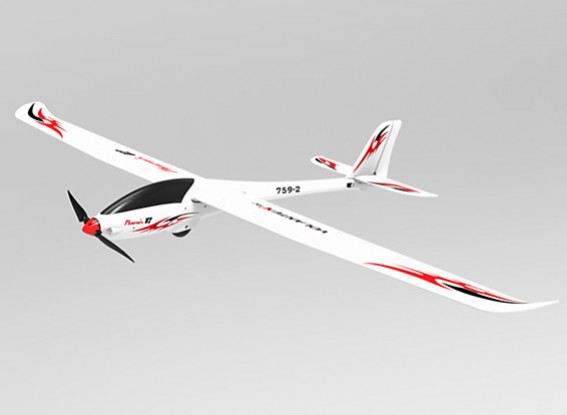
phoenixv2-2000.jpg


Wingspan of 2m is a bit of a stretch for DTFB and because I don't have time to go to the store, I'm only doing this with stuff I have on hand. That means no carbon fiber or aluminum reinforcements. I sketched up a design for the wing last night along with some key dimensions I can work from. These are literally all the plans I have, except I'll steal the Ridge Runner's tail surfaces, scaled up a bit.

Volantex-Phoenix-V2-2000-wing.png


The wing will have a 200m chord and an 11% thickness, and will use 3 foam spars running almost to the tips. The center section will be a full width (30") section of foam board, with one of those pieces I sketched above attached to both ends. I am not planning any dihedral or polyhedral, although it would be easy to add some of the latter by just jacking up the "second section" above. The tips are kinda undercambered but it is also easy to just glue a second tip on and taper it to the end.

The tail boom is going to be a triangle that sockets into a square fuselage with an overall length of 1100mm. I made a little mockup last night to test the dimensions and try some techniques.
DSC06861.JPG


I know it is noon so I'd better get started, eh? Actually I started at 7am and have been making good progress, I wanted to feel like I'd have a shot at getting it done today before I posted anything and failed. The day is now half done and as I pound down a PB&J sandwich for lunch I realize the day is already half over. I think we're going to have to scrap a few of the plans, like an iNav flight controller and flaps. These can be added later though.

Odds on being able to build a decent 2000mm DTFB plane in 10 hours whose wings won't just fold up on the first turn?
 

Figure9

Elite member
I'm always impressed with how quickly the Flite Test team can put together the giant projects they do for their youtube channel. Giant flying battleships, a big ole cargo plane, a paper airplane bigger than any room I could build it in. Today is my last day off before starting a new job where I may not see daylight for a few weeks (crunch mode software development) and I want to make the most of it. When I checked the weather last night, it said today was going to be a perfect day for flying a glider. Partly cloudy, high approaching 80F, maximum wind gusts 4 knots. I decided to put all these conditions together and challenge myself to scratch build a new design and have it in the air before the sun goes down.

I don't have enough time to come up with my own original idea, so I just stole one-- the Volantex Phoenix V2 2000.
View attachment 158266

Wingspan of 2m is a bit of a stretch for DTFB and because I don't have time to go to the store, I'm only doing this with stuff I have on hand. That means no carbon fiber or aluminum reinforcements. I sketched up a design for the wing last night along with some key dimensions I can work from. These are literally all the plans I have, except I'll steal the Ridge Runner's tail surfaces, scaled up a bit.

View attachment 158267

The wing will have a 200m chord and an 11% thickness, and will use 3 foam spars running almost to the tips. The center section will be a full width (30") section of foam board, with one of those pieces I sketched above attached to both ends. I am not planning any dihedral or polyhedral, although it would be easy to add some of the latter by just jacking up the "second section" above. The tips are kinda undercambered but it is also easy to just glue a second tip on and taper it to the end.

The tail boom is going to be a triangle that sockets into a square fuselage with an overall length of 1100mm. I made a little mockup last night to test the dimensions and try some techniques.
View attachment 158296

I know it is noon so I'd better get started, eh? Actually I started at 7am and have been making good progress, I wanted to feel like I'd have a shot at getting it done today before I posted anything and failed. The day is now half done and as I pound down a PB&J sandwich for lunch I realize the day is already half over. I think we're going to have to scrap a few of the plans, like an iNav flight controller and flaps. These can be added later though.

Odds on being able to build a decent 2000mm DTFB plane in 10 hours whose wings won't just fold up on the first turn?

I love it! I’ve been dreaming up a glider based on the tiny trainer plans using what I can scrounge out of my beat up Champ RTF. The plan is to use a wing somewhat like what you‘re doing on a Tiny Trainer fuselage & maybe an abrupt taper behind the wing with a boom to the tail. Keep in mind, it’s all been day-dreaming so far. The Champ’s brushed motor might not be enough, but the Champ’s receiver works with my DX6e. I have no idea what physical component designs I’m going to find in the Champ when I disassemble it, I’ll find out when I pop the cap off the Exacto knife. Thanks for posting this & fair lift for your maiden. Figure9
 
Fun project! Its often amazing what one can build in only a day, I myself have done so. As far as a lot off Flite Tests projects though, it might be more of movie magic with how quickly they get built, at least for some!
 

CapnBry

Elite member
I love it! I’ve been dreaming up a glider based on the tiny trainer plans using what I can scrounge out of my beat up Champ RTF. The plan is to use a wing somewhat like what you‘re doing on a Tiny Trainer fuselage & maybe an abrupt taper behind the wing with a boom to the tail. Keep in mind, it’s all been day-dreaming so far.
I'm in the exact same boat, errr cockpit? I've had this in the back of my head now for a long time, and I made a Ridge Runner which as a 1.4m wing (my build). It got sort of floppy in the middle and I added a heavy spar which makes it a little less thermal-capable than it was. That took a lot longer than a day to build, but I needed some sort of deadline to get this project started.

The day is ticking away faster than I'd hoped, but I do have a wing complete with control surfaces. I can hold it close to one tip and it doesn't sag a ton, and I put a 3kg weight on the center and it didn't snap in half so it's gonna be good enough. Tiny Trainer wing represent!
DSC06872.JPG


I tried to get a little curve in the bottom of the leading edge which kinda worked, and you can see my 3 spar layout here, along with the piece of patch material I had to use because I cut the angle on the foldover backward. 🎺
DSC06876.JPG


Working on the tail surface now. I'm going to try to do a KFM-4 on the horizontal stabilizer, since it is 440mm wide and it would be kinda floppy, and it could use a little more thickness if it were an actual airfoil. A NACA 0010 or 0012 would be 13-15mm thick and this makes it ~14mm so it seemed like a perfect fit.
 

CapnBry

Elite member
The H stab and V stab are done, along with a 600mm triangle tube boom. I knew the vertical stabilizer was too big, so I actually cut a little off of it, but I had scaled up the horizontal one from the Ridge Runner to 125% size and decided to scale both of them. In retrospect it is crazy big so I should have just come up with something better, but we're against the clock here! Check out that quality rushed filleting and patching using small bits of foam, and there's a BBQ skewer embedded in the vertical stabilizer that goes into the horizontal as well.
DSC06879.JPG


You can see the KFM-4 airfoil here, and I ironed the edges to give it a slightly more aerodynamic shape. If I had more time I probably would have tried to sand them round instead of making a trapezoid. The step is at 50% of the chord of the stabilizer.
DSC06864.JPG


I've still got the fuselage, which has been simplified to just a rectangle, then the motor mount and all the servos. The servos usually take me like 8 hours for some reason, so I'm not sure if I'm going to make it, but if I don't completely lose track of time I think this thing may very well see the sky today.
 

Figure9

Elite member
‘Servos usually take 8 hrs, so !’m not sure if I’m going to make it’... @CapnBry. Even if you don’t complete the build in one day, it was the lofty 1 day goal that put you way ahead of the game. The 1st cut of on-hand materials was also a big boost putting you over & above the dream stage. Mostly because that leaped you over the “Do I have time to build another project” stage, ’IF’ that holds you back like it does me. Figure9
 

FoamyDM

Building Fool-Flying Noob
Moderator
I like the build so far, esp. the concept.
Can you share more triangle to square transition details.. I like it and would like to use it for other ideas. the transition would be helpful.
I hope your flight went well
 

CapnBry

Elite member
You guys are great! Yes this was pretty ambitious but I think @Figure9 is right, it's getting past the "Hrmm well what do I want to build next?" with all the great FT designs and designs you guys share I get a case of the do-nothings because everything is so attractive.

Fuselage. KAKOW! You can see I've got a little power pod for the sole reason that I will probably need to get at the ESC wires to spin the motor the right direction later. Oh how much down / right thrust did I add? None! I would have, but I forgot. It's OK though, because I made a power pod! The good news just keeps coming, right? Don't have time for it now though.
DSC06881.JPG


I stuck the wing on so I could get a feel for how it was balancing out. Pretty tail heavy even with an 850 3S up as far as it can go. Note that I ran the rubber bands through the wing instead of completely over it, so they can rest against a double layer of foam on the bottom, with a BBQ skewer for reinforcement.
DSC06886.JPG


I got the servos done in record time, although I may have been a little too generous with the servo extensions. 🤪 I've seen Josh use some pretty humongous extensions as well so I hope they still work over this distance.
DSC06888.JPG


And the tail servos too. This isn't how I intended to place them, but I couldn't remember what my genius plan was so I just made do. I came into this section so confident then stonewalled myself with my lack of memory. Remember in bed last night how you had that idea on how to do the tail servos? Maybe it was a dream.
DSC06890.JPG


Just gotta get a receiver in it and GOOOOOOOO!
 
Last edited:

CapnBry

Elite member
DSC06897.JPG


We did it everyone! Sun sets at 6:23pm, photo taken at 6:29pm. I brought the tripod with me to video it, but I thought by the time I went back to the car, brought it, set it up for the lighting conditions... there would be nothing but darkness.

Oh but your hatch is open! There is no hatch! You may notice in the last batch of photos that the nose it completely solid. I wasn't sure how this was going to balance out so I just cut out a rectangle once everything was assembled. There are a couple skewers that run along there as well, the way that nerdnic does then for his designs. There's some velcro holding down the receiver and the battery so I was hoping nothing would just fall out. I have had a battery just drop right off a Tiny Trainer mid-flight, which was a delightful bit of panic. Why is it not doing anything and flipping like a flipping chihuahua?!

I managed to not crash it on the maiden, although the launch was a bit of a mess. It just would not climb! I ended up giving it 80% up elevator just to get it up over the trees (and above the lake 😓) almost full elevator and with most of my throttle, I flew around for a few minutes. Cut the power and was able to coast around for a while, bouncing off the bottom of stick travel. Landing, like a Marvel movie, was very very long. I killed the power on the far side of the field over the trees and dove down, and it just floated across the entire 100m of field and I was able to drop it just before getting to the playground.

As it flew past me I saw what the problem was, the triangle to square mating area. The tail was sagging a lot. I forgot that I meant to glue it together so for this flight it was just being held by a couple skewers and not enough leverage. I'm glad I didn't glue it though because the 6cm of mating distance and skewers is not going to cut it. @FoamyDM, you may want to not follow my lead on this one, but I'm going to work to resolve this some time over the week.

Stats:
AUW 634g with 1400mAh 3S, ~520g dry. Wing alone is 271g, everything else is 363g.
Motor: Turnigy Aerodrive SK3 2826-1130KV. Got this sucker for $9 on black friday 2 years ago. Don't let the numbers fool you, it is the same size as an FT Radial 2212 1050V (Power Pack B), the Turnigy is less efficient but spins a prop a little faster. My Radial is busy right now.
Prop: APC 8x4.5SF generates 709g of thrust on 3S in this setup
Wingspan: 1960mm. I made an executive decision to use the break between DTFB sheets as the aileron edge instead of having 20mm of stubby bit. Panels are 600mm - 760mm - 600mm
Length: 1100mm and change, maybe closer to 1200mm if you count the prop spinner which is how I like to get that extra edge in the length competition
Servos: 4x of the cheapest 9g servos you can find. 2 more will be added for flaps at some point
Receiver: FlySky FS-iA6B

Woo! Man I am pretty jazzed about the experience. At first I thought I was going to make it easily, but by 5pm I was sweating pretty hard just trying to get it done. I'm glad it flew but it definitely needs some work before it's going to be able to soar around for extended time. I'm going to have a hard time relaxing this evening due to being so keyed up from racing the deadline. I love the events we do here where everyone builds a particular model around the same time, maybe we should organize a one day build day for building whatever you want but with the constraint you have to have nothing when you start, and fly it that same day?

EDIT: haha I think every tool I own is on the floor of my build area along with 1729 scraps of foam. What a mess. No time to clean up tonight I gotta start a job tomorrow. Right?!
 
Last edited:

CapnBry

Elite member
Here was what I had as the part going from the triangle to rectangle transition. Just a notch cut out from the bottom of the triangle, 6cm from the end, with other triangles glued to the side to support it from all sides. That was clearly not enough on my maiden so I tried adding a popsicle stick to take out any slack and give it a little more length to work with.
DSC06899.JPG


This didn't work at all even with two skewers going through it to limit the amount of rotation it can make. Someone might be able to make this work if they 3D print something that goes around it to stiffen it all up. I also tried moving the popsicle stick to the top, where the leverage would help prevent it from sagging (down is closest to the camera in the photo) which made no difference. The fit is crazy tight to the point that the rectangle bulges slightly when the triangle part goes in, so the precision of the fit didn't appear to be an issue.

To work around it I just installed it, then made a giant thick bead of hot glue around the perimeter. It doesn't sag any more, but I'm not sure how long it will hold. The real solution could probably be to increase the engagement depth by quite a bit, but the extra weight of making the triangle 100-150mm longer means it is probably best to just make one giant square tube for the fuselage with a reinforced butt joint to make it long enough (nose to boom is 1100mm, larger than a DTFB). With a rectangle, the servos can also go inside then too.

I managed to get another flight it just to test it, but it was really windy so not much soaring. I calculated out the CG and had it pretty noseheavy too, so I dropped to a 850mAh 3S and an AUW of 599g. It flew just fine even considering the wind, but I am still waiting for better weather. The CG I have at about 75mm back from the leading edge. The calculator says 10% static (safety margin) is 73mm or as far back as 92mm for 0% safety margin. Lots of room to work with there without getting fussy about it.

EDIT: Forgot to post this from when I tested the wing strength. A little over 8lbs of weight sitting up on top.
DSC06844.JPG
 

Figure9

Elite member
Here was what I had as the part going from the triangle to rectangle transition. Just a notch cut out from the bottom of the triangle, 6cm from the end, with other triangles glued to the side to support it from all sides. That was clearly not enough on my maiden so I tried adding a popsicle stick to take out any slack and give it a little more length to work with.
View attachment 158732

This didn't work at all even with two skewers going through it to limit the amount of rotation it can make. Someone might be able to make this work if they 3D print something that goes around it to stiffen it all up. I also tried moving the popsicle stick to the top, where the leverage would help prevent it from sagging (down is closest to the camera in the photo) which made no difference. The fit is crazy tight to the point that the rectangle bulges slightly when the triangle part goes in, so the precision of the fit didn't appear to be an issue.

To work around it I just installed it, then made a giant thick bead of hot glue around the perimeter. It doesn't sag any more, but I'm not sure how long it will hold. The real solution could probably be to increase the engagement depth by quite a bit, but the extra weight of making the triangle 100-150mm longer means it is probably best to just make one giant square tube for the fuselage with a reinforced butt joint to make it long enough (nose to boom is 1100mm, larger than a DTFB). With a rectangle, the servos can also go inside then too.

I managed to get another flight it just to test it, but it was really windy so not much soaring. I calculated out the CG and had it pretty noseheavy too, so I dropped to a 850mAh 3S and an AUW of 599g. It flew just fine even considering the wind, but I am still waiting for better weather. The CG I have at about 75mm back from the leading edge. The calculator says 10% static (safety margin) is 73mm or as far back as 92mm for 0% safety margin. Lots of room to work with there without getting fussy about it.

EDIT: Forgot to post this from when I tested the wing strength. A little over 8lbs of weight sitting up on top.
View attachment 158741

I was so impressed with your triangle boom that I attempted one with scrap DTFB. Mine looked like a skinny banana when I got it done. Not as easy as I thought. I decided to try a tapered boom by building a modified Simple Soarer so I can get some experience working with the FB & long glue joints. I have a lot to learn. Haha Figure9
 

CapnBry

Elite member
It is real tough to do, right? It took me a few attempts before I got the idea to come together properly. I wanted a 40mm inside part, so I cut 35.5mm-4.5mm-40mm-4.5mm-35.5mm where 4.5mm is the thickness of the foam and those parts were removed. Then I did a 45 degree bevel on both sides of the 35.5mm end pieces. Glued and folded up the ends like an A fold, except so they meet in the middle, let that cool, then put a bead down the center.

The real magic was that I didn't use a whole glue stick to do it and that it ended up straight. I don't think either of those was my doing. ;)
 

bracesport

Legendary member
the old 'nube tube' from 'experimental airlines' is a folded structure - I typically make my FT fuses this way - sounds similar to what you are doing? :D

I really like what you are up to on this one!