
You are using an out of date browser. It may not display this or other websites correctly.
You should upgrade or use an alternative browser.
You should upgrade or use an alternative browser.
36" Northern Pike - 3D Printed Cuda Clone (It Flies & STL's are Posted!)
- Thread starter localfiend
- Start date

kilroy07
Legendary member
Pretty sweet prints! I hope to own an original Prusa someday....My printer is happily performing its purpose in life, making planes.
Cool man, looking great. I think this plane is very well suited to obnoxious and bright colors. I need some florescent purple and yellow...
DroneRocket Guy
Member
Need to get some new filliment for this plane but can't decide which color LOL.
Im getting the fillment for this plane from atomic fillment. They have good prices and free shipping, they are also a us company. Should according to reviews print like a dream. I can't wait to get the 27inch version printed out and show it here! Thanks everyone here so much for the help. Also localfiend, you design is great better than most I have seen. It is a honor helping you test the 27inch before public release.
PS- I am still new to rc airplanes but I have lots of experience in other fields that relate. Noob question would a 1000mah lipo be good for the 27inch it would be a 3 cell so I don't burn my esc from the f pack. Thanks
Last edited:
JGplanes
Active member
The first print (factory file) turned out perfect!
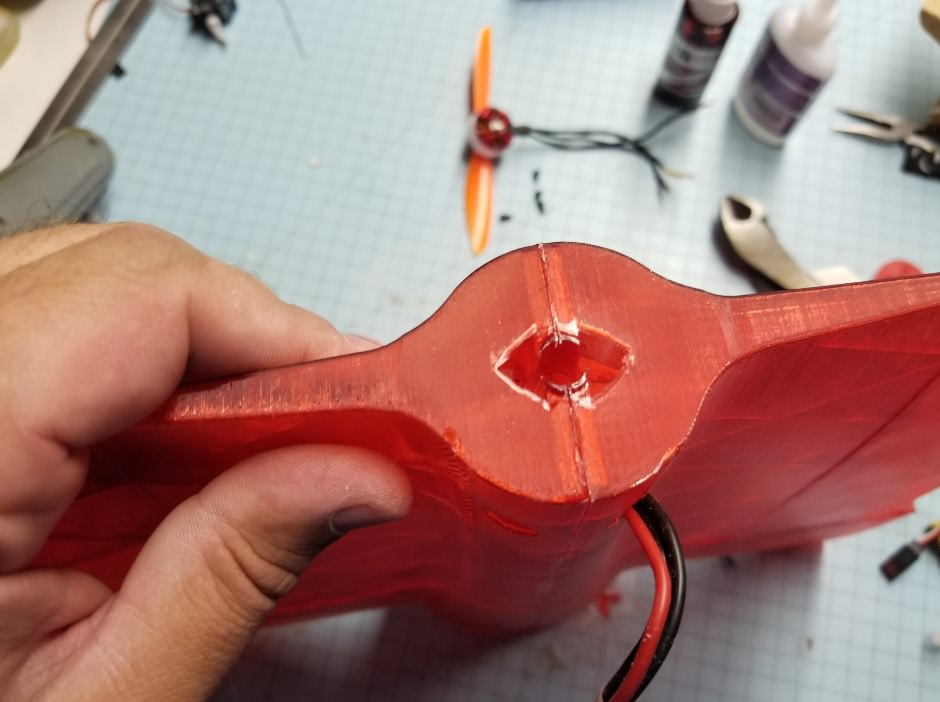
FYI The second one (right wing piece 1) just stopped about an hour into the print right at the rim of the hole for the wires (pic 1). Unfortunately I couldn’t restart it. I also noticed that the skin was easily pulling away cleanly from the internal structure (pic 2). I don’t think it’s the print settings because it’s only on one side and the other side is very secure.
I’ve started another print of the right wing 1 piece. I’ll let you know how it turns out.
JG


The first print (factory file) turned out perfect!
FYI The second one (right wing piece 1) just stopped about an hour into the print right at the rim of the hole for the wires (pic 1). Unfortunately I couldn’t restart it. I also noticed that the skin was easily pulling away cleanly from the internal structure (pic 2). I don’t think it’s the print settings because it’s only on one side and the other side is very secure.
I’ve started another print of the right wing 1 piece. I’ll let you know how it turns out.
JG
Dang, I hate when that happens. I've just recently printed 2 of those sections and didn't have any trouble. And actually, since you have a Prusa, you can print both the left and the right sides of that piece at the same time. There might be a couple spots where stuff can pull away (Fusion can't always make a perfectly calculated curve for cutting spars along a fillet so I took what I could get), but as a whole, that piece doesn't need the structural support, it mostly just to hold the skin in place.
Stopping mid print is a concern, but not for the file. You might want to check your SD card to make sure nothing is corrupted, or that you safely removed it after the file finished uploading completely. If you pull the card out of your computer too early, or don't safely remove it, sometimes the file won't be fully copied, or can become corrupted. Your printer will still print the file, until it comes to the bad bit of code and then stops. I've also seen this happen on prints where the power to the printer fluctuated.
Good news, it’s at 86% right now and still going strong. I usually print out smaller batches or single large parts so if they fail I don’t waste a lot of filiament.
Good to hear, was probably just a g-code bug/corrupted file then.
Just a note to those that might not be familiar with thin wall stuff, you can print the big pieces by themselves without issues, but some of the smaller parts are better to print in groups. Gives the filament more time to cool with the longer layer times. You won't necessarily get a failure, but quality can suffer.
DroneRocket Guy
Member
I'm getting my 27inch beta print started next week. Got some imoact modified bright white pla. Should work well if it crashes. I have gcode posted here mabey monday.Good to hear, was probably just a g-code bug/corrupted file then.
Just a note to those that might not be familiar with thin wall stuff, you can print the big pieces by themselves without issues, but some of the smaller parts are better to print in groups. Gives the filament more time to cool with the longer layer times. You won't necessarily get a failure, but quality can suffer.
I'm getting my 27inch beta print started next week. Got some imoact modified bright white pla. Should work well if it crashes. I have gcode posted here mabey monday.
Sounds good. I'm getting my 3rd printer going (I hope) so I may have some time to test this weekend as well.
Ok, I'm gonna start the assembly instructions here. I'll probably eventually make a PDF or something to add to thingiverse, but for now, I'll just add instructions as I print the parts. And yes, some of these parts are ugly. Didn't bother to reprint ugly stuff as I was tuning for PETG.
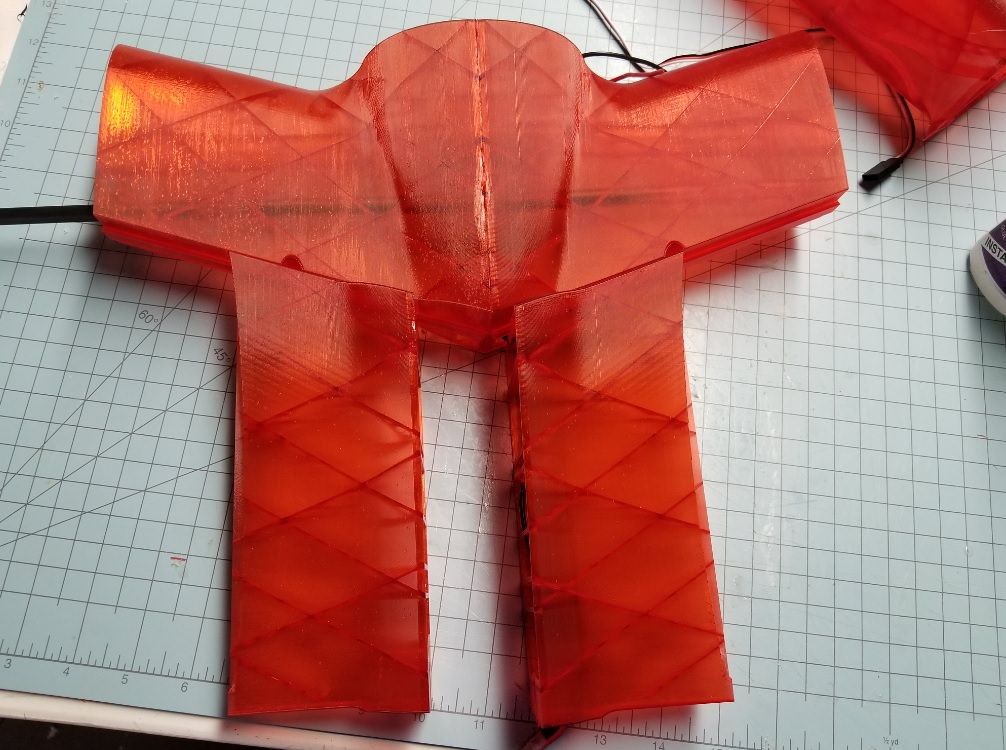
All 6 of the fuselage sections can be glued together using the Popsicle stick trick. There's no particular order of operations for the fuse assembly.
Wings will work best if you go in the order laid out below.
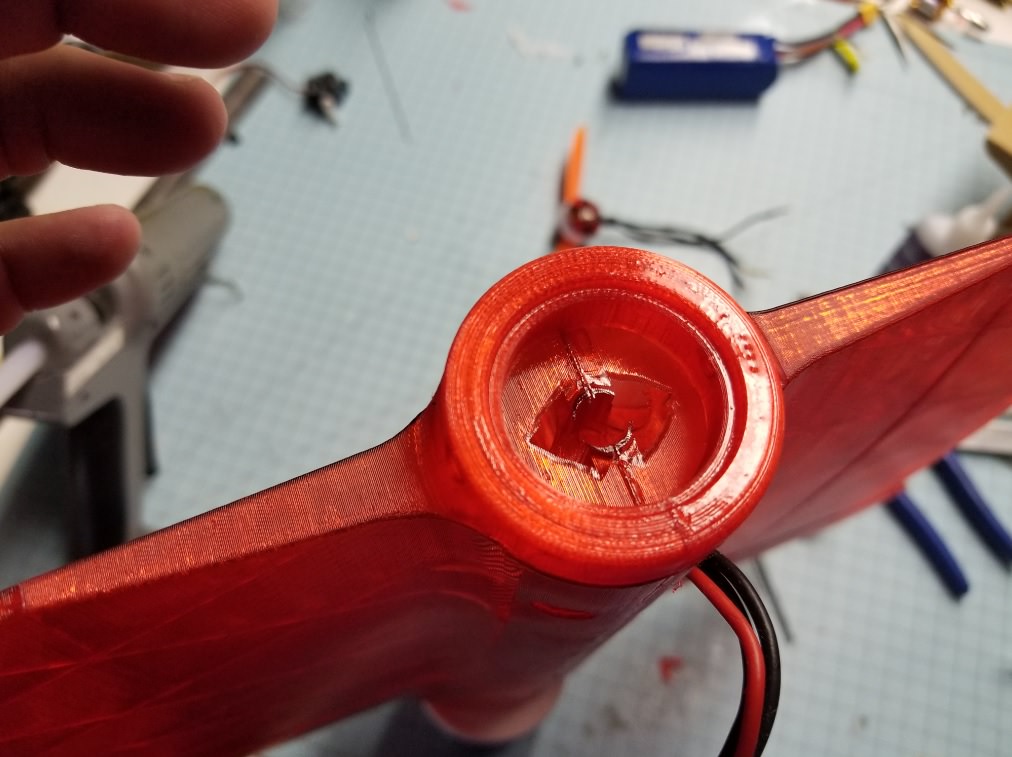
Wing Sections 1&2 have four holes that need to be cut out so that you can run the motor wires that go to the ESC.
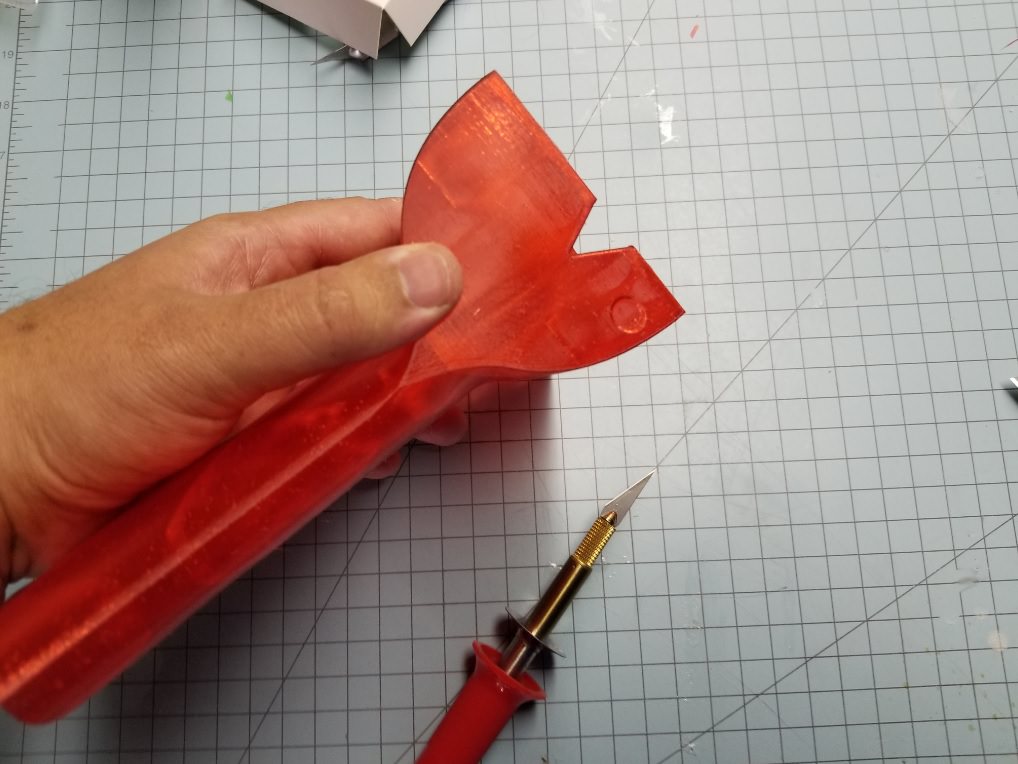
I use a hot knife, but a soldering iron would work as well. You could also wire wrap a blade to your iron to make a temporary hot knife. A normal hobby knife can work if you're really careful. If you're not careful, you can cut much further than you mean to, or separate layers and make a mess.
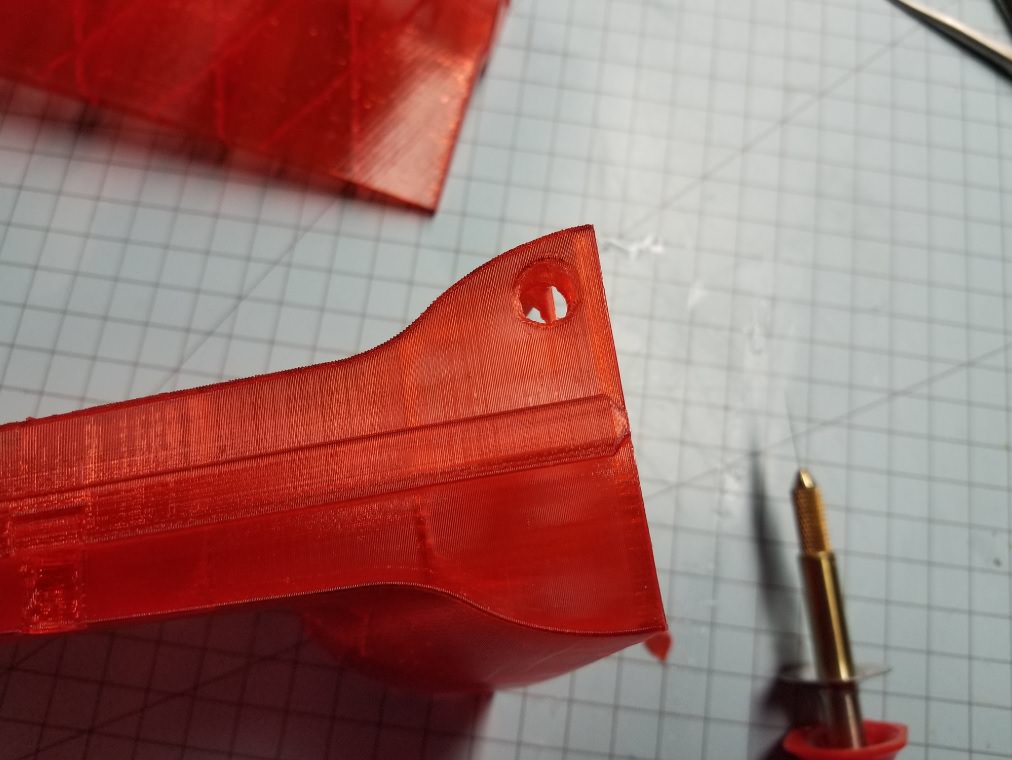
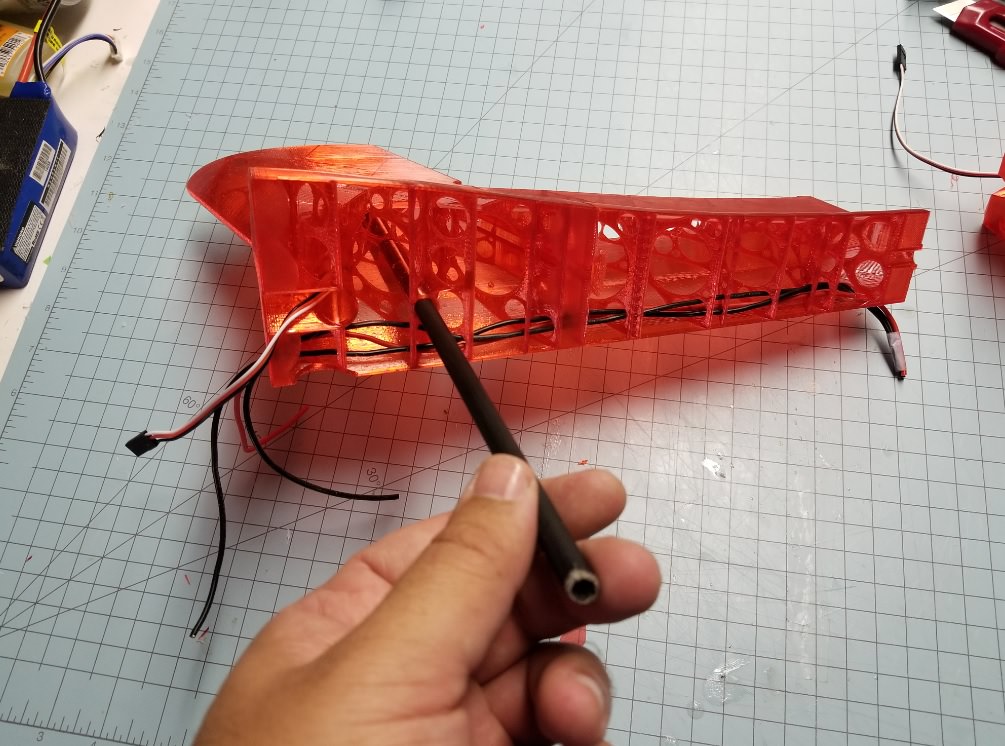
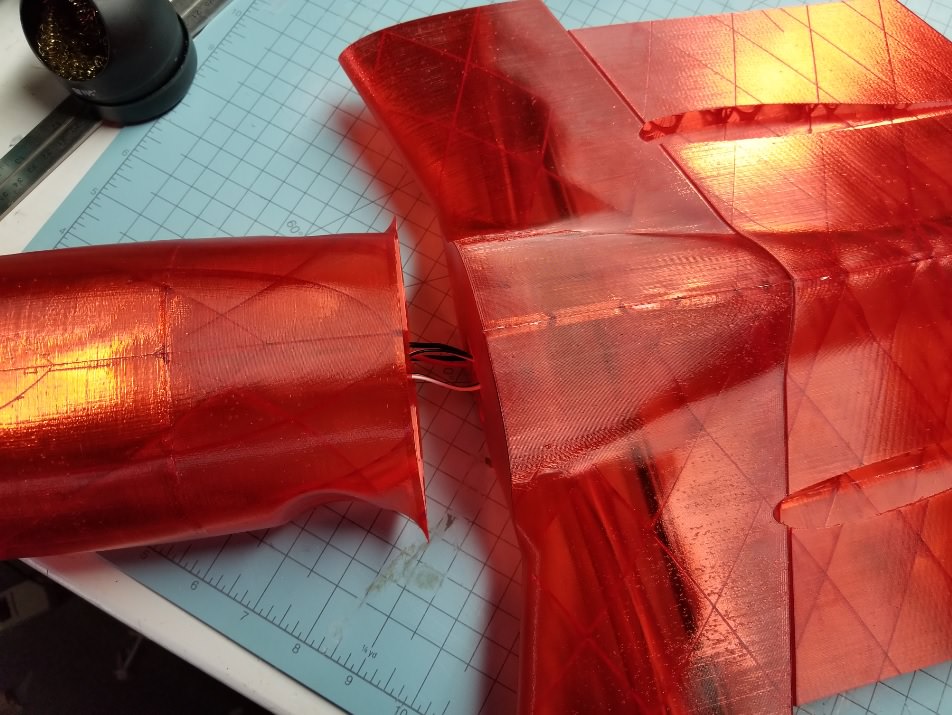
Once all 4 holes are cut, you can run your motor wires. I'm using 16 gauge wire, but if you've got some crazy motor and want to go bigger, there are holes on both the right and left sections if you run out of room. You can also see a piece of cheapo carbon fiber arrow. 8mm carbon tube will work as well. Heck, you could probably get away with smaller if it was supported, or wood if you don't mind the extra weight. Also, nothing is glued yet.
I prefer to glue the left and right wing section 1 pieces first. Once the wing section 1 pieces are glued, you can add CA to the section 2 pieces and glue them together. I don't put any glue into the tongue and groove bits until the whole wing is assembled. Makes it easy to line everything up that way.
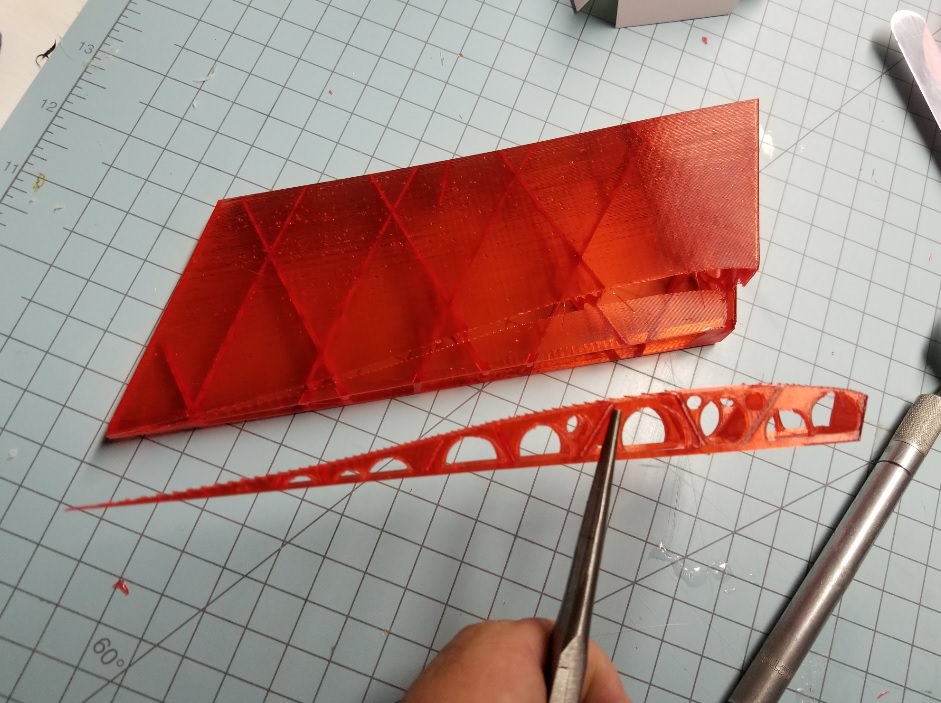
The Left and Right Wing Section 3 piece has support material that needs to be removed.
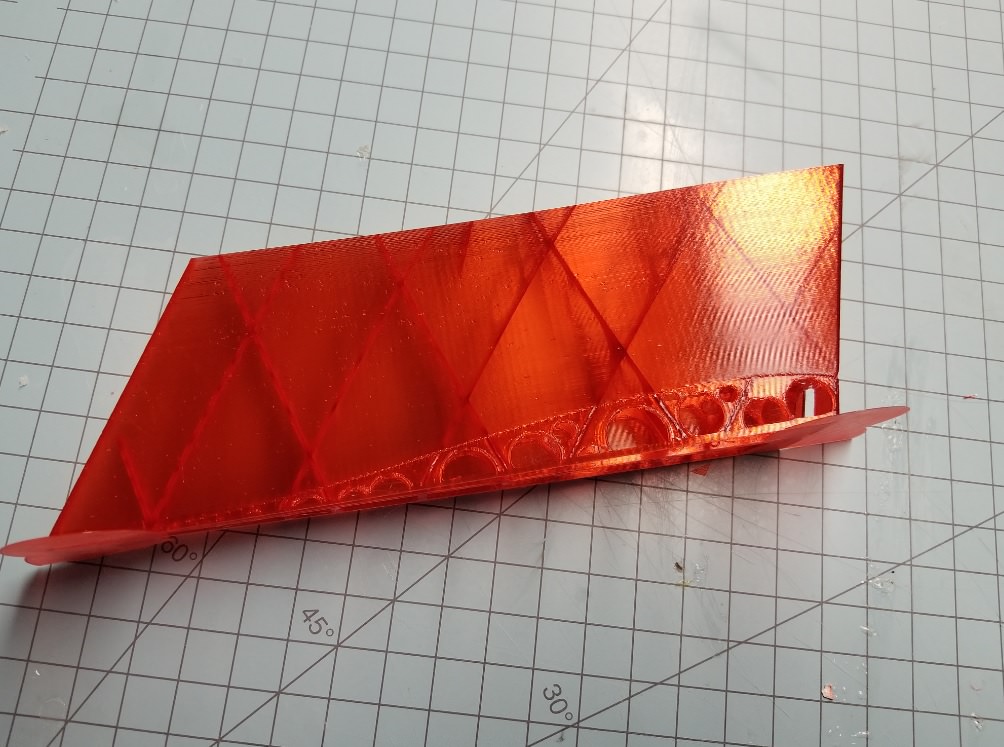
Remove the helper discs material, or brim if you printed with either, and run your knife along the back side of the support at both ends
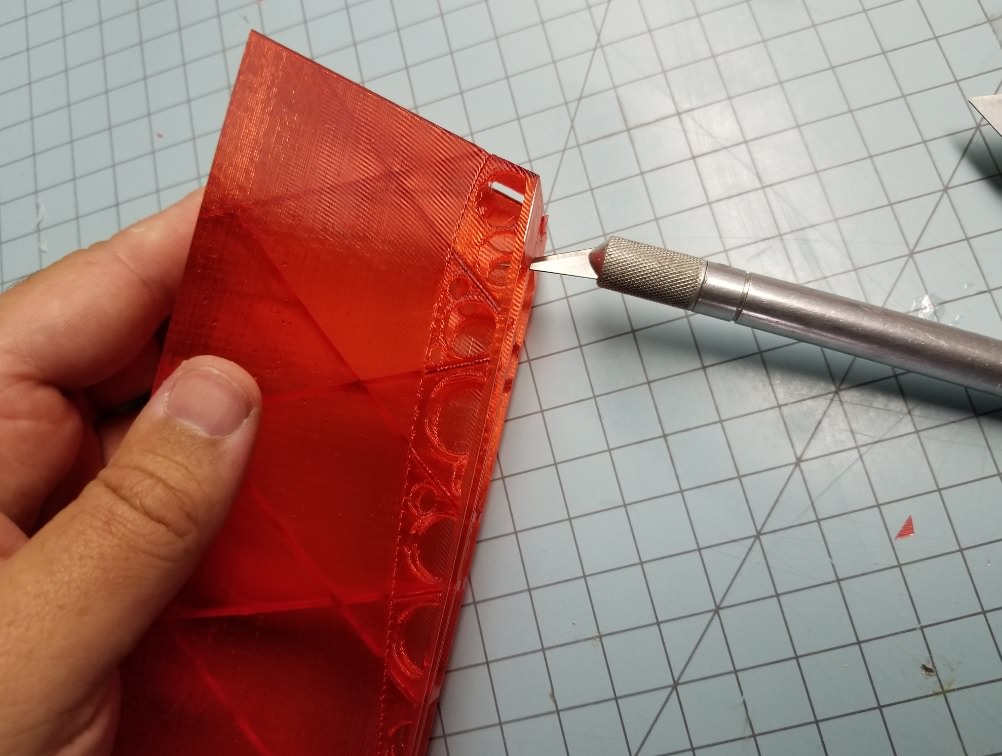
Then you can carefully insert your knife between the wing and the support material. I just use a standard knife for this, no need for a hot blade.
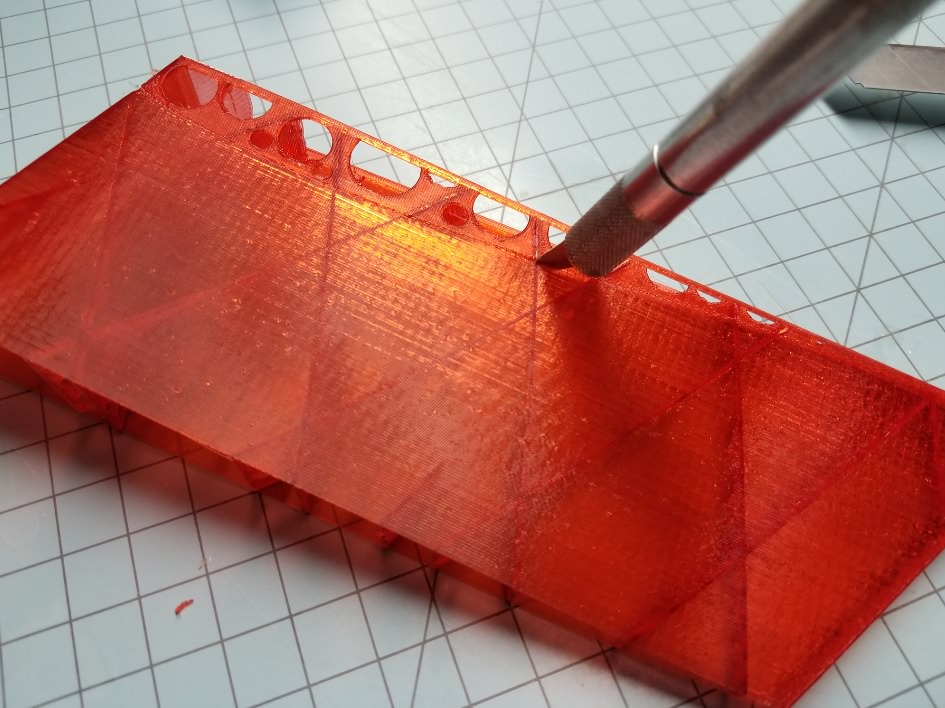
After you've traced the perimeter, if the support hasn't fallen off, you can gently pull it away with a set of pliers. If it's not coming off easily, you've got more cutting to do.
To be continued.....
Continuing on...
Motor mount install. I've since update the STL for wing section 2, but if you have the old version like I do here, cut off the diamond from the back of the plane. It was going to be a locating mark, but in testing was more trouble than it's worth. Meant to remove it before posting files, but it slipped my mind. Cutting it off won't hurt anything. If you're concerned, add some drops of glue.
Next glue on the motor mount.
Attach your motor with some 3mm screws. This bolt pattern should work for almost any reasonable power setup you want to try. If there's anyone out there with something oddball, I can make another firewall.
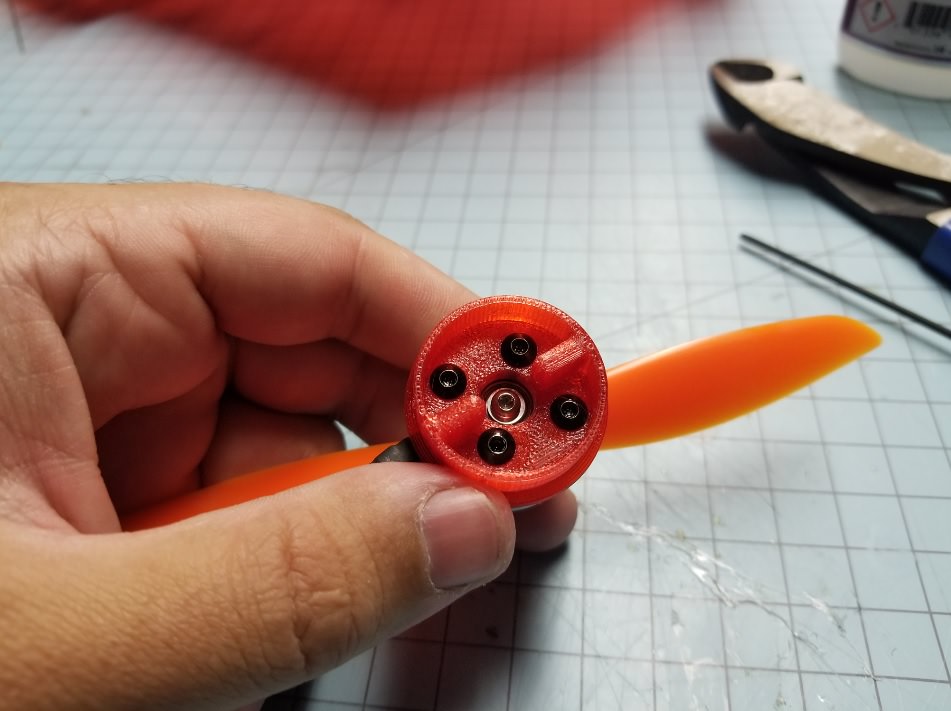
The firewall piece will now just plug into the back of the plane. You could pin it in with some wire/dowel, use 3mm bolts, or glue it on. I use a couple bolts in case I need to swap out / service motors.
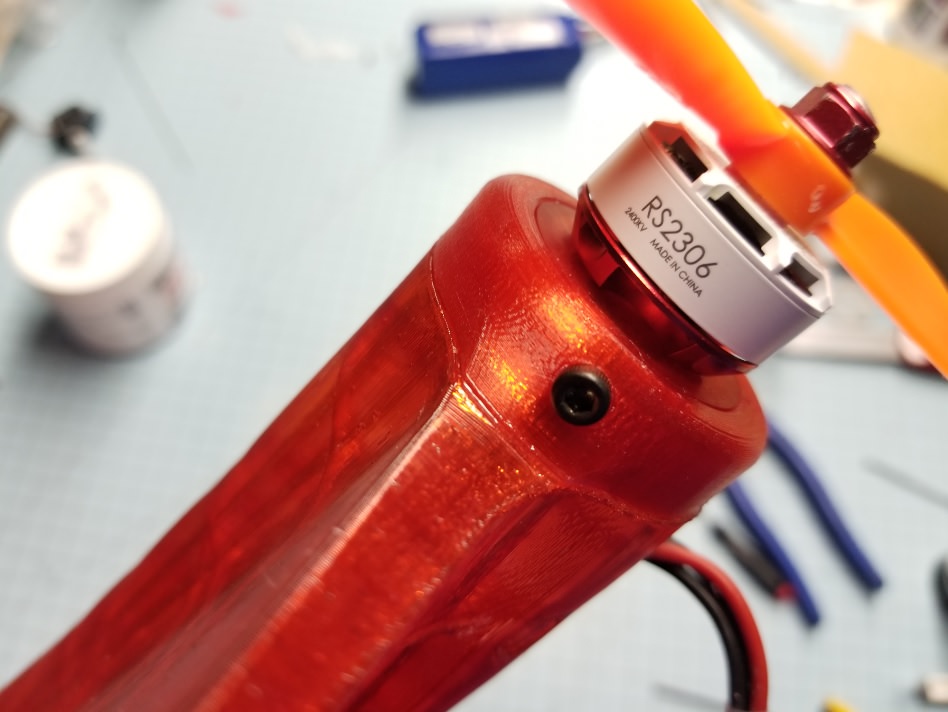
Next I glue on the fuselage. Line up your electronics wires and slap on some CA.
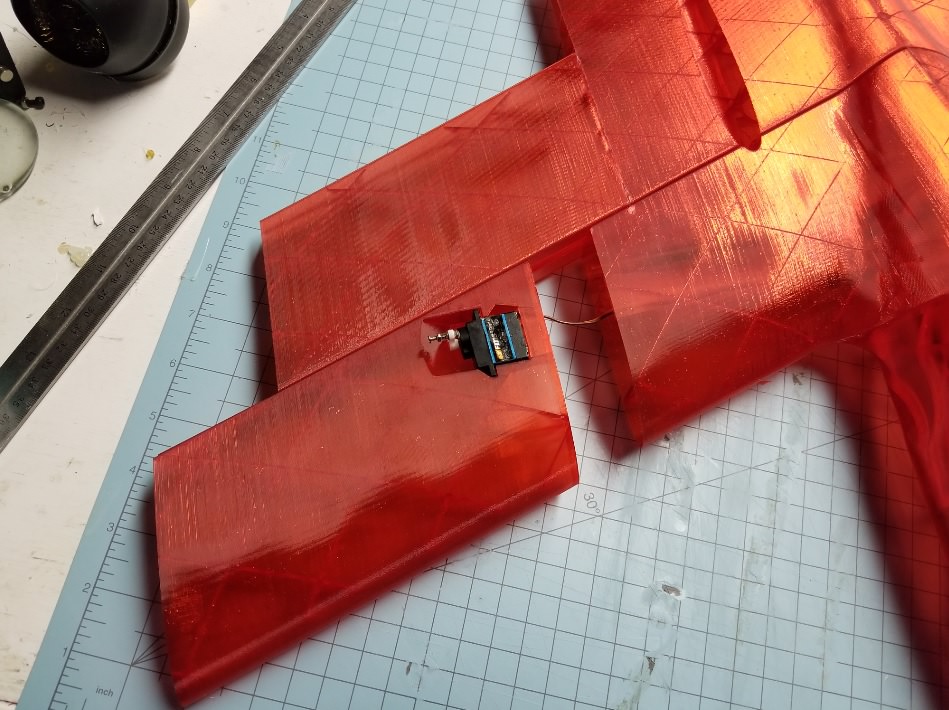
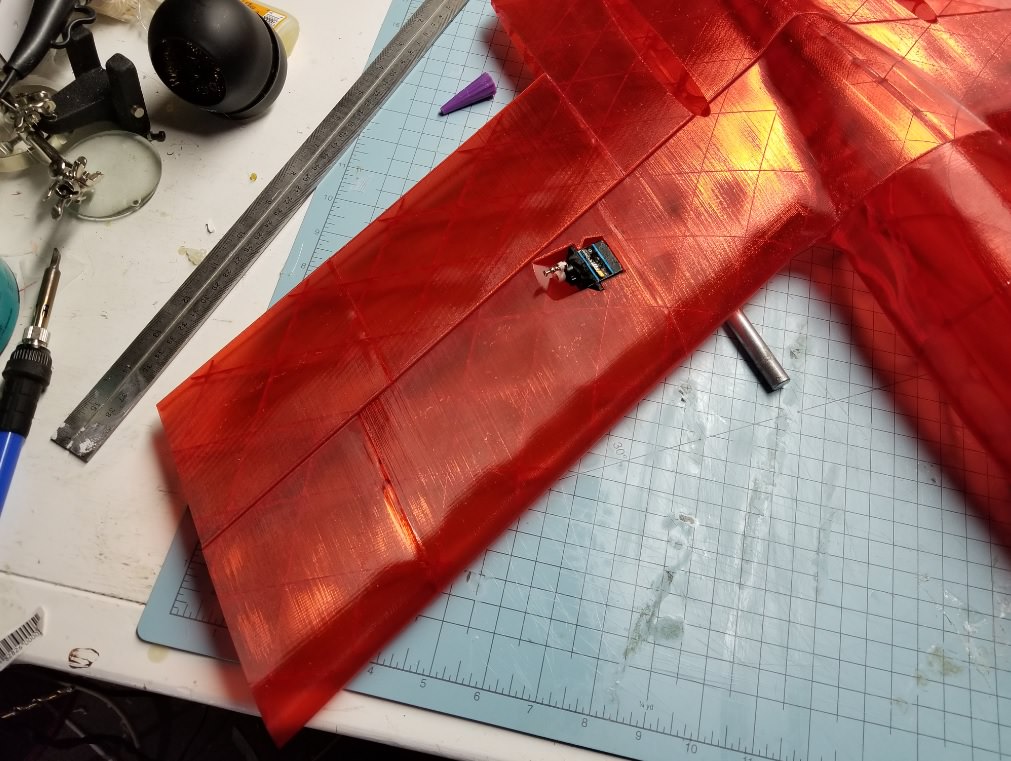
Once the fuse is connected, you can start sliding on the wing pieces and gluing them into place. At this point, I'm also adding glue to the tongue and groove sections. Just make sure you don't put any glue in a place that will make it impossible to slide on the next piece. It's also a good time to slot in your servos. These can be glued or taped in at the moment.
Complete all the main wing sections, and then do the same on the other side.
Motor mount install. I've since update the STL for wing section 2, but if you have the old version like I do here, cut off the diamond from the back of the plane. It was going to be a locating mark, but in testing was more trouble than it's worth. Meant to remove it before posting files, but it slipped my mind. Cutting it off won't hurt anything. If you're concerned, add some drops of glue.
Next glue on the motor mount.
Attach your motor with some 3mm screws. This bolt pattern should work for almost any reasonable power setup you want to try. If there's anyone out there with something oddball, I can make another firewall.
The firewall piece will now just plug into the back of the plane. You could pin it in with some wire/dowel, use 3mm bolts, or glue it on. I use a couple bolts in case I need to swap out / service motors.
Next I glue on the fuselage. Line up your electronics wires and slap on some CA.
Once the fuse is connected, you can start sliding on the wing pieces and gluing them into place. At this point, I'm also adding glue to the tongue and groove sections. Just make sure you don't put any glue in a place that will make it impossible to slide on the next piece. It's also a good time to slot in your servos. These can be glued or taped in at the moment.
Complete all the main wing sections, and then do the same on the other side.
I'll try and finish the build log this evening. For now, I'm getting ready to head out and fly.


Man if I had a 3d printer this would totally be in the process of being printed!!!
Buy one! They're awesome. Or find somebody local who has one. The 3D printing community can be a lot like FT in a way. They really like to help out new guys.
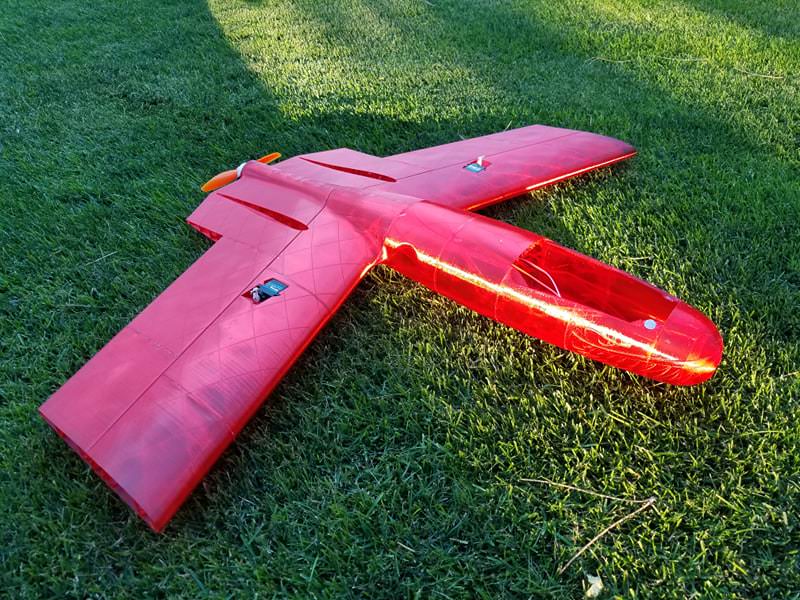
Here's the maiden of the PETG version. Can't tell a difference between this and PLA in the air, still rock solid stable and a lot of fun to fly.
DroneRocket Guy
Member
Buy one! They're awesome. Or find somebody local who has one. The 3D printing community can be a lot like FT in a way. They really like to help out new guys.
Here's the maiden of the PETG version. Can't tell a difference between this and PLA in the air, still rock solid stable and a lot of fun to fly.
Awesome maiden! As soon as my filliment comes I'll get an idea for settings for the filliment and get my printer printing!
DeepEndofPool
New member
Just found this thread last night and of course today I'm on the road for a week. With internet, I hope...
Awesome job, LocalFiend! Just a few weeks from concept to published design and flight video is amazing.
I started back in June but I'm not quite as far along. I am attempting to create a B-17 warbird. I expect it will take me a little longer since: I've never used Fusion before. I don't own a 3D printer yet. The last plane I built was a rubber-band powered Piper Cub back in about 1970. Crazy? Yeah, look at my login name. But not totally. I started looking on FliteTest to find a cheap simple plane to learn on. I'm looking to start with the Simple Scout.
Anyway, I have questions! About a million of them, but the most immediate one is more of a request. LocalFiend, can you say more about how you are creating the internal structure? I've studied the 3DLabPrint designs to see what I want to do, but I'm using construction planes and intersection sketches with offset. That limits me to straight line components. I've only used the Model toolset so far.
I don't mean to hijack this thread. I'll start my own build thread to if anyone is interested to watch the noob stumble around, but I wanted to jump in here and add my congratulations to LocalFiend for a fantastic contribution, and to sneak my question in.
Thank you!
Chip
Have you read through the thread? I go into pretty good detail on spar creation several posts down on page one. If you have any specific questions about that process, let me know.
You can get a lot done in just the model workspace. Work on getting clean outer bodies of the plane first, then you can work on adding in internal structure bits. If you mean straight line components as no use of sculpting tools and such, then I do the same thing. It's all sketches that have been placed on various constructions planes that are either extruded, lofted, revolved or swept together.
One other thing I recommend, is downloading a slicer to play with even though you don't have a printed yet. It is very helpful to periodically export stuff you're working on then trying to slice it to see how what you drew will print out. Since you're wanting to do airplanes, I recommend either Simplyfy3D (the best slicer I've found so far, but expensive) or Cura (free).
DroneRocket Guy
Member
Hi I was putting together the g-code files for the mini pike and noticed that the elevons 2&3 and Right elevons 2&3 dont match. Is this normal or is this a mistake. I am posting all the g-code i process here soon. Most of the files are around 6 hours or less.
JGplanes
Active member
Ok, I think this a legitimate question... When I'm printing the "elevon section 1" with the control horn, am I supposed to print the last few mm solid so that the control horn is solid? Mine has no infill with the factory settings, and I can't seem to find it in the instructions. I think I know the obvious answer, but I wanted to make sure.
Attachments

Similar threads
- Replies
- 3
- Views
- 235
- Replies
- 8
- Views
- 809
- Replies
- 0
- Views
- 129