CranialRectosis' Twitchity Mini-Hex build

cranialrectosis

Faster than a speeding face plant!
Mentor
For adjust the camera angle, I use packing expanded plastic (sort of EPO/EPP, but used in the packing for protect many good like TV, etc) and I cut the shape and angle that I need, using a hobby knife. I was using foam before, but it is way more precise and easy to quickly cut the "cone" needed for the job.

Details and photos please. :)
 

cranialrectosis

Faster than a speeding face plant!
Mentor
Eagerly awaiting video with a Mobius or GoPro to see if (or how much of) the props are visible on the completed hex. I have 6 SunnySky 2204 2300kv motors that don't yet have a home, and this could be it if the geometry is right. I want a hex to go with my Blackout Mini H, and the only reason I didn't already order the BO Hex is the 5" prop limitation. I want more flexibility with the option of 6" props.

The colour options on this build are great too. Looks sharp.

Twitchity did a great job creating this frame. The G-10 is a light color and that allowed me to use paints that don't cover black frames well. If you want a white copter, black G-10 is a tough way to start out.

Because of the color of the G-10 Twitchity used, I was able to use flourescent green spray paint from the local hardware store and do it in two coats.
 

e_lm_70

Senior Member
Details and photos please. :)

I did move my mobius to my DIY brushless gimbal on my big x900, ... and I'm still slowly moving the TOPCAM + 100mW Video TX on the FPV250 (the micro video TX will fit inside the TOPCAM instead of 500mAh battery, and all will be power by 5v from ESC ... ultra light fully HD recorder + video TX ... ultra cheap too ... still I gotta to test the range, but for me this set up is for fly LOS + short range FPV)

Attached here are some photos ... clearly no rocket science here ... just a quick and easy cutting job ... for make any type of needed inclination, using "scrap" material (the protection "foam" from packing)

Also, if you check my video http://www.youtube.com/watch?v=J0xIYXu_q8c ... at the end, 6:24, showing the copter the Mobius mount it is visible.

mount.jpg
03072014643.jpg
 

Twitchity

Senior Member
Well I tried to cut out the updated design to the Twitchity Mini Hex, but unfortunately the little spindle on my CNC machine didn't feel like cooperating with me tonight :mad: On the longer cuts (basically the outside of the frame) the bit would slowly work its way out, dig into the waste board, and bind up the machine. I've had it with the little spindle that came with the machine, and thankfully I have a nice Dewalt router to replace it with, I just need to wait for the mounting bracket to arrive :)

The next design will have 4 different configurations which I will show assembled once I get the pieces cut out, but the main changes in the design is the frame is 6mm longer (can't go any longer without interfering with the front rotor and keeping it the same size), extended the tail on the bottom plate a little and made it wider with cutouts for a battery strap, and added 6 spots for anti-vibration balls for the plate that will hold the FC and cameras. This can be bypassed and still run the same configuration cranialrectosis with the standoffs mounted directly to the middle and top frame.

The only other idea I was throwing around was making mounting locations on the bottom frame for a camera bracket to be mounted to if someone wanted to mount a GoPro underneath. Would this be a good idea? If anything it might save a few grams of weight if not used. The bottom frame wights 24g as is, so I would suspect all of the frame pieces would weigh around 80g total.

Since I'm waiting for my spindle mounting bracket to arrive, I will gladly take criticism to improve the design :)

Untitled-6_zpsdc78b62a.jpg
 

FinalGlideAus

terrorizing squirrels
I say go ahead with the GoPro idea. Six motors will carry it nicely.

Really impressed with what you've achieved Twitchy. Keep it up mate!
 

e_lm_70

Senior Member
...

Since I'm waiting for my spindle mounting bracket to arrive, I will gladly take criticism to improve the design :)

Untitled-6_zpsdc78b62a.jpg

It is looking very good.

One little note.

What is the point to have the most left plate with an additional extension ?

I would guess this could be an extension for mount the camera, but then I would expect this into the vibration isolated part of the frame.

PS: Have you seen the last video Flite Test "Exploring Gorges du Verdon" ? They show a new folding prototype copter ... also this one use vibration ball for totally isolate the "cage" : battery + cam + etc ... from the rest ... I don't think it is a "trend" ... it is just a recognition how it is more "easy" to kill the jello with a very effective anti vibration "system"
 

FinalGlideAus

terrorizing squirrels
I think that extension is for mounting the battery so the CG is correct.

Those vibration balls are a great idea. They are just better suited to larger gimbal quads with larger, lower KV motors. The smaller quads with high KV motors are not as much of a problem.

BTW: Twitchy you're tempting me to get a frame off you someday soon :)
 

FinalGlideAus

terrorizing squirrels
I had a look back at the frame and since you're looking for feedback....

I can see that lightening hole you made in the arms inboard of the motors becoming a weak spot in a crash. I would rather take the couple of grams weight penalty and know the arms are more crash resistant.

Also, during his destruction testing of the Warpquad, Soma found the outer mounting bolt hole in the arms connecting to the center plate acted as another weak point and would break there. His solution was to slightly increase the width of the arms at that point. I'm sure Cranial could show you pics of that if needed.

While I'm on it, what thickness are the arms?
 

Twitchity

Senior Member
FinalGlide is correct, the extension on the bottom frame is so you can mount a battery so the CG is correct.

I was worried that the anti-vibration balls wouldn't provide much vibration reduction with these little high KV motors, but I had hoped that with the weight of the battery and FPV gear on the top cage they would reduce what little vibration might be there. This is a feature that will be in the next version of the frame, but can be bypassed if wanted.

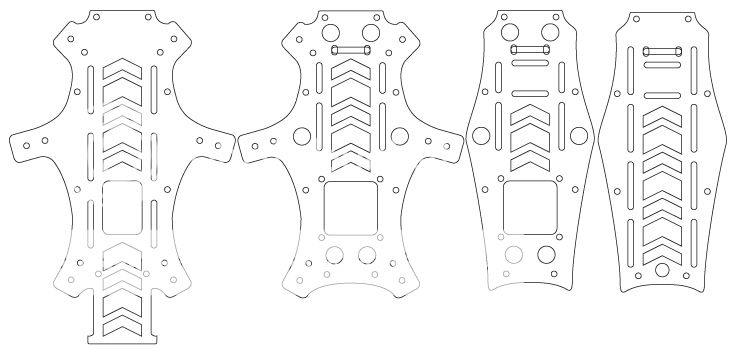
When I put the hole in the arms to lighten it up a little bit, I was worried it would cause a weak point in a crash so I'll remove it for the next design. I have seem Soma's videos on his Warp Quad build and I did notice the arms were thicker next to the mounting holes. I will edit my design to do the same :) Also, while we're on the topic, should I increase the distance between the two mounting holes? As you can see in the picture above, the holes are fairly close together. I can extend the frame a little bit and move the outer mounting hole further away.

The arms are 1/8" (3.175mm) G10. Once I get a design finalized, I would like to start making them out of 1mm and 3mm carbon fiber if there is a demand for it.

FinalGlide, if you're truly interested in this frame, shoot me a PM and we'll see if we can work anything out. I could use another tester, and you're an infinitely better pilot than myself.
 

FinalGlideAus

terrorizing squirrels
Widening the distance between the arm mounting holes can always help I guess but it's probably worth finding out if its needed before you go to too much trouble. I do notice the mounting points for the middle arms seem a little thin. Maybe on the center arm attachment points the rear radius could be made to be not so sharp of a corner if that makes any sense. It will give that arm a little more "meat".

Thanks for the pilot comments. I am but a humble multirotor pilot that is on a never ending quest to perfect the ultimate crash :)

Sending you a PM now...
 

cranialrectosis

Faster than a speeding face plant!
Mentor
I am glad this thread moved forward in my absence. Sorry guys, I had to step away.

This frame is a total blast to fly and I need to post some updates and get more feedback to Twitchity ASAP.

It is raining outside now. Once it stops, I will take the copter out with the Mobius so we can see what the camera sees from a few different mounting positions on the copter.

I also have some 35mm standoffs on order. When they arrive (after I paint them purple), I will re-assemble the copter using the provided camera mount which I painted green.

One other item of note. I fly a warpquad with 1000 and 1300 mAh 35C lipos. They don't do well on this copter and get pretty warm when I fly and do spins. I am looking for some 1500 or 1800s with a higher C rating. I will also put the copter on a wattmeter and test some draw later on today.
 

Twitchity

Senior Member
Thank you for the update cranialrectosis, and I'm excited to hear how I can improve on the design. Looking forward to see what the little hex is capable of.

The weather in central Florida hasn't been kind to me either. We've had nasty storms just about every afternoon for the past few weeks so no flying for me.
 

FinalGlideAus

terrorizing squirrels
Yes agreed on the battery Cranial, the numbers tell the story. At wot each motor is pulling around 15a so that's getting close 100a at wot for the hex. The Warpquad can draw around 70a.

If you're using 1300 35c then that'll be killing them. I would suggest 2200 65c type batteries at a minimum for that setup.

I run Nanotech 1800 65c batts on my mini H with the cutdown FC's and it doesn't like extended WOT flying. That's just a quad with 5" inch props. This an FPV ship in design so that means you won't be as crazy on the throttle as acro but will hold WOT for longer (because you can :) ) so it can be harder on the batteries.
 
Last edited:

Twitchity

Senior Member
Well my little netbook I was using the run the software decided it didn't want to work anymore, so now I have my desktop torn apart and sitting out next to the garage door so I can run the CNC. Since it's uncomfortable to sit on the floor, and I can't use the computer for anything else at the moment, I will leave a picture here of the V2 frame being cut out of black G10.

IMG_20140708_180232_zps3ac7a0fe.jpg
 

Tritium

Amateur Extra Class K5TWM
ShapeOko 2! I like it! Mine is a 1 upgraded to a 2+. ;)

Would you share any cut files or do you plan to make a business of frame production?

Thurmond
 

Twitchity

Senior Member
ShapeOko 2! I like it! Mine is a 1 upgraded to a 2+. ;)

Would you share any cut files or do you plan to make a business of frame production?

Thurmond

I do plan on making this a side project to make a little more cash, but if you're only going to use it to make one for yourself I wouldn't have a problem sharing the files with you.
 

Twitchity

Senior Member
I need the popcorn emoticon right now! Nice work Twitch :D

Little more for you :) The third piece is almost finished being cut too.

e6f1dfc2-3bda-4639-a80e-fac17a3f4729_zpsbb256b24.jpg


Tritium, PM me an email address and I'll send you the svg files I used to generate the g-code. Since you have a Shapeoko too, I'm sure you know your way around Makercam.