Time to stop procrastinating . . .
So after getting tired of not building anything while my workshop was in disarray (stupid water heater!) I decided a few days back to start a kit I've had siting on my desk since I picked it up in May:

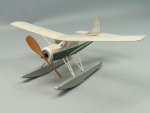
Great kit, comes with two lasercut sheets, quite a bit of 1/16th stock of various widths, a pack of white tissue and ascetate, a few odds-n-bobs, two sheets of plans (one to build on and one with construction details) an instruction booklet (with a few minor variants). Pretty much just add glue and elbow grease (lightly) and she's supposed to come out a bit like this:

Pretty little thing. After running a few nights, I noticed the Winter Balsa Build-Along had just started, so into the ring she goes.
A couple of planned changes . . .
First, floats are a nice scale touch, but she's going to be a flying model -- Fixed LG. I've also got the combined guts from a Parkzone Night Vapor and a Champ, so she's getting the RC treatment. A good combo -- servos on the brick, decent power motor and lights to string into the wing and fuse. Finally, I've got to make an access hatch to get to the electronics and battery after everything is covered.
so, on with the build logging . . .
Night 1:
So first night, naturally, I wasn't thinking about it and snapped one nessie-quality pick of the "finished" product:

Pretty simple so far. Lay out the pieces on the side view of the plans and glue, cutting the sticks to size around the laser-cut pieces. Assemble two sides, then glue in the horizontal spacers between the halves in all the right spots, bending to get the tail together. Glue the two front side-cheeks onto the fuse, then glue on the firewall with a slight down-angle.
Easy-peasy and everything is still open and accessible. That will change, but some decisions have to be made before that . . . particularly how the motor will mount while keeping it accessible, where to mount the brick, and how to get to it for service and battery.
Night 2:
Doesn't seem like much:

. . . but made a few decisions.
The motor will mount to the front cowl block. a quick check showed the motor can be trimmed a bit to fit inside the keyhole in the firewall, so all I'll have to do is removeably secure the cowl to the firewall and everything fits in nice . . . and the motor pops out with the cowl if I nee to fix something . . . so on the stringers go over the top and sides.
Tomorrow the hatch and cowl . . . in a bit better detail . . .
So after getting tired of not building anything while my workshop was in disarray (stupid water heater!) I decided a few days back to start a kit I've had siting on my desk since I picked it up in May:
Great kit, comes with two lasercut sheets, quite a bit of 1/16th stock of various widths, a pack of white tissue and ascetate, a few odds-n-bobs, two sheets of plans (one to build on and one with construction details) an instruction booklet (with a few minor variants). Pretty much just add glue and elbow grease (lightly) and she's supposed to come out a bit like this:

Pretty little thing. After running a few nights, I noticed the Winter Balsa Build-Along had just started, so into the ring she goes.
A couple of planned changes . . .
First, floats are a nice scale touch, but she's going to be a flying model -- Fixed LG. I've also got the combined guts from a Parkzone Night Vapor and a Champ, so she's getting the RC treatment. A good combo -- servos on the brick, decent power motor and lights to string into the wing and fuse. Finally, I've got to make an access hatch to get to the electronics and battery after everything is covered.
so, on with the build logging . . .
Night 1:
So first night, naturally, I wasn't thinking about it and snapped one nessie-quality pick of the "finished" product:

Pretty simple so far. Lay out the pieces on the side view of the plans and glue, cutting the sticks to size around the laser-cut pieces. Assemble two sides, then glue in the horizontal spacers between the halves in all the right spots, bending to get the tail together. Glue the two front side-cheeks onto the fuse, then glue on the firewall with a slight down-angle.
Easy-peasy and everything is still open and accessible. That will change, but some decisions have to be made before that . . . particularly how the motor will mount while keeping it accessible, where to mount the brick, and how to get to it for service and battery.
Night 2:
Doesn't seem like much:

. . . but made a few decisions.
The motor will mount to the front cowl block. a quick check showed the motor can be trimmed a bit to fit inside the keyhole in the firewall, so all I'll have to do is removeably secure the cowl to the firewall and everything fits in nice . . . and the motor pops out with the cowl if I nee to fix something . . . so on the stringers go over the top and sides.
Tomorrow the hatch and cowl . . . in a bit better detail . . .


