BATTLEAXE
Legendary member
This thread is about documenting the life of my Simple Scout. I have gone through a whack load of planes just trying to get anything to fly for more the 30 seconds under my control as opposed to the plane doing what is perceived as having a mind of it's own. In the beginning I knew to some point that they would be sacrificial planes till I honed up enough skill to make it work, and if I really liked a plane that I have beat up I can take a day and build a new one with little cost. Given that these planes that have gone to the graveyard didn't last long I didn't see any reason to really document anything or even take video of the maidens to look back on and learn from. Then I got on this forum and realized how useful it can be to show others the build process and the flights to get constructive feedback to help improve the builds, improve my flying skills, and to help others in need vicariously through my struggles. As so many people I have never met have helped me I feel like I can pay it forward to others as well. I really appreciate all the comments, criticisms, feedback, banter, suggestions, and collaborations that have come from this forum and I hope I have done the same, and will continue to contribute to this hobby.
That being said, here is the beginning of my Scouts story. I chose the Scout out of my strike of good luck with the Mini Scout, (actually 2 of them). My first MS was my first real flight where I burned through a couple batteries without tearing the airframe apart with sudden interactions with the ground. Not to say I didn't crash, but it took the abuse for the most part and I was able to see a controlled pattern of flight translated from what i saw in the air, to my thumbs, and the plane reacted. Now I did build 2 because I did fold the wing on the first due in part to a quick save in the up elevator to keep it from hitting a building, but I was so impressed with it that I built a second. The second was just as loyal to my progress as the first so it deserves just as much credit. Here are my babies:
 MS #1
MS #1
 MS #2
MS #2
Kept the red and white theme going as a rabbits foot of sorts. Not superstitious whatsoever")
Build Process Pt. 1
Since there has been such a good run going with the Scouts, and seeing how much others liked the standard size Scout as well it just seemed like a natural progression. Why mess with a good thing? The problem I had though was that my larger power set up was almost twice the size and power then the Scout was designed for. So out of necessity is the mother of all invention. The battery I have to use is to big to fit in the Scouts designed power pod and the motor is to big to use the straight off (no thrust angle) firewall. How was i gonna make this work? In the building phase of many planes I got used to doing modifications to suit my needs, DTFB lends such adaptability with ease of construction and the Ft designs have endless possibilities. If you think of it you can create it. Here is my conundrum:

Originally the battery is supposed to Velcro under the power pod but my battery is physically to large to make it fit. I have been of the philosophy of keeping my battery inside the regular power pod for safety, it tends to be a bullet upon the event of a crash damaging other electronic parts or itself. Having it in its own compartment I found is the best place for it. Solution:

With solutions always come more problems to solve, gotta love life's little tricks. After some thinking I figured that I haven't yet had a plane that had a removable top hatch in the nose to contain the battery yet, its always been the standard power pod. And with the power pod in some of the planes it has been a hassle to just change the battery, electronics placement getting in the way or being hooked up in or around the pod makes it a puzzle. So there was my battery sitting on the plans running into the leading edge of the wing by a couple inches. I have the opportunity to modify that now as well. The fun just begins but I think i have formulated a plan in my head and hopefully it works out on the bench. I need enough room in the battery compartment to not only house the battery but to be able to move it back and forth to get proper CG, and keep it from smashing into the motor shaft in case of a nose dive. Gotta cut away the LE of the wing inside the fuse to achieve this, which means I lose lateral stiffness of the wing, but if i build up the spar I may gain that strength back. Plan in play:


Found a length of 3/4x1/2 inch balsa to relatively fit with some sanding of coarse, into the FB box spar. Cut 9" length, cut in half at 4.5" per side for the dihedral angle allowances and viola, stiffened up spar and into the wing it goes:


You can see the balsa down the spar, fit so nice like it wasn't even there.
Next was to build the fuse, anyone who has built the Scout before, or any other FT planes will find this part rudimentary stuff so I won't bore you with the basics. Literally all I did was extend the cavity cut in the doublers meant for the original pod a couple inches back to make room for the new extended compartment. Once the fuse was folded up I cut the reliefs for the wing out and slid it through the fuse. It did take a few tries to get the shape of the reliefs with some sanding here and there to get it to slide in without putting undue stress on the fuse walls. Once in it was centered and squared then glued solid, I like to glue my wings in solid because I have tried the floating wing trick on a couple planes and found that when the wing takes a hit it will tear the fuse apart from the TE back.


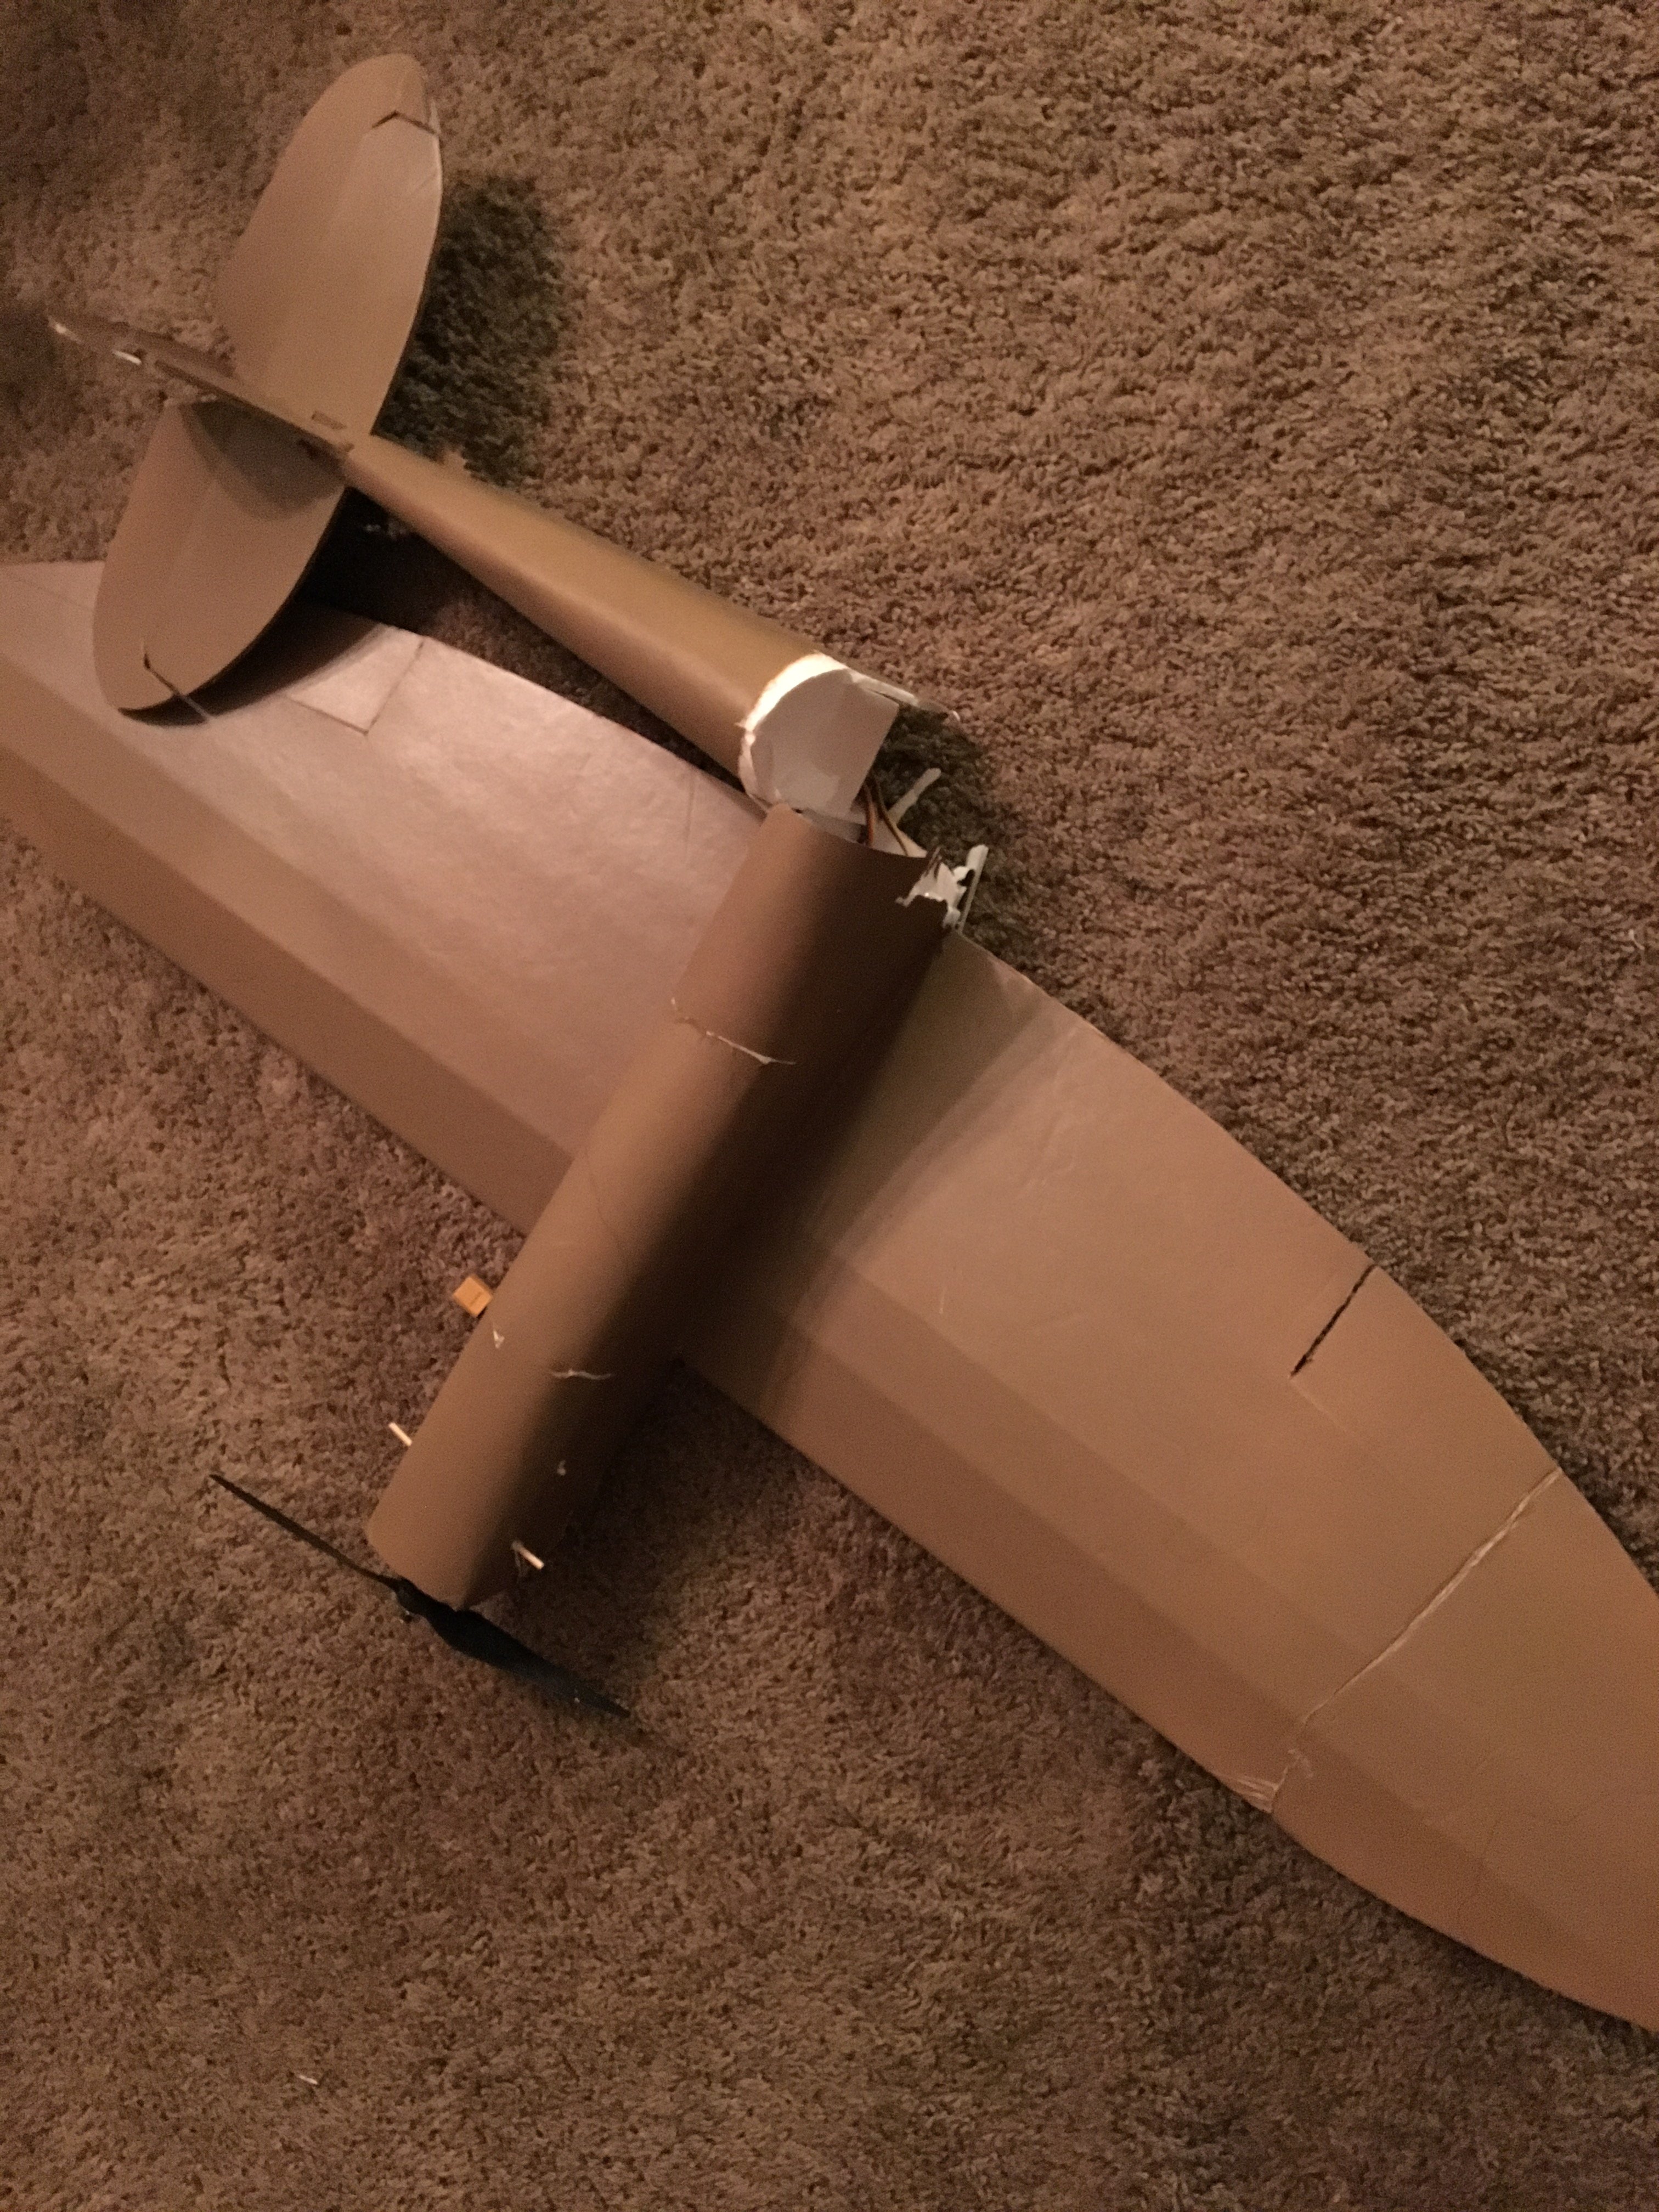
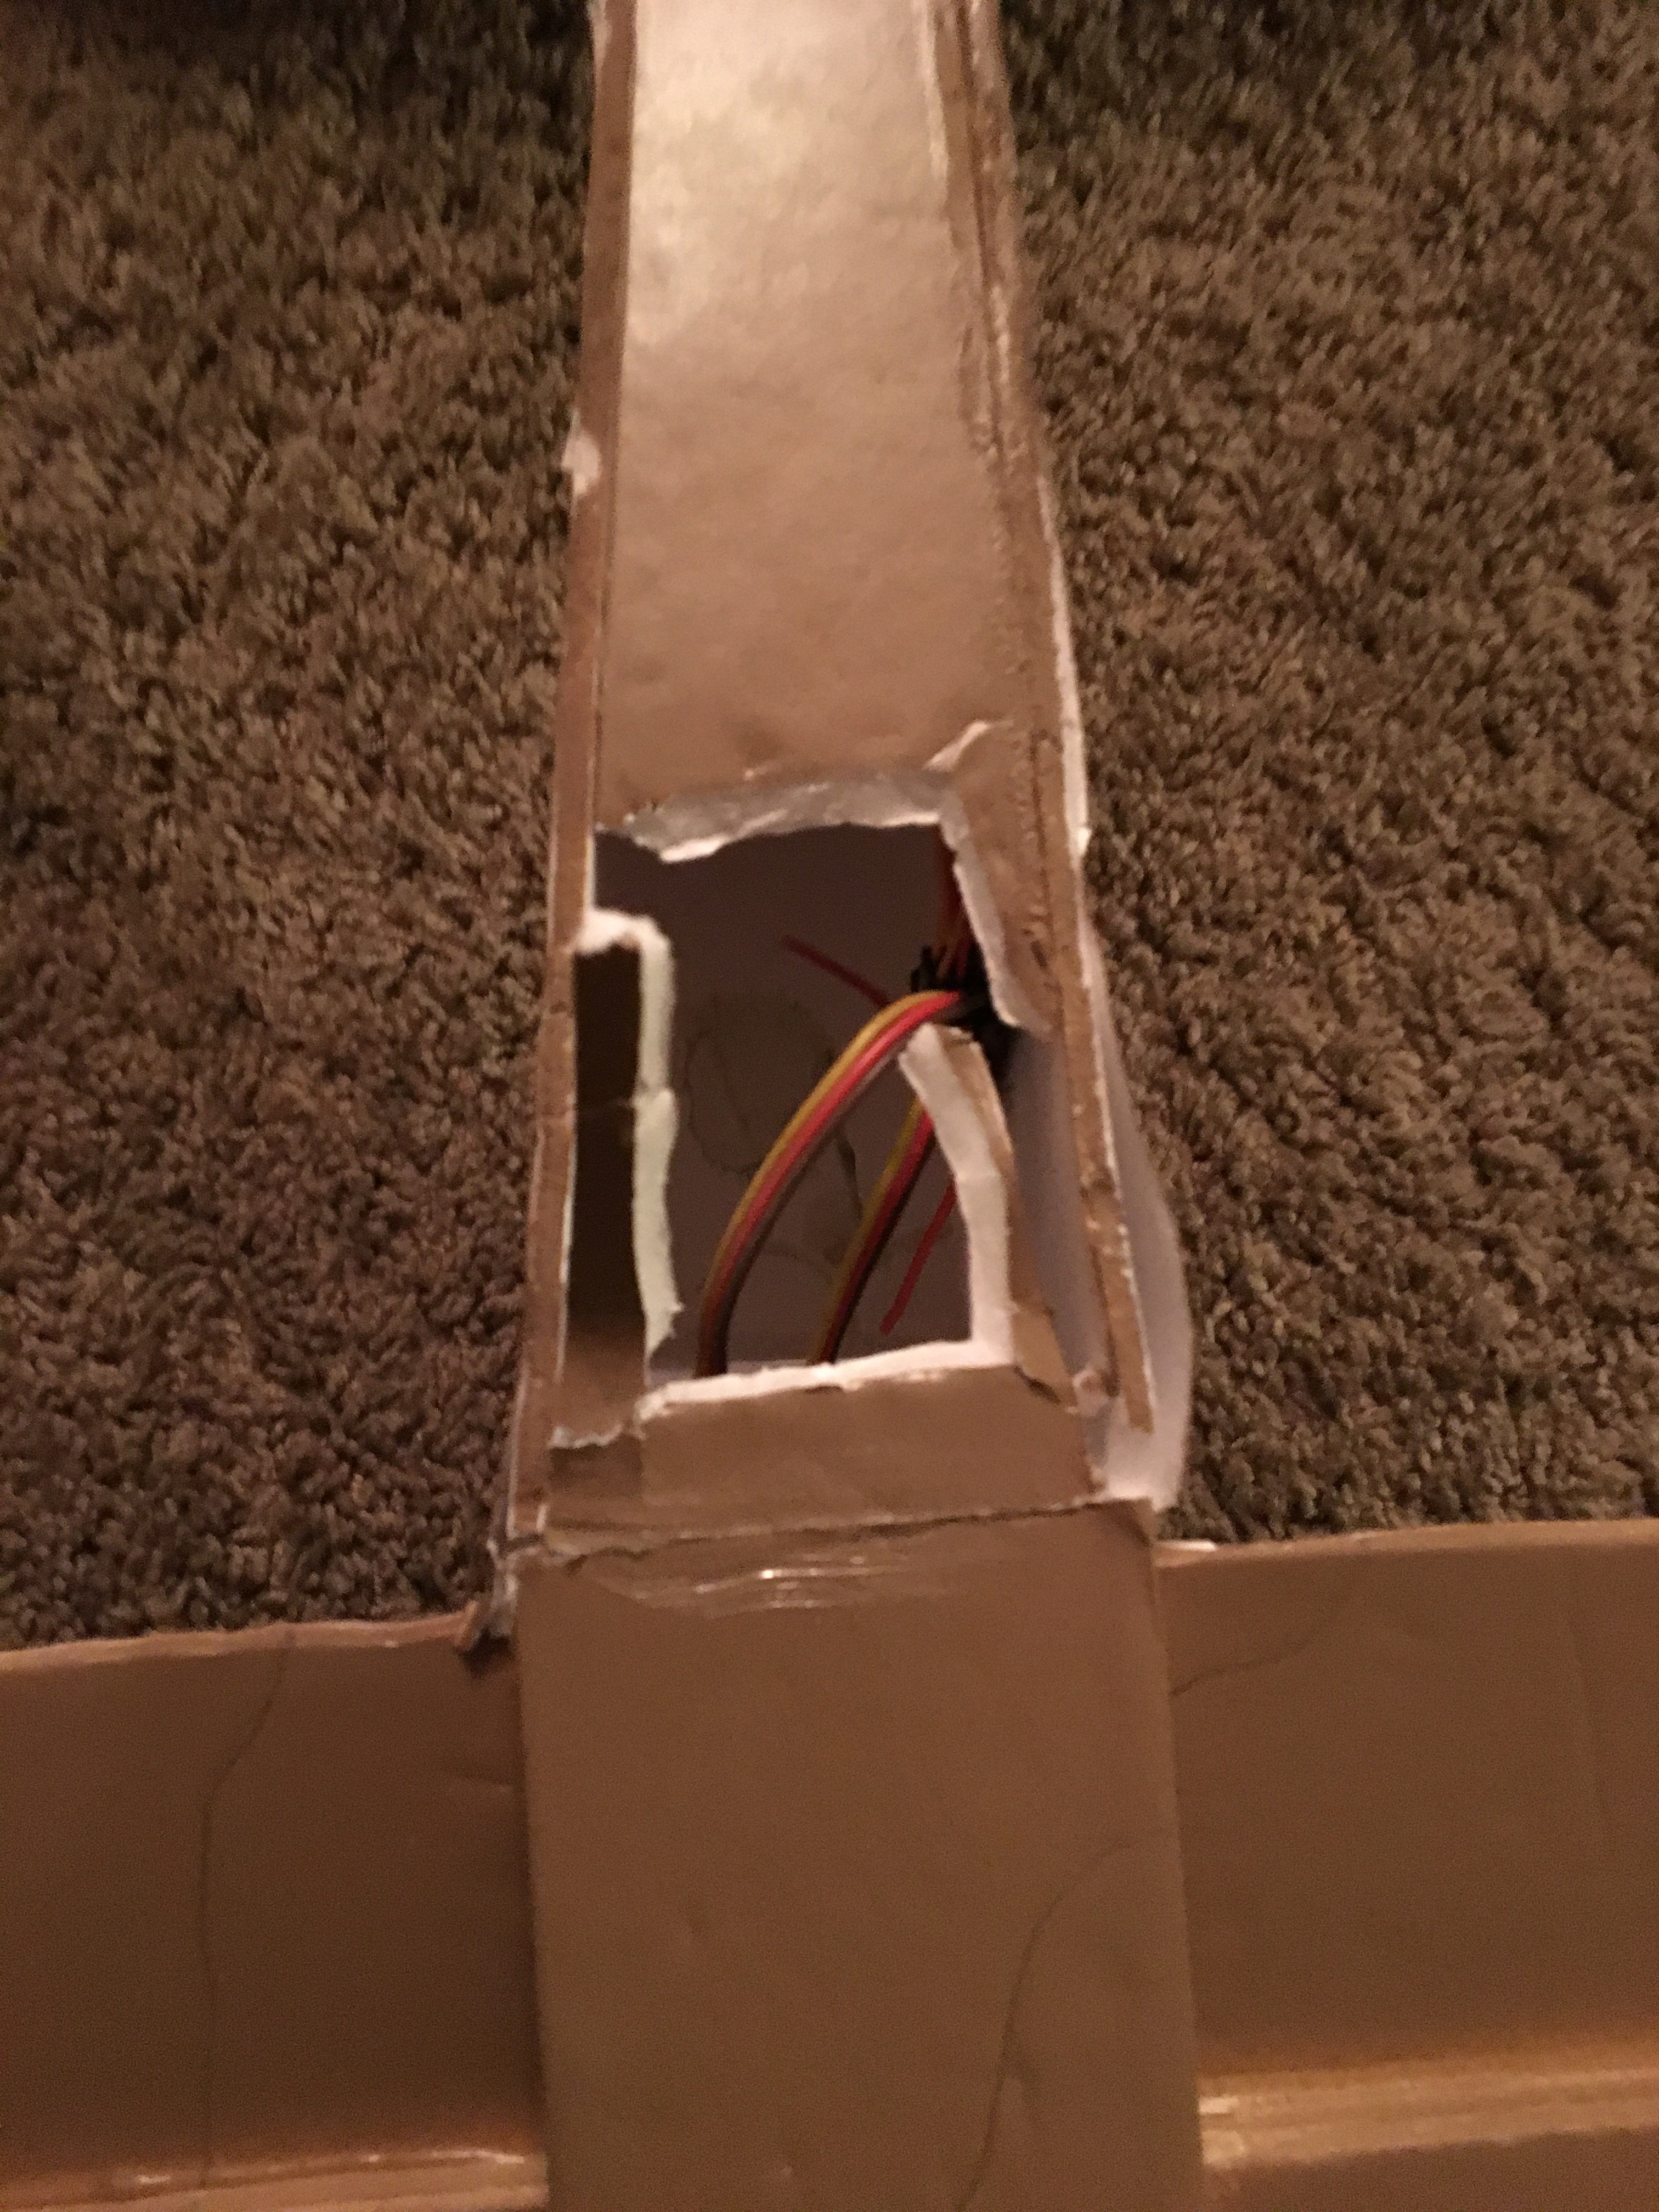
As you can see here I did cut the section of the LE that resides inside the fuse and replaced it with a extended pod/battery compartment that is a permanent fixture glued to the inside of the LE and the rest of the nose, effectively continuing the doubling strength from top to bottom. The front of the compartment was also designed with down and right thrust to compensate for the larger motor. You can also see the spar from inside the wing and the space below where the battery wires feed down to the intended space for the ESC. Separate compartments and room for the battery, airflow for the ESC, and ease of battery changes achieved. Looks like this is coming together as planned
(to be continued)
That being said, here is the beginning of my Scouts story. I chose the Scout out of my strike of good luck with the Mini Scout, (actually 2 of them). My first MS was my first real flight where I burned through a couple batteries without tearing the airframe apart with sudden interactions with the ground. Not to say I didn't crash, but it took the abuse for the most part and I was able to see a controlled pattern of flight translated from what i saw in the air, to my thumbs, and the plane reacted. Now I did build 2 because I did fold the wing on the first due in part to a quick save in the up elevator to keep it from hitting a building, but I was so impressed with it that I built a second. The second was just as loyal to my progress as the first so it deserves just as much credit. Here are my babies:
 MS #1
MS #1
 MS #2
MS #2Kept the red and white theme going as a rabbits foot of sorts. Not superstitious whatsoever
Build Process Pt. 1
Since there has been such a good run going with the Scouts, and seeing how much others liked the standard size Scout as well it just seemed like a natural progression. Why mess with a good thing? The problem I had though was that my larger power set up was almost twice the size and power then the Scout was designed for. So out of necessity is the mother of all invention. The battery I have to use is to big to fit in the Scouts designed power pod and the motor is to big to use the straight off (no thrust angle) firewall. How was i gonna make this work? In the building phase of many planes I got used to doing modifications to suit my needs, DTFB lends such adaptability with ease of construction and the Ft designs have endless possibilities. If you think of it you can create it. Here is my conundrum:
Originally the battery is supposed to Velcro under the power pod but my battery is physically to large to make it fit. I have been of the philosophy of keeping my battery inside the regular power pod for safety, it tends to be a bullet upon the event of a crash damaging other electronic parts or itself. Having it in its own compartment I found is the best place for it. Solution:
With solutions always come more problems to solve, gotta love life's little tricks. After some thinking I figured that I haven't yet had a plane that had a removable top hatch in the nose to contain the battery yet, its always been the standard power pod. And with the power pod in some of the planes it has been a hassle to just change the battery, electronics placement getting in the way or being hooked up in or around the pod makes it a puzzle. So there was my battery sitting on the plans running into the leading edge of the wing by a couple inches. I have the opportunity to modify that now as well. The fun just begins but I think i have formulated a plan in my head and hopefully it works out on the bench. I need enough room in the battery compartment to not only house the battery but to be able to move it back and forth to get proper CG, and keep it from smashing into the motor shaft in case of a nose dive. Gotta cut away the LE of the wing inside the fuse to achieve this, which means I lose lateral stiffness of the wing, but if i build up the spar I may gain that strength back. Plan in play:
Found a length of 3/4x1/2 inch balsa to relatively fit with some sanding of coarse, into the FB box spar. Cut 9" length, cut in half at 4.5" per side for the dihedral angle allowances and viola, stiffened up spar and into the wing it goes:
You can see the balsa down the spar, fit so nice like it wasn't even there.
Next was to build the fuse, anyone who has built the Scout before, or any other FT planes will find this part rudimentary stuff so I won't bore you with the basics. Literally all I did was extend the cavity cut in the doublers meant for the original pod a couple inches back to make room for the new extended compartment. Once the fuse was folded up I cut the reliefs for the wing out and slid it through the fuse. It did take a few tries to get the shape of the reliefs with some sanding here and there to get it to slide in without putting undue stress on the fuse walls. Once in it was centered and squared then glued solid, I like to glue my wings in solid because I have tried the floating wing trick on a couple planes and found that when the wing takes a hit it will tear the fuse apart from the TE back.
As you can see here I did cut the section of the LE that resides inside the fuse and replaced it with a extended pod/battery compartment that is a permanent fixture glued to the inside of the LE and the rest of the nose, effectively continuing the doubling strength from top to bottom. The front of the compartment was also designed with down and right thrust to compensate for the larger motor. You can also see the spar from inside the wing and the space below where the battery wires feed down to the intended space for the ESC. Separate compartments and room for the battery, airflow for the ESC, and ease of battery changes achieved. Looks like this is coming together as planned
(to be continued)
Last edited: