Monster sized Fock-Wulf FW-42

rockyboy

Skill Collector
Mentor
You are hard mounting the rudder? Wouldnt that be a target for damage during transport?

I am not sure of your plans over all. I just know I whack the rudders on my planes all the time just moving room to room.

Of course none of mine will be glassed like this one so I have no real comparison of the strength and durability it adds.

I'm planning for the rudder to be removable like the canards are - those long glued in arrow shafts will slide into tube sockets I need to glue into the fuselage. Hangar rash is a real threat in my workshop too :D
 

PsyBorg

Wake up! Time to fly!
The progress you have made since I lost internet is great. Steady and precise is what makes the best builds for sure.

This will be an attention grabber where ever it goes.
 

rockyboy

Skill Collector
Mentor
Gluing in the rudder mounting tubes with the rudder in place to make sure they line up. I carefully placed tape on the bottom to make sure the gorillia glue doesn't foam out in a way that makes this a permanent mounting. :)

20180727_184419-1024x576.jpg
 

rockyboy

Skill Collector
Mentor
10 pounds all put together so far. No batteries or motors or fiberglass or paint.
20180728_171322-1280x720.jpg
20180728_171057-1280x720.jpg


Next here's a servo mount for the rudder. I still need to recess it into the surface so it's flush.
20180728_234613-1024x576.jpg
20180728_234144-1024x576.jpg
 

b-29er

Well-known member
For some reason i saw this
188952_3318e1fbbf24c6ef4e31d6ac99cf49fe.jpg
and i thought "that fuselage will look sweet once its covered in fondant!"
nah but that looks awesome, great work!
 

rockyboy

Skill Collector
Mentor
For some reason i saw this
188952_3318e1fbbf24c6ef4e31d6ac99cf49fe.jpg
and i thought "that fuselage will look sweet once its covered in fondant!"
nah but that looks awesome, great work!

Yeah, it's got a bit of a layer cake look :ROFLMAO:

Looking AMAZING! Also do you have a weight goal?

I'm still hoping for 20 pounds ish. Figure 2 or 3 for the finish, 2ish for the motors, 2ish for the batteries, hopefully not too many more heavy "ish" things :D
 

rockyboy

Skill Collector
Mentor
I've got an idea... Not sure if its a good one though.

So with my recent reduction in airplane storage space, I'm back to looking hard at a way to keep the fuselage and center wing section detachable.

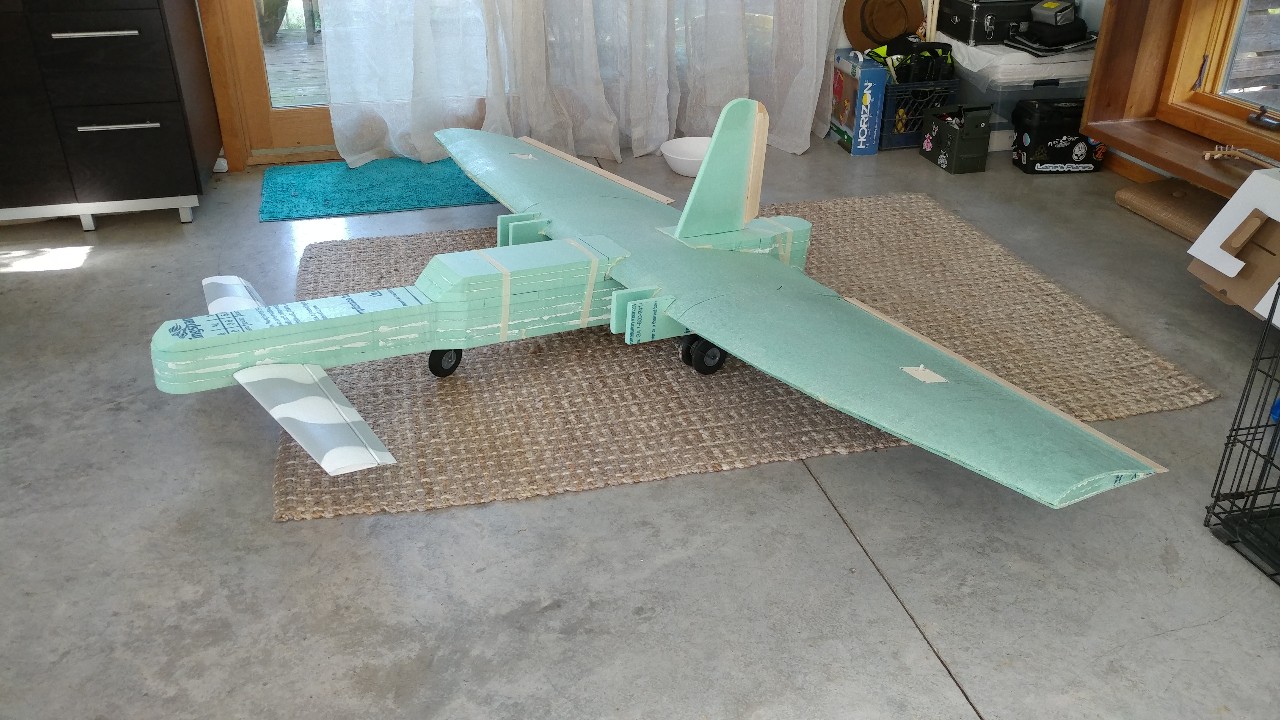
What I've come up with is using a thin plywood plate - shown here sitting on top of the wing, glued to the bottom of the fuselage. Before I glue that in, I'll take two 30" fiberglass arrow shafts and recess / glue them into the bottom of the fuselage to help carry the load of the nose landing gear and batteries back to the main structure.

Then I'll punch six 5/8 holes vertically through the fuselage and glue in pieces of the 1/2" dowel with gorilla glue to match the holes I already drilled in the plywood. The plywood plate gets glued to the bottom of the fuselage, over the arrow shafts, and screwed into the dowels for good measure.

There is already a plywood mounting plate in the wing, and that will be screwed into the dowels for the removable portion of the connection. This makes those 6 screws the full and final mechanical pieces that take the whole load of connecting the thrust of the motors and lift of the wings with the weight and lever forces of the batteries and nose landing gear. So, fingers crossed, this will at least get me through a couple flights... :cautious:

20180801_233015-1024x576.jpg


Oh, and I also realized looking at pictures of her fully assembled on the ground, that I'm going to need to cut a pretty good sized angle of fuselage off the back so it won't hit the ground trying to rotate up on takeoff. It'll be a little sacrifice to the scale look, but necessary at this point in the design unless I were to start over with the main landing gear and try to get another 3 or 4 inches of height. And even if I did that, she might still need the tail trim.

@PsyBorg how tall are the rear turret assembly parts that need to be recessed into the fuselage? I want to make sure I don't chop off too much :D
 
Last edited:

wilmracer

I build things that fly (sometimes)
Mentor
Looking awesome!

Have you checked to see how much rotation you're getting before the tail drags? Maybe just rounding it a bit in the back will give you enough clearance to takeoff and flair. As light and large as she is she will probably just fly right off the ground.
 

rockyboy

Skill Collector
Mentor
Looking awesome!

Have you checked to see how much rotation you're getting before the tail drags? Maybe just rounding it a bit in the back will give you enough clearance to takeoff and flair. As light and large as she is she will probably just fly right off the ground.

Boy I hope so! :D

I need to put her all together again and spend some time specifically looking at that. Do you know of any other trike style models out there that have similar rotation concerns I might be able to learn from?

Thanks!
 

Hai-Lee

Old and Bold RC PILOT
Boy I hope so! :D

I need to put her all together again and spend some time specifically looking at that. Do you know of any other trike style models out there that have similar rotation concerns I might be able to learn from?

Thanks!
There is one trike that has extreme rotation issues. it is the Dornier Do335 Pfiel, (arrow). Apart from a prop protecting tail fin the solution was to allow the craft to fly off of the ground rather than to yank back on the elevator when there is some speed.

With the canard at take off a minor down lean on the elevators can keep the plane on the ground until after take off speed is reached and then a relaxation of the elevator to neutral will see the plane lift off almost perfectly flat. On a canard this large it should be almost beautiful to watch and extremely graceful.

Just one thing, canards do not rotate in the normal sense. For take off the foreplane lifts the nose of the plane and this causes the main wing incidence angle to increase. This change in plane incidence angle causes the plane to lift off of the ground.
 

PsyBorg

Wake up! Time to fly!
I am redoing the turrets now I have an idea how they should move.

ATM they are 4.5 inches base plate to highest point where it pivots for gun pitch.

I will have Tom print off a new base that should make em shorter now that he has a 3d printer.
 

rockyboy

Skill Collector
Mentor
There is one trike that has extreme rotation issues. it is the Dornier Do335 Pfiel, (arrow). Apart from a prop protecting tail fin the solution was to allow the craft to fly off of the ground rather than to yank back on the elevator when there is some speed.

With the canard at take off a minor down lean on the elevators can keep the plane on the ground until after take off speed is reached and then a relaxation of the elevator to neutral will see the plane lift off almost perfectly flat. On a canard this large it should be almost beautiful to watch and extremely graceful.

Just one thing, canards do not rotate in the normal sense. For take off the foreplane lifts the nose of the plane and this causes the main wing incidence angle to increase. This change in plane incidence angle causes the plane to lift off of the ground.

Thanks Hai-Lee!! I've only flown about 4 or 5 canards so far, and every one of them has been hand launched. I love the idea of a flat lift off like you describe and really really hope that's how she will fly :D

I am redoing the turrets now I have an idea how they should move.

ATM they are 4.5 inches base plate to highest point where it pivots for gun pitch.

I will have Tom print off a new base that should make em shorter now that he has a 3d printer.

Awesome! I'll make sure to leave an appropriate space when I do some trimming back there.

This thing is looking pretty awesome.

Thanks! Some days I resent how much it's taken over my shop and my building time, but then when I see it all together and imagine how it's going to look all painted up, I don't feel so bad about putting so much time into it :D And with Hai-Lee's description of how it should be able to handle on take off.... yeah - I really want to see her fly :D

On the building front, I haven't made it to the hardware store in about a week now to get the 5/8" tube to cut the vertical holes for the spars. Should be able to drop by on Wednesday though. So instead I decided to take a crack at filling in the rough join at the front edge of the wings. On the center wing panel somehow this joint came out very nice and only needed a little squirt of Gorilla Glue inside a couple voids to be nicely ready for fiberglass. Not the case on these outer wing panels.

20180806_224624-1024x576.jpg


I thought about cutting square across the leading edge and installing a balsa block, and then sanding that to shape. Then I remembered I had half a can of "Great Stuff Expanding Foam" from the bathroom renovation. So I taped across one side of the gap to make a nice smooth shelf, and squirted a generous line of foam across the leading edge. Tomorrow after it's dried out, I'll try my hand at shaping it. :D

20180806_225500-1024x576.jpg
 
Last edited:

Hai-Lee

Old and Bold RC PILOT
Just one thing i forgot to mention in my previous post is that when the plane is at rest on level ground the nose should be slightly higher than the tail. This nose up attitude allows it to fly off of the ground without rotation or the application of elevator.

Have fun!
 

rockyboy

Skill Collector
Mentor
So I trimmed the foam into shape and it sux. Very squishy. Much more than I remember the last time I used this. Maybe the 85% humidity is messing with me.
20180808_110625-1024x576.jpg


So i cut the leading edge square again.
20180808_235508-1024x576.jpg


And cut down a couple long balsa pieces that were too soft for structural use somewhere else and squirted a little ammonia where the bend needed to happen. Then strapped them down to dry in place for the evening.

20180809_001337-1024x576.jpg


Next will be to gorilla glue the leading edges in place and carve them into shape.

Should have the right size brass tubes to cut the holes for fuselage dowels tonight too.
 

rockyboy

Skill Collector
Mentor
Arrowshaft spars glued into routed slots and clamped in place under a board so the glue doesnt flow over too much. Less sanding this way.
20180809_233946-1024x576.jpg


And one of the leading edge pieces glued and clamped in place. Love me some bungee cords :D
20180809_225827-1024x576.jpg
 

rockyboy

Skill Collector
Mentor
Probably an odd question, but whats so important about having wood on the leading edge?

I made a very messy join of the top and bottom fan fold at the leading edge of these two panels. Pretty horrible actually. So to trim it back to get close to the right shape it opened up all kinds of voids in the leading edge. So I need something to help the fiberglass top layer hold the right airfoil shape when the epoxy is curing. And the expanding foam from the can was so flexible and squishy I didn't think it would be safe under there - any hanger rash bump would flex like a sponge and mess up the finish. So the easiest idea I could come up with to fix it was to trim back further till I got a flat firm surface and glue on the balsa strip that I can shape easily. Hopefully this will work out so I can match the airfoild of the center wing section where I did get the fan fold to join together nicely matching the airfoil shape with just a little sanding.

And continuing that story here is the first panel with the clamps removed.

20180811_002150-1024x576.jpg


And time to glue and clamp the other panel.
20180811_002933-1024x576.jpg


Back on the fuselage I seem to have under glued one of the spars - it's got a solid joint on the bottom but didn't foam over the top. I'll fix that when I put the plywood plate on the bottom.
20180811_001943-1024x576.jpg