Mustang7302's iQuad Build Log

Mustang7302

Senior Member
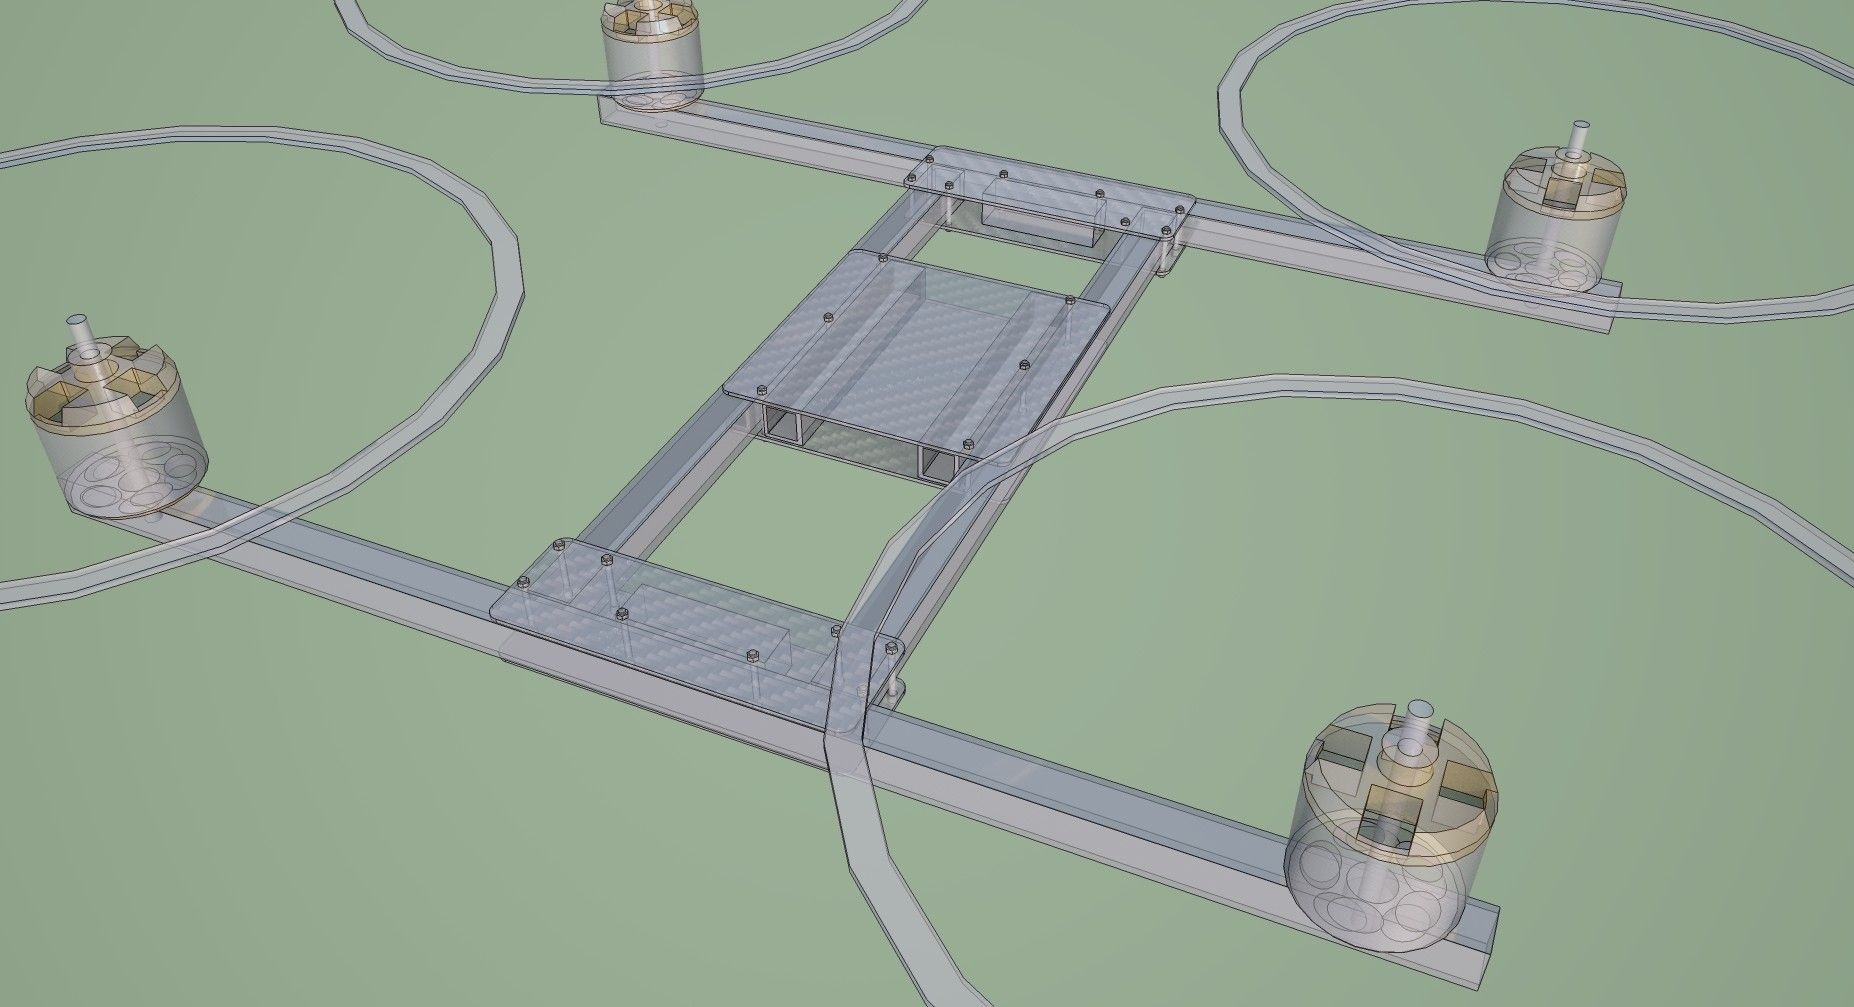
Got the new frame for the iQuad finished being painted today. Masked off half of the support booms with blue painters tape and laid down two costs of blue paint on all surfaces.

1vgq.jpg


I just happened to have a piece of Carbon Fiber sheet laying around which was the same size of the new support plates and used it to get a look at how it would look together.

92vv.jpg


Even though I've taken all of the hardware off of my last version of a iQuad for 10" props, I still had its frame in one piece and put the two next to each other for comparison. As you can see they're within an inch of each other in size, that's because I decided on the spacing out the rotors on the new build further than ~1/2" apart to not have the center plate in the thrust column.

wlis.jpg


Finally, I ran to Radio Shack to get some 7" female/female jumper prototyping wires for micro-controllers to make the wire harness that will connect the receiver to the KK2.1. Took seven wires and used red, blue, and white heat shrink to "label" the ends of each wire with different color combinations and then secured them together with some wire mesh.

vy86.jpg
 

Mustang7302

Senior Member
Looks like my order from HobbyKing International with "EMS Express" shipping is finally out for delivery today. This however doesn't mean I will have my part this afternoon. Typically shipments from across the ponds have required a signature and I assume I will get the pink slip of doom to pick up the parcel from the post office. Even if I go to the post office this afternoon, they typically wont have it off the truck yet from me to pick up. So lets cross fingers and hope for the best...

Build To Do List:
  1. Cut & Drill Carbon Fiber Plate for Center Hub
  2. Drill Motor Booms for Motor Mounts
  3. Cut & Drill 3/8"W & 36"L Zip Ties to 8" Pieces
  4. Pull the Battery Strap Through the Slots in the Lower Plate
  5. Solder XT60 Connector & JST Harness to the ESC's Power Leads
  6. Apply Wire Mesh and Heat Shrink to the ESC's Motor Leads
  7. Mount the ESC to the Lower Hub Plate with Velcro
  8. Mount the KK2.1 to the Top Hub Plate with 4" Zip Ties
  9. Mount the Top & Lower Hub Plates to the Frame
  10. Wire the ESC Signal Wires to the KK2.1
  11. Route & Secure the ESC Motor Leads Along the Frame
  12. Mount Motors to Booms with Landing Gear Zip Tie Loops
  13. Wire the Motors to the ESC
  14. Wire the Receiver to the KK2.1
  15. Mount Receiver to the Frame
  16. Cross Fingers and Power Up the Electronics
  17. Go Through the KK2.1 for Setup and Calibration
  18. Calibrate ESC Throttle Range
  19. Test Motor Direction and Correct Wiring As Needed
  20. Mount Props to the Motors
  21. Go Fly!

Looking slick 'Stang!

Thanks, Dan! Hope to keep it clean, light, and enjoy flying around.
 

jhitesma

Some guy in the desert
Mentor
Typically shipments from across the ponds have required a signature and I assume I will get the pink slip of doom to pick up the parcel from the post office. Even if I go to the post office this afternoon, they typically wont have it off the truck yet from me to pick up. So lets cross fingers and hope for the best...

Don't give up hope. My orders from HK have always required a signature in the past...but the last 3 didn't. So along with the other changes in shipping it seems they may have stopped requiring signatures as well. Or maybe my mailman is just lazy.
 

Mustang7302

Senior Member
They're here! You were right jhitesma, no signature needed and it was left in the large parcel locker at the mail box.

dk12.jpg


Now to start building!
 

jhitesma

Some guy in the desert
Mentor
Glad to hear I'm not the only one no longer needing to sign for his goodies. Can't wait to see some progress!

Looks like your box got a few good kicks too. Amazes me that I've yet to have anything damaged in shipment given the state of the (super thin) boxes and minimal packaging materials they use to keep weight down. Worst I've experienced was my very first HK order - box was trashed and had a hole in it but nothing was missing. What was really odd though was the 24g motor I ordered was soaking wet, the little box it came in was literally dripping. Nothing else in the package was wet though. Still have no idea how that happened but that little motor is still going strong even after being packed full of sand more times than I can count in bad "landings" :D
 

Mustang7302

Senior Member
Yea, the box was a little beat up. But everything seemed to be in one piece and I was so ready to get to building. Speaking of building, I have steps 1 through 3 done on the to do list; which took about an hour and a half.

Printed and taped the template for cutting and drilling the CF plate, took the sheet out to the drill press and scroll saw.

qqwy.jpg


Once the CF hub pieces were done, I attached them to the support booms, and proceeded to attaching the motor booms to the support booms. For the record however, I centered the plates to the paint lines and realized I am off center by 1/4". Oh well, the build must go on! Used a Kreg surface clamp to hold the two booms together while I ran the screws into them.

ko6k.jpg


With the frame all done I needed to get the landing loops cut and drilled too. Cut the big zip ties to 8.5" long and used the X brace that came with the SK3 motors to guide drilling each end. Tip: Group all four together, wrap with painters tape to keep them secure, and drill all four at once.

vhdg.jpg


Here is a quick side by side comparison of the NTM 28-30S 800KV (300 watts) motor next to the Turnigy Aerodrive SK3 28-26 1275KV (95 watt) motor. Can see where the weight savings certainly comes in. I will say though that spinning the SK3 motor by hand is much smoother than the NTM motors; but above all I love that the SK3 motor has a cup in the base of the motor which keeps the shaft and c-clip from protruding into the mounting surface.

bmmk.jpg


On to steps four through twenty-one!
 

Cyberdactyl

Misfit Multirotor Monkey
Looking good!

Let me know how much abuse that scroll saw blade takes cutting the CF. I have pretty much dulled my fine TPI band saw blade to where it can't cut hot butter now.
 

Mustang7302

Senior Member
Looking good!

Let me know how much abuse that scroll saw blade takes cutting the CF. I have pretty much dulled my fine TPI band saw blade to where it can't cut hot butter now.

It didn't feel like the scroll saw blade was abused too much. Went through the material without much pressure and left pretty nice edges.


It flies!

But before I get into that, let me finish documenting the rest of the build process. In the last post I had forgotten a picture showing the hub plates were drilled where they would attach to the support booms together; this ensures they would line up well. Also, the completed frame and all of the mounting hardware and landing loops came in at 155 grams.

b99z.jpg


I then brought everything in side and started working on the electronics. I lengthen, not the prettiest thing I've done, a two pin JST hardness I cut off of something a while back to use as the battery voltage line for the KK2.1 and solder it into the XT60 connector with the ESC's power leads. I haven't hooked up the voltage lead just yet because I don't to risk polarity issues and I want to make sure I am not going to break something by pushing 12.6V into that header. Then I moved on to putting the wire mesh on the motor leads from the ESC to tidy them up a bit.

f8kl.jpg


Looped the battery strap through the bottom hub plate's slots and mounted the ESC with some velcro.

ccgz.jpg


It was time to put some attention to the KK2.1. I used the lid from the foam box the FC is shipped in and trimmed off the overhang of the top layer over the bottom layer. The KK2.1 fits perfect on this little square.

acgb.jpg


I used CrainialRectosis' method of mounting the FC to its plate with zip ties anchored on the back side and trimming off all of the extra bits.

6o1b.jpg


Here is the view from the top side of the flight controller's mount.

jrqt.jpg


At this point I was in the home stretch, mostly. I ran into an issue with not enough clearance for the top plate to sit on top of the support booms due to the height of the of the zip tie heads. In the favor of getting it done tonight, I used some nylon stand offs on the four corners to make clearance of everything and used the lock nuts on the middle screws to help keep everything firm. It isn't pretty but it does the job well.

The last bit of a hick up I ran into was the male 3.5mm bullets on the motors were a little too wide to fit into the 3.5mm female connectors from the Q-Brain. A pair of pliers gently squeezing the bulb of each of the male connectors made them just small enough for a snug slide into the female ends. Got the rest of the wiring done and powered it up for the first time.

u6vu.jpg


I went through and did a receiver test and reversed a couple of channels, centered the channels with sub trim, set the motor layout to X4, calibrated the accelerators, and calibrated the throttle range on the ESC. I was very pleasantly surprised to have gotten the motor rotation on each motor right the very first stab when I started to test them. Put props on it and she was ready to get airborne! On my way out to the garage I put it on the kitchen scale, and the all up weight came in at 630 grams; this is exactly what I was hoping for!

Then came the moment of truth, will it lift off gracefully or flop around like a fish out of water?! It went up very smoothly without the slightest hesitation. I ended up flying it around in the garage for about four or five minutes before calling it a night. There were no bad tenancies, no oscillation on auto-level mode, and has a very spirited vertical climb. I trimmed it out with just one or two clicks and let it hover in front of me; it just stayed put, almost like it was on a GPS lock (very little wind this evening). It seemed to hover just slightly below the 50% mark on the throttle travel.

For months, as I have learned to fly and learned from my mistakes of earlier builds, this is the setup I have been dreaming to do. My wife was awesome enough to green light ordering the parts as a Christmas gift, and it has been everything I could dream it to be so far. Tomorrow I will see about trying to get a little video of it and certainly run a few batteries through it.
 

Mustang7302

Senior Member
Topped off one of my Turnigy Nano 1800 3S batteries and went out for another flight in the drive way. 10 minutes in the air just hovering and doing mild maneuvers brought one pack down to 3.75V per cell. This is very impressive flight time; it might have upwards of 12 to 13 minutes per pack.

Haven't touched a single setting in the PI Editor or for the auto level mode, and it flies so well. So much smoother than anything else I've built before. I don't know how much of that is the KK2.1 versus KK2.0 or MultiWii Pro versus the lighter weight versus the CF prop and motor combination. But I do know is that I am very happy with this combination!
 
Last edited:

Craftydan

Hostage Taker of Quads
Staff member
Moderator
Mentor
That's fantastic to hear Mustang! Nice to hear she flies as nice as she looks!

(And you are going to shrink tube/tape/palstidip those exposed spliced wires coming off your battery connector right?)
 

Mustang7302

Senior Member
That's fantastic to hear Mustang! Nice to hear she flies as nice as she looks!

(And you are going to shrink tube/tape/palstidip those exposed spliced wires coming off your battery connector right?)

There is clear heat shrink tube on those splices ... but it looks bad. I just didn't have any red and black tubing that was thin enough for that small of a wire, except for the clear.
 

Craftydan

Hostage Taker of Quads
Staff member
Moderator
Mentor
Ok, sorry -- saw that and cringed. All I could picture was an unwelcome light show followed by a blue-white streak heading to the ground.

Good to see you're treating her right ;)
 

Mustang7302

Senior Member
Every time I look at it I think the same. Then I remember there is clear heat shrink on it. I may look into just covering that area with black heat shrink to hide it.

A note on the Q-Brain: The box fits just barely in a 3" wide cavity between the frame rails. Also the 10" motor leads are quite generous; I ended up running each channel to the opposite side that they came out on to used up the extra length. The front-right channel goes up and to the left across 2/3's of the motor boom, the front-left channel goes up and to the right across 2/3's of the motor boom, and the same applies for the back. Just make sure the M3 channel on the Q-Brain is actually going to M1 on the motor layout and on the KK2.1, since it is the only channel with a BEC. From there I had to re-order the other motor numbers off of the Q-Brain into the KK2.1 based on their actual layout on the frame and not the channel number they were connected to.
 

cranialrectosis

Faster than a speeding face plant!
Mentor
I found it easier to get the KK2 and the MultiWii to tune and balance with the 8045 props and quick motors. Your other builds have been with much larger motors and 1045 or 1047 props and then with the MultiWii Pro which I have found is a PITA to tune especially with 1045 props.

Beautiful copter Mustang. This is the tidiest copter I have seen you build since the Bat.

Whatcha gonna name her?
 

Mustang7302

Senior Member
Naming a build is like naming a stray cat. Once you give it a name, you can't get rid of it. I dont know if this color combination will endure the test of time, more specifically rebuilds. Even being 250 to 300 grams lighter than previous builds, I anticipate breaking booms at one point or another.

I am very pleased with the tidiness of this build. The Q-Brain helps a lot with reducing extra clutter from a power harness running power out to ESCs closer to the motors, then the signal wire coming back to the center hub as well. Since I now have the extra space between the the ESC and the top plate, I think I will loop the ESC's power wire through the hub and out of the front to keep it from dangling in the back.

I wonder what kind if impact having the FC up closer to the plane of the props has on its reactivity to maintaining flight? I am still astonished at just how smooth it flew last night. Can't wait to get home this afternoon to fly it more.
 

cranialrectosis

Faster than a speeding face plant!
Mentor
Naming/painting/cleaning up your flying toy implies a dedication. Such an implication may be useful someday. ;)

Does your Q-Brain get warm? My ESCs do and more than I would like. I will rebuild my Knuckle I copter to get better airflow to them.

I should think the standoffs might make the copter a bit more efficient having the sensors closer to the same plane as the rotors. They may also increase air flow to the ESCs. I expect they also make the copter more flexible offsetting the new efficiencies in a 'push' of sorts.

You might consider CyberD's 3M foam pad/tape solution to allow you to eliminate the standoffs.

I like the hybrid. Zip tie landing gear and wood for cheap build/fix and vibration reduction on the booms. CF for rigidity, performance and weight reduction. You took the knuckles out to reduce the air dam effect on a small copter and you have a craft that weighs 220 grams less than mine, has more power with similar motors and the same size rotors, gets similar if not better flight time and uses a smaller, cheaper battery.

Damn fine build Mustang.
:applause: :applause: :applause: :applause: :applause: :applause: :applause: :applause: :applause:
 

Cyberdactyl

Misfit Multirotor Monkey
Very nice project. Looks good. I also like the idea of using ties as a "ratchet screw". :cool:

I have been working on a full carbon fiber H-frame that uses no holes whatsoever on the booms or main spars.

I found 1.5mm CF will deflect a bit if semi-cantilevering plates by clamping one side and having no other support for several inches. Also, the 10mm square tube HK sells will oval slightly under hard clamping pressure unless you get the screws snug against the tube. The really like the square tubes and they are a decent price, but it would be nice if the inside round diameter was maybe 1mm less.

HQuad.jpg
 
Last edited:

cranialrectosis

Faster than a speeding face plant!
Mentor
CyberD, I seem to remember a post about strengthening CF square booms by stuffing them with round dowel and gluing in place with Gorilla glue. Obviously stuffing the entire boom will make the boom weigh a ton, but have you considered just supporting the areas where you are clamping or just the ends of the inner rails where most of the clamping happens to prevent the deflection and distortion?

Of course, if you plan to run wires down the inside of the booms this option is a fail.