Sig Kadet ARF restoration

speedbirdted

Legendary member
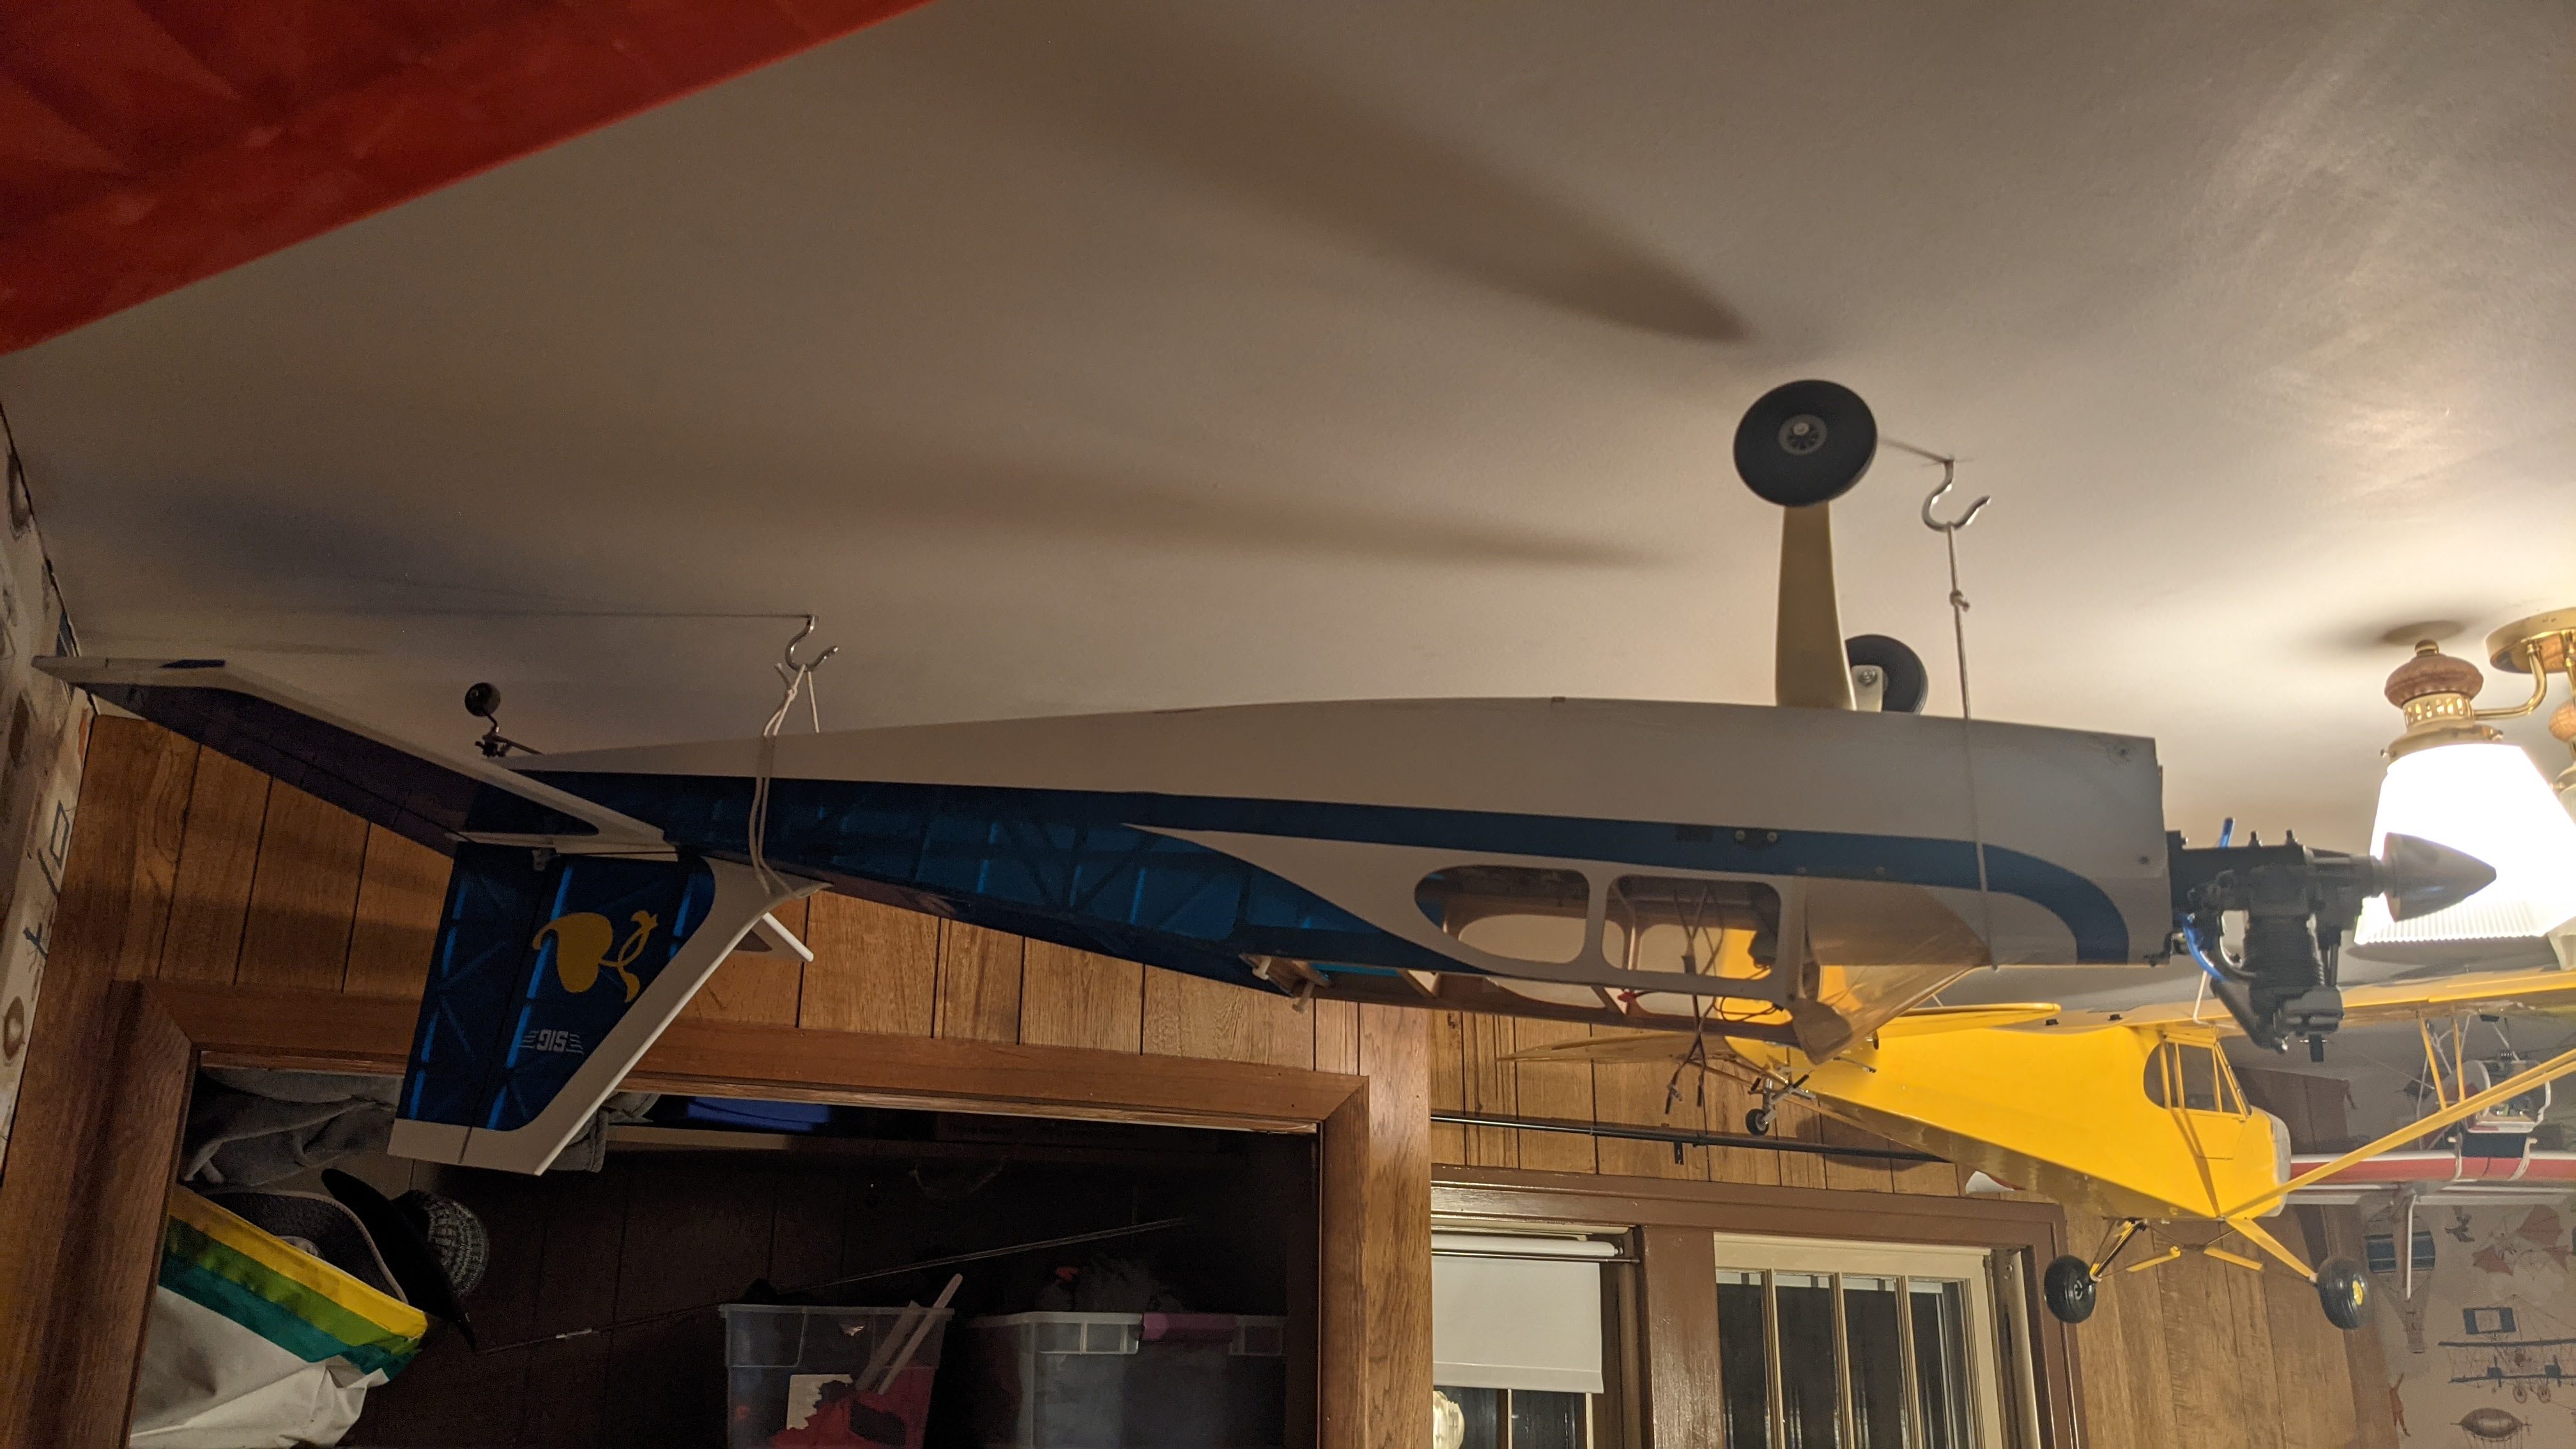
I've had this fatty hanging from my ceiling from the past several months now. It's been the beater airplane for the last 3 or 4 flying seasons. I had an inkling it had some structural damage and plus the covering is really falling apart so it got retired for the last season, but now I think it deserves to have some life breathed back into it...
PXL_20210305_023941759.jpg


It doesn't look so bad from that angle. The other side isn't so happy. o_O

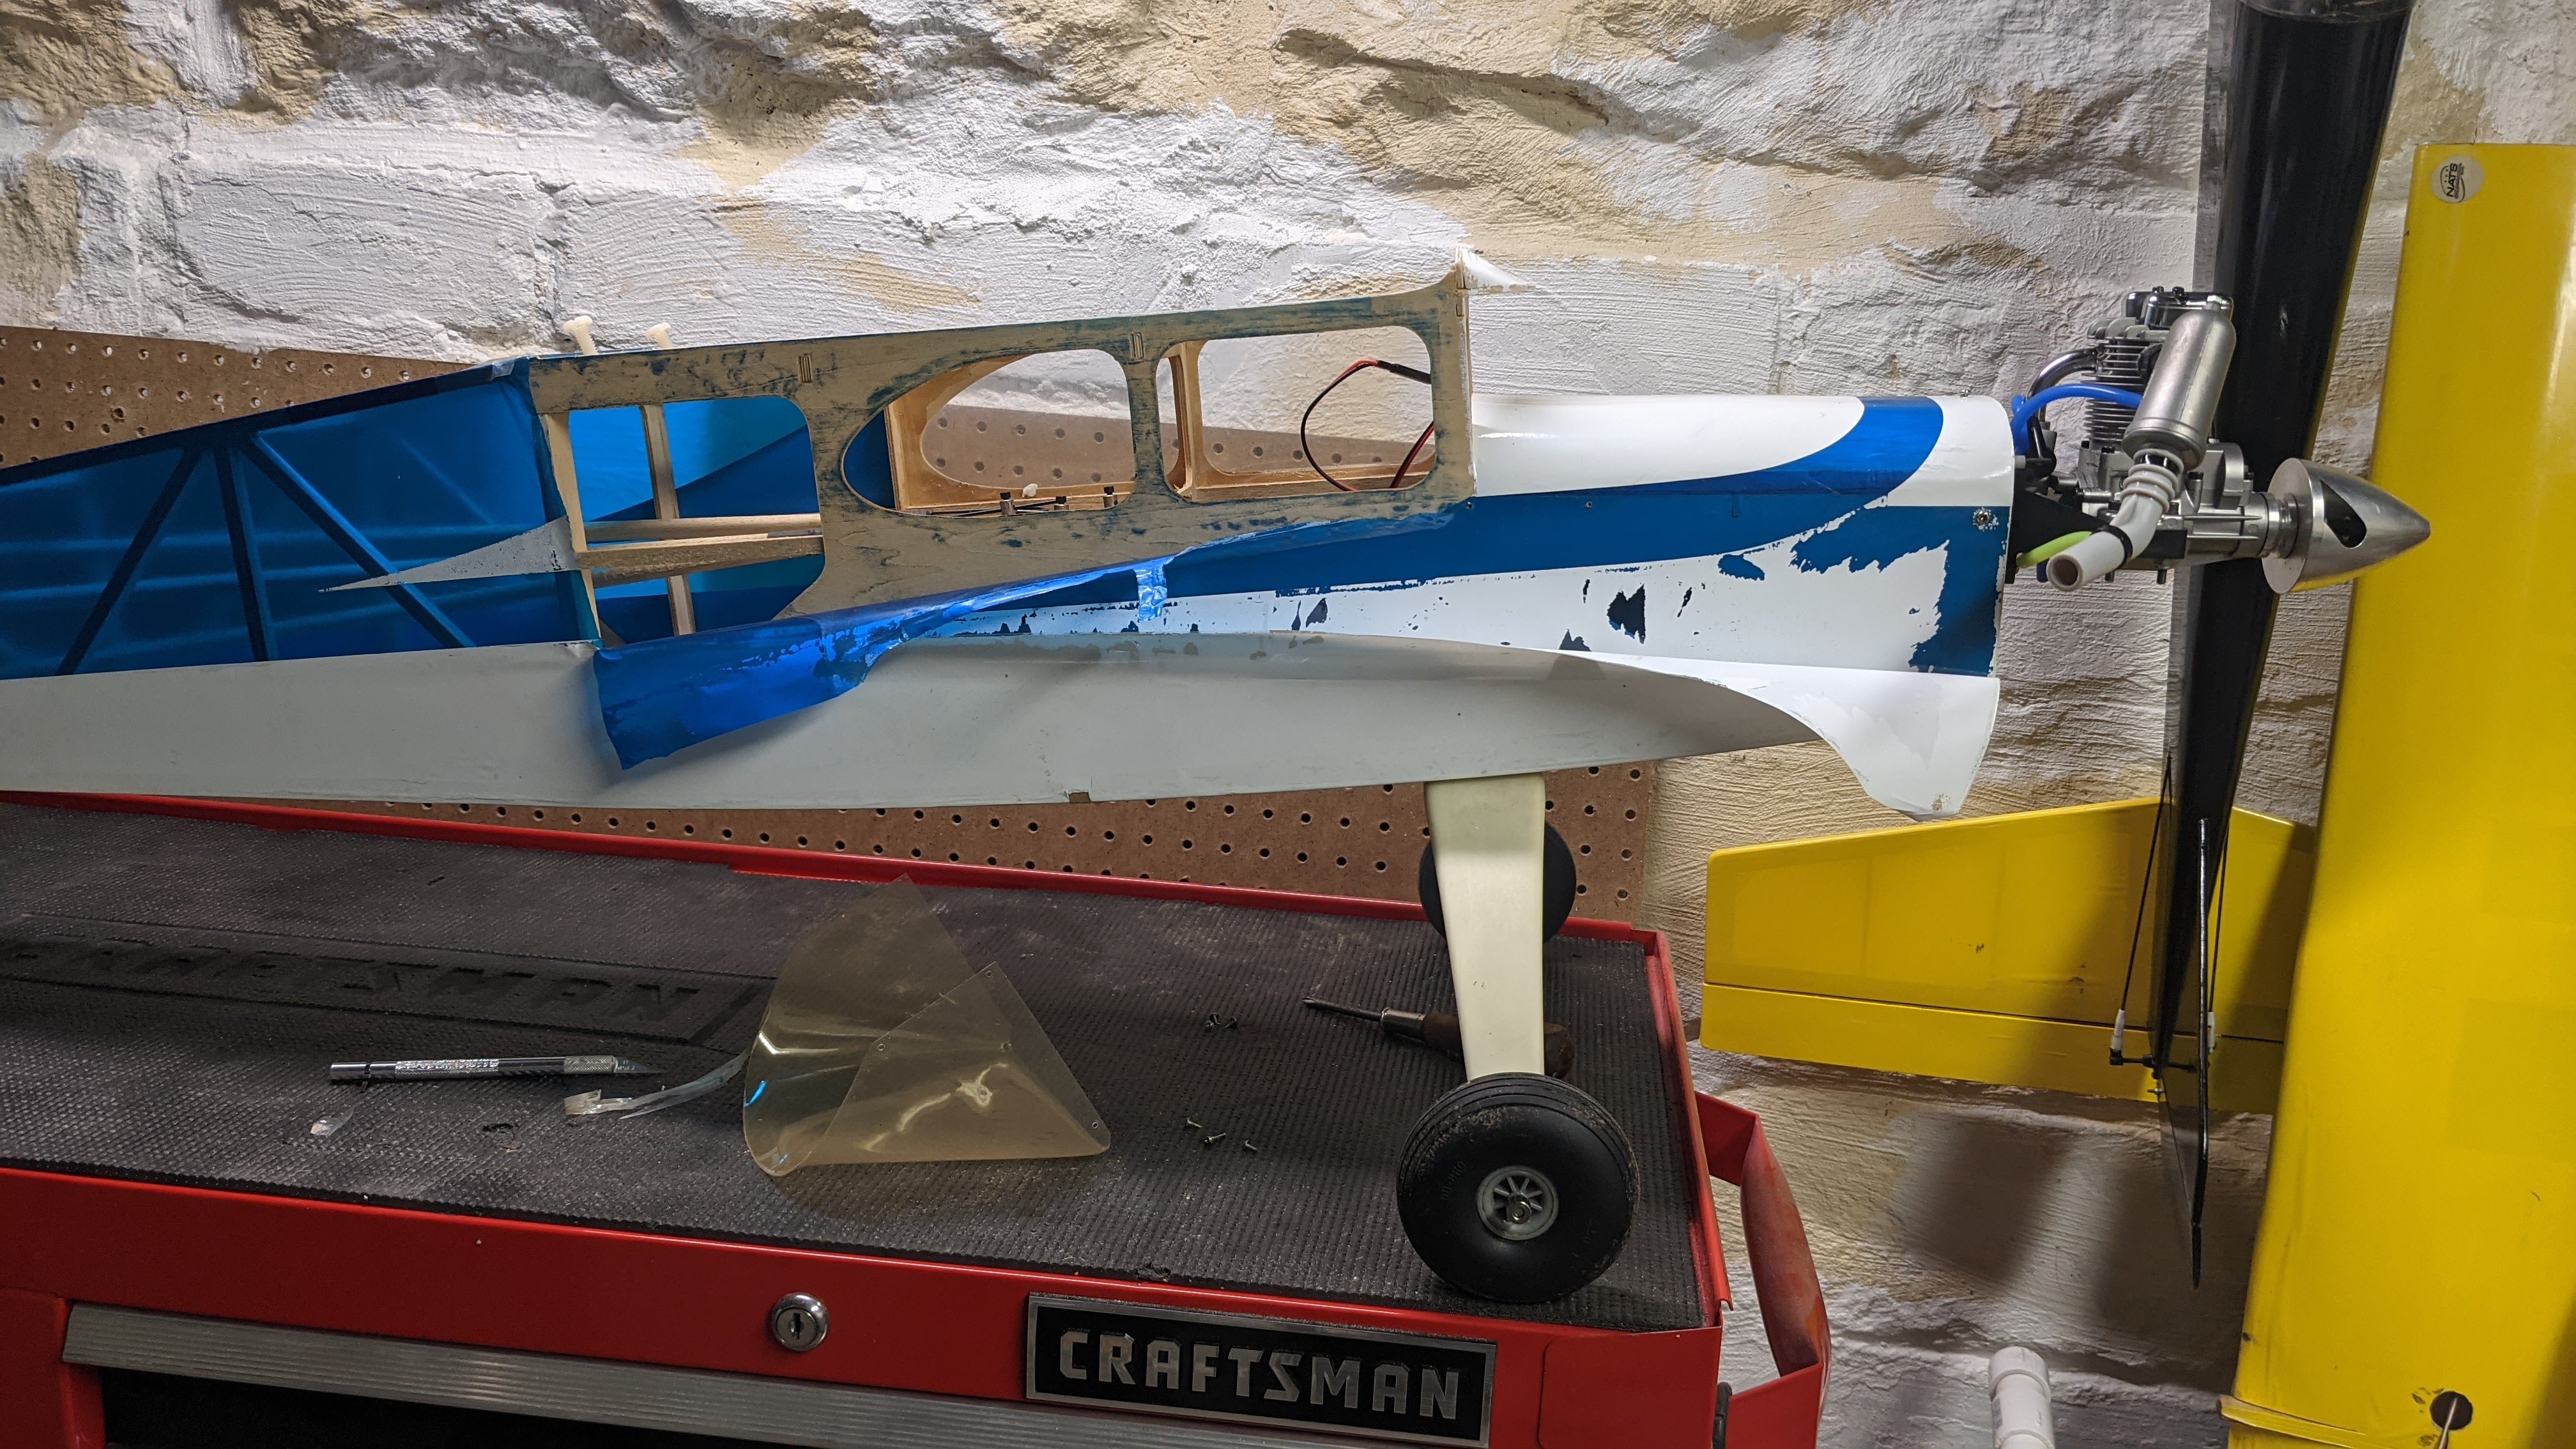
Whatever Sig covers their ARFs in, it's really no good at all. The adhesive sucks and it's not very strong. Plus it leaves all kinds of blue gunk on the airframe you have to sand off. I tried blasting it off with a heat gun and all kinds of chemicals but sanding seems to be the only way to get it to leave. All the covering will be stripped off and replaced.
PXL_20210305_050258015.jpg


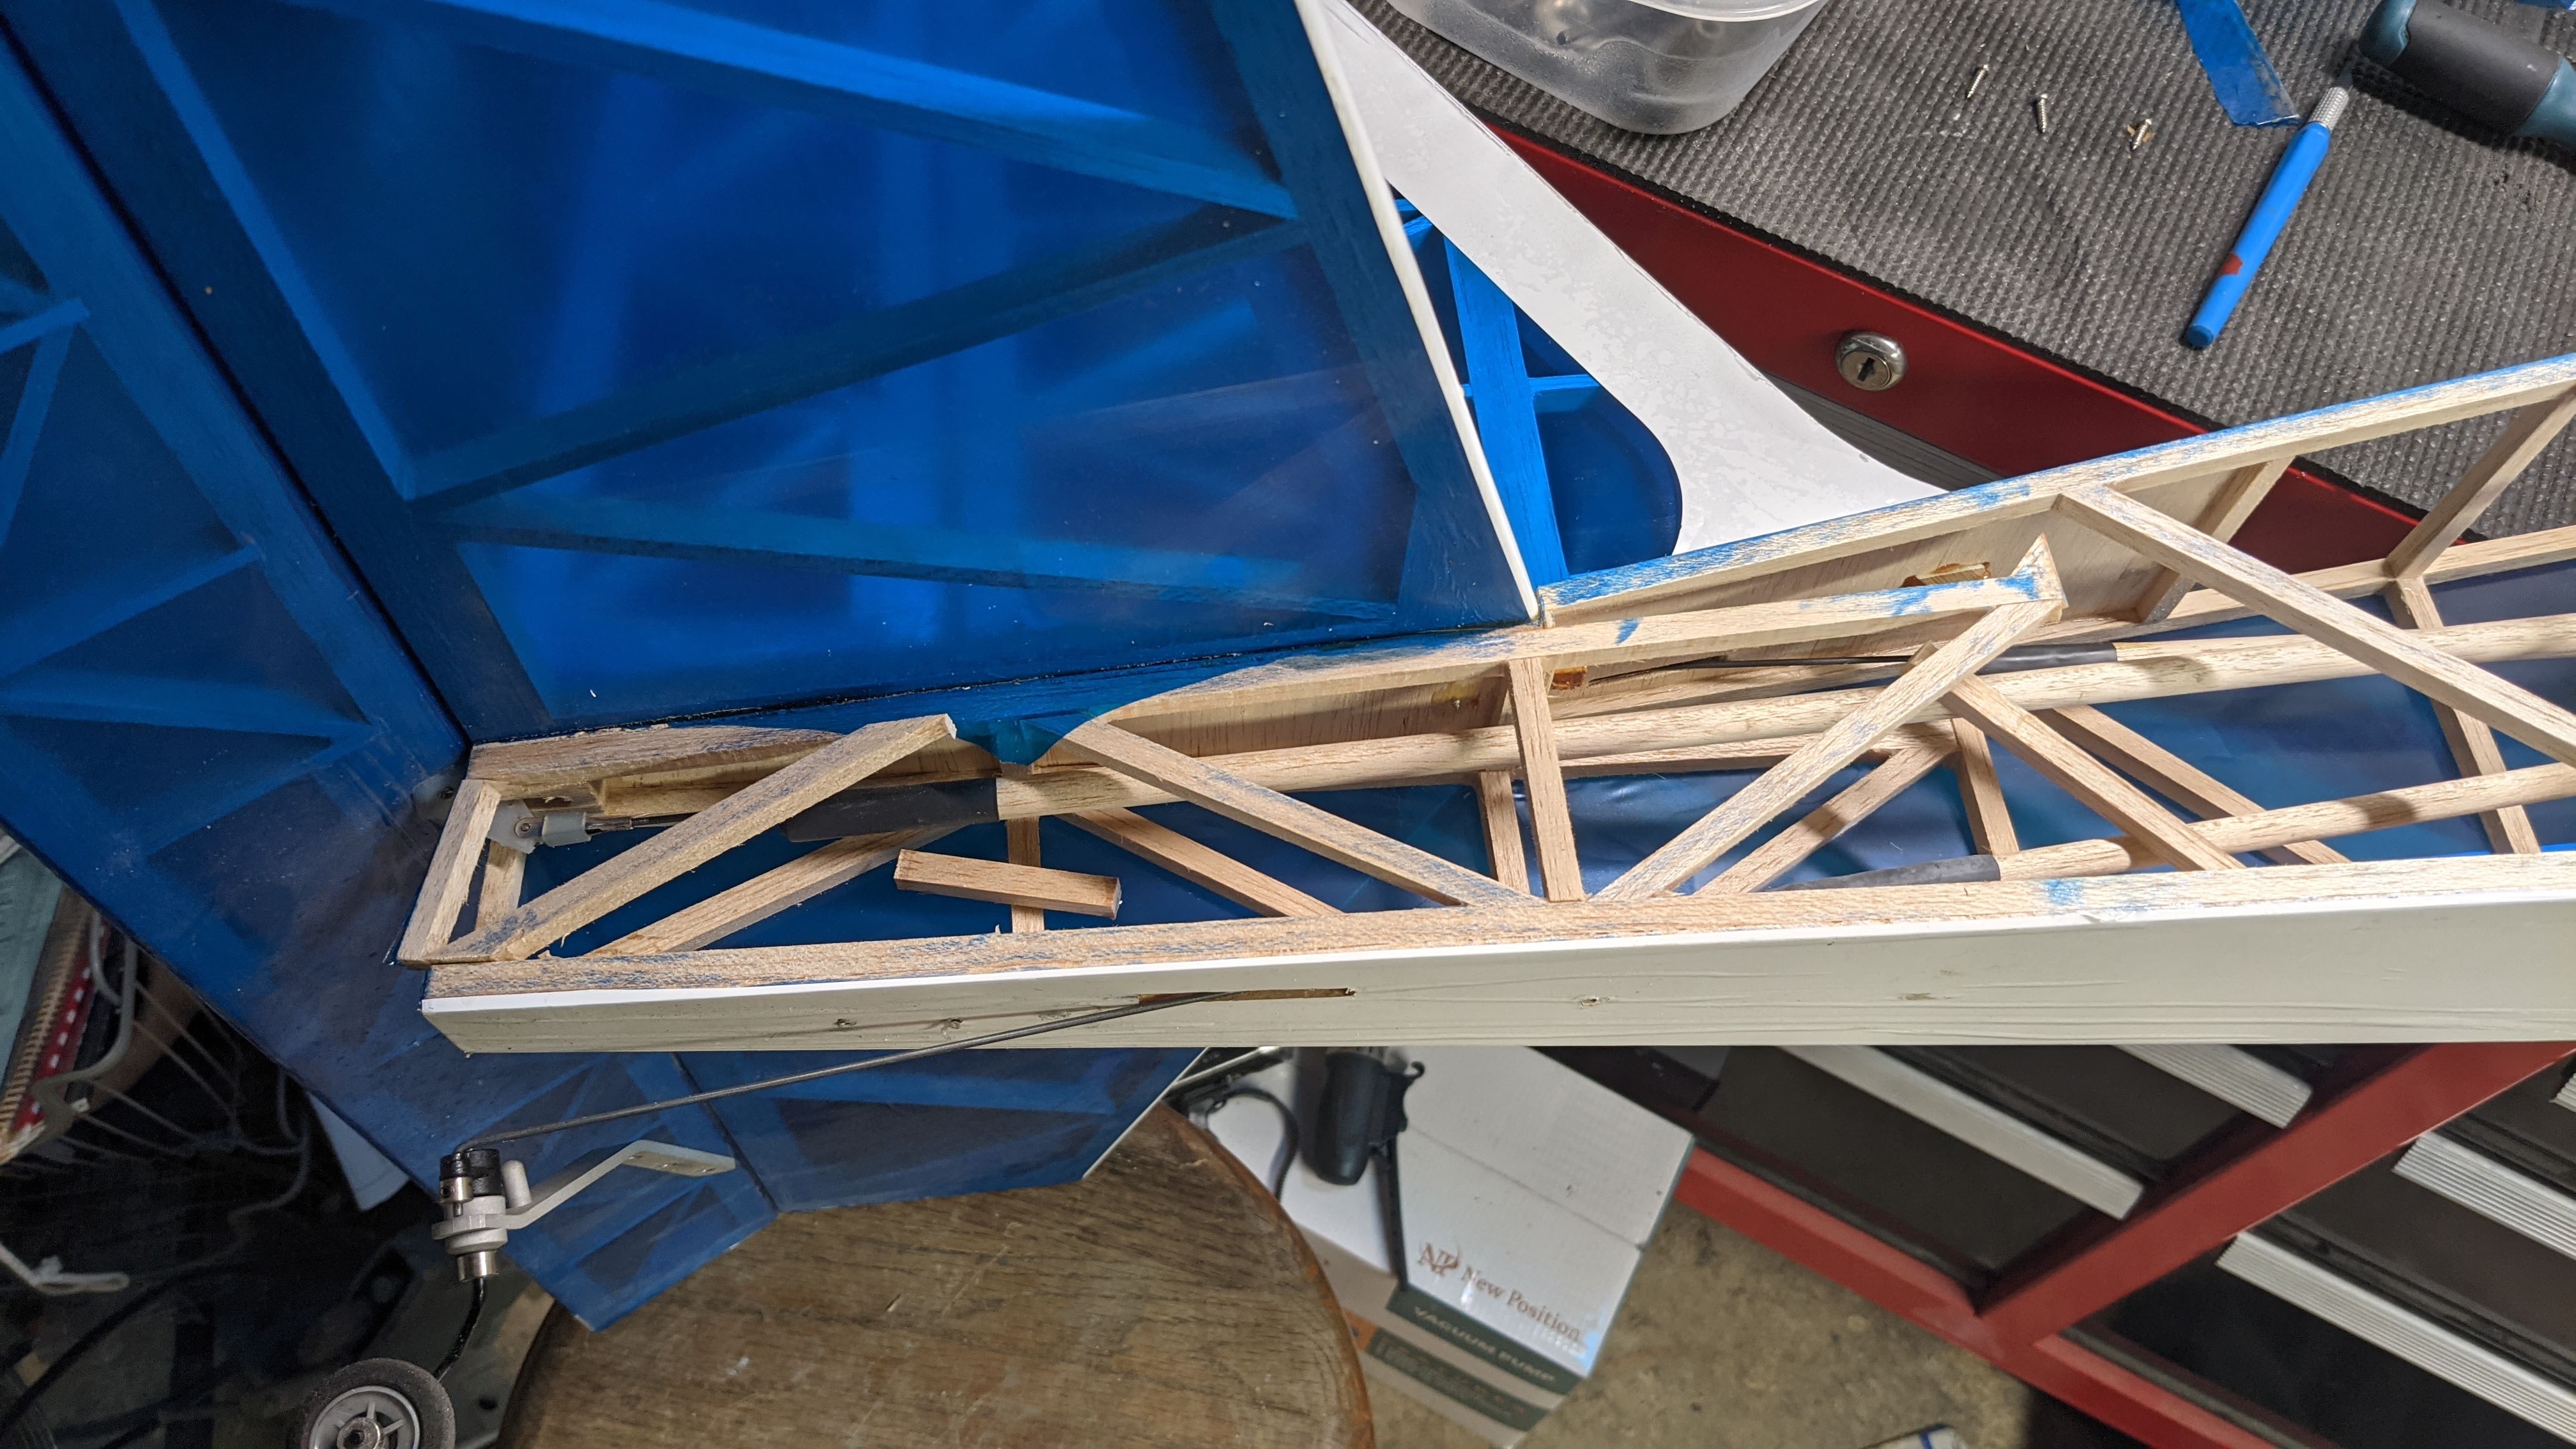
It didn't take long to realize that taking off the covering was a good idea. I thought the tail end might have a bit of problems structure wise... but this is quite a lot more severe than I anticipated. It turns out most of the tail was held together by the covering film. Can you count the number of broken joints? I can't believe I flew it like this without the tail just falling off.
PXL_20210305_051855303.jpg


I started cleaning up the rudder and elevator first, just to see how hard they were to get to the point that they could accept new covering. Took entirely too long but the result is ok I guess.

The hinges included are of the CA type. They were installed with too much gap (almost 1/8) and I'm going to replace them hopefully with Robart hinge points which would be a much more appropriate setup for a model of this size.
PXL_20210305_073301742 (1).jpg


As for the coloring scheme I'll replace it with I have a few 5m rolls of Chinakote (it's the no-name stuff sold on Banggood which is surprisingly good actually) and I think I'll do something in orange and yellow, for good visibility.

This plane has a few other areas I want to change that I've honestly wanted to do for the entire time I've owned the thing. Probably the one I've wanted to do the most is a better gear and access to the tank. Whoever built this ARF many years ago epoxied the tank in! That'll have to go obviously. The current tank is only 8 ounces which quickly becomes empty when trying to feed a Saito 91, so I think I'll also end up replacing the tank itself. For better access to it I'll add a hatch in the bottom of the fuselage, which will also then allow me to mount the receiver and battery farther forward to eliminate some of the need for nose weight. Not having to play with the tank bung through the firewall means I can then seal the firewall completely against fuel. How I will do this exactly will be thought about soon. I'm thinking of epoxying sections of brass tube running through it...

On the gear; it's both too narrow and I don't like how it looks. I think what I'll do is either solder together some music wire gear with some plywood triangles to make it look sorta Cubbish... or maybe I'll buy the Robart cub gear. It would be kind of waste on a Kadet but at least then the suspension would be nice. I'm also going to fiberglass some wheel pants.

Speaking of fiberglass I need another cowling. The one I had on it before both had the engine hole cut to the wrong size (I've had about 5 engines on this plane) and the Saito on it currently is too long so the cowl couldn't fit anyway even if the cylinder fit. I've invested in vacuum bagging equipment lately so I'll use that.

I also want to build some floats for it. It's got very good low speed handling so it should do pretty well on them...
 
Last edited:

speedbirdted

Legendary member
Thank goodness it is not another conversion thread, depending on how opaque the covering is you may not need to remove the stain in the balsa before recoating.
It passed through my head briefly when I initially got this airplane and wasn't really into nitro to do that. I'm really happy I didn't! Unfortunately I did cover some test patches and the blue shows right through, so it'll all have to come off.

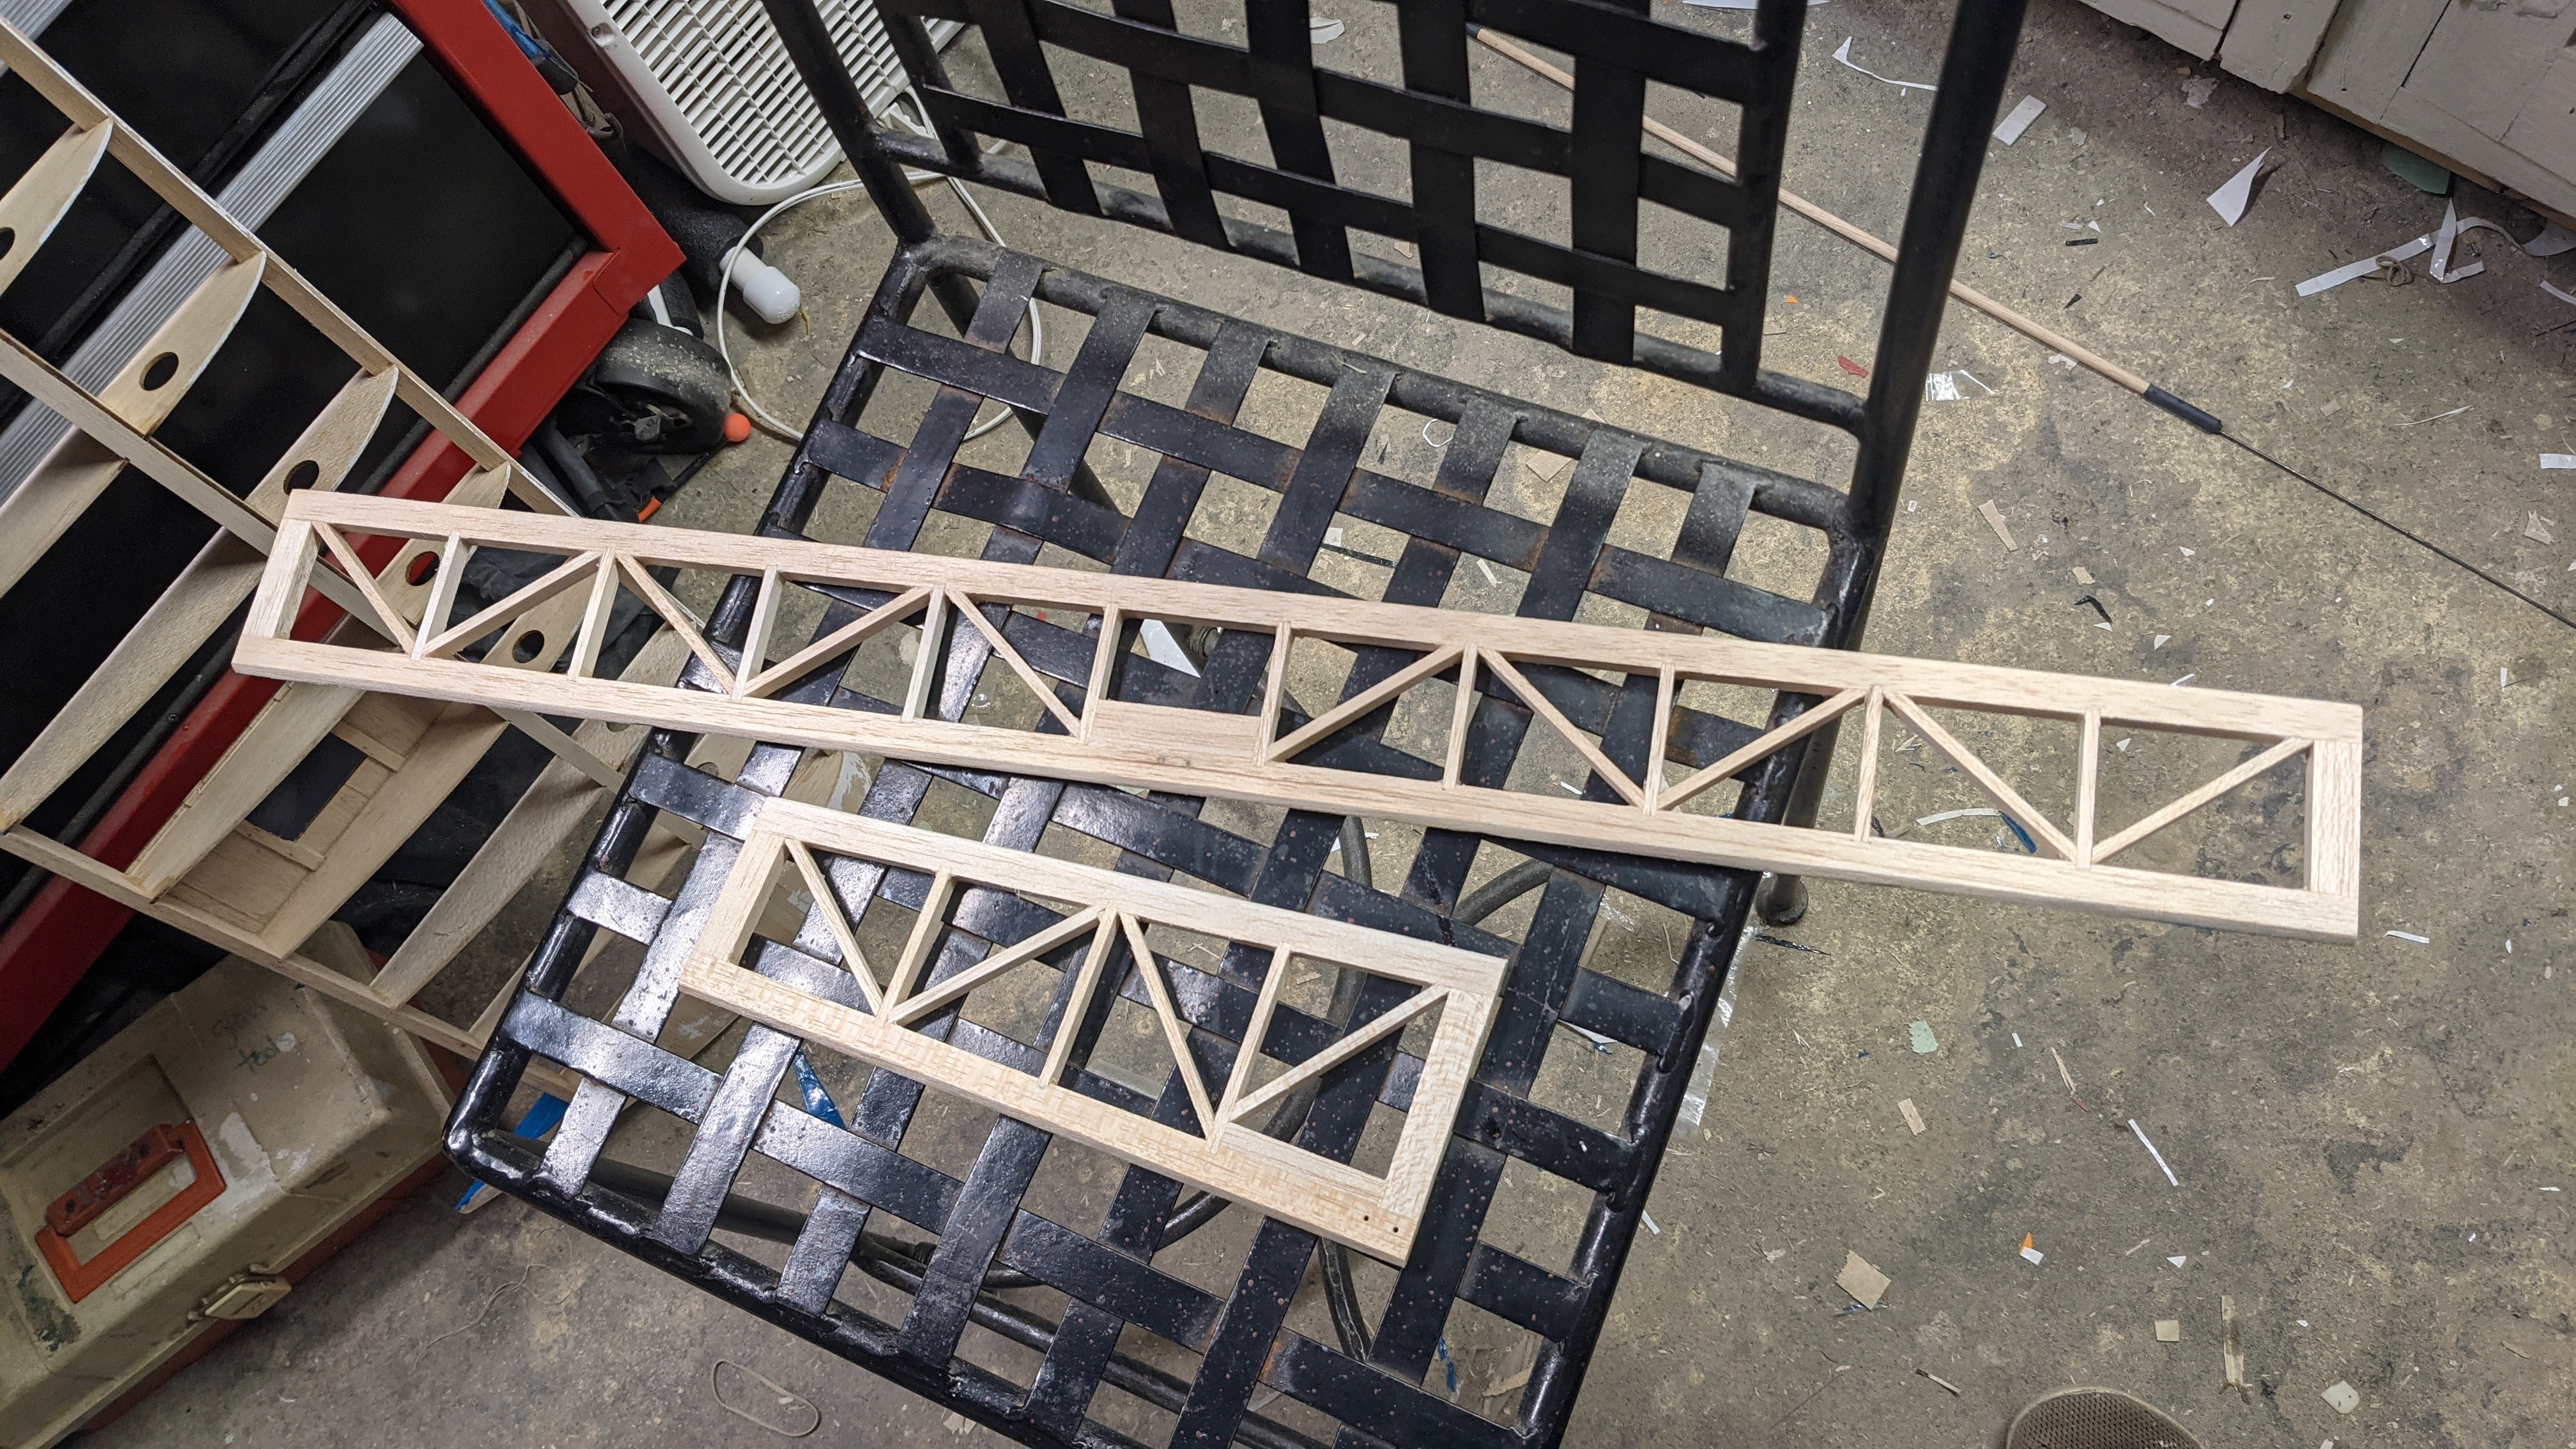
I rebuilt the tail today. I only needed to fabricate one new stick as it had broken in half and was barely hanging on. The tail was reglued with Titebond throughout. I prefer it on larger planes over CA. It came out nice and straight, and very stiff.

PXL_20210305_213517168.jpg


I also buckled down and sanded off all the blue staining. No it wasn't fun. An electric sander would have benefited me massively but unfortunately I'm poor and don't have one. The staining clogs up sandpaper like nothing else - I think I replaced the paper on my blocks 5 or 6 times. There's still a bit of covering in the tail that I couldn't quite get to, mostly because it's so soaked with epoxy that no amount of sanding would ever get it off. I think I'll just cover it with white paint or primer or something so that it won't show through the covering...

I'm happy with the end result though. I will sand it down a bit smoother still for the covering, but for now it gives me access to the internals to do all the modifications I want to do.

PXL_20210306_021640615.jpg


The first order of business from here is to figure out where to put hinges and where to put the blocks to reinforce them. I'll also cut the hole for the hatch and do some modifications to install a tank on a foam cradle. My plan is to install a slant tank upside down so all the tubes can be easily reached for maintenance through the hatch. I'm not sure at the moment how big of a tank I want, but ideally I want as much endurance as I can get because flying for an hour at a time is a lot of fun.

I'm also tempted to investigate installing flaps, just because I can. Why not make a slow plane slower?
 

speedbirdted

Legendary member
Something more: I've fleshed out the color scheme I want (for the most part):

KADET.PNG


MSPaint is hard ok? It's not really in the job description for aeromodelling.

Can you tell I have the hots for scallops lately? ;) In reality though this color scheme is an almost exact ripoff from an Aeronca Sedan I saw at Oshkosh like 6 or 7 years ago. If you own that particuar sedan, sorry, but you can't have that sexy of an airplane and not expect people to want one like it! :p

The wing and horizontal will be colored just like the vertical and rudder (What is that pattern called? I know there's a name for it) on the top sides, their bottom sides will be a solid color to aid orientation.

Those who know more about painting things than I do; I'm calling on you for this next part. As you can see the cowl and pants are painted. The only method I know of to get exactly color-matched paint is to go to Home Depot or something and have them mix up a batch of house paint with that little color scanner thing they've got there. This would be fine if latex paint was fuel proof; it isn't. Now I'm thinking do I try to fuel proof it with resin or lacquer or something, or is there another fuelproof paint that I'm not aware of that can be ordered in custom colors? I thought maybe I could use Klass Kote but getting a custom color of that mixed is prohibitively expensive, and plus you can only buy custom colors in huge quantities. I only need a little.

Though if I do end up buying a bunch of Klass Kote paint I might as well just chuck the idea of a film covering and buy a bunch of Koverall and use that instead. It'd be a LOT stronger and likely would never need re-shrinking...
 
Last edited:

rockyboy

Skill Collector
Mentor
Great project! Love the color scheme too. On the fuel proofing, if I remember the process a club member told me properly, he used home depot color matched latex paint, let it cure completely (like 2 or 3 weeks) and then used several coats of water based polyurethane (or maybe it was Lustrekote clear or a final top coat of that over the poly?) I remember scratching my head at the idea of water based poly curing to a glow fuel proof state, but he had planes flying with his process for years.
 
Last edited:

speedbirdted

Legendary member
Great project! Love the color scheme too. On the fuel proofing, if I remember the process a club member told me properly, he used home depot color matched latex paint, let it cure completely (like 2 or 3 weeks) and then used several coats of water based polyurethane (or maybe it was Lustrekote clear or a final top coat of that over the poly?) I remember scratching my head at the idea of water based poly curing to a glow fuel proof state, but he had planes flying with his process for years.
I've never heard of using Polycrilic to do that with, but I guess I'll try it on some test patches. My idea was to use epoxy finishing resin or clear epoxy paint over the latex but I'm not sure if the latex would like that. I could test that too...

In other news the hinging is done, at least for the tail. I added some blocks for the hinges to go through as there was insufficient substance already there to glue them onto. You can see the rudder has a booboo near the top, because I tried to glue one of the hinges in and some of the glue migrated into the hingey bit and stuck it solid :( There's not really a way to get hinges out without destroying everything around them so I figured I might as well do it in a controlled manner and put new wood in afterwards.

PXL_20210307_032319329.jpg


I got the alignment pretty good for the rudder and elevator; no binding there. The ailerons are a different story though; one is fine but the other is pretty poor. The bits of CA hinge left in the pieces made it pretty hard to drill straight, so I made foam jigs for the rudder/elevator and ailerons to fit into to hold them straight for drilling. Unfortunately there is both no way to jig the whole wing and it wouldn't fit in the drill press anyway, so drilling the aileron hinge holes straight was much harder and didn't go as well. I will have to re-think my technique for it tomorrow...

PXL_20210307_001603498 (1).jpg
 
Last edited:

speedbirdted

Legendary member
Fuselage modifications commenced. Cut out the hatch and cut out a big chunk of the rear tank support, and then extricated the stock tank. From there I cut out more of the tank support to facilitate installing the tank cradle. I made the cradle itself out of 1/8 basswood. Sitting in it right now is a (I think) Hangar 9 10oz tank. Plenty of room for more - the dimensions in mind were that of a 14oz Sullivan slanter and that will fit in nice and snug. I figured with such a large fuel load I would also move the tank rearwards a little, for less affect on the CG as the fuel gets burned.

There's going to be plenty of room for plumbing up front. No fighting it like it used to be! The hatch will be made out of a piece of 3/32 ply. I will add the rim for it to fit onto on the inside next. I'll also seal it with maybe some thin weathering strip as it is on the bottom of the airplane and could be susceptible to picking up runway gunk, but that's a job for after the covering goes down...

I'm conflicted on how to secure it though. Part of me wants to use a screw at each corner, another part a tongue on one side and two screws, and another no screws, a tongue, and a servo horn... and one more part wants to use magnets :p

PXL_20210309_061706107.jpg


The wing strut setup was also mocked up, this is the basic configuration I want. Hardwood blocks with blind nuts will be installed in the wing, and either a big hardwood or aluminum plate will be installed running across the fuselage (and may double as the rear gear support if I can get the spacing right) These struts will be functional. The Kadet ARF (at least the older design which is what I have) has a nasty reputation for folding wings and I see why; the only thing supporting them in the middle is a 1/8 thick piece of aluminum that runs across them (and which one wing half slides into) The newer design has a wing tube which I briefly considered putting in, but that would be a lot of work in comparison to just adding some struts. Plus the struts just look cool, kinda old school...

The main struts will be made of either 5/8 or 3/4 inch K&S streamline tube; the only stuff I had on hand at the moment was some 3/8 which was left over from another project; it's obviously much too small, but it will suffice for just a mockup. The jury struts are brass tube and they also are functional as without them the struts tend to flutter. The attachment points on either ends of the struts will be made with a piece of 4-40 pushrod wire with a clevis JB welded into the end of the strut, then the strut end will be cut to shape.

I also have an idea about just using one strut per wing instead of two; the one strut would have its attachment point bolted directly to the wing spar (bolted around it, not through it) Installing blocks onto the wing ribs seems iffy to me because I don't know if the wing rib can take the load, but also attaching directly to the wing spar with just one strut would double the load per strut and load on all the associated connectey bits in between the wing and fuselage attachment.

PXL_20210309_063602426.jpg
 

rockyboy

Skill Collector
Mentor
Tongue and magnets! :)

I agree the idea of connecting those struts in at the ribs feels a little sketchy. I'd think one rib strut connected to blocking directly attached to / surrounding the spar - and with some shear webbing in there too - could do a solid job of transferring the loads into a place that could take it.
 

Bricks

Master member
The only thing I do not like about struts is they are a pain the arse. I have a Citabria and always having to connect the strut is like I said above, and just more parts to keep track of. As Rockboy said it will do the job if beefed up in the rib area and fuselage.
 

OliverW

Legendary member
The only thing I do not like about struts is they are a pain the arse. I have a Citabria and always having to connect the strut is like I said above, and just more parts to keep track of. As Rockboy said it will do the job if beefed up in the rib area and fuselage.
My cub is the same way. I'm thinking of using cotter pins where it joins the fuselage, but it works pretty well as is so it may not be worth it
 

speedbirdted

Legendary member
I think I'm just going to use one strut per wing. If I use 3/4 inch tube that should be more than strong enough to take all the G load I can throw at it.

Much work has been done. I haven't been providing updates because my computer's HDD took a fat steamy crap and corrupted pretty much everything so I've had no way to really post much of anything until yesterday. The fuselage has had the most work done to it - I've finished up the hatch and how it'll be secured. I built rails inside the fuselage for it to sit on and it's secured with two bolts on one end and a tongue on the other. The firewall has also had some work done to it - I've sealed every hole in it that's not for the engine mount bolts. I now just have to figure out where to drill the new throttle cable hole and the holes for the fuel and exhaust pressure tubes. I'm going to use a three line tank for ease of fueling but the vent line will get a fuel dot somewhere farther back on the fuselage. After I get those installed, the firewall will get coated in glass resin to make it impervious to fuel.

PXL_20210314_031122234.jpg


Time to make a new cowl, starting with the plug. Usually I would make a plug out of balsa as it's very nice to work with but sadly I didn't have any balsa that was both of the required size and of a crappy enough grade that I wouldn't feel bad not using it on an airplane. Instead I used foam. I needed to glue together three sheets of 2" thick foam to get a plug thick enough. Foam-cure glue is amazing; not only is it very strong (almost like epoxy) but it will not impede hotwire cutting! Only thing I don't like about it is the long cure time, so I had to set a weight (a quite expensive weight) on the blocks overnight before I could cut out the rough plug.

PXL_20210314_205408502 (3).jpg


From there I made six templates out of 1/16 bass (two per dimension) and cut out the rough plug shape; then it was just a matter of busting out the sandpaper and shaping it.

PXL_20210315_010607652.jpg


I then cut the plug in half with the hotwire and coated both halves in epoxy resin. This is as it sits at the moment; it looks a lot rougher than it actually is. I will sand it between coats of resin. After I have sufficient resin applied I'll mount each plug to plywood and make molds out of Ultracal, then stick that in the vacuum bag and hopefully end up with something usable...

PXL_20210319_010117540.jpg


I also put some more thought into the aileron servo setup. I won't use the servo doors that it had. The epoxy holding the servo mount blocks onto them was not doing its job well; light pressure is all it took to break them off. I wanted to build new doors out of plywood to attach the servo to, like I did on my Cub, but I did that to hide the servos entirely inside the wing; this not being a scale plane gives me less need to do that and so I decided to just rig up a more traditional arrangement involving the servo poking out of the wing. This also gives me the advantage of ready adjustability of the servo horn and its associated clevis, if needed.

PXL_20210319_015616124 (1).jpg
 

speedbirdted

Legendary member
Lately my time available to work on aircraft has been limited, but I've been getting some work done on this. The cowl patterns are very close to completion; fourth and final coat of epoxy resin went on today. I believe only very light further sanding will be needed to get it to a state where I can mount them to plywood and make the molds. All I need to do is get some Ultracal. I tested my vacuum bag setup and it seems to work great with just a 2 CFM pump so soon I will have some cowl parts underway.

You can see where I had to patch in some extra foam after screwing it up with the hotwire. Luckily the seam is invisible and will not show up in the mold or finished cowl (I hope ;))

PXL_20210330_041843054.jpg


I also got around to making the wheel pant patterns. I could have used commercially available ones but making stuff out of fiberglass is far too fun :p I felt I didn't go into much detail about how I did this type of work last time so here's a more in depth explanation.

Templates were cut out with a laser. I could have used a scroll saw to cut them out but I had a really nice pant modelled in Blender so I took the 3-views from there and used them instead. Each view is cut out individually; pins were used to hold the foam together while cutting each view.

PXL_20210330_024528156.jpg


Much cutting later. After removing the excess foam, I now have a rough pattern.

PXL_20210330_025846636.jpg


From now all that is needed is sanding to the final shape. Not complete yet; I still need to wipe it with a tack cloth and then cut it in half, and then do the whole resin thing over again. I will build some sort of jig to get the exact halves at some point. I am worried the precise tail of the pant will put up some problems with the glass layup, especially concerning when the two pant halves are glassed together; I may end up instead making the tails out of solid balsa blocks and carving them out manually, then covering them with another light layer of glass or primer to blend them in with the rest of the pant and erase the seam.

I only need to make one pattern for the pants, as they are symmetrical and I should be able to reuse the mold twice. Normally for mounting pants a flat spot is included to affix a bracket but I have an idea; instead I'll glass flat wood pieces on the outside of the pant to make a flat spot, instead of including a flat spot in the design of the pant iself.

PXL_20210330_032639984.jpg
 

speedbirdted

Legendary member
Package containing the fuel system and landing gear bits arrived today, so that went together. A 14 ounce tank slides in here with room to spare. Inititally the measurements of the tray suggested it would be much tighter, but the tank turned out to actually be about 1/8 inch narrower than the dimensions on the web site said it would be.

The fuel tank tubes are easily reachable for maintenance here. Just how I like it! I also labeled them, as I always forget which tube does what. V, P and C for Vent, Pressure and Carburetor.

PXL_20210407_233806382 (1).jpg


Here is a trick an old timer taught me for installing the brass tubes in tanks. Often times, tubes will need to be placed close to the edge of the tank, to do things like be able to get the most fuel possible out of the tank when defueling. It's difficult to get a small gap that also does not block the tube with the tank wall, so you can cut notches into your tubes like so, and then press them against the tank walls which now will not be blocked by the tank wall itself. You must be very careful to deburr everything, as running metal shavings through an engine will quickly destroy it.

PXL_20210407_225559705.jpg


TIme to build the gear. I drew up a template for it; the design is close to that of a Cub; I like that kind of look, and this airplane is basically a non-scale Cub so it fits nicely. The main structure is 5/32 music wire; the suspension bits were going to also be 5/32 but I changed it to 3/32 wire later after realizing I could not bend 5/32 wire as tightly as I wanted to.

PXL_20210408_010445569.jpg


Shaping the parts. You can see the visible toe-in angle; I used 2 degrees inward on each gear leg. If this ends up being excessive, it'll get reduced. It's much less noticeable from other angles.

PXL_20210408_024528943 (1).jpg


Everything cut to shape and bound with copper wire. I thought the rubber bands in the center would have more effect on suspension as I thought the wire would be less stiff, but they actually do very little. I guess it'll just be more of an aesthetic touch...

PXL_20210408_040017826.jpg


Soldering the joints together. Silver solder and a torch is my preferred technique for this now; I used to do it with an iron, but since trying a torch I've never looked back. The trick to it is to use a lot of flux. You can't overdo it, just pile it on there like crazy. It can be wiped away afterwards.

PXL_20210408_042740884.jpg
PXL_20210408_042012732.jpg


Standing up on her new legs for the first time. Next steps here would be adding the plywood triangles in between the gear legs; i will secure them with glass cloth and resin. They might get installed after the maiden, so I can change the toe in angle of the gear more easily if it turns out I need to change it.

PXL_20210408_045105330.jpg


Next I will fiberglass the cowl and pants...
 

speedbirdted

Legendary member
I've been chipping away at the glass bits, when I get time. Today I did major work on the cowl molds.

Here is a completed "box" for pouring the Ultracal into. It's not particularily sophisticated (it's intended to be destroyed to get the finished mold out anyway) but I cut out the green foam bit on the hotwire to waste less plaster. I used minimal epoxy to hold it together. I tried making one with Foamcure glue, but it doesn't seem to stick to foamboard very well.

PXL_20210413_015029956 (1).jpg


End result. I'm very happy with this. It needs a bit of tidying up, mainly around the edges, but as an unfinished product I'm satisfied.

PXL_20210413_035752422.jpg


I used to do this with Plaster of Paris. Now that I've tried Ultracal, I don't think I'll ever use anything else. This stuff is amazing. It's much stronger, and takes fine detail much better. If you look closely, the few very small scratches I accidentally forgot to sand out of the plug appear in the mold. If they appear in the finished cowl I will sand them out or primer over them, no big deal.

I've still got a few thoughts about next steps though. Some tests with vacuum bagging glass layup onto random things to get some idea of how the process worked revealed that sometimes the layup behaves weirdly when you try to make it go around sharp corners. I'm thinking I will get around this problem by applying some resin with microballoons to the sharp edge at the front of the cowl where it meets the spinner; I think this is where that type of problem would crop up. I now wonder, since my microballoon bottle is getting pretty low, are there other substances that can be substituted? I've heard of people using things like baking powder and even balsa wood dust instead, but I've never tried it myself...
 

telnar1236

Elite member
It's not usable in every situation, but baking soda works fine. It's very heavy though, since baking soda is basically rock. Balsa dust isn't as good as some microballoons if you want to sand it, but it works well and it's pretty light. Do not use baking powder unless you know it will work with that specific resin. It contains an acid which can mess up the chemistry.

If you really want to go cheap, you don't even need to use resin at all, since a mixture of baking soda, a bit of flour, and Elmer's glue produces a surprisingly strong filler. It should never be used anywhere remotely structural, obviously, and it needs to be covered with something to keep the resin from seeping into it for use in a mold, but for the cost, you can't beat it. I use it pretty frequently for fiber glass molds since it's totally safe to use with foam and will never melt it.
 
Last edited:

speedbirdted

Legendary member
I've been gradually refining my vacuum bag setup, and now I have something workable. I was having a lot of problems sealing the hose inlet, but now I've bypassed that problem by 3D printing a little adapter thing to go inside the bag, and then epoxying the bag, flange and hose all together to make it airtight. The disadvantage with this method is you have to print a new adapter if you want to use a new bag, but I've made the bag somewhat reusable so that shouldn't be a huge issue. The bag edges are sealed with silicone caulk and tape; you don't even need to wait for the silicone to dry, it seals perfectly when it's wet.

PXL_20210420_235636500.jpg


Laying up the glass. I used one layer of light 1.5 oz cloth as the outermost layer for a smooth finish and three more 6 oz layers for strength. I am not concerned about the weight of the cowl; the plane will end up needing some nose weight anyway and I would rather accomplish it at least partly, if not fully, by making the cowl bulletproof than having to add lead which does nothing else. Instead of standard release wax I used some locally obtained Carnauba wax as I didn't feel like waiting another week for more release wax to come in the mail. It does the job just as well.

PXL_20210421_005359653.jpg


In the bag. The sealing method works quite well; I only had to run the pump for initially about 10 minutes, and then a few minutes at a time every 20 or so minutes to maintain a very good vacuum. My pump advertises itself at 5 CFM but it's more like 2 judging by what people reviewing it on Banggood have to say :p Either way it does the job just fine. The resin fully cured after about an hour; I was intentionally light with the hardener because I was unsure about how long the setup would take.

A nice trick (that I neglected to do) is to use a bunch of paper towel in between your breather cloth and peel ply. If the resin bleeds into the breather cloth (which it will) it will usually then bond to the bag itself and then it becomes a massive pain to remove the finished part from the bag afterwards.

PXL_20210421_010014527.jpg


Finished part taken out and trimmed a little. I will leave the flange around the edge for now; it will help join the two halves together, and I will cut it off after that is complete. Other than that I'm very happy with it. There are a bit of areas on the interior of the cowl where the cloth wrinkled a little but it will not show up externally.

I must thank @telnar1236 for the baking soda tip. It worked perfectly. I used a bag with a pinhole in it to squeegee a bit out around the edge where the cowl and spinner meet, and it kept it very nice and sharp. It's slightly chipped in a few small places (I think this is a result of clumps in the baking soda falling off) but it's nothing a little bit of spackle and then a generous amount of primer won't fix.

PXL_20210421_170614939.jpg


In the meantime my paint room (which used to be the workshop) is progressing well. I should have the fume extraction fan put in sometime in the next week and then all that's left to do is get a better HVLP gun and some paint to use.
 

speedbirdted

Legendary member
Halves trimmed and joined. It still needs a bit of filler in a couple places but instead of spackle I think I'll just use the baking soda stuff with a bit of resin. It actually sands quite nicely.

The spinner fits perfectly. I didn't think it would come out looking this nice.

PXL_20210425_041809441.jpg
 

speedbirdted

Legendary member
I've been getting back to working on this a bit. I coated the firewall in glass resin, and drilled the holes to route the throttle cable and fuel/pressure tubes. I still need to figure out where to put the outlet for the vent line, but I think I'll put it on the left side of the fuselage near the bottom. I tested the placement of all the fuel lines on the inside and it was a breeze to set up because the bottom hatch provides great access.

I also cut the rough holes in the cowl, just to make sure everything fit together like I wanted it to. Originally I was going to do this after painting it but I figured it would suck if I painted up the cowl all nice and then found that it didn't fit correctly :p They will definitely get cleaned up with the dremel a bit in the near future. I need to cut some holes for the HSN to go through, and another for a screwdriver to go through to get to the LSN. Maybe I'll also epoxy a brass tube into the bottom for the crankcase vent tube to go onto, just to prevent it from flopping around out the bottom like it otherwise would.

I didn't actually want the holes to fit the engine as tightly as possible. Behind the engine was also left open intentionally because I have a feeling I will need to get in there to play with the throttle linkage or carburetor or something at some point. If I can't make something 100% reliable it might as well be accessible.

From here I need to install the hardware to secure the cowl. I think instead of screws I'll use pegs mounted to the fuselage and clips to hold it on, so the cowl can be taken off without requiring tools. I also need to install some washers in the cowl to reinforce the area where the peg will pass through it. Originally I was going to glass the washers into the layup in the vacuum bag, but of course I forgot to do it...

PXL_20210614_060147900.jpg


From here once my threaded rods show up in the mail I think I'll get the struts set up. Hopefully by the time I get all the bits that need to be painted done I'll have the paint room also done.
 

speedbirdted

Legendary member
Time to add some color.

PXL_20210620_084439722.jpg


I started with the elevator and rudder as they were the smallest and would prove whether this unknown covering would work. I'm actually quite impressed by it. Shrinks up very nicely, and stays that way. The adhesive is very effective too - the usual complaint I see lodged against these types of Chinakote type materials is that they don't stick down very well, but that is not the case here. It resists edge pulling well when shrank, and is difficult to even manually peel off. An added bonus is that it doesn't require ammonia to adhere covering on top of other covering without air bubbles forming. One can just use the iron and make sure not to trap any significant amounts of air by always going outwards from previously adhered areas. It will not form spontaneous air bubbles like Monokote or Ultracote tend to do.

Wings and ailerons were done next.

PXL_20210622_072819708.jpg


Solid yellow on the top, solid orange on the bottom for base layers. I will add a checkerboard pattern in yellow towards the wingtips on the bottom, and the other weird pattern that I don't know the name of but described in an above post in orange on the top. This covering comes in 5 meter rolls and I have two rolls of each color so I have more than enough to play with.

I actually for a minute considered glassing over the joint in between the wings and just epoxying the wings together but some quick measurements of my car determined that I would have to either remove the front seat or it would have to go in between the seats and fight the gear stick for space, so that idea was thrown out. If I do the struts right it should be more than strong enough...

Speaking of the struts, progress has been made. I forget where I got this technique from but a good way to make a very sturdy strut attachment is to cut out a balsa wall to fit about 3" down inside the strut and then screw a threaded rod through it, glue it in place in there with the rod coming straight out, and then pack the hole full of JB weld down to the piece of balsa. This will hold the threaded rod in until the end of time and give you the added benefit of being able to shape the end of the strut more easily by cutting away material, if one so desires.

I did this on both main struts, and all four jury struts. I made the jury struts out of 3/8 tube, and of course forgot to take pictures of them.

PXL_20210615_232550514.jpg


Both main struts finished. The things in the middle are for the jury struts to get secured to. I made it so they could swivel when unattached from the wing, so that when the wing is removed all the strut equipment can be secured to the fuselage sides. This way all I have to do to attach the wings is to put in four screws and attach two clevises, plus the nybolts that go into the fuselage.

The little one behind them is one of the jury struts, before it had the eyelet on the end cut down.

PXL_20210618_171100375.jpg


I also got the paints! Since I don't have the spraying apparatus set up yet I might as well get the fuselage interior paint set up. At first I was a little disappointed in the inaccuracy of the color matching, but it gets a little darker as it dries, and then it's very close. This coat looks a little messy but it was only the first one - I'll probably do two or three total. I've also never been particularly gifted at using paint brushes for anything...

PXL_20210622_072258568.jpg


Initially I thought the orange covering and paint would be quite a bit darker, and seeing just how bright it is when applied disappointed me for a minute... but I've actually come to quite like it.