BATTLEAXE
Legendary member
Over the brief time I have been on this forum, or even in the hobby for that matter, I have noticed a consistent division over the power pods. Some are on the "love the power pod as a sacrificial lamb to save the damage to the fuselage" side, which makes sense. Why not just build a new pod because of a nose in incident instead of doing surgery to the nose of the fuse or building a new airframe entirely. I can see how that point is appealing especially to pilots in training, or the weekend warriors who like the sport maneuvers and take risks any chance possible. But what I have found in my own experience, and others crashing as well, not naming an names... @PoorManRC, what ends up happening is that it isn't only the power pod that takes the damage but the nose absorbs some inertia tell tale by the crushed nose and the pilots groans and sighs. Hence surgery or a full rebuild of the fuselage is still required.
Other side of the fence is the good folks who don't like the power pod because in the action of switching it in and out of planes or just to change a battery the power pod wears out, gets weak, wrinkles, deforms, and just becomes less effective each time it is removed or installed. Another good point. Just like in the build vids where The Bix says "build your power pod first" then move on to the airframe, is something I do every time. But in the build process I tend to fit the power pod in a handful of time to check fit, squareness or symmetry, electronics placement, airflow, fitting landing gear, etc... the power pod is so far removed from new by the time it is ready to maiden. It will have been handled so much that it is misshapen, paper is frayed and delaminated on the tabs, skewer holes are worn out and loose, and I know there are other issues many of you have already experienced.
It's not that the power pod is a bad design or even a bad idea, it is the limitations to the medium we are so used to using. No matter how you prep it, cut it, tape it, seal it off, it is inherently weak. No ones fault, it is the material we use because it is easy to build with, and it is CHEAP. Crash, rebuild, repeat. There have been some really creative ways to help solve problems with FB by way of bracing, laminating, taping, types of glues, most of which I would have never thought of if it wasn't for being on this forum, all brilliant as they are we keep hearing the same issues floating to the top.
This thread is to help with our power pod woes to those who wish to try it for our beloved swappable airframes. If it is something you gravitate to because you think its a good idea then try it out and post here to provide feedback to others. If you think it's a bad idea, still try it and post your feedback and opinions here. It's just an idea we all can learn from albeit a positive or a negative to move forward with the idea machine. I watched a build vid from @nerdnic on his P-39 and noticed he used BBQ skewers in a way I hadn't seen before, he frenched in some sections of skewers around his battery hatch for strength and durability, knowing people are going to be handling this area a lot. So i played around with BBQ skewers in creative ways on my builds to see where it could go, my Baby Blender and Speedster Biplane both use skewers for wing struts and cabanes, and recently as control rods. Now i have integrated them into the power pod and I am super impressed. Check it out:
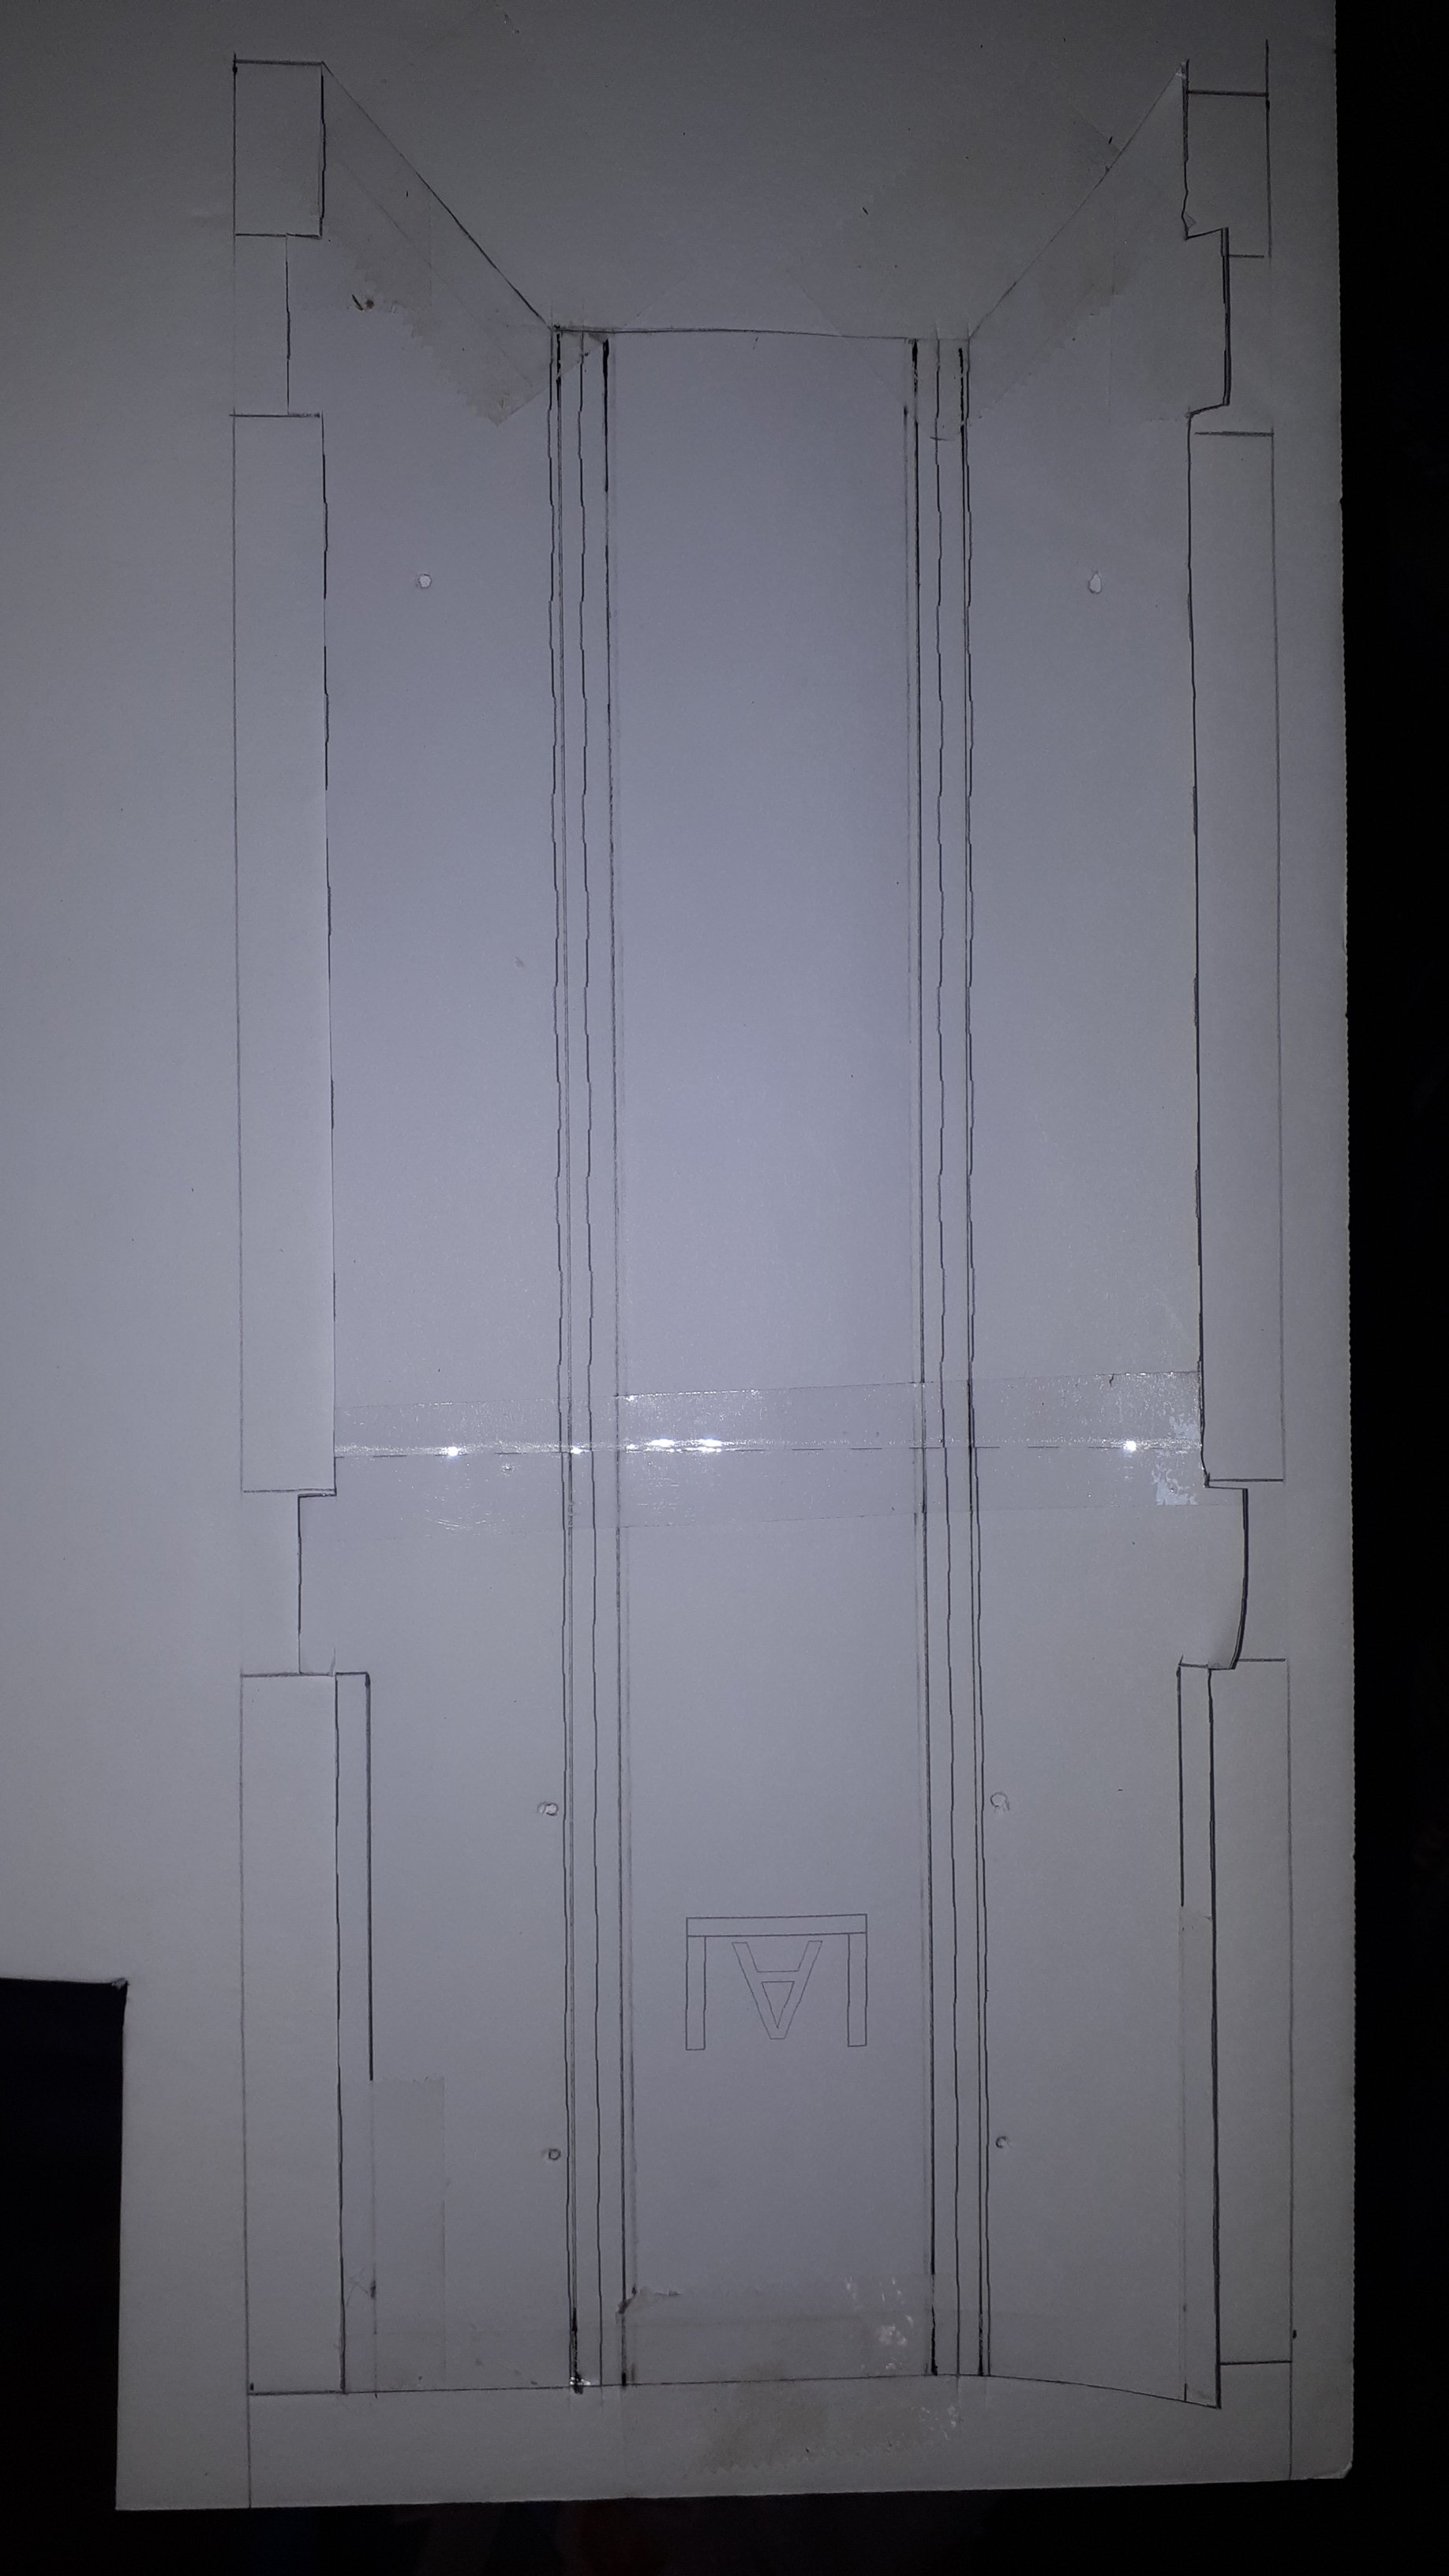
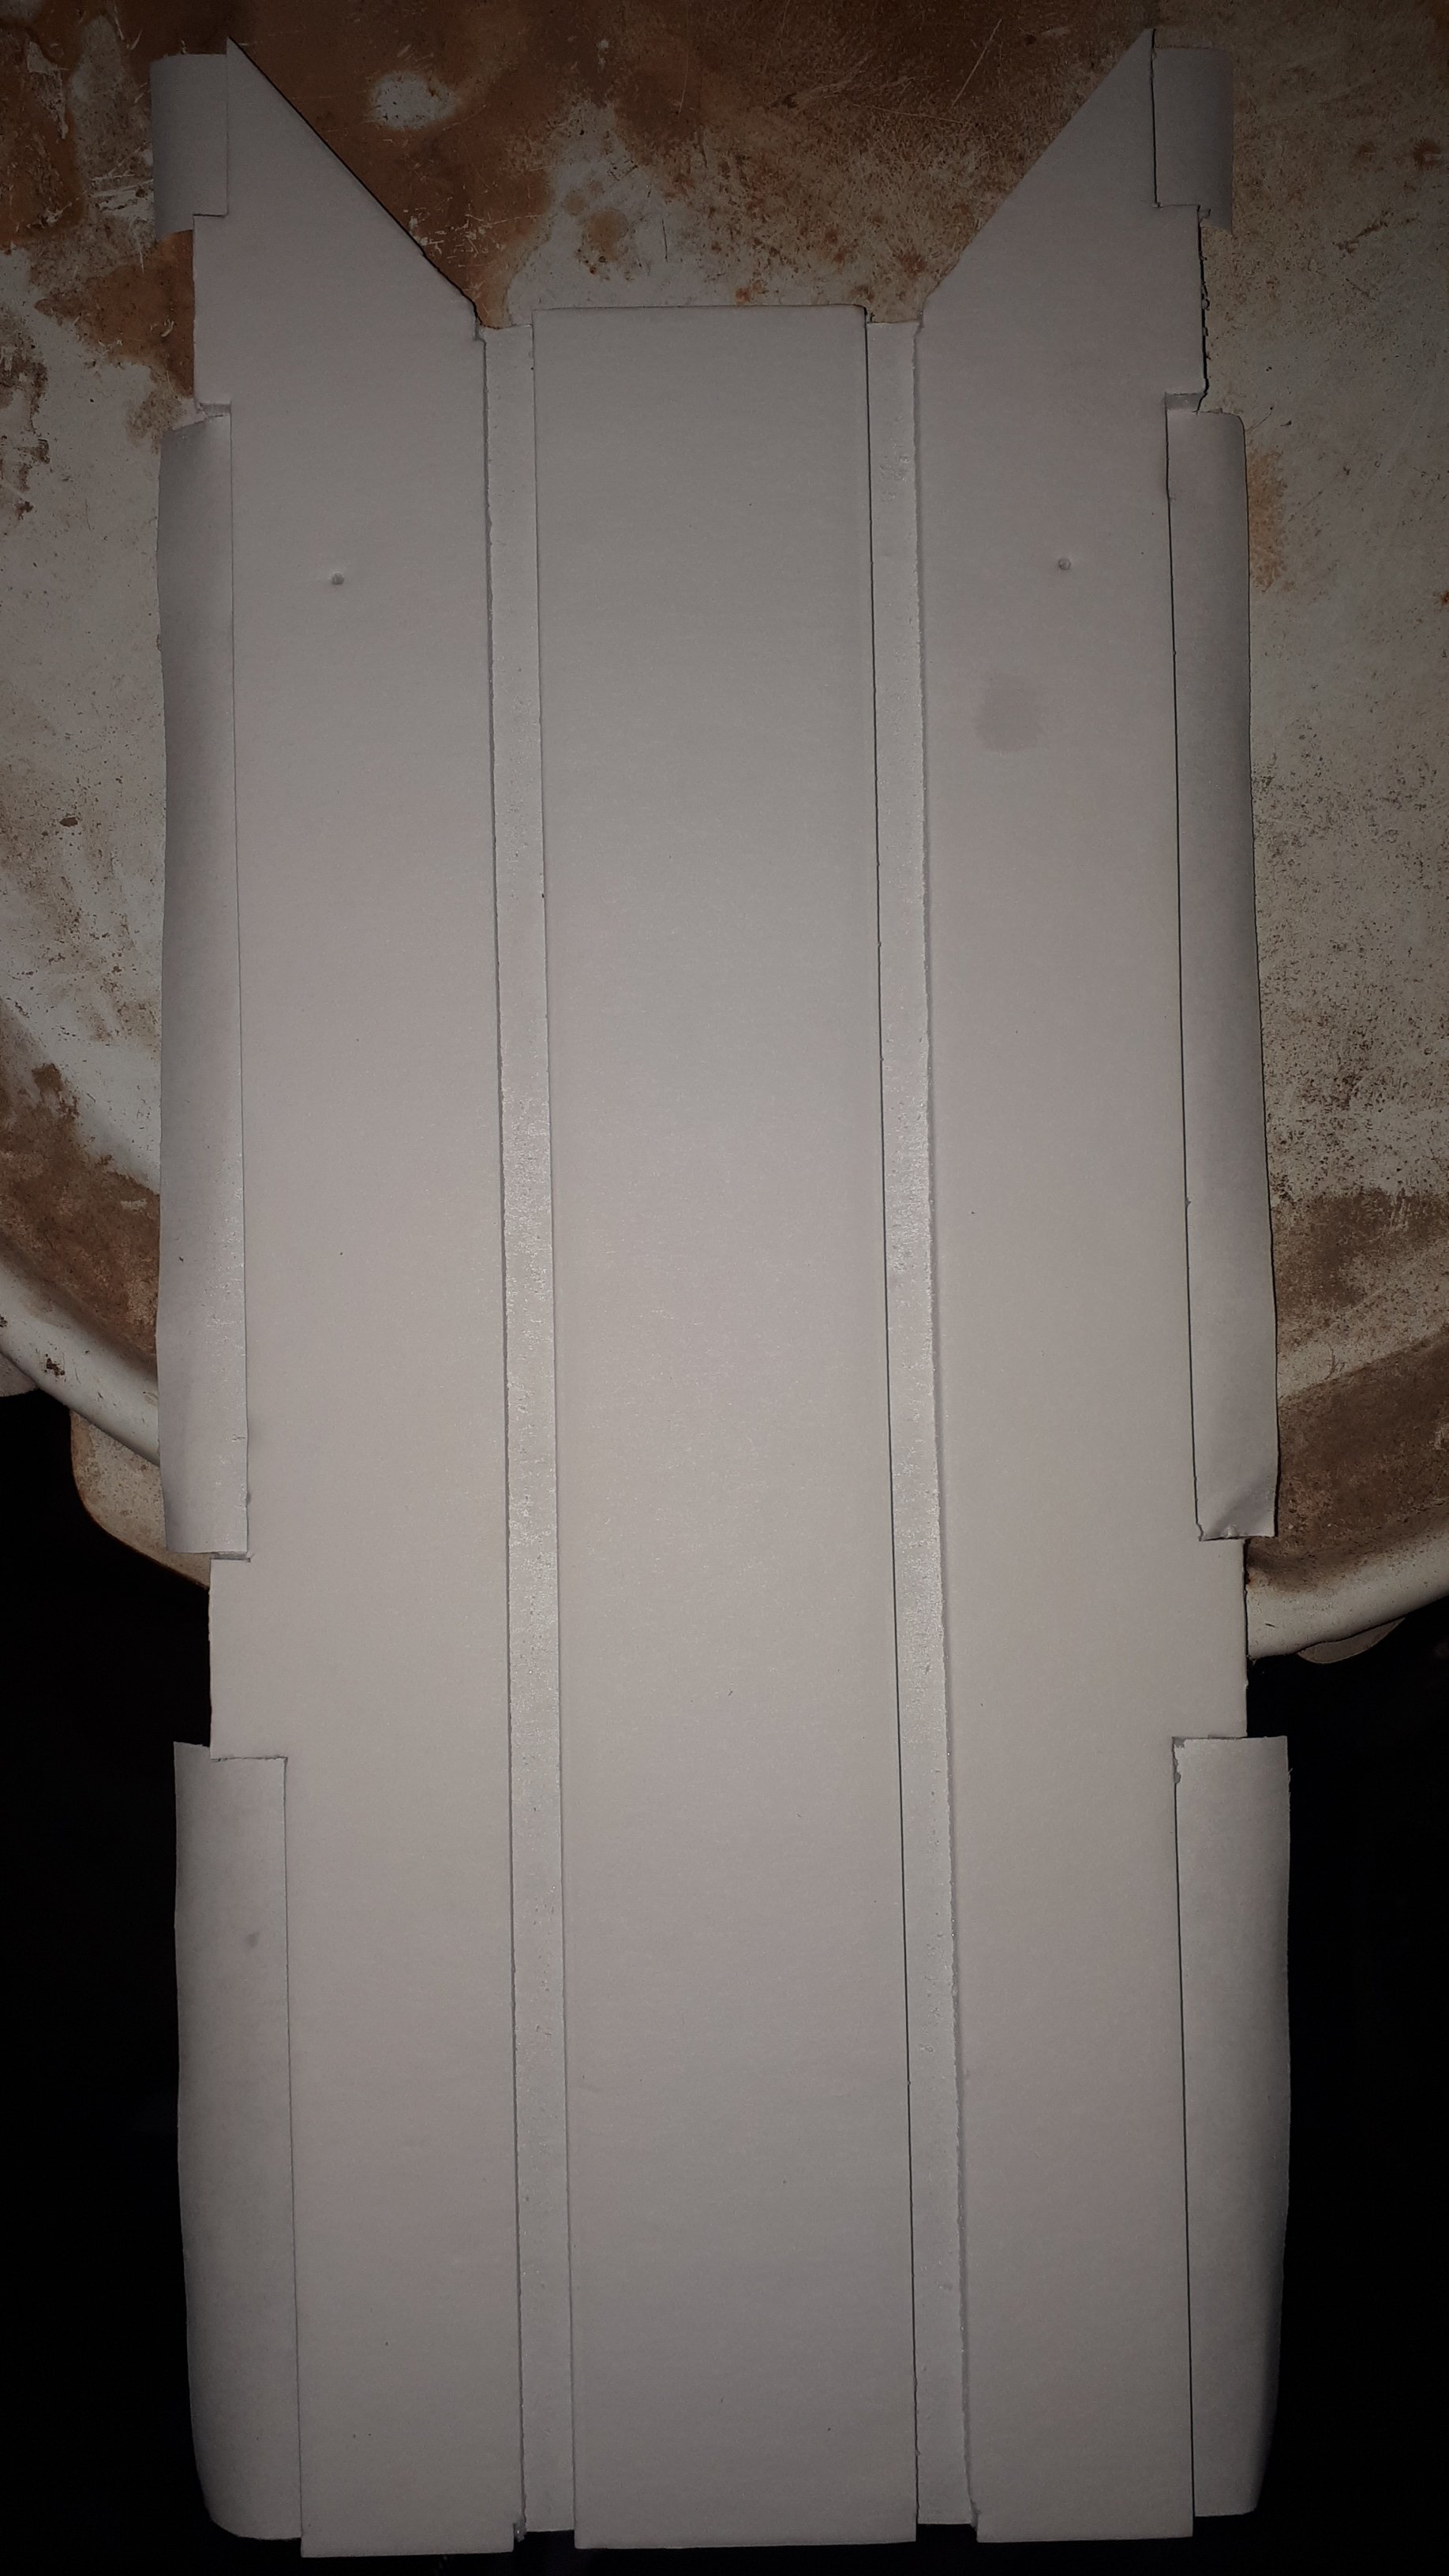
We all know what this is, comes with every standard size planes set of plans or SBK. And if you look closely you can probably guess where I am going with this. To help alleviate the delaminating paper issue i am extending the sides up a half inch to peel the foam from the paper, glue and wrap it over the edges to the inside of the pod, excluding the tabs, (mostly because I haven't got that one quite worked out yet), simple so far. The plan also says to do an A fold to form up the sides, which is what we are doing dimensionally but there is a twist, the cavities cut for the A fold are moved in toward the center of the bottom plate an 1/8" and fully cut out to a 1/4" in width, 1/8" on the bottom plate and 1/8" on the side cheek side, split half and half. This new channel now will house a BBQ skewer running the full length of the pod front to back once folded 90 degrees. Now you will want to dry fit this a few time on a scrap piece of FB to adjust for the diameter of the skewers you are using, I have bought skewers of different sizes so double check what you have on hand and how it fits, and if not, adjust the width of the channel you cut and remove. A full 1/4" worked for what I had. They should fit in as so:
BACK
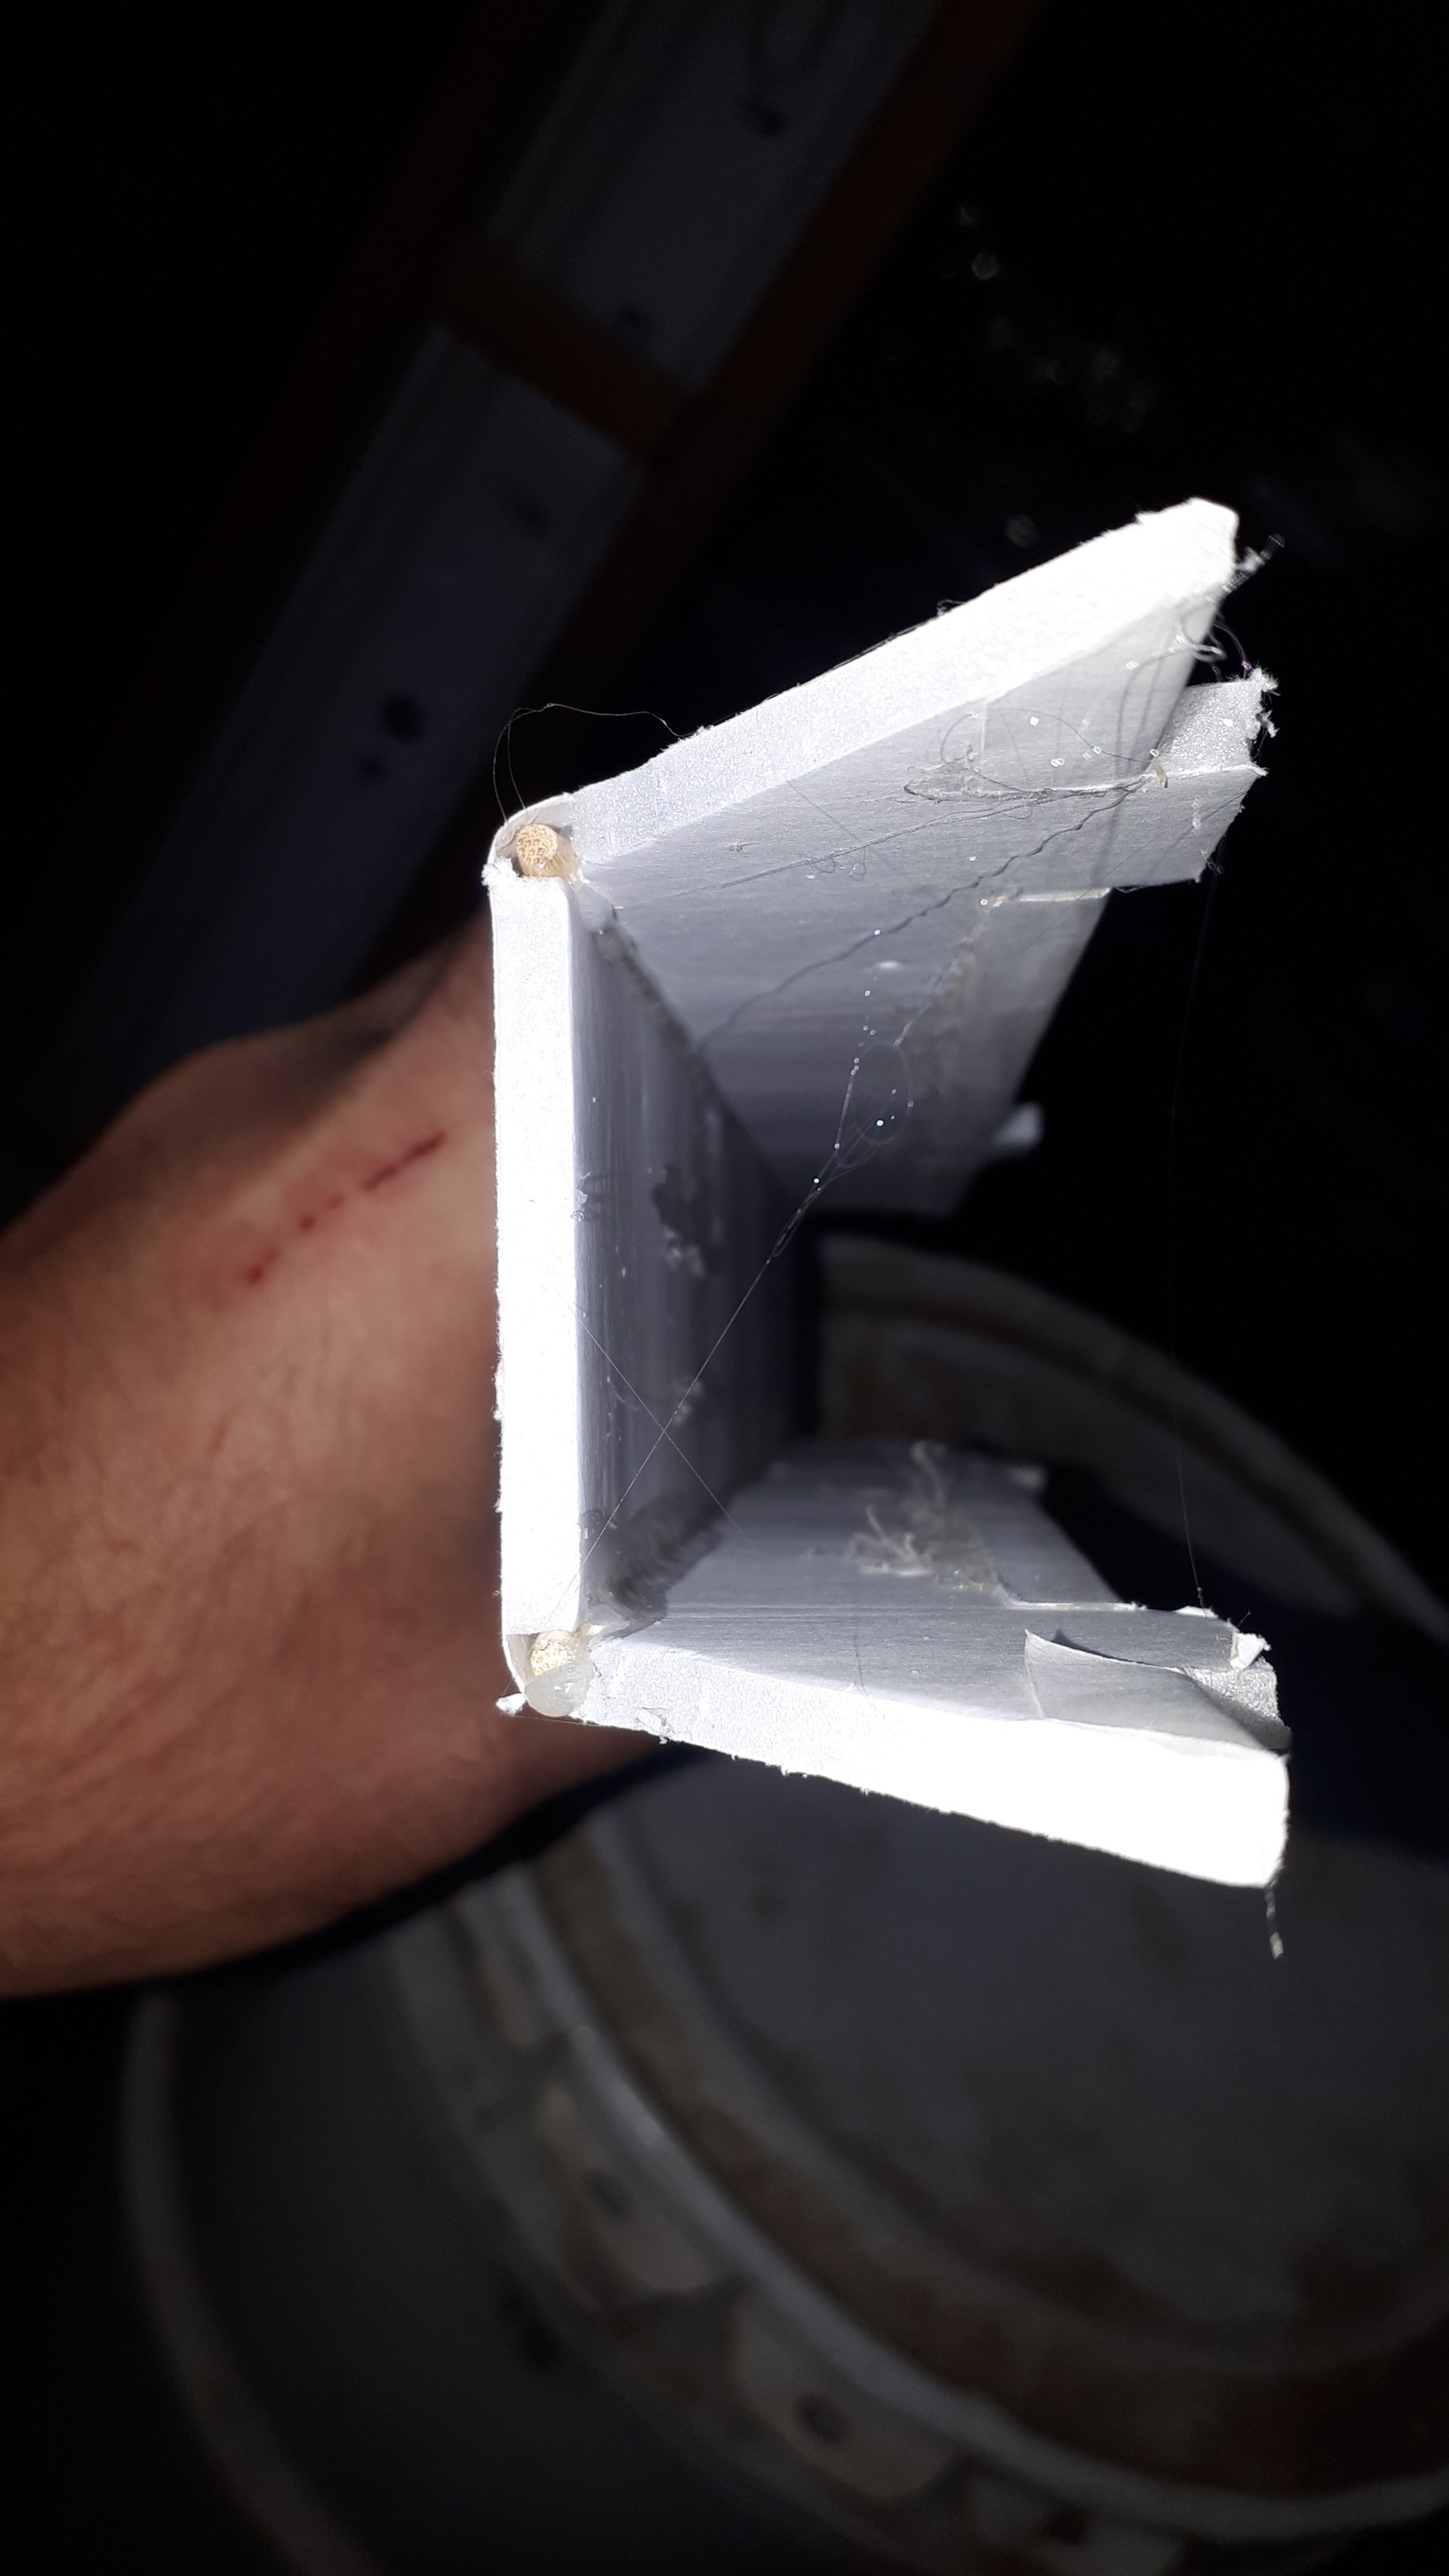
FRONT
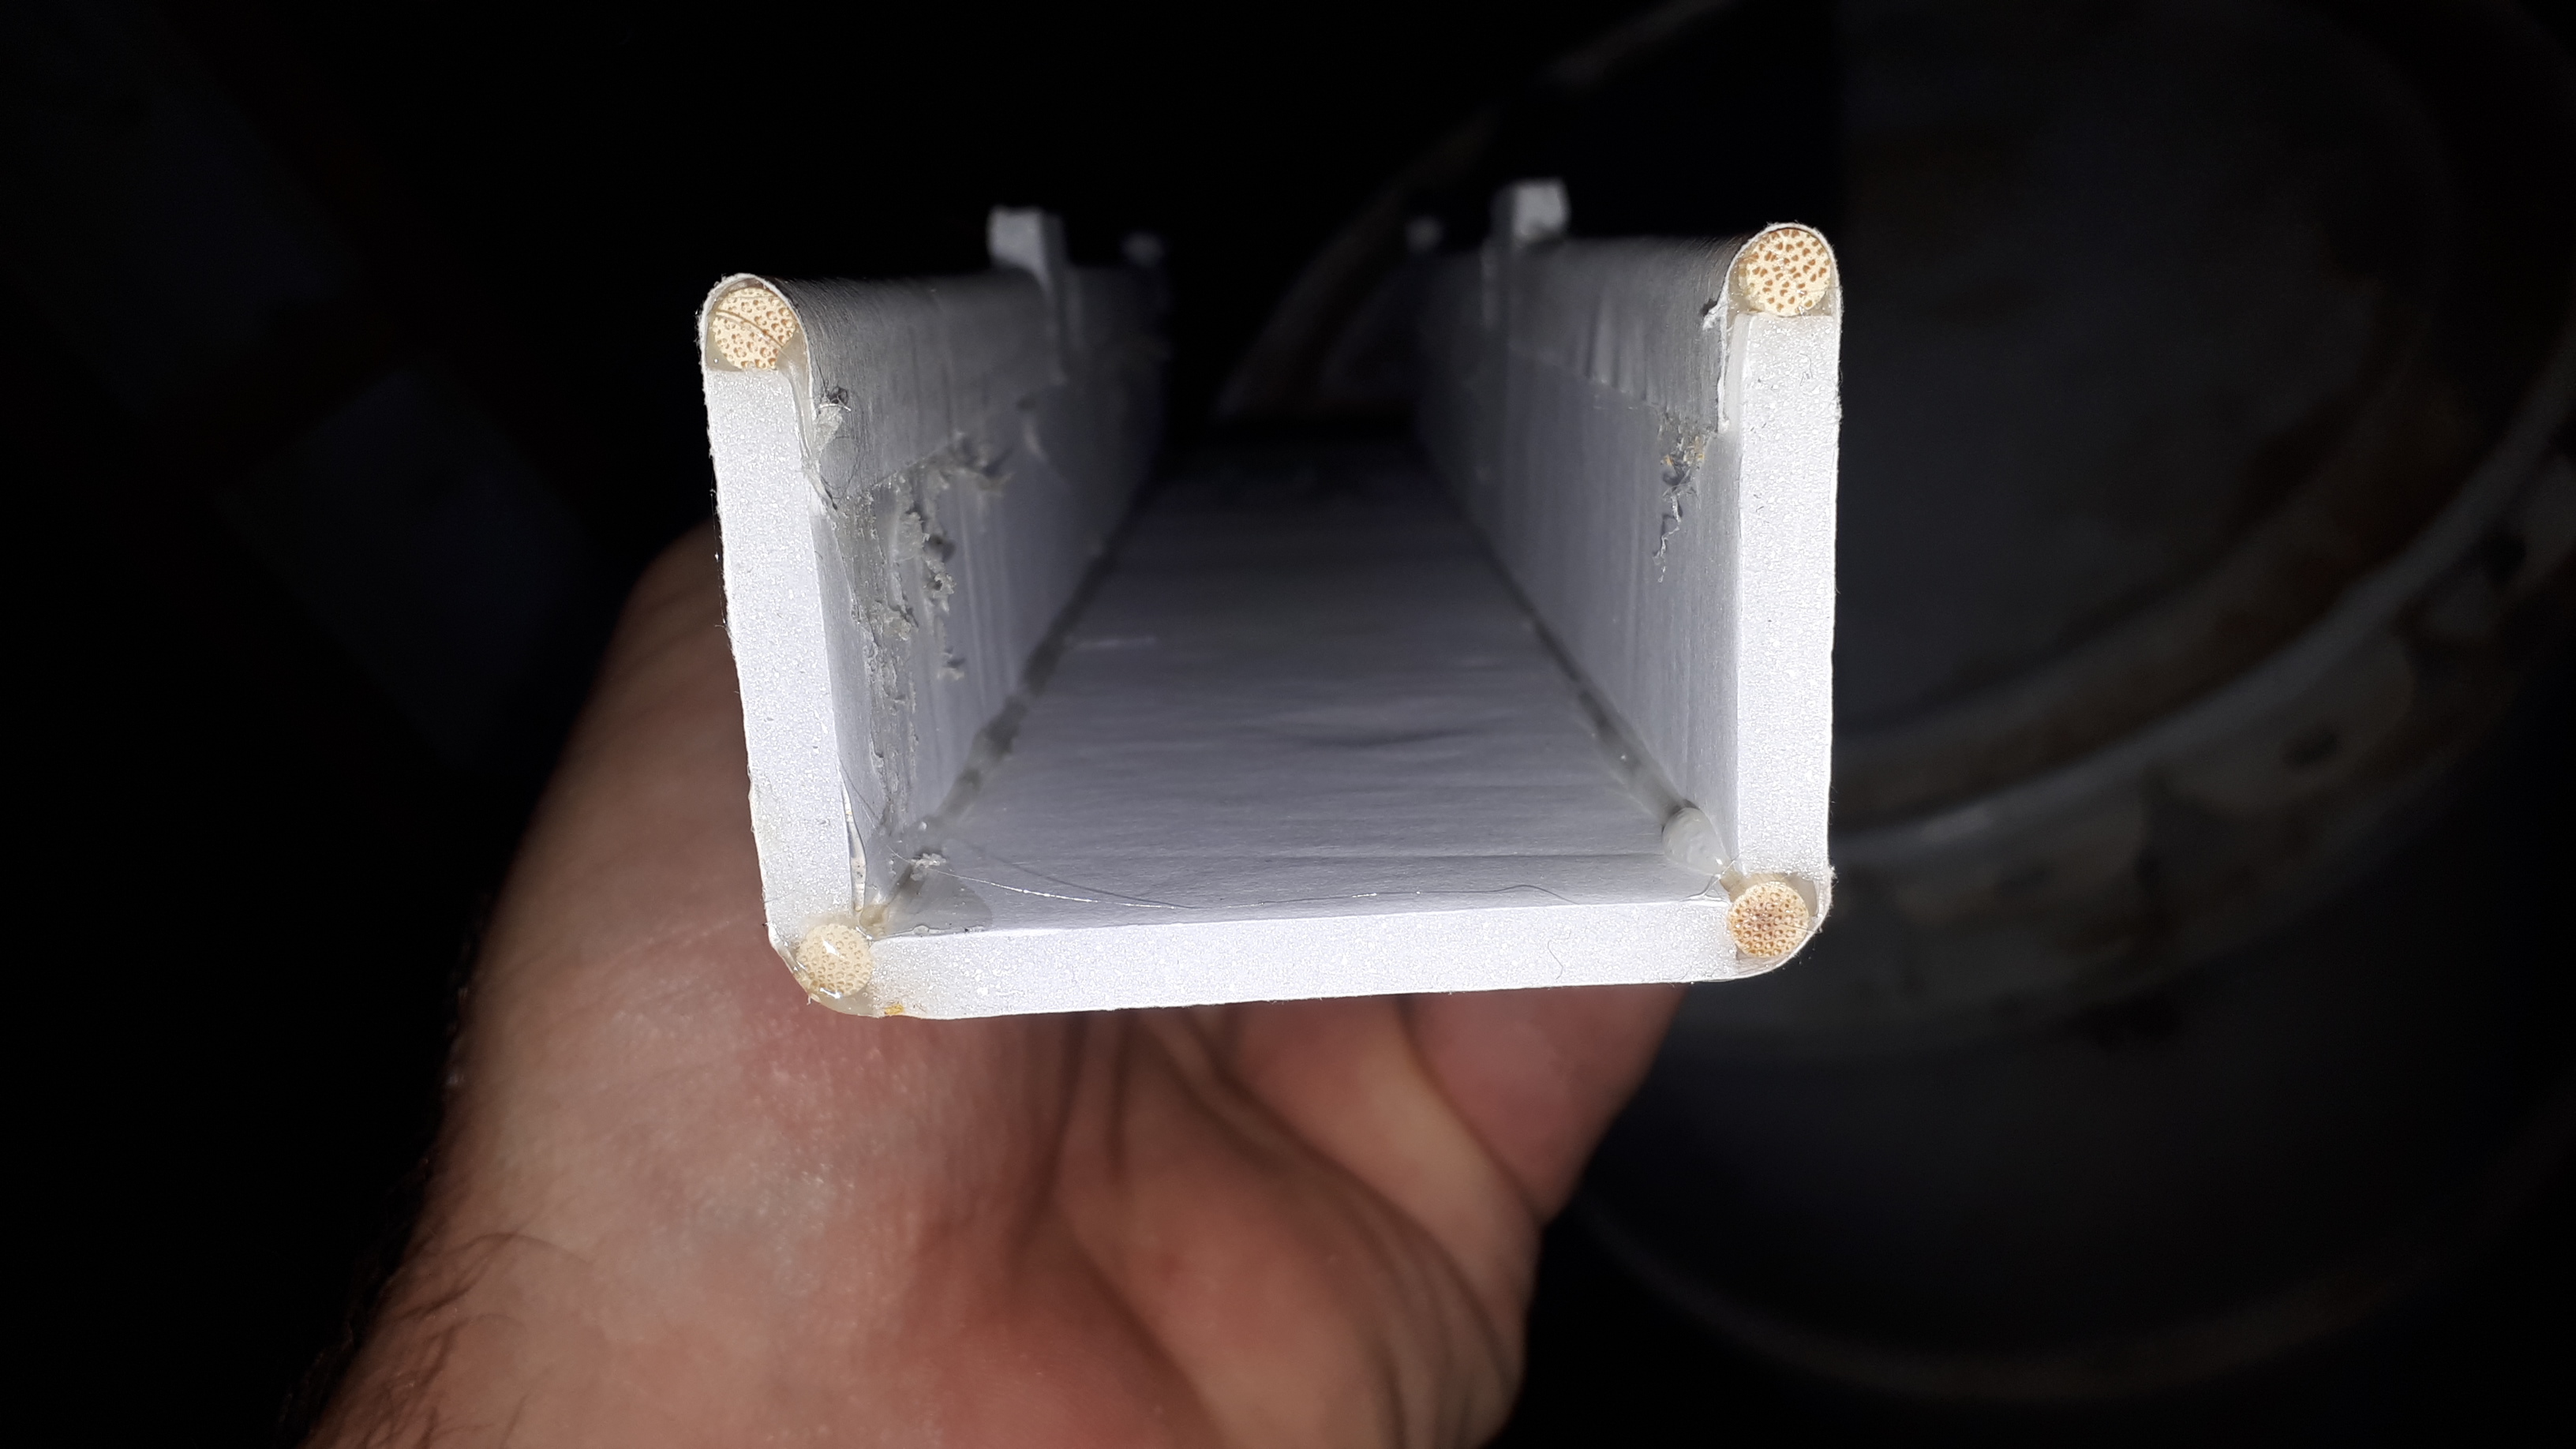
Here it is apparent that the skewers are fully sunk into the corners and surrounded in HG, now remember to dry fit this a few times before the gluing, you may have to work the side cheeks up a few times to get the foam to form into the diameter of the skewers. I had to, there was some tension to get the sides 90 degrees to the bottom plate so there was a little work to do. And on the top rail there are skewers that extend back to just the front of the first tab. For that i cut out an extra 3/16" for the paper to wrap over and down on the inside of the pod and maintain the proper wall height. Advantages... the corners and top edges are more resistant to twisting and bowing from handling, frames in the FB which is laterally weak by design, and most importantly, once the firewall is glued and taped on, any hits it takes from crashes, the energy is now transferred and distributed into the skewers and the whole body of the power pod instead of being localized to just the front inch or two. Disadvantages... adds a little more weight to the pod, how much exactly I am not sure of, around the same weight as just 2.5 BBQ skewers, and the build time is increased somewhat, depending on how many of these you have built before.
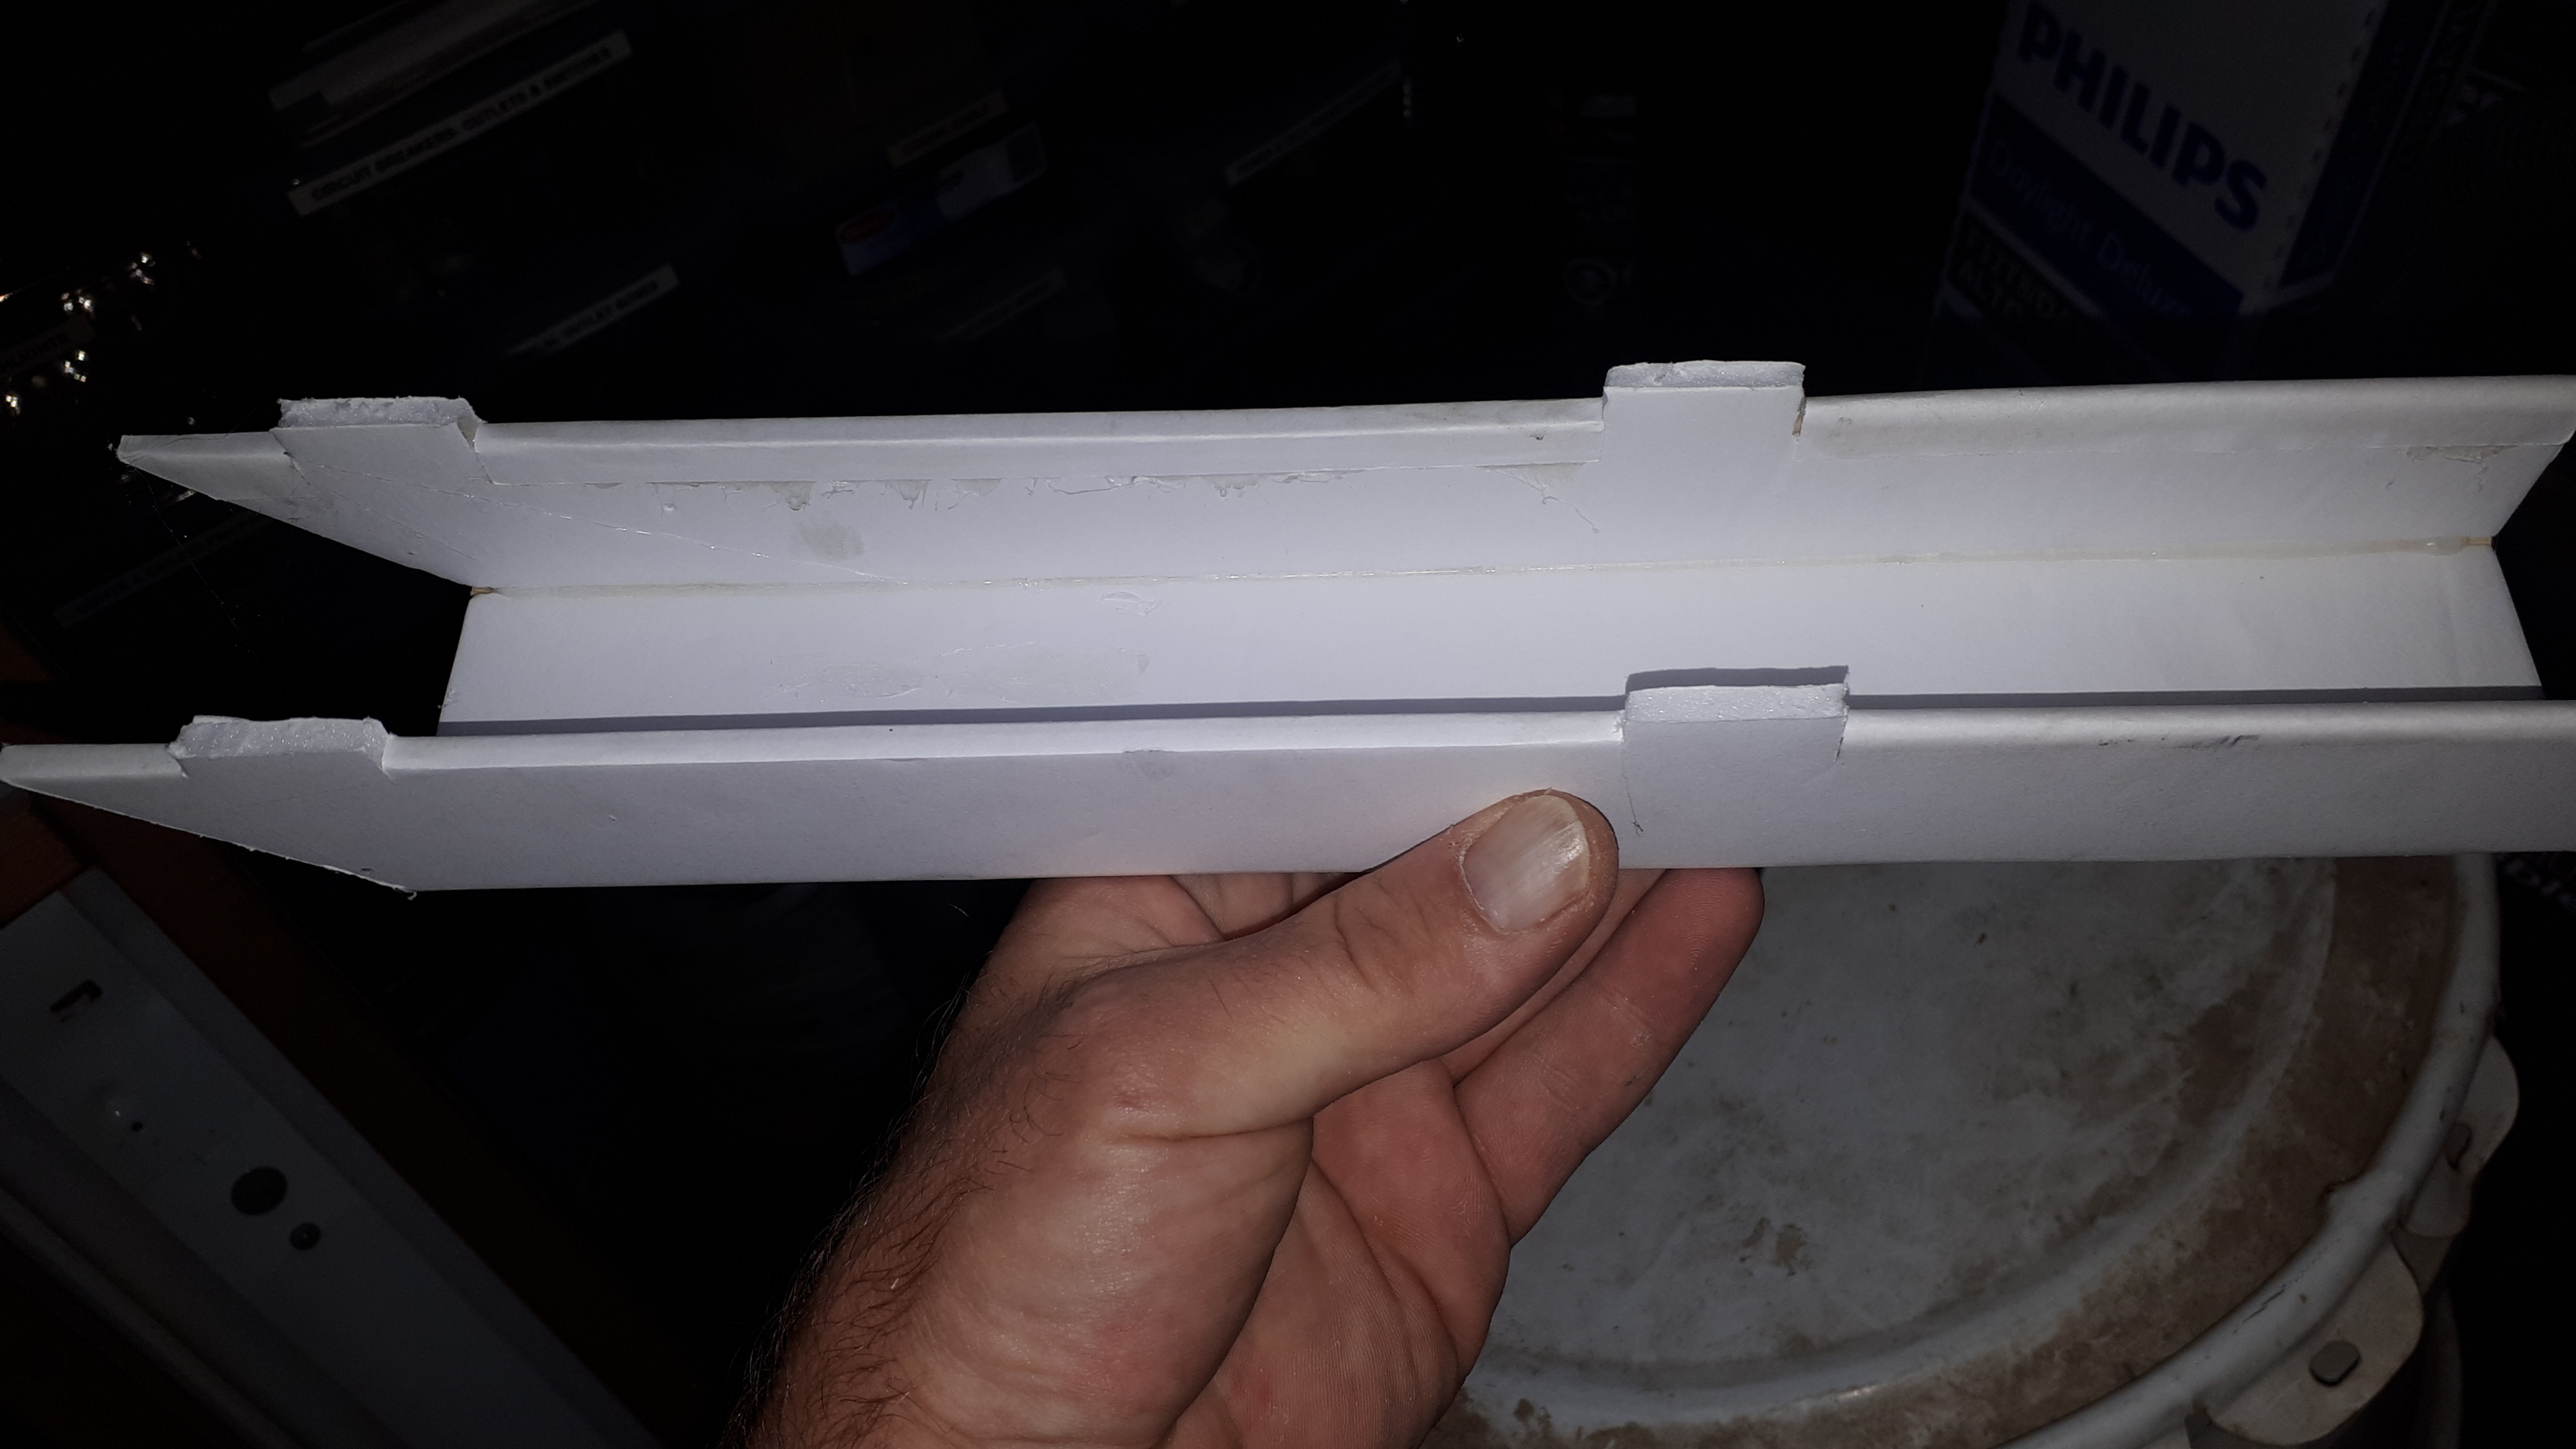
Looks like a power pod
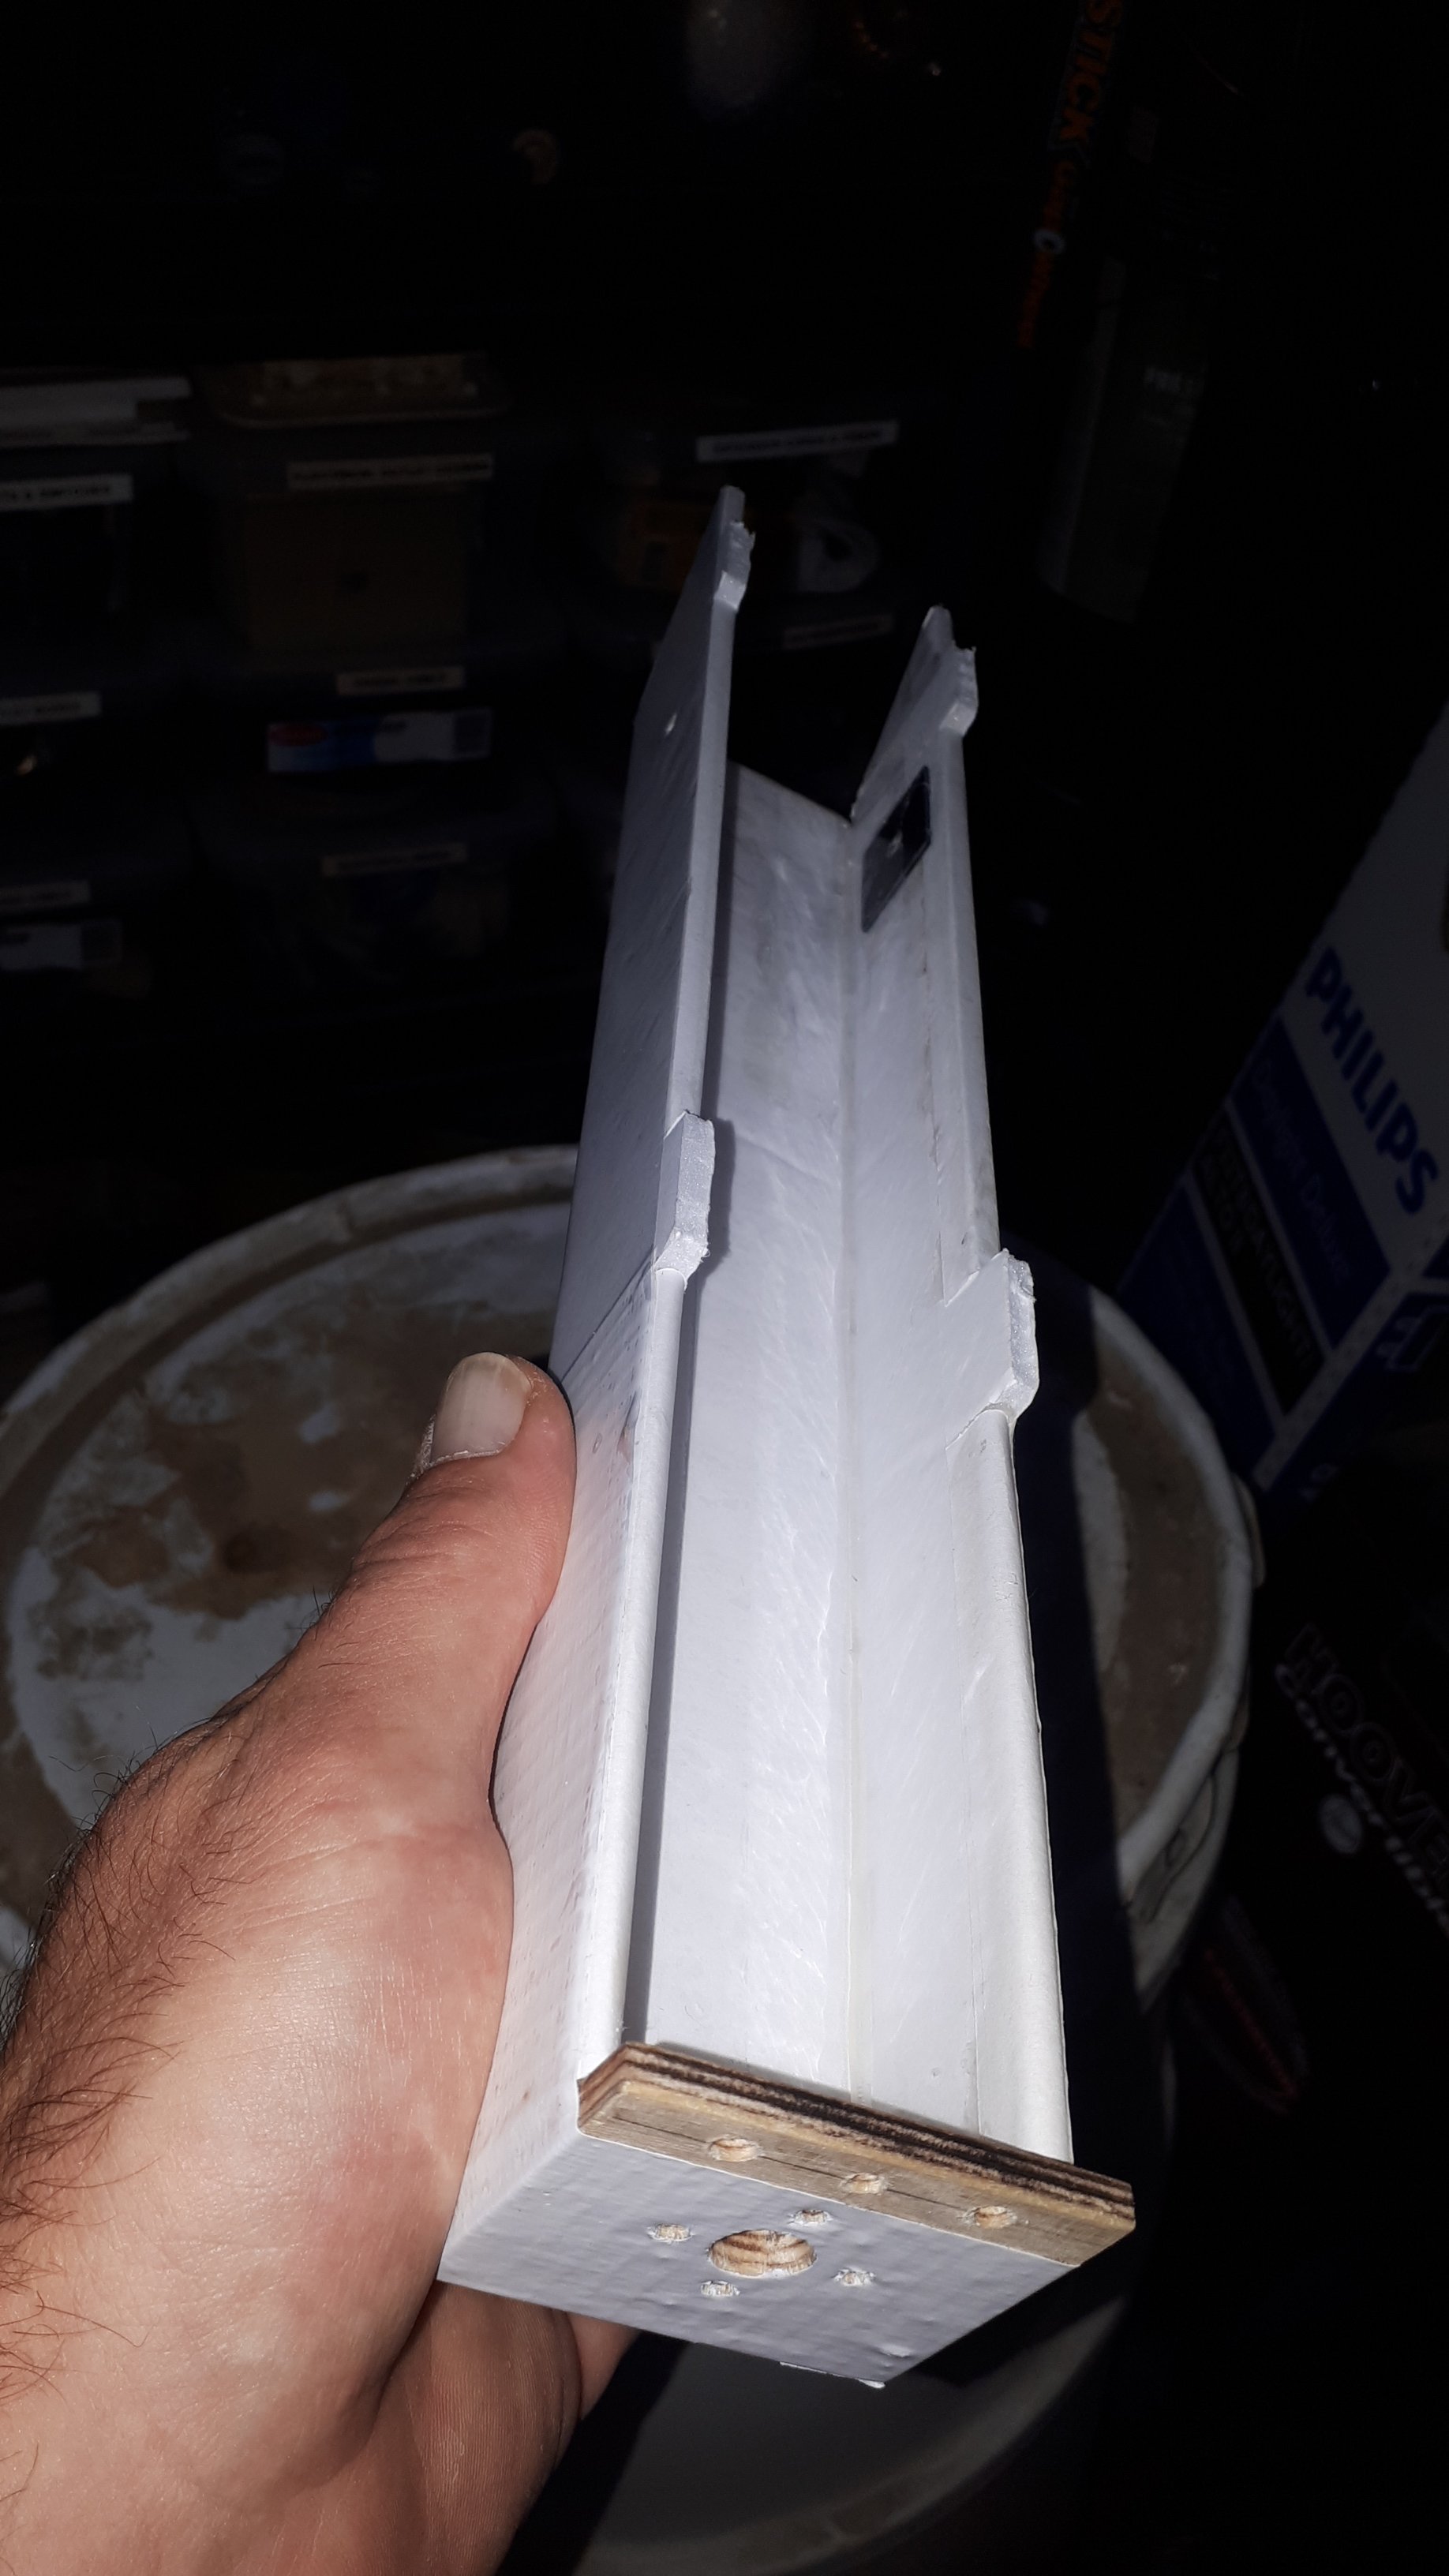
Firewall installed
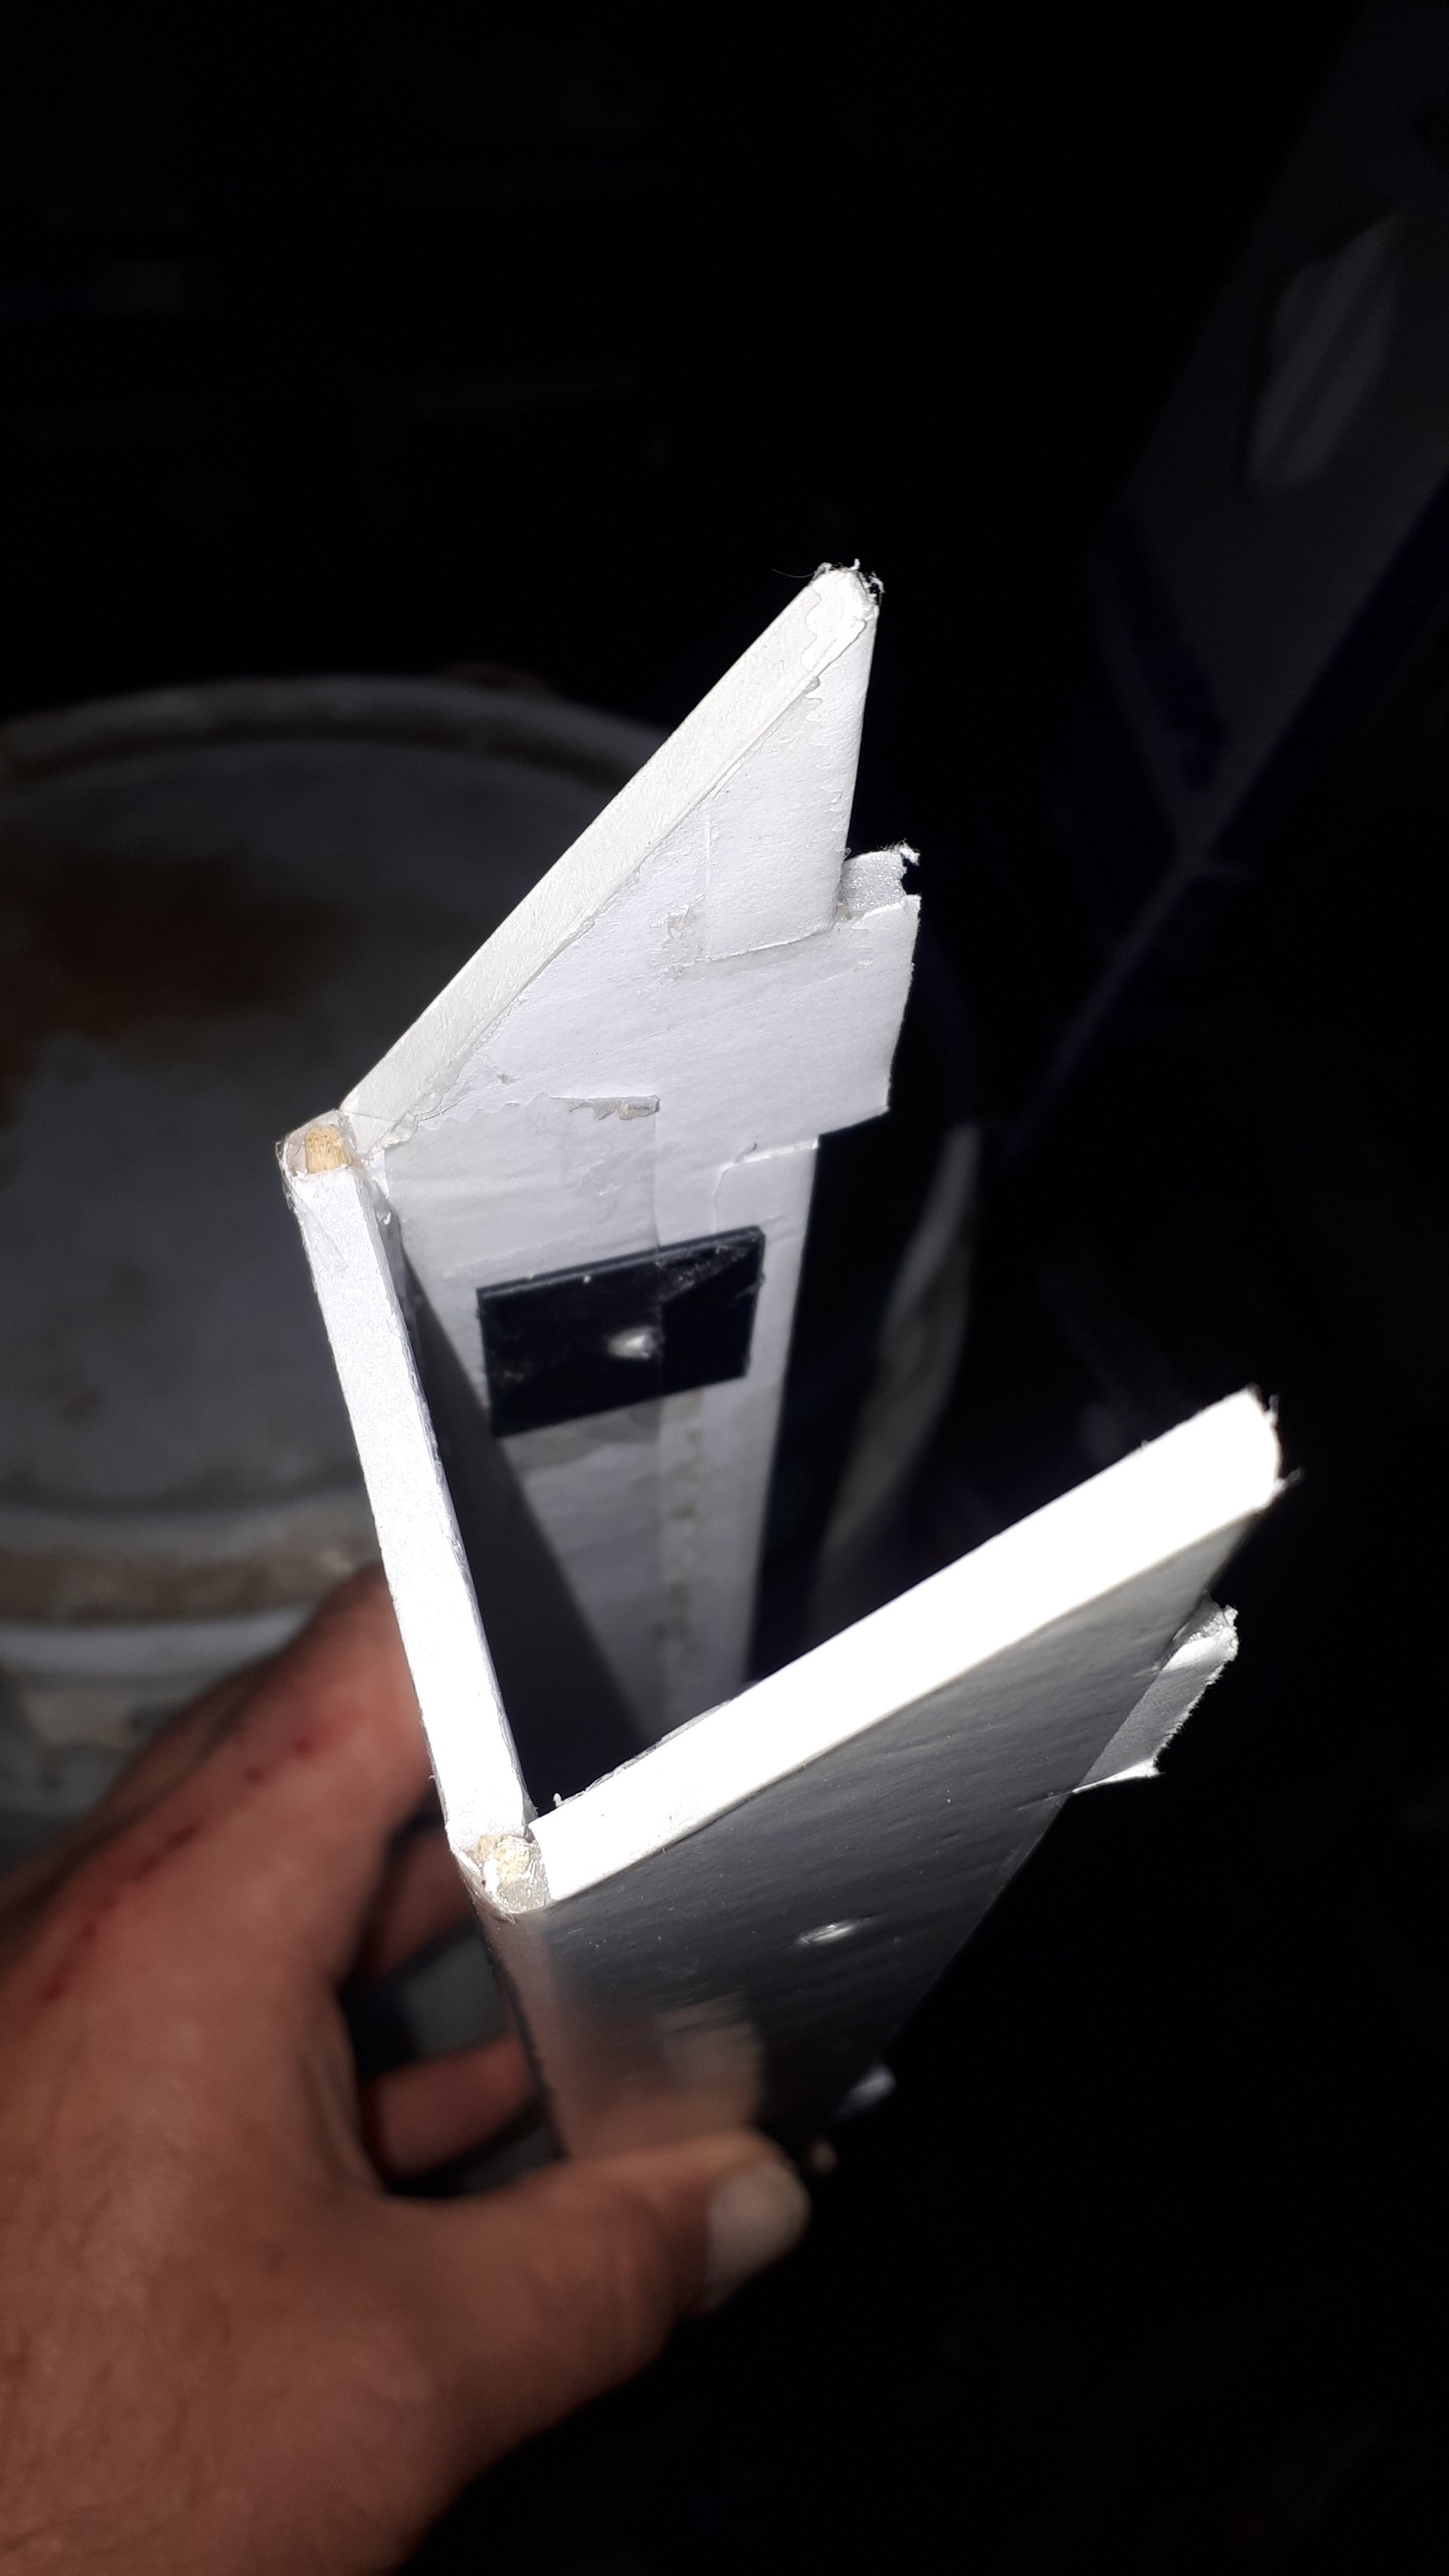
Plastic reinforcements for the skewers glued in and taped over
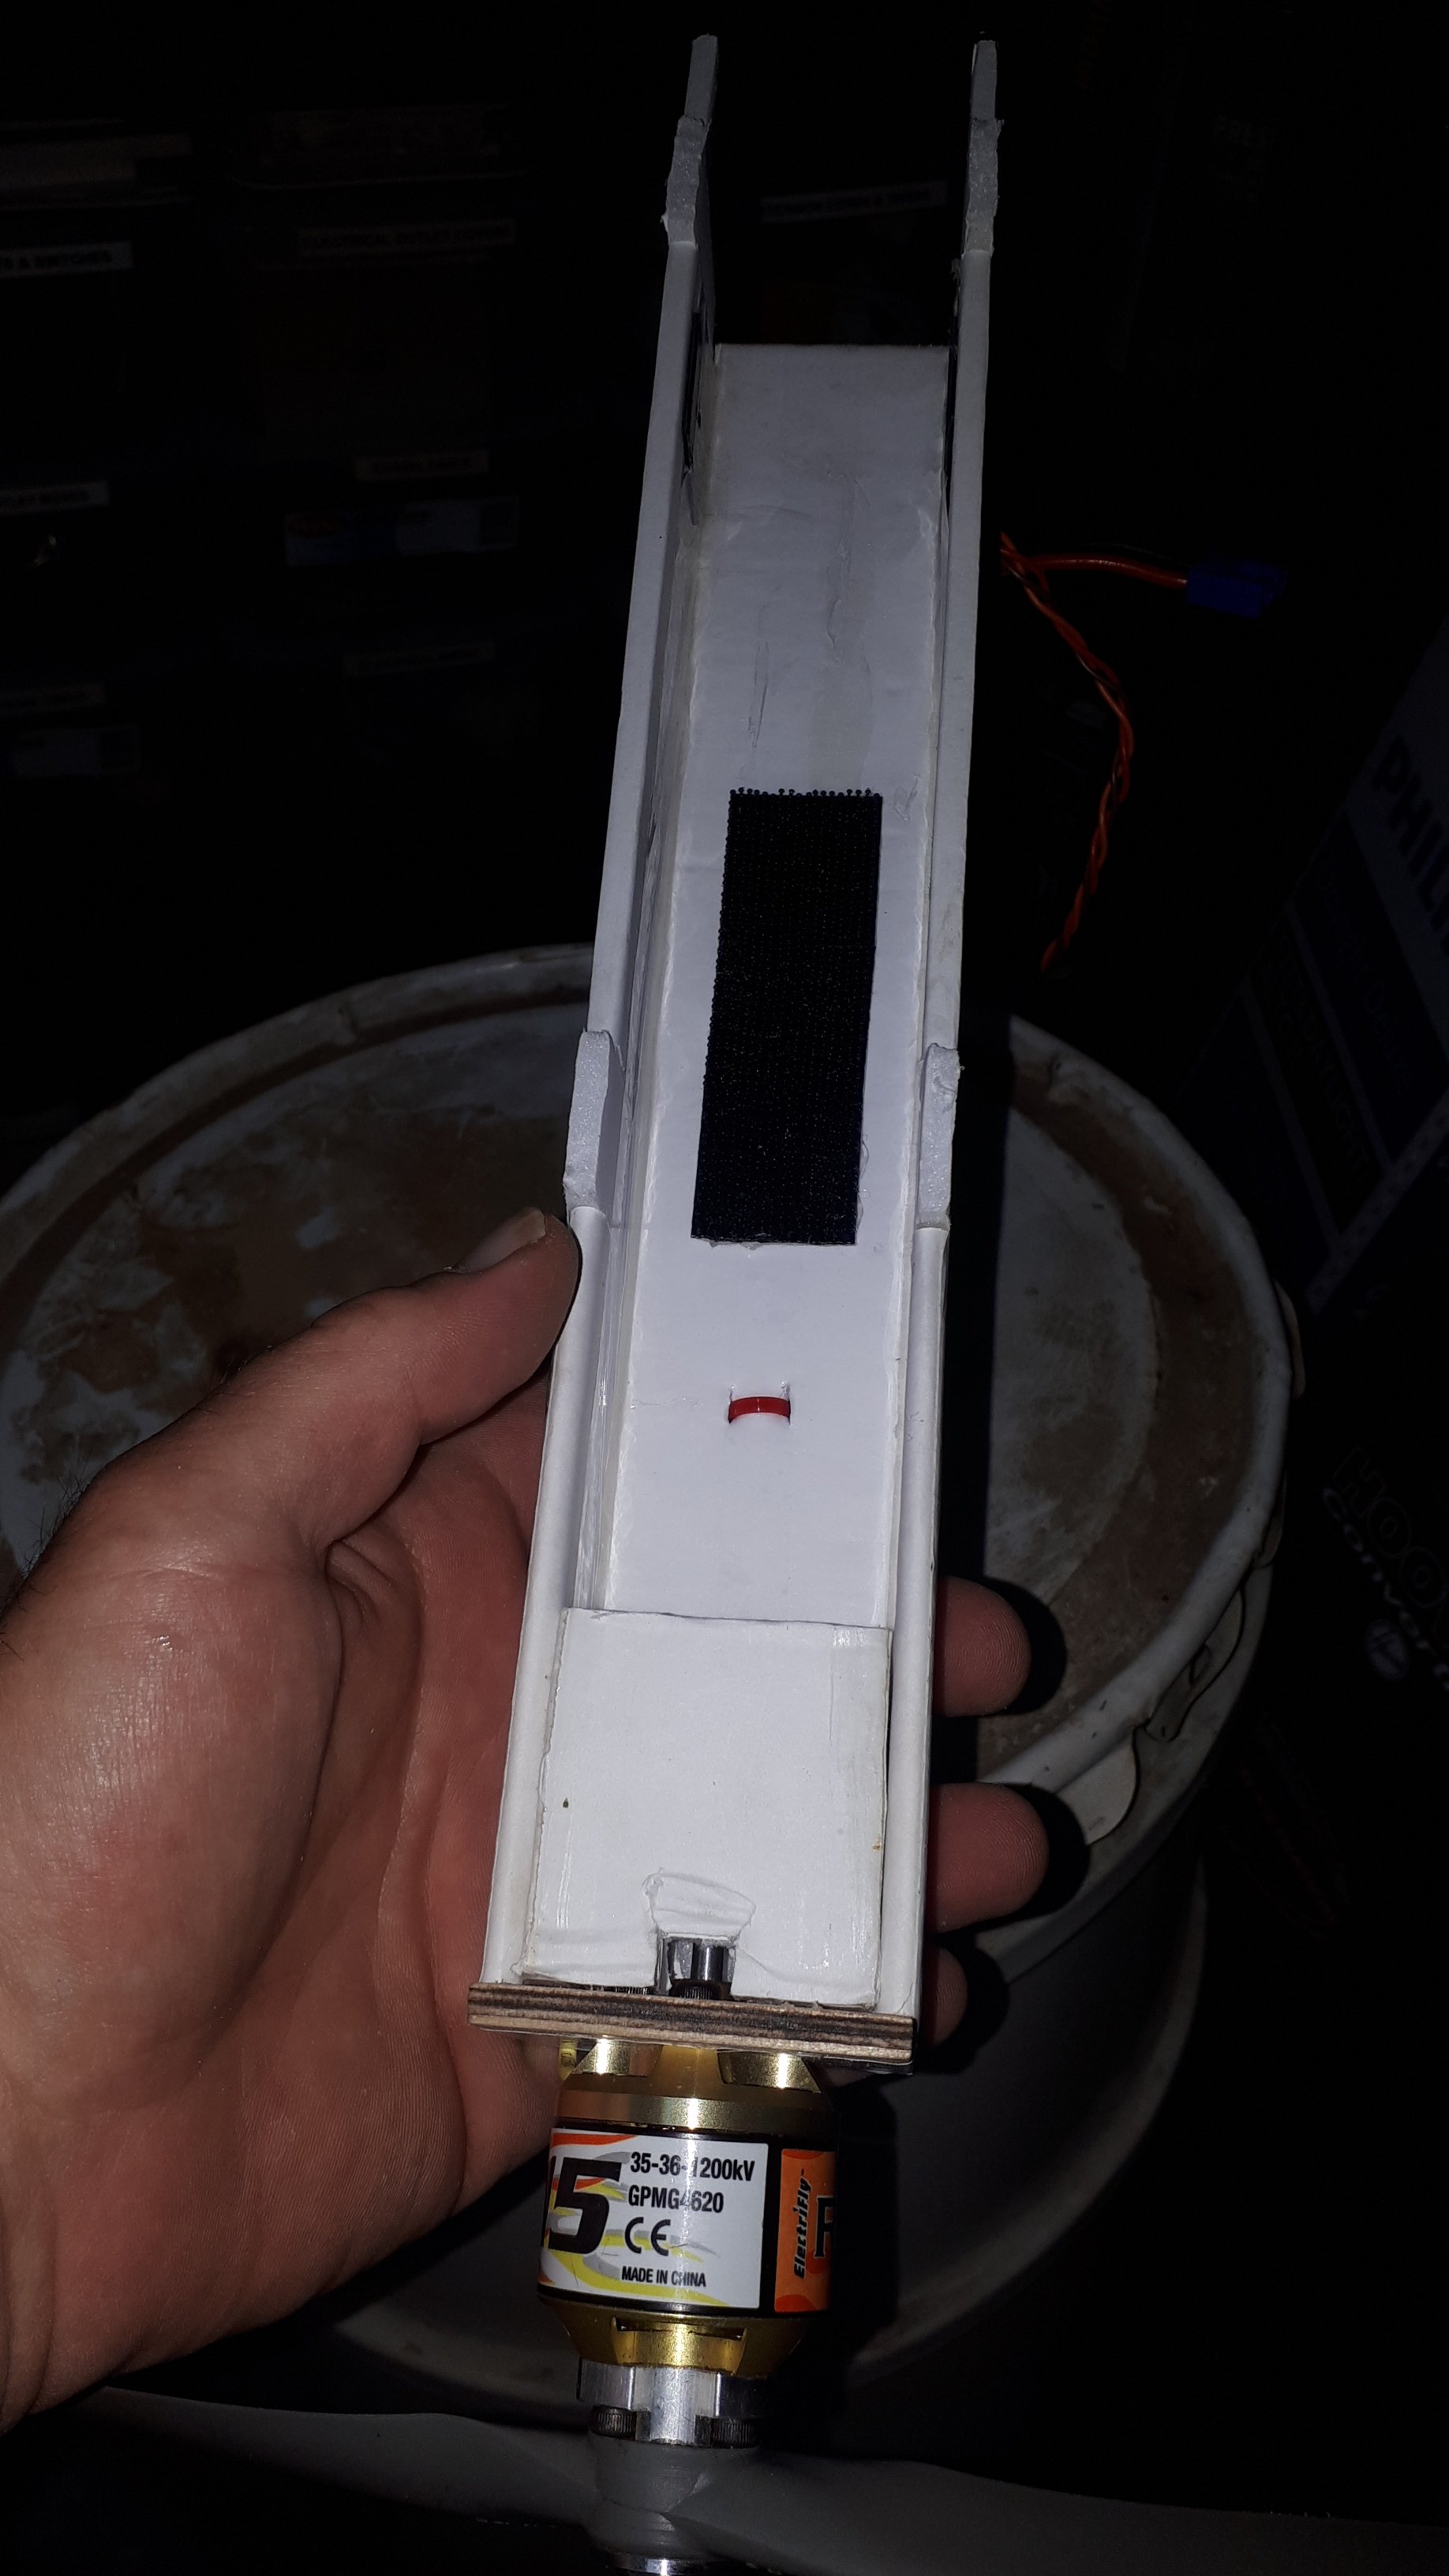
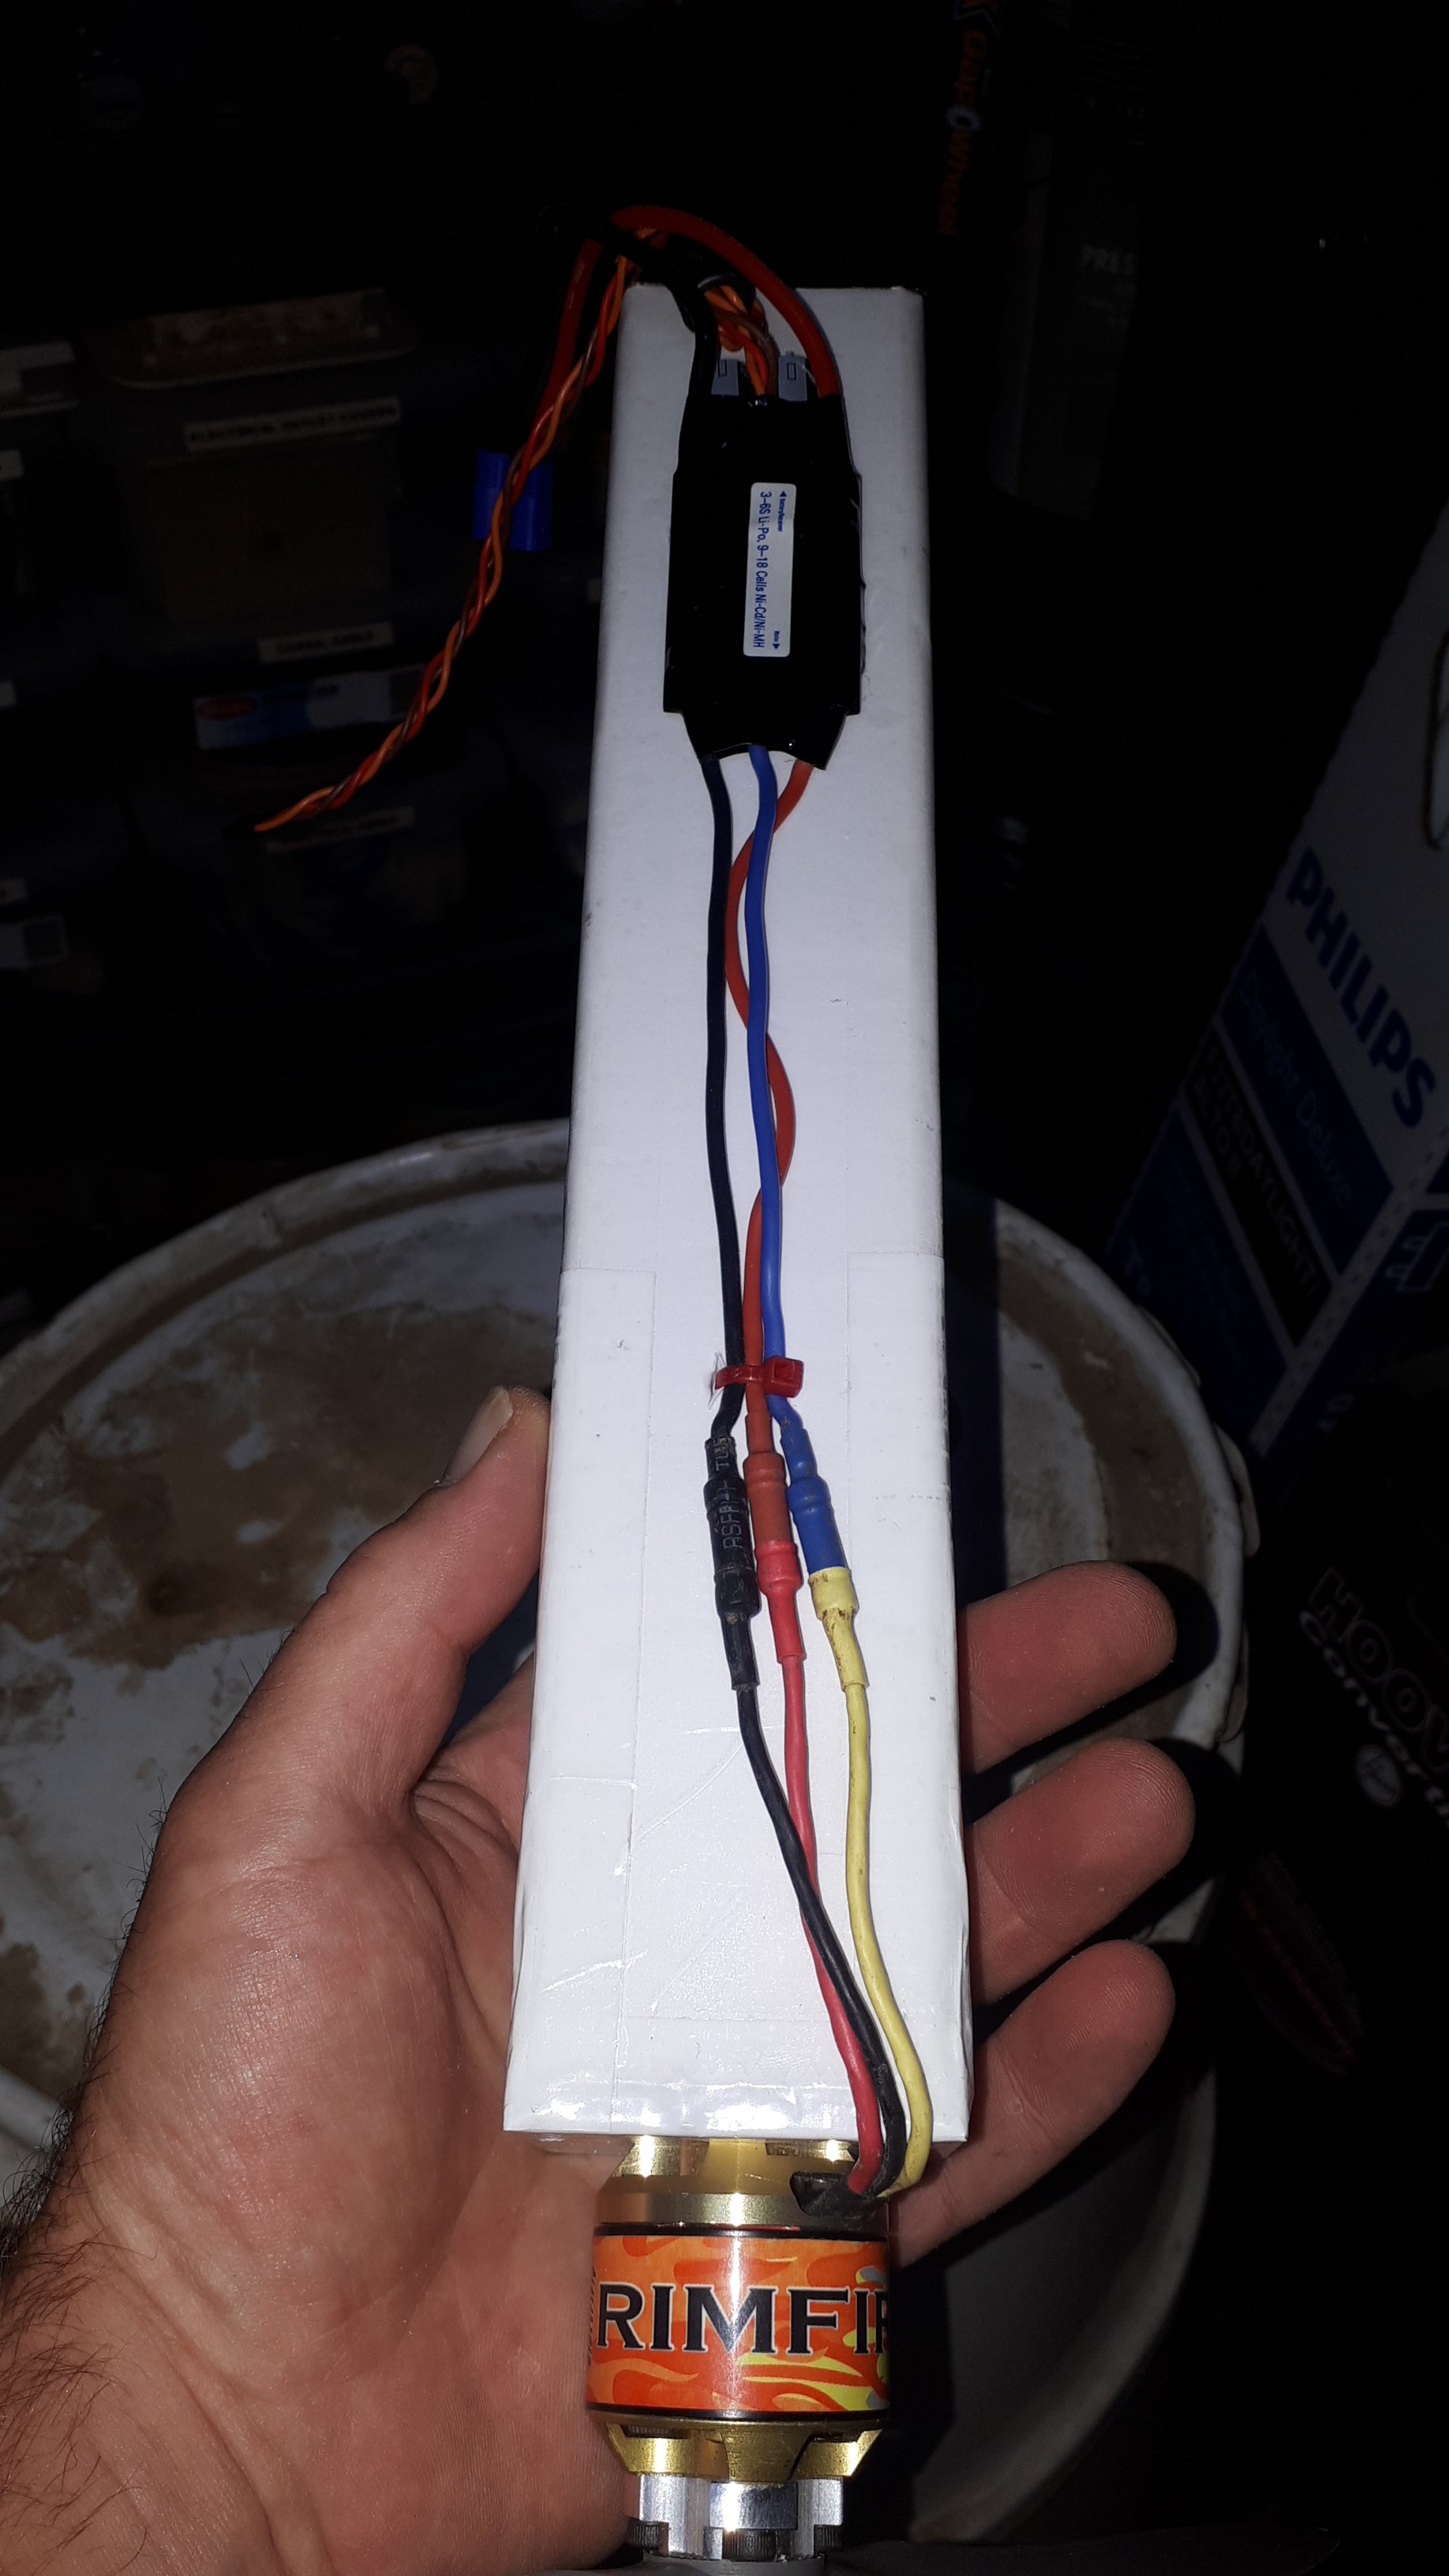
Motor, ESC, and battery Velcro installed
That's the deal ladies and gentlemen. Now if you are on the side of the pod is the sacrificial lamb, I bet there haven't been very many times you have taken a decent hit to the nose and just replaced the pod without repairs to the airframe. I know its only happened to me once or twice, its usually a full surgery, ask my Bloody Wonder, and I felt like I won the lottery. And if you are on the I'm tired of building pods that just wear out from a handful of battery changes side, try this and tell me what you think. That's my 2 cents
Other side of the fence is the good folks who don't like the power pod because in the action of switching it in and out of planes or just to change a battery the power pod wears out, gets weak, wrinkles, deforms, and just becomes less effective each time it is removed or installed. Another good point. Just like in the build vids where The Bix says "build your power pod first" then move on to the airframe, is something I do every time. But in the build process I tend to fit the power pod in a handful of time to check fit, squareness or symmetry, electronics placement, airflow, fitting landing gear, etc... the power pod is so far removed from new by the time it is ready to maiden. It will have been handled so much that it is misshapen, paper is frayed and delaminated on the tabs, skewer holes are worn out and loose, and I know there are other issues many of you have already experienced.
It's not that the power pod is a bad design or even a bad idea, it is the limitations to the medium we are so used to using. No matter how you prep it, cut it, tape it, seal it off, it is inherently weak. No ones fault, it is the material we use because it is easy to build with, and it is CHEAP. Crash, rebuild, repeat. There have been some really creative ways to help solve problems with FB by way of bracing, laminating, taping, types of glues, most of which I would have never thought of if it wasn't for being on this forum, all brilliant as they are we keep hearing the same issues floating to the top.
This thread is to help with our power pod woes to those who wish to try it for our beloved swappable airframes. If it is something you gravitate to because you think its a good idea then try it out and post here to provide feedback to others. If you think it's a bad idea, still try it and post your feedback and opinions here. It's just an idea we all can learn from albeit a positive or a negative to move forward with the idea machine. I watched a build vid from @nerdnic on his P-39 and noticed he used BBQ skewers in a way I hadn't seen before, he frenched in some sections of skewers around his battery hatch for strength and durability, knowing people are going to be handling this area a lot. So i played around with BBQ skewers in creative ways on my builds to see where it could go, my Baby Blender and Speedster Biplane both use skewers for wing struts and cabanes, and recently as control rods. Now i have integrated them into the power pod and I am super impressed. Check it out:


We all know what this is, comes with every standard size planes set of plans or SBK. And if you look closely you can probably guess where I am going with this. To help alleviate the delaminating paper issue i am extending the sides up a half inch to peel the foam from the paper, glue and wrap it over the edges to the inside of the pod, excluding the tabs, (mostly because I haven't got that one quite worked out yet), simple so far. The plan also says to do an A fold to form up the sides, which is what we are doing dimensionally but there is a twist, the cavities cut for the A fold are moved in toward the center of the bottom plate an 1/8" and fully cut out to a 1/4" in width, 1/8" on the bottom plate and 1/8" on the side cheek side, split half and half. This new channel now will house a BBQ skewer running the full length of the pod front to back once folded 90 degrees. Now you will want to dry fit this a few time on a scrap piece of FB to adjust for the diameter of the skewers you are using, I have bought skewers of different sizes so double check what you have on hand and how it fits, and if not, adjust the width of the channel you cut and remove. A full 1/4" worked for what I had. They should fit in as so:
BACK

FRONT

Here it is apparent that the skewers are fully sunk into the corners and surrounded in HG, now remember to dry fit this a few times before the gluing, you may have to work the side cheeks up a few times to get the foam to form into the diameter of the skewers. I had to, there was some tension to get the sides 90 degrees to the bottom plate so there was a little work to do. And on the top rail there are skewers that extend back to just the front of the first tab. For that i cut out an extra 3/16" for the paper to wrap over and down on the inside of the pod and maintain the proper wall height. Advantages... the corners and top edges are more resistant to twisting and bowing from handling, frames in the FB which is laterally weak by design, and most importantly, once the firewall is glued and taped on, any hits it takes from crashes, the energy is now transferred and distributed into the skewers and the whole body of the power pod instead of being localized to just the front inch or two. Disadvantages... adds a little more weight to the pod, how much exactly I am not sure of, around the same weight as just 2.5 BBQ skewers, and the build time is increased somewhat, depending on how many of these you have built before.

Looks like a power pod

Firewall installed

Plastic reinforcements for the skewers glued in and taped over


Motor, ESC, and battery Velcro installed
That's the deal ladies and gentlemen. Now if you are on the side of the pod is the sacrificial lamb, I bet there haven't been very many times you have taken a decent hit to the nose and just replaced the pod without repairs to the airframe. I know its only happened to me once or twice, its usually a full surgery, ask my Bloody Wonder, and I felt like I won the lottery. And if you are on the I'm tired of building pods that just wear out from a handful of battery changes side, try this and tell me what you think. That's my 2 cents
Last edited:

