1938 "Twin Cyclone" Free Flight to RC conversion

TooJung2Die

Master member
Twin Cyclone

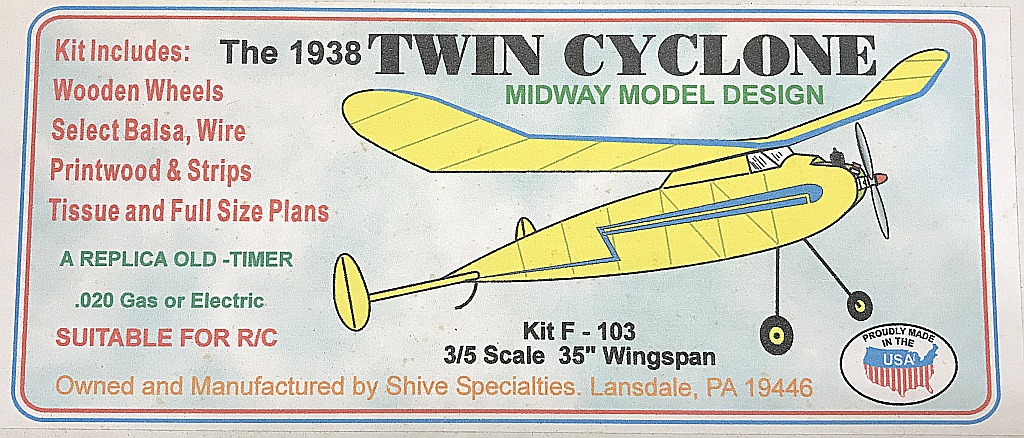
I recently finished a Willy Nillies Eaglet 250. Willy Nillies kits are so easy the next balsa build on the workbench needs to be more challenging. I bought this "Twin Cyclone" kit from Penn Valley Hobby when they went out of business two years ago. The 3/5 scale plans and the contents of this kit indicate it is from the 1970's.
IMG_0935.JPG


The 3/5 scale "Twin Cyclone" was kitted by several kit manufacturers. This is the best photo of a completed kit I can find so far.

Micro Mod F103 TwCyl.JPG


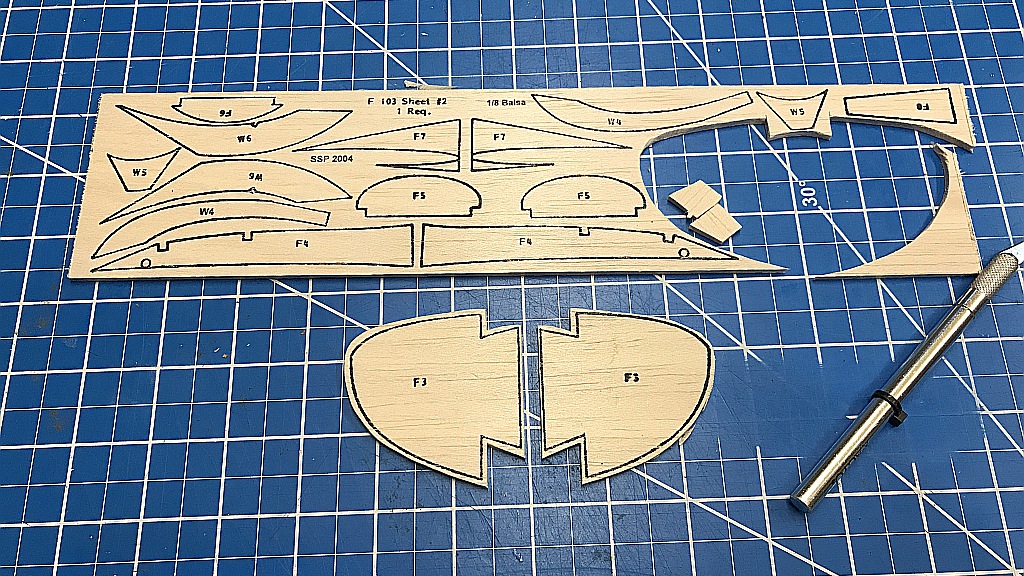
Kit contents. There are no instructions, just the drawing. No die-cut or laser cut parts, the only nod to convenience is some parts are printed on balsa sheet.

IMG_1909crop.jpg


Cutting out the sides to the nose cowl. I learned on past kits to cut outside the lines and sand the parts to the finished shape.
IMG_1910crop.jpg


The plans are covered with wax paper. The longerons were soaked in water for a couple of hours before bending them to shape.

IMG_1911crop.jpg


Left and right fuselage sides.

IMG_1913crop.jpg


The nose shape and sheeting is not clearly drawn so I'll be winging it on my own, along with hatches and such to access the RC electronics. Let the fun begin!

Jon
 
Last edited:

Tench745

Master member
There are a lot of old kits like this that look so good. I'm finding myself drawn to the Robinhood for (another) future project.
This seemed like a good place to put a plug in a local guy who just started an online store selling old balsa kits https://www.flyboyzblog.com/store/ In case anyone else wants to join in the printwood balsa fun. If you feel it's out of place, I can remove it.
 

TooJung2Die

Master member
This seemed like a good place to put a plug in a local guy who just started an online store selling old balsa kits https://www.flyboyzblog.com/store/ In case anyone else wants to join in the printwood balsa fun. If you feel it's out of place, I can remove it.
Thank you for the link. Not out of place at all! I'm going to bookmark that for future purchases. I'm intrigued by the funky designs of some of the very old model airplanes.

It's not a balsa kit manufacturer site but I think it deserves a mention in this forum's balsa kit sticky!

I'm finding myself drawn to the Robinhood for (another) future project.
That's a nice vintage design. I like the look of the bigger Robinhood 80 just because it has a motor cowl.

Jon
 
Last edited:

speedbirdted

Legendary member
I love vintage designs. Looking forward to seeing this done! What will you be doing for covering? I've personally wanted to do something like this with the ultimate old school tissue paper covering but that's a whole new skillset to learn. Knowing you, I'm going to guess Doculam...
 

TooJung2Die

Master member
What will you be doing for covering?
I haven't decided yet. It came with two colors of tissue. I really enjoy applying tissue and you can't top it for looks. On the other hand document laminating film is perfect for this type of airplane. I could do tissue over doculam too. I have weeks to think about it. :)
 

TooJung2Die

Master member
It doesn't look like I got a whole lot done yesterday because most of my time was spent puzzling over how to build the nose. The landing gear wire is lashed to plywood with dental floss and glued. The fuselage came out pretty straight.

IMG_1924crop.jpg


The firewall and front bulkhead in the drawing are not going to work. The drawing shows a Cox Tee Dee .020 engine but the firewall in the kit is too narrow to mount a Cox .020. I tried it with the Willy Nillies .020 motor mount. You know there is going be some re-engineering before starting a project like this. I'll be designing a new firewall.

Jon
 
Last edited:

TooJung2Die

Master member
I'm still working on it now and then. No hurry. I had to think about the nose section. I can ponder something simple like that for days. :unsure:

New firewall. I could've moved it forward. 1/4" standoffs were added so the Willy Nillies .020 motor mount fills the space without shortening the nose. I didn't realize the Tee Dee motor in the drawing is that much longer than the Pee Wee motor mount.

IMG_1937crop.jpg


Top front sheeting and motor mount. These Willy Nillies motor mounts look awesome for old timer glow engine to electric conversions.

IMG_1945crop.jpg


4.3 gram rudder and elevator servos. The rudder is controlled by a carbon fiber torsion rod. The elevator control is conventional push rod, .025" wire in a guide tube.

IMG_1942crop.jpg


A 500mAh 3s or 800mAh 2S just fit in the battery bay.

IMG_1939crop.jpg


After I get the ESC hooked up I can finish sheeting and shaping the nose section.

Jon
 
Last edited:

TooJung2Die

Master member
Plenty of room for the 3 channel FlySky receiver on the servo tray.

IMG_1946crop.jpg


The 12A ESC goes behind the firewall. The battery bay is the next opening towards the rear.

IMG_1947crop.jpg


Sheeting is glued to sides of the nose.

IMG_1949crop.jpg


After the glue dries the nose is getting rough sanded to shape.

IMG_1950crop.jpg


Carving the battery hatch out of a chunk of balsa was easier than making a sheeted cover.

IMG_1952crop.jpg


A little more sanding and I'll be glad that's done. I think I'll make the tail feathers next. The twin rudders will be interesting ...

Jon
 
Last edited:

TooJung2Die

Master member
No pre-cut ribs in this kit. No cut out anything. :) The horizontal stabilizer is built from various size sticks and sanded to a symmetrical airfoil shape. Sand carefully and don't break anything!

IMG_1955crop.jpg


Ribs and leading edge roughed out to a basic airfoil shape.

IMG_1957crop.jpg


Built a hinge line and added the elevator.

IMG_1958crop.jpg


When I measured the drawing the right side of the horizontal stab was 1/8" longer than the left. :confused: I built to match the left.

Jon
 
Last edited:

TooJung2Die

Master member
This is the tail end of the fuselage after joining the two sides and installing the servo rods.

IMG_1943crop.jpg


After some cutting and lots of very careful sanding the slot for the horizontal stab will match the shape of the airfoil. Here's the slot rough cut prior to sanding.

IMG_1960crop.jpg


Sanded slot for a nice snug fit. Added gussets to the end ribs. That's where the rudders attach.

IMG_1961crop.jpg


Jon
 
Last edited:

TooJung2Die

Master member
Weekend update. The wing is taking some time while I figure out how to build it. The bottom is undercamber, the leading edge is elevated and the trailing edge droops. First step is cutting out the ribs, then sanding and slotting them.

IMG_1962crop.jpg


Here's a side view of one of the main sections.

IMG_1967crop.jpg


There was a lot of sanding and shimming to get those wingtip parts to all fit together.

IMG_1965crop.jpg


The center section is pinned down. A plywood brace is glued and clamped to reinforce the center joint.

IMG_1970crop.jpg


Four days later the wing is framed. The wingtip dihedral is a bit radical but it looks cool and old timey. The leading edge and center will get sheeting.

IMG_1972crop.jpg


Jon
 
Last edited:

TooJung2Die

Master member
The sheeting is finished on the leading edge and center section of the wing. This is going to be a pretty wing. The edges need to be sanded to shape prior to covering.

IMG_1976crop2.jpg


Taking advantage of the extra wood around the print wood to enlarge the rudders. I find that free flight airplanes need larger tail feathers when you add control surfaces for RC.

IMG_1977crop.jpg


Those dotted lines represent a trim tab to be used on the left side rudder for free flight.
Jon
 
Last edited:

speedbirdted

Legendary member
How will you do the twin rudders? My approach would be to set up a bellcrank, then attach to that a separate pushrod that runs between the two rudders. But in this case that might be too much tail weight.
 

rockyboy

Skill Collector
Mentor
I know it might seem crazy, but if you make one rudder big enough you don't need two and the extra weight of the mechanical connection. But that really messes with my symmetry OCD. o_O
 

TooJung2Die

Master member
How will you do the twin rudders? My approach would be to set up a bellcrank, then attach to that a separate pushrod that runs between the two rudders. But in this case that might be too much tail weight.
Do you remember the days of single channel escapement? In post #11 I showed the rudder servo attached to a torsion rod. There will be a link connecting the two rudders. The torsion rod will connect to the middle of the link like this escapement connects to one rudder.

Escapement.jpg


The vertical rod at the tail will move the link controlling both rudders instead of just one. It is very simple using fewer moving parts than having a bellcrank at the tail.

I know it might seem crazy, but if you make one rudder big enough you don't need two and the extra weight of the mechanical connection.
That's not crazy at all. That is exactly what I was going to do at first! I've used single-side elevators and if you're not intending to perform aerobatics it works beautifully. One rudder would be enough but I think the torsion rod idea is so simple it changed my mind.

Jon
 
Last edited: