3D Printing fails

jhitesma

Some guy in the desert
Mentor
I haven't had any good failures in quite awhile. My printer is pretty dialed in and so is my workflow. But...every now and then something can still go wrong.

This weekend I decided to print an egg-bot clone I've wanted one for a long time but could never justify the price they charge for them. There are a bunch of designs on Thingiverse including a few that use a fully printed frame which looked nice to me.

This one caught my eye http://www.thingiverse.com/thing:1683764 But it's mostly a derivative work that doesn't really add much other than trying to sell their own hardware kit. It's mostly based off this one: http://www.thingiverse.com/thing:299483 so I figured I'd give that one a go.

Fired up the new prusa edition of slic3r since it's been working well for me, loaded the resulting gcode into repetier-server and it looked like a nice 5 hour print. Cool, let's do it!

Started out fine so I let it run...an hour or two later I checked on it and...um....

20170311_174357.jpg

Well, that's not right!

Before printing it I had played with settings a few times and most of the resulting gcode was looking like 15 hours to print...even when I used fewer perimeters and less infill. So I had a feeling something was wrong with my gcode...but it looked good in slic3r's preview.

My usual workflow on PC is to use repetier-host to prepare my build plate and control slic3r then send the gcode to repetier-server. But I've been working from a mac lately and the mac version of repetier-host is way behind the PC version so I've just been using slic3r directly and manually uploading gcode to rep-server. I'm on the free version of rep-server though so I no longer have 3d previews on there and decided to fire up rep-host to view the gcode....

Screen Shot 2017-03-11 at 6.07.26 PM.png

Well, that explains it!

Not sure why slic3r's preview looked normal....but this is a beta release of the prusa edition slic3r I'm running so not surprised some issues can come up!

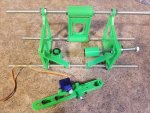
So it looks like that base IS a 15 hour print...and not very adjustable...so I wound up going with this design instead: http://www.thingiverse.com/thing:844167 and had it all printed in well under 15 hours:
20170312_180137.jpg

But...I only have one spare stepper on hand. So going to be a few days until I get some more steppers and can finish it.

$16 in hardware from Homedepot, $18 for two steppers from steppersonline on ebay, and some electronics I have on hand...lot easier to justify that cost to the wife than $200 for the official kit!

(Still haven't decided what I'm going to do for the electronics....may just use an arduino nano and some spare stepper drivers on perfboard...but I also have a spare RAMPS/Arduino Mega just laying around which would be quicker and easier...but seems really wasteful!)

So...let's see some more print failures. You don't even have to include non-failure followups like I did - I just want to see those piles of spaghetti :D
 

LitterBug

Techno Nut
Moderator
I had a few last week before realizing that my old glue on the print bed needed to be removed and relaid. Will have to post those up when I get home. For now, here's some crap XYZ filament that would not print no matter what I did. It always ended up plugging the hotend. XYZ has the temp locked based on their proprietary cartridges and I have not set my printer free with Repetier yet. Been going around and around with XYZ support trying to get either an identical working replacement, or a natural cartridge. I have a problem calling this "clear red" too. More like translucent pink.

BadRedCartridge.jpg

Cheers!
LitterBug
 

LitterBug

Techno Nut
Moderator
Sometimes it's better to print 1 up. Tried several times to print these worm gears with other parts and they kept failing at about the same height. They would get knocked over when the extruder would jump back and forth between them after reaching a certain height. (need another fan to help with printing these types of parts too) In this case, the one next to it fell over, but the other stayed up. Looked like a hairy Lion (unfortunately hair has already been removed) until it got too heavy to stand up any more and got fused to the extruder for the remainder of the printing. Looks more like a melted crayon now.

DOH.jpg

Cheers!
LitterBug
 

jhitesma

Some guy in the desert
Mentor
Sometimes it's better to print 1 up.

Yep. The chances of failure go up fast when you start to put multiple items on the bed since one failing for some reason can lead to others failing.

Like these linklings:


Went great until right at the end...then one came unstuck...and then the filament meant for it got in the way and caused another to fail...then....yeah. That was when I first got my printer and one of my first times with ABS, small models with little bed surface were not a great choice to try with ABS at that point.

I still tend to print things one item at a time. I've done big prints with lots of things on the plate at once...but it just makes the chances of failure so much higher I'd rather take my time and print things one at a time usually. Like when I did my MPCNC....I could have done all four corner blocks at once and saved about 4 hours. But the parts were like 6 hours each already...I didn't really want to leave it running for 20 some hours by itself, and if one had failed and taken them all out I'd have wasted a lot more than 4 hours!

Pronterface will let you stop trying to print one object if it fails partway through...but that requires printing while tethered and the computer near my printer isn't reliable enough for that. I'd have more failures from the computer crashing during a print than anything else :D

I like my semi-tethered setup. I run repetier-server on a $9 C.H.I.P connected to the printer. I also have a SSH tunnel between the CHIP and one of my servers so I can access it from anywhere. I can fire up rep-host and it works just like being tethered - but the CHIP is far less likely to crash than my desktops! I tried octoprint but wasn't very impressed by it for a number of reasons. I just wish the mac version of rep-host would catch up to the PC version, it doesn't support connecting to rep-server right now which is the big feature I liked the most. I guess repetiers plans are to improve server to where it can do everything host can do and you can just run it all in a browser - kind of like astroprint. Will be interesting to see how they do with that.
 

LitterBug

Techno Nut
Moderator
This is one of my more spaghetti-ish fails caused by lack of adhesion. Once one part started moving......

GotSpag.jpg
 

jhitesma

Some guy in the desert
Mentor
Come on guys, don't be ashamed...I know more of you out there have some fails to share :)

I got a few more this weekend. I was working on getting Taulman Alloy 910 nylon printing on my machine...long story I'll share it it's own post...but it resulted in a number of pretty spectacular failures:

20170430_103528.jpg 20170430_204606.jpg 20170430_204620.jpg 20170430_204640.jpg 20170430_213450.jpg

The second photo is just poor bridging - the design of the part really needed supports but I wanted to see how it would do without.

Most of the rest were caused by extreme underextrusion caused by the high temp of Nylon exposing a weakness in my extruder. But a few were also caused by poor adhesion when I was doing a bunch of rapid tests and didn't want to bother properly preparing my print bed in between.
 

PsyBorg

Wake up! Time to fly!
The all white ones look like Styrofoam gone awry. That or you tried printing with a cotton candy machine by accident. I do like that one two tone frame there. That would be awesome if you could do that reliably for LOS flying or for a learner working on orientation or nose in flight.
 

LitterBug

Techno Nut
Moderator
The all white ones look like Styrofoam gone awry. That or you tried printing with a cotton candy machine by accident. I do like that one two tone frame there. That would be awesome if you could do that reliably for LOS flying or for a learner working on orientation or nose in flight.

MMMmmmm.... Printing with sugar! Need me some sweet filament.... Sure to make lots of mistakes if you have to eat all of em.... I think you are on to something PsyBorg!
 

jhitesma

Some guy in the desert
Mentor
The all white ones look like Styrofoam gone awry. That or you tried printing with a cotton candy machine by accident. I do like that one two tone frame there. That would be awesome if you could do that reliably for LOS flying or for a learner working on orientation or nose in flight.

Yeah, it's got the strength of styrofoam or cotton candy too :D

The two tone is very repeatable. That's one of the nice things about Nylon, it can be dyed with acid based dyes like I use for my pysanky easter eggs. So I've got 16 colors mixed up and ready to go. What I didn't anticipate was that the dye would also wick up through the nylon. I only had the very bottom of that frame in the dye - just up to the bottom of the crossbars the motors mount on. The rest of that was from the dye wicking up through the nylon.

Got plans for some tye dye frames now ;)
 

jhitesma

Some guy in the desert
Mentor
Somebody needs to integrate injet with 3D print.... Just sayin'

LitterBug

Well...if you have some white or clear filament and some colored sharpies:
http://www.thingiverse.com/thing:77424


I tried it by hand...but you really need to color the whole filament to get it to work well. Just holding the sharpie against it as it feeds doesn't make a big difference. And I don't have 4 pens of the same color (well, other than black) to try...but...still nice way to add some color changes on a single extruder printer.
 

localfiend

I like 3D printers...
Mentor
Somebody needs to integrate injet with 3D print.... Just sayin'

LitterBug

My Prusa I3 will hopefully be able to do this soon:

kolaz.jpg

Not quite the same as injecting ink at the nozzle though, that could do some cool things if it wouldn't hurt layer adhesion.
 

PsyBorg

Wake up! Time to fly!
Spongy material soaked with dyes that the media passes thru before extruding wouldn't work? Like that dense grey shipping foam maybe?
You could even get fancy and have solenoids pinching two pieces together at various points in the feeds with multiple colors all computer controlled for timing.
 

localfiend

I like 3D printers...
Mentor
Spongy material soaked with dyes that the media passes thru before extruding wouldn't work? Like that dense grey shipping foam maybe?
You could even get fancy and have solenoids pinching two pieces together at various points in the feeds with multiple colors all computer controlled for timing.

That could possibly work. Though things might get muddy with more than 1 color. Also, there is quite a bit of distance between the top of the extruder and the nozzle tip on most printers. Wouldn't be super accurate.
 

dkj4linux

Elite member
On a quest...

Looking for a ArduinoMega/RAMPS enclosure that I like (I need a half-dozen or so for all my "unfinished" machines), I tried one last evening... left it printing at 34% and looking good... woke up to this...

20170507_064423.jpg

20170507_064441.jpg

20170507_064520.jpg

20170507_064801.jpg

20170507_064821.jpg

20170507_070241.jpg

This was with my "stock" FT2020 I3 and it didn't occur to me that I don't have enough Z-axis to do a 171mm tall object... I actually have less than 140mm or so of Z travel. What printed looks pretty good (it could still be made functional) but I'm still not satisfied that this is what I want as my "standard" enclosure. I've looked at a couple of others but still not excited...

20170503_143533.jpg

20170506_110500.jpg

I'm currently looking at (and printing) one of these... it looks more like what I'd be happy with:D

http://www.thingiverse.com/thing:567088

I know my new Prusa I3 Mk2 has sufficient build volume to handle anything I need but I'm still playing with it...

20170502_144310.jpg

and don't want to tie it up with such "mundane" objects... at least not until the "new" wears off ;)

-- David
 

jhitesma

Some guy in the desert
Mentor
Yeah, I've yet to enclose any of my RAMPS because none of the cases I've seen impress me. Started designing my own...but got distracted by other projects pretty quickly.

My fail for the weekend is I decided to try the new 1.1.0 release of Marlin.

I've complained before that the Marlin team doesn't seem to understand the meaning of RC - "Release Candidate" and that it means you should have a feature freeze and just focus on fixing bugs in the current code. Instead they keep adding features and making major changes between RC's which pretty much defeats the point of an RC release. Well...their 1.1.0 release isn't impressing me much yet...the docs don't seem to be updated for it. One of the big new features I've been looking forward to is the new UBL - Unified Bed Leveling system...which uses a mesh leveling setup with a lot of features for fine tuning the mesh. Except the docs for it on the site for the 1.1.0 release don't seem to work with the 1.1.0 release. And just a day later they already have fixes for it pushed to a 1.1.x bugfix branch. And the comments in the code make it sound quite different from what the docs say...and the comments even contradict themselves (they talk about it being designed to benefit deltas...but it's disabled for deltas and not suggested for them yet.)

Ugh...I did finally read enough PR's to figure out the basics and get it to do an initial mesh...and I've got it to do a three point autolevel based on the mesh...but can't get the G26 test print command to work to tell how good my mesh is...

So I haven't even been able to get a print failure in almost two days thanks to messing with this :(
 

dkj4linux

Elite member
FolgerTech 2020 adventures!

Having fun with new Prusa I3 Mk2 and customized Slic3r, I've learned that ignorance is indeed bliss.

20170511_163007.jpg

After printing many parts with my FolgerTech 2020 I3 and building several machines... I never once questioned why, or even noticed, that it didn't have a print cooling fan installed. Apparently it didn't come standard in the kit and all my parts were bulky/blocky enough and properly sized without it, so they were good enough for my need. But now, playing with my new printer, I've done far more "experimentation" with slic3r settings, watched numerous videos (I especially like Tom Sanladerer's...), and done more demanding prints; i.e. "3Dbenchy" has become my friend. I printed the treefrog at 0.5mm, and three 3dbenchy's... at 2.0mm, 1.5mm and 1.0mm. And they are easily the nicest looking prints I've ever done

So, curious, I decided to see how my FolgerTech could do. Not so good!

20170509_123653.jpg

20170511_163128.jpg

It was looking pretty nasty on the lower hull and I then recalled a tip TomS had given in one of his videos... direct a small external fan across the part. I set it up -- midprint -- and, sure enough... it immediately improved the print quality and from there on up it looks quite good.

20170509_123628.jpg

So, I looked out on Thingiverse and found the perfect fan...

http://www.thingiverse.com/thing:1161013

I printed it, found a small 40mm fan (on an old motherboard), and installed it on my FolgerTech... it fit perfectly.

20170510_063815.jpg

20170510_170732.jpg

20170510_170744.jpg

Getting quite excited about the dramatic improvement in print quality and finding the perfect "thing" solution, "disaster" then struck... midprint, and with no warning, the power shut down and the RAMPS board power connector melted!

20170511_090734.jpg

20170511_090726.jpg

20170511_123511.jpg

Googling, it's apparently a common problem with RAMPS. The screw terminal connectors are marginally rated for the current required by the heat bed and extruder... and if a connection loosens for any reason, melt-down is the result. No component failure required... it can be as simple as just a loose connection. I felt certain that this was the case here... the printer has been working perfectly for over a year. I probably bumped/moved something while installing the print fan... so decided to simply hard-wire the power connection...

20170511_104255.jpg

20170511_110927.jpg

Once again, back on track -- and with new print fan operational -- I printed a new 3dbenchy (far right) using the configuration I'd always used... certainly improved but still not up to par with the one printed on the new Prusa... bed temp too hot?

20170511_161659.jpg

So I decided to use the exact profile used with the Prusa for feeds, speeds, retract, temps, etc and... voila! Almost an exact match (the yellow one in the foreground) with the one from the new Prusa, next to it.

20170511_161806.jpg

20170511_161743.jpg

20170511_161719.jpg

I'm a happy camper! -- David
 
Last edited:

LitterBug

Techno Nut
Moderator
Those are some really good looking fails! I've had a bunch lately playing with ABS directly on the heated glass bed and with various glue sticks. Picked up a BuildTak sheet and PEI sheet last week and am just getting around to putting it on, releveling the bed, setting Z , and printing a previously failed test. Hoping the Buildtak works cuz it's MUCH cheaper than PEI.

Here's some recent fails
PrintFails.jpg
PrintFailsB.jpg

Cheers!
LitterBug
 
Last edited:

jhitesma

Some guy in the desert
Mentor
David I like how your fail ends up as a success :)

Tom's videos are great, he's got some really great tips!

I've been meaning to try the official Prusa settings on my Folger i3 to see how they do...seeing your success I'm going to have to try that for sure now. I saw that prusa is now including a free version of the 3Dlab prints printable spitfire in their settings distro too...

I've had a print fan on my folger since the first week I got it - same one you're using...though the funnel has been redesigned since I printed it. And I had to switch to a different one when I switched to my new extruder. But the difference is remarkable and well worth it. Only issue is my 40mm fan has gotten noisy the past few months and I keep forgetting to order a new one (I've already stripped all the 40mm fans on random electronics around the house since I use them so often!)

I've continued to have mixed success with Marlin 1.1.0.

A big part of why I switched was to try the new UBL stuff as I've noticed lately that my autolevel isn't leveling as well as I'd like. Specifically the front right corner of my bed seems to be squishing the first layer more...though further testing has shown that the back of the bed (where I rarely print) is even worse. I did some manual adjustments to try and fix it but it persists. My inductive sensors tests out as accurate to 0.002mm repeatability anywhere I test it on the bed...so it doesn't seem to be the issue. Right now my working theory is that my glass may not be as even as I had hoped.

The other symptom is setting the z-offset of the probe has always been a pain...it's confusing because it's a negative number and remembering if increasing or decreasing it makes for a thicker or thinner first layer is something I just can't get my head to remember properly. But worse, I make adjustments and get results that don't make sense. Like I'll be moving the setting in one direction and the nozzle will be getting closer to the bed...then suddenly it's further from the bed :( This really came to a head a bit over a week ago when I decided to reprint the spacers for my singlecopter in Nylon...they're little round parts and weren't sticking to my glass bed very well. Nylon sticks to G10 great though so I put a thin sheet of G10 over the glass and tried to adjust my offset to account for it...and quickly remembered how much I hate adjusting the offset because of how it seems to jump sometimes. I was hoping 1.1.0 would be better about that.

I actually haven't had a chance to find out yet :p

What I have learned is that traditional bed leveling still works just as well as ever and there's now an option to have Marlin phase it out as the print progresses so after a few mm you're printing with normal z changes only once per layer. That should save some wear on my z axis so I like that.

I also just for kicks tried the Marlin defaults for feeds/accels/jerk instead of the ones suggested for the Folger that I've been using:

Marlin Default:
#define DEFAULT_MAX_FEEDRATE { 300, 300, 5, 25 }
#define DEFAULT_MAX_ACCELERATION { 3000, 3000, 100, 10000 }
#define DEFAULT_ACCELERATION 3000 // X, Y, Z and E acceleration for printing moves
#define DEFAULT_RETRACT_ACCELERATION 3000 // E acceleration for retracts
#define DEFAULT_TRAVEL_ACCELERATION 3000 // X, Y, Z acceleration for travel (non printing) moves
#define DEFAULT_XJERK 20.0
#define DEFAULT_YJERK 20.0
#define DEFAULT_EJERK 5.0

What I've been using:
#define DEFAULT_MAX_FEEDRATE { 250, 250, 2, 17 }
#define DEFAULT_MAX_ACCELERATION { 1000, 1000, 4, 750 }
#define DEFAULT_ACCELERATION 500 // X, Y, Z and E acceleration for printing moves
#define DEFAULT_RETRACT_ACCELERATION 400 // E acceleration for retracts
#define DEFAULT_TRAVEL_ACCELERATION 400 // X, Y, Z acceleration for travel (non printing) moves
#define DEFAULT_XJERK 17.0
#define DEFAULT_YJERK 17.0
#define DEFAULT_EJERK 4.0


The machine amazed me at how quick it was with those Marlin defaults! But the higher jerks and accels scared the heck out of me. When it changed direction it was pretty violent. Machine seemed to be tolerating it...but I strongly suspect it would not be great for long term reliability running the machine like that, so I slowed it back down.

Even so at the higher settings I'm getting some flat out amazing prints. I could tell it was moving a lot faster but overall print times weren't that much quicker on small test parts. The thing that amazed me most though is the ringing I see in most of my prints was gone with the higher settings and usually lower settings are suggested to get rid of ringing. So...going to do some more experimentation to see if I can bring some of those back up without the violent movements I was getting. Will probably try the Prusa settings first though...

I haven't got to do much printing with 1.1.0 yet since I've spent most of the past week just fighting to figure out UBL and still haven't got it working. They posted some docs now: http://marlinfw.org/docs/features/unified_bed_leveling.html I tried them and was able to get a mesh generated...which confirmed the back of my bed is higher than it should be....and I could theoretically fix that now with UBL mesh editing. But anytime I try to print with UBL it ends in major disaster and either air printing an inch off the bed or slamming my printhead into the bed :(

Plus there have been quite a few fixes hitting their repo every day. So I definitely don't suggest anyone try 1.1.0 yet...even the bugfix. If I needed to print something I could...and it would probably come out a little bit better than my old RC6 was doing...but honestly without UBL working I don't see any major benefit of 1.1.0. Yes, my print quality is very slightly better and the LCD menus are nicer but that's about it.

If you do try 1.1.0 be sure to use the bugfix branch though!