3D Printing fails

LitterBug

Techno Nut
Moderator
Can failed prints be remelted down and spun? Is there a recycling for used filament?

Some people do make their own filaments and recycle failures, but quality and consistency is going to go down as contaminants and heat cycles increase. I am testing the biodegradability of some of my failed PLA prints and broken singlecopter parts in a compost pile. You could also melt failures down and use them in molds....

Cheers!
LitterBug
 

chasedog90

New member
The only plastic good for recycling is ABS and the only reason to do it is many small prototypes or items with a one time use e.g. Engine companies. This alows the companies to make design changes without wasting as much material and money.
 

agentkbl

Illegal Squid Fighting?
The only plastic good for recycling is ABS and the only reason to do it is many small prototypes or items with a one time use e.g. Engine companies. This alows the companies to make design changes without wasting as much material and money.

PET and PVC are frequently recycled. To much fruition, I'm afraid. Please be careful with your blanket statements.

Remember: "Only a Sith deals in absolutes"
 

jhitesma

Some guy in the desert
Mentor
Well looks like my theory about my glass being the cause of my leveling issue is wrong. Measured the glass and it's accurate everywhere I measure it. But just to rule it out I tried rotating it 180 degrees and doing a bed level test print (just some big 2mm tall single wall squares that basically fill the bed) and got the same results with the back being about .1 mm shorter than the front and having a squished "elephants foot" first layer while the front looks great.

Hmmm..

Looking at the machine I see one thing that could account for this. The power wires for the heated bed are under the area in the back that comes out off. I just can't think through whether those throwing off the probe could cause what I'm seeing or not. THis is when I get all twisted and backwards - thinking about whether a probe result woudl result in a higher or lower first layer :p

But I think it makes sense...if the wires are causing the sensor to trigger just a little early then the probe would be reporting that that part of the bed is higher than it really is so it would lower the print head more to compensate which would result in the squished layer. I had a similar problem when I first started using the 8mm distance inductive probe where it would read false over screw heads in the plate under my heated bed. I fixed that with a layer of HD al foil over the heated bed which triggered the sensor more consistently...maybe I need two sheets of foil in there....
 

LitterBug

Techno Nut
Moderator
SUCCESS!

Printed two long runs with the junk purpurin colored ABS that XYZ sent me. BuildTak sheet works like a charm. Works TOO good actually. Really have to work hard to get the prints off. Need to lower the bed a bit more because the first layer was squished pretty bad.

Cheers!
LitterBug
 

jhitesma

Some guy in the desert
Mentor
Well I had a nice weekend of fails!

I pretty much gave up on the new 1.1 releases of Marlin. It's just doing goofy things for me. When it works - it's GREAT and I get some of the best print quality I've seen off my machine. But then I'll run the same gcode again and it will just skip the entire first layer for some reason :(

The UBL stuff looks great - but the docs are incomplete and I've yet to get it to work even after reading the notes in the source code and a bunch of the code submissions from when it was added. I was able to define a mesh and do a G26 to confirm the quality of the mesh...but then when I tried to print with it...either it never probes for Z or it starts printing 20mm above the bed or slams the nozzle into the bed :( So something in the UBL code definitely seems off to me.

If it wasn't for the randomly skipping of 1st layer (which is easy to identify since the skirt doesn't print) when printing I'd just disable UBL and keep bugfix-1.1x with bilinear leveling. But since I can print the same gcode 3 times in a row and get 3 different results...it tells me something isn't right in 1.1


So I went back to RC6. And decided it's time to finally install the Y axis upgrade I've had parts sitting here for since last March. http://www.thingiverse.com/thing:1278055

I've been putting it off since I didn't want to have to recalibrate my Z offset. But since I've really messed things up at this point why not. Plus I realized it won't affect the Z offset since I'm not moving the probe. The height of the bed may change slightly but that won't matter it will just change where it finds 0...duh.

The one other reason I haven't printed it is I wanted to print this to attach my bed to the new carriage:
http://www.thingiverse.com/thing:1266958

You can just bolt the bed right to the carriage...but I'm not huge on that solution since I think I'm getting bed flex as the bed moves currently and that's causing some of my leveling issues. So a big stiffener has a lot of appeal to me. But that's the biggest footprint I've ever tried to print. I've done things that are the full width or full length or have to be put diagonal to fit...but never something that fills both X and Y this much.

First issue...my Y isn't exactly centered. So first attempt to print left a bunch of space at the front of the bed and tried to print right off the back :( Ok, move the Y endstop back and that should fix it....except there's a tensioner on my Y belt which gets caught in the stepper gear if I move the endstop back that far...and I really won't want to mess with that Y belt since it's super finicky. Pushed it as far as I could without getting the tensioner stuck and it JUST barely fit if I decreased the distance between my print and skirt from 4mm down to 2mm.

Second issue...that's a big flat part...perfect for warping. So...let's finally try this PEI sheet I've got. I have boxes of mirror tiles so instead of putting the PEI on my existing glass I just cut a new square and put it on there. Did a few test prints and it seemed to be working but wasn't blowing me away like I expected. Still...let's try.

Actually...that's looking horrible :( And after 7 layers it jumped :( Then it came off the bed entirely :(

20170514_121557.jpg

So...that sucks. But it looks like it's overextruding. Checked my settings...and sure enough somehow my E steps had doubled ?! Could have sworn I double checked that when I reflashed (I used to run 16 microstepping on the extruder but switched to 32 at some point so must have had the old setting in there still even though I know I checked it.)

Got that fixed and tried again. BTW - Did I mention this is a 6 hour plus print that takes about 30 minutes per layer?
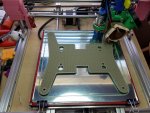
20170514_123127.jpg

Now we're talking! That's looking great! Except...wait...is that a shadow?
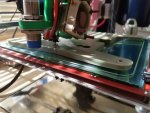
20170514_151551.jpg

Yeah, not feeling the PEI love :( I let it finish since I was 5 hours in at this point and wanted to see how it would come out. Sure enough 3 layers from the top it shifted a mm or two :( I could probably have made it work...but this is supposed to be stiff and flat to keep my bed level...so...let's try again.

Back to PVA glue on a fresh sheet of glass. I now have 3 sheets of glass with my printer. 1 dedicated to PVA, 1 dedicated to hairspray, and 1 with PEI. Should make switching between surfaces easier :D

20170514_214328.jpg

Now we're talking! Came out great! And I can finally get this Y installed.

Except it seems I've used some of the hardware for it on other projects over the past 15 months :p So...gotta hit the hardware store tonight before I can try it.
 

dkj4linux

Elite member
Some days... you're the bug!

Fail #1: I THOUGHT I was going to fail... :rolleyes:

Ha-ha! A two hour plus print, 100% complete, looks good... and 45mm of filament to spare! :cool:

20170526_191638.jpg

Fail #2: the prototype part was too small/tight in almost every dimension... :(

Fail #3: I started a second print on another printer because I thought the first print would fail... ;)

Fail #4: Unbelievable... the second print was too small/tight as well... :rolleyes:

Oh, well... back to the drawing board :black_eyed:
 

CaptCaveman37

New member
Be careful when removing support material, just had to get a tetanus shot and need to take a bucket of bleach to the garage.

:(

Jamie
 
Just a thanks to everyone who has commented especially jhitesma. I have a 3d printer which I never got working properly, (been sat for three years) you have all given me food for thought on getting it to work.
 
I have a Prusa Mendel i1 as you can see in the picture. I could never get it working properly, the prints would always fail. The second pic was a good print, normally its just a spider web of plastic. What software would people recommend? Any idea why it always fails?


tamuct01

Well-known member
Started a print of a toilet for my daughter's doll house last night. This morning the printer was stopped with a BED THERMAL RUNAWAY error. I checked underneath, and the bed thermistor had come loose triggering the fault. That's a big chunk of plastic and time (15 hours) I won't get back. :-( I'm using the Prusa i3 Mk2.
 

jhitesma

Some guy in the desert
Mentor
I have a Prusa Mendel i1 as you can see in the picture. I could never get it working properly, the prints would always fail. The second pic was a good print, normally its just a spider web of plastic. What software would people recommend? Any idea why it always fails?

Ohhhh...a classic! I wanted to build one of those so badly but never had the funds to pull it off. Hard to say exactly what's wrong but that looks like an extrusion issue so could just be calibration related or an extruder issue.

Not sure what firmware/software you're running on a setup of that vintage...It looks like a Melzi board which is still supported in Marlin. Assuming it's the newer version with the ATMEGA1284P processor it should still work. If it's the older version with the 644P then I'd probably suggest just replacing it with a RAMPS setup...you can get a full Arduino Mega/Ramps 1.4/Graphical LCD setup for <$40 on ebay and amazon now which uses the more powerful 2560 processor and has modular stepper drivers so if you kill one you can easily replace it and can swap to different driver chips if desired.

The hardest part of switching to new firmware will be getting the configuration setup right. You'll have to figure out the steps for your axis's and extruder steppers. Triffid's guide is a great place to get started with that: http://reprap.org/wiki/Triffid_Hunter's_Calibration_Guide

As for software on the PC side...there are lots of options. I'm a big fan of prusa's version of slic3r for slicing: https://github.com/prusa3d/Slic3r but others like Cura and a lot of people swear by Simplify 3D (Personally I can't justify $150 on slicing software with no demo to try it before shelling out that kind of money when there are so many great free options. Though S3D does seem to do supports better than anything else out there.)


Another thing that could be causing issues is if you're driving the prints over USB from the computer instead of off the SD card on the controller. Though without an LCD that could be tricky (there are gcode commands for it but I've never used them.) I actually use a halfway approach and use a dedicated board computer (in my case a $9 C.H.I.P but RaspPi's are most commonly used) running repetier-server or octoprint (I kind of prefer repetier-server...but switched to octoprint recently due to rep dropping features from the free version.) With this setup I'm still technically printing over USB...but doing so from a dedicated Linux computer so there's a much lower chance of a crash or some other process on the computer interfering. It gives 90% of the reliability of SD based printing with all of the benefits of a direct USB connection (easier to issue manual gcode commands when calibrating and changing things around, can watch print progress easier, and makes it easy to control the machine.)


When I ran repetier-server I really liked repetier-host for managing my slicing since it could use either slic3r or cura and then upload the gcode to rep-server. But since I've switched to octoprint I just use slic3r direct now since it can send to octoprint itself.

My general workflow is:

CAD: (usually onshape or openscad) to generate a model and export as .STL
Slicer: slic3r for me to generate gcode
Printer: Either direct print off SD, or using [octoprint or repetier-server] on a dedicated computer

Honestly with electronics that old I'd probably just get a cheap RAMPS setup and switch over since it would be easier to find help from other users. Ramps is getting kind of dated and a lot of people are moving to 32bit based boards like smoothie...but...on a machine of that era that would almost certainly be overkill ;)

I'd say get your firmware updated, go through the configuration and you'll probably be 90% of the way to great prints...though there is a chance your extruder may have mechanical issues...but a new Mk8/9 style extruder can be had for about $20 and would work great if that was the case. This stuff is all a LOT cheaper than it was when you initially built that guy :D
 
I happen to already have the mega and the ramps 1.4 board. Its so complicated and never got it to work. Had better luck with the original Melzi board. It is indeed the newer processor ATMEGA1284P.

I built it into a box to be contained. That worked a treat looks amazing. I am thinking it might be worth stripping it down and starting again?


jhitesma

Some guy in the desert
Mentor
Well, you should be pretty close then :) Much easier to find help with RAMPS than melzi at this time....

Do you know what version of Marlin you have on it? if it's working at all you could try just going through the triffid calibration stuff to confirm it's all looking good. If that test print you shared earlier was done on your current configuration then you're probably close except possibly the extruder.

Do you have any detailed photos of the extruder? I'm wondering if your drive gear on it could be slipping as that print looks like it's both over and under extruding. So I wonder if maybe it's overextruding which is then causing the filament to load up in the hot end and making the drive gear start to slip and chew the filament causing it to skip and underextrude.

I'd start with the extruder calibration. Measure out 110mm on the filament going into the extruder - then heat it up and tell it to extrude 100mm of filament. You should have just 10mm sticking out from the top of the extruder to your mark at that point. If so...good! If not...then that's the first problem :)

Once it's doing 100mm of extrusion accurately I like to slice and print a 20mm cube with no top or bottom (so just a shell) and 0.5mm thick so it gets printed as a single wall. With a 0.4mm nozzle I use 0.48mm as my default extrusion width so that should print as 0.48mm. If it doesn't then I measure how far off it is and adjust my extrusion multiplier in slic3r to correct and re-test. I actually do that last part for each new filament and keep a config profile in slic3r for each filament so I can switch between them easily.

If you can print a single wall test like that but still have issues...I'd be looking at the mechanics of the extruder. On a machine of that vintage it could be the hobbed bolt or drive gear isn't very effective and/or the heater/thermister may have issues.
 
The prints shown was done on the Melzi before I purchased the ramps. Never managed to get the ramps to work. Motors would shudder and one would move at all. I also have the problem that some of the 3d printed parts are now starting to break as its not very strong.

The extruder is c**p, I believe its a really old version. The metal plate on the third is reinforcing the arm as it snapped, hence why i tried printing the white one in my previous post. I will definitely get an upgraded extruder. Going to have to find someone near me with a 3d printer to print the replacement parts.


Snarls

Gravity Tester
Mentor
Started a print of a toilet for my daughter's doll house last night. This morning the printer was stopped with a BED THERMAL RUNAWAY error. I checked underneath, and the bed thermistor had come loose triggering the fault. That's a big chunk of plastic and time (15 hours) I won't get back. :-( I'm using the Prusa i3 Mk2.

Woah how big of a toilet was that if it takes 15 hours. Good marlin has safety features like thermal runaway or else there could have been a bigger, and more dangerous mess on your hands.
 

tamuct01

Well-known member
Woah how big of a toilet was that if it takes 15 hours. Good marlin has safety features like thermal runaway or else there could have been a bigger, and more dangerous mess on your hands.

It's a scaled up model my daughter wanted for her American Girl sized (18" dolls). Assembled size will be ~180mm tall. I was able to record what layer the printer stopped at, so I resliced the model to make up the missing parts. The final one is printing now. Instead of gluing 2 parts together, there will be 4. I think it'll turn out fine for a doll potty. :)
 

Snarls

Gravity Tester
Mentor
Cool, I always wondered if prints were salvageable by somehow starting the print at the layer where things went wrong. Let us know how it turns out.
 

jhitesma

Some guy in the desert
Mentor
That extruder does look goofy. The damaged idler arm could go a LONG way towards explaining the print issues. I'd offer to print you any parts you need to upgrade...but...shipping would be more than they're worth :)

Since you already have a stepper and a hot end that looks like it can accept a bowden feed....your easiest way to get up and going may be to get something like this: http://www.ebay.com/itm/MK8-All-met...Reprap-/262774335132?var=&hash=item3d2e92269c

And a length of PTFE tubing...I'm not a big fan of bowden extruders...but it would probably be enough to get you up and printing..then you could print your own replacement parts and an upgraded extruder.

Thank you for all your help, as soon as funds permit I am going to get an upgraded extruder and get the ramps board working. Is the one you linked to in your post the best one, are there alternatives? If i can get it too a point where I can print, I can reprint some of the parts. I have had to superglue some parts back together. Unfortunately these part are fundamental to structure so I am hoping they hold long enough print new ones. Unless there is anyone in the UK willing to print a few parts.

Worst case, once I have found a job I will save up and get a different printer. I have been looking he MD5. At least then I could print small clips and what not to allow me to get the other printer up and running. I purchased the printer in April 2014 and never had it fully functional.I am keen to get it going as i have a couple of robot designs i want to build and a 3d printer would be very helpful. Its why i purchased one to start with.

When I get the new extruder, as I need to take half of it off to change it due to the way its built, plus I have had to take it apart slightly to fix parts. I might just strip it down and rebuild it from scratch.
 
Last edited: