Anybody else scratch building tonight?

DZFlyer

Member
Howdy 🤠

new here. first post.

i started flying rc planes recently, purchased one of those amazon $99 twin prop F22 raptors you are seeing everywhere. i pretty much pushed those planes to their absolute max, literally flew the paint off them. I started flying those till something broke, would fix or replace until air frame was destroyed, pull the electronics and build my own plane. did the same with the volantex 400mm warbird series (still love).

I struggle to figure out how to make since of transmitters & receivers, but purchased a millennial flerken, power pack f, and radiomaster cc2500.

i have built several sub 100 gram planes, below is my first “real” plane. i was aiming for 250 grams without battery and went over, air frame loaded is 315 grams, with battery 400 grams.

power pack f (6x4.5 prop)
aura 5 lite
11.1v 100c 850mah
cc2500

anyways, finished it up last night. controls work….i think. throttle, ailerons, elevators work (used a servo reverse circuit for one rear servo, two rear servos for elevators). still figuring out transmitter and how to turn on stabilizer.

but this is what i was building last night…
Welcome! That build looks very clean. Good luck with the maiden and further flights. I have noticed that repurposing electronics in new airplanes is quite popular and has a lot of potential due to the lack of readily available micro electronics. I am new myself, and this forum is a great source of suggestions and interesting ideas! :)
 

Captain J

Active member
Welcome! That build looks very clean. Good luck with the maiden and further flights. I have noticed that repurposing electronics in new airplanes is quite popular and has a lot of potential due to the lack of readily available micro electronics. I am new myself, and this forum is a great source of suggestions and interesting ideas! :)
well…i have built and crashed more than built and flown 😂🤣
 

DZFlyer

Member
well…i have built and crashed more than built and flown 😂🤣
My first build was done according to a random video on YouTube and was a small, sub-200 gram bush plane made of styrofoam. Unfortunately, there was no information about all-up weight or any specifications, only a pdf with a three-view of the airplane. On my first set of test flights, I realized that the airplane was ridiculously underpowered. It couldn't take off from the ground and dove straight down when hand-launched. So I got a bigger propeller and that worked better off of a rand launch but still very underpowered. After those crashes, the entire front section was ripped apart along with the landing gear plate and a section of the central fuselage and tail (styrofoam + rc plane doesn't mix well). Long story short, the poor plane is now more epoxy than foam. I learned a lot from that project even though I had no successful results, and the experience helped me build my FliteTest Tiny Tutor (which actually flew). :)
 

Houndpup Rc

Master member
My snow plane!!!!!
Simple Scout With Snow Skis.png
 

L Edge

Master member
First time flying a 4ch. plane without gyro and only damage was popping off one of the skis in a less than graceful landing! otherwise I did pretty good for first time!
Looking at your flex system of ski, it is retained to the wing? If landing gear bends a lot from hard landing, guess what happens?

Here in another idea to rotate the ski to move up and down and return to the neutral position and from tipping up. Solder a small segment(about an inch long ) of wire about 1/2 way up and across the landing gear so it is perpendicular to landing gear wire.

Next cut notches in the front and rear part of the ski in the vertical wood segment. Find rubber bands and hook from the notch on front part of ski and wrap on backside of small wire segment . Do the same to back and wrap from the notch on the backside to wrap around front segment. End result, ski can be moved to rotate up/down and end up in neutral position like the wing.

Once that is done, now add additional rubber bands(or whatever) to front and back so it is resistant to wind and always return to neutral position. I tried a loop and wind snapped the not enough rubber bands on ski and you know what happed next.
 

Houndpup Rc

Master member
Looking at your flex system of ski, it is retained to the wing? If landing gear bends a lot from hard landing, guess what happens?

Here in another idea to rotate the ski to move up and down and return to the neutral position and from tipping up. Solder a small segment(about an inch long ) of wire about 1/2 way up and across the landing gear so it is perpendicular to landing gear wire.

Next cut notches in the front and rear part of the ski in the vertical wood segment. Find rubber bands and hook from the notch on front part of ski and wrap on backside of small wire segment . Do the same to back and wrap from the notch on the backside to wrap around front segment. End result, ski can be moved to rotate up/down and end up in neutral position like the wing.

Once that is done, now add additional rubber bands(or whatever) to front and back so it is resistant to wind and always return to neutral position. I tried a loop and wind snapped the not enough rubber bands on ski and you know what happed next.
Yes it is retained to the wing. So you mean solder a cross section across between the landing gear legs and hook my rubber bands up to that instead of the wing?
 

L Edge

Master member
Yes it is retained to the wing. So you mean solder a cross section across between the landing gear legs and hook my rubber bands up to that instead of the wing?
No, not between the landing gear legs, but 2 1" wires about 1/2 long and solder about 1/2 way up each leg (from your picture) so you are hooking from the ski to the backside of the wire so it is under tension. Now take 2nd rubber band from back part of ski to 1" wire. When hooked, ski is parallel to wing chord and if you pull up or down on ski, tension of rubber bands bring it back to parallel.

Do that and show photo of setup before you fly.
 
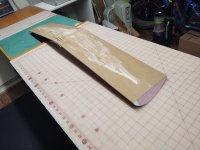
I've been working, slowly, on a Mambo, scaled up to 360 in. sq. 1100 Kv motor, 3S1000-1500, REM controls. Wing is hotwired pink foam; fuse & tail feathers are hotwired ~ 1/4" green (Lowes) and pink (Home Depot) foam, with a precious small bit of Model Plane Foam. I've covered the wing with brown wrapping paper and a 50/50 mix of Titebond II & water (I call it Glue Glop ;-)). As of today, I'm still cleaning up the wingtips. Next step is to mate the wing to the fuse, finish the battery hatch, etc., before sanding and papering the rest of the model.
A few shots from building.
 

Attachments

  • 8 Fuse on the jig.jpg
    8 Fuse on the jig.jpg
    1.4 MB · Views: 0
  • 13 Wings are papered and hung to dry.jpg
    13 Wings are papered and hung to dry.jpg
    4.5 MB · Views: 0
  • Spars done.jpg
    Spars done.jpg
    5.5 MB · Views: 0
  • Wing tips sawn.jpg
    Wing tips sawn.jpg
    5.9 MB · Views: 0

cyclone3350

Master member
I've been working, slowly, on a Mambo, scaled up to 360 in. sq. 1100 Kv motor, 3S1000-1500, REM controls. Wing is hotwired pink foam; fuse & tail feathers are hotwired ~ 1/4" green (Lowes) and pink (Home Depot) foam, with a precious small bit of Model Plane Foam. I've covered the wing with brown wrapping paper and a 50/50 mix of Titebond II & water (I call it Glue Glop ;-)). As of today, I'm still cleaning up the wingtips. Next step is to mate the wing to the fuse, finish the battery hatch, etc., before sanding and papering the rest of the model.
A few shots from building.
Gotta Luv the Mambo. Luv to see these old school birds in foam. BTW nice job on the wings. Hot wire cutting is such a fine art of trial and error,(in my case lot's of error) before it works out.
 

Houndpup Rc

Master member
No, not between the landing gear legs, but 2 1" wires about 1/2 long and solder about 1/2 way up each leg (from your picture) so you are hooking from the ski to the backside of the wire so it is under tension. Now take 2nd rubber band from back part of ski to 1" wire. When hooked, ski is parallel to wing chord and if you pull up or down on ski, tension of rubber bands bring it back to parallel.

Do that and show photo of setup before you fly.
Oh I see! Will have a good test when I get to doing that we just got dumped with a snow fall!
 
Gotta Luv the Mambo. Luv to see these old school birds in foam. BTW nice job on the wings. Hot wire cutting is such a fine art of trial and error,(in my case lot's of error) before it works out.
Thank you :). Yes, lots of errors -- I've been cutting cores since 1985, but I still usually only get 2 usable cores for every three I cut :-(.
 
Saturday, I drilled through the wing LE bulkhead and the wing dowel reinforcements in the wing, the Gorilla Glued the dowel in place. I use an old-fashioned pencil sharpener to make the dowel a bit easier to stick through the bulkhead (I've since shortened the dowel, then re-sharpened it).
Today, Sunday, I did the wing bolts and the wing top bolt strengthening underplate.

By the way, assuming my Mambo flies well, I'll send the plans and building instructions to the Outerzone.
 

Attachments

  • 17 Wing dowel.jpg
    17 Wing dowel.jpg
    5.6 MB · Views: 0

shadeyB

Legendary member
Well pilots and fellow builders 1st build of the year and it just looks fast 😂😂
One of Britains strategic bombers that never was ,,,,,,,, TSR2
powered with 70mm FMS on 6s
Just some sanding and filling to do before it’s time for the paint shop 🙌
6mm Depron with 3mm Depron skin
3D printed nose cone, shock cones and intakes, exhaust housing , EDF intake and thrust tubes
cant wait to get this one airborne 😂🎮💫🚀💫
IMG_4773.jpeg

IMG_4774.jpeg