You are using an out of date browser. It may not display this or other websites correctly.
You should upgrade or use an alternative browser.
You should upgrade or use an alternative browser.
FT Simple Stick Video ( Slow Stick S250 )
- Thread starter alan0043
- Start date
RossFPV
Well-known member
This video got me inspired to fix up my old simple stick, re-maidened it last night and despite having 3 out 4 control surfaces warped it flew great after some trimming. Even got another flight this morning with loops,rolls, a little inverted and poor attempt at hovering. The FT simple stick is awsome.👍Hi Everyone,
For anyone that has missed the latest FT video, here you go. This video is about the FT version of the Horizon Hobby's Simple stick. Enjoy !
joelspangler
Active member
OK, I found/downloaded the plans, but was hoping there would be a bit more information. I haven't looked at arrows for a long time, but I remember there being different lengths and shaft thicknesses. Was hoping to know for sure which specific type to get. Was also hoping for some guidance of spacing for the general area that each of the 3d printed parts would attach to something like "The wing starts at 6 inches from nose". I'm grateful for a free plan as a FTCA member, but it seems like I will need a little additional information to be able to complete this project.
Carbon fiber arrows are a standard diameter.
I think most arrows are 6mm. But it would be a good idea to check first before buying.
Flying Farm Kid
Active member
I can't find the plans where do I go again?
Thanks!
Thanks!
Just open the 3D print file and look at size of the holes for the shaft/fuse.
Then you can download the Slow Stick plans for free. You'll also get free FT Simple Stick plans for joining.

Go to FTCA.FliteTest.com and join FTCA.I can't find the plans where do I go again?
Thanks!
Then you can download the Slow Stick plans for free. You'll also get free FT Simple Stick plans for joining.
Flying Farm Kid
Active member
I found it thank you!Just open the 3D print file and look at size of the holes for the shaft/fuse.
Go to FTCA.FliteTest.com and join FTCA.
Then you can download the Slow Stick plans for free. You'll also get free FT Simple Stick plans for joining.

Foamforce
Well-known member
Regarding wing location on the shaft, here’s my guess. The exact position probably doesn’t matter that much. Closer to the nose would make it a little more stable, since it increases the distance from the trailing edge to the stabs. I’ll probably just eyeball it and make it look similar to the video and then move the battery around to balance. Alternately, I could put the battery where I want it and move the wing around until it balances, as long as that doesn’t put it too close to the tail.
Does that check out?
Does that check out?
Hoomi
Master member
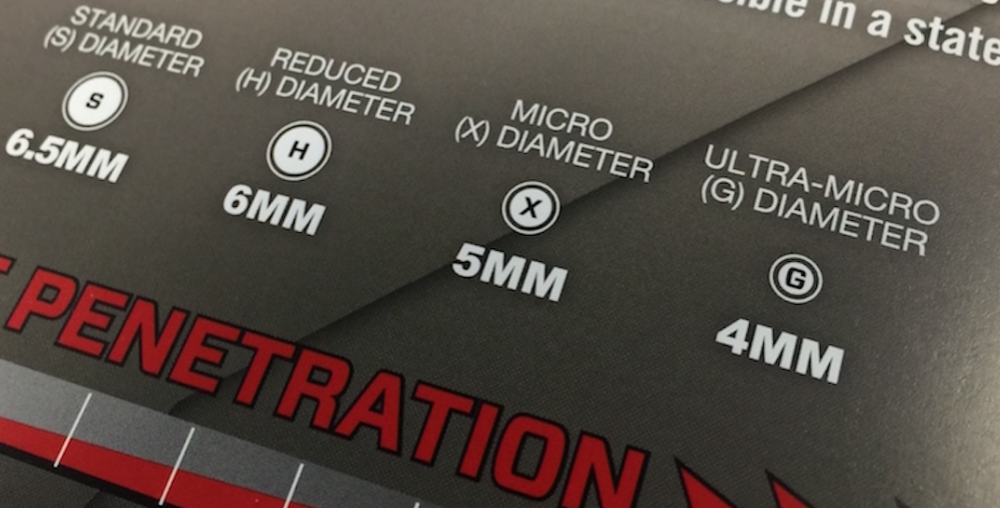
Maybe they used to be, but now they are available in several different diameters. There were at least three different diameters available at the Walmart where I bought mine.Carbon fiber arrows are a standard diameter.

SIMPLIFYING ARROW DIAMETERS FOR BOWHUNTING
For years now, Easton has been using letter codes- S, X, H, and G- to indicate the internal diameter (and therefore, component compatibility) of our
Hoomi
Master member
That's what I did on mine. I left the wing mountings loose until I had the nose and tail assemblies complete, put the electronics on, including the battery, and adjusted the position of the wing until the CG was right. Once I had the position, and made sure the wing was properly aligned with the tail surfaces, I secured it with some CA glue.Regarding wing location on the shaft, here’s my guess. The exact position probably doesn’t matter that much. Closer to the nose would make it a little more stable, since it increases the distance from the trailing edge to the stabs. I’ll probably just eyeball it and make it look similar to the video and then move the battery around to balance. Alternately, I could put the battery where I want it and move the wing around until it balances, as long as that doesn’t put it too close to the tail.
Does that check out?
That's what I did on mine. I left the wing mountings loose until I had the nose and tail assemblies complete, put the electronics on, including the battery, and adjusted the position of the wing until the CG was right. Once I had the position, and made sure the wing was properly aligned with the tail surfaces, I secured it with some CA glue.
A friend of mine told me that is how he would build the plane. Move the wing with all the electronics installed to find the CG. Then glue the wing parts in place. Thank you Hoomi so much for your insights and technical help.
Last edited:
Gilwo
New member
The arrow I bought at Walmart would not fit through the 3D printed parts. I had to use a 9/32 drill clamped into a vice and very slowly and carefully ream the holes larger to fit my arrow.Carbon fiber arrows are a standard diameter.
Similar threads
- Replies
- 5
- Views
- 189
- Replies
- 1
- Views
- 426
