Lowrider CNC

jhitesma

Some guy in the desert
Mentor
I had mixed results this weekend. The wheels are looking pretty good:
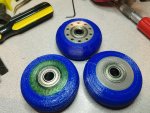
20170729_221526.jpg

I did two tire profiles - both seem to work, the first one has squared shoulders and prints easier:
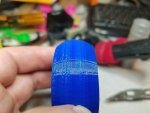
20170729_221557.jpg

The second one I filleted the edge where the curved face meets the flat sides:
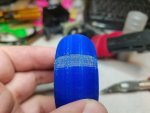
20170729_221604.jpg

The second one looks more like a real skate wheel - but is trickier to print since there's less in contact with the build plate, and it doesn't come out as symmetrical since the one side tends to sag while printing without support (and supports and TPU don't play nice together.)

They both have the same OD and since the wheels only roll on the crown they're interchangeable. I wouldn't mix them on a pair of skates...but on the low rider they should be fine to mix and match. I have 3 of the rounder profile and 1 square profile on my mockup and it seems fine.


I also did a test of a modified hub that should be stronger despite having holes in it:
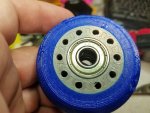
20170729_221532.jpg

It should be stronger since those holes get multiple perimeters around them so it gives more material than if this was just infilled. But...it's really not necessary for the low-rider and the hubs take more than twice as long to print this way - it's also a bit of a pain to line the holes up on the two hub halves. So...I only did one like this as a demo.

The tires should be printed with 6 perimeters. My first test only used 3 and made for a squishy tire due to the low infill:
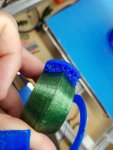
20170729_100834.jpg

The 4 I'm actually using have 6 perimeters and the center section is solid TPU from the crown to the PLA hub. They have very little give and seem to be totally usable.


The tires are kind of tricky to assemble...and once together do not come apart without destroying the tire. In fact - I'd probably put them in real skates and skate on them if I still had a pair to try it on. They wouldn't last very long - but I'm fairly confident they're structurally sound enough they could be used to support a full sided adult.


The wheels consist of 3 pieces - 2 identical hubs and 1 tire:
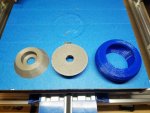
20170729_225225.jpg

The hubs are stacked - you could glue them but there's really no need:
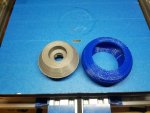
20170729_225231.jpg

The stacked hubs are then pressed into the tire - which takes some force despite the flexibility of the TPU:
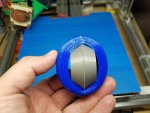
20170729_225248.jpg

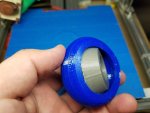
The hubs are then rotated - the point shown in the photo is the trickiest part - getting the tire over the "lip" of the tall part of the hub takes considerable force:
20170729_225313.jpg

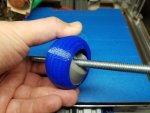
I found it helps to put a long bolt or piece of all thread through the hub to get more leverage doing this:
20170729_225340.jpg


Also - when I assembled my first Y plate I found why the bearing spacers are important. I accidentally tightened one of the bolts through a wheel too much and found out that it creates enough force to damage the bearings. The PLA hubs (I used MakerGeeks impact modified Raptor PLA) held up to the clamping force just fine...but the bearings themselves gave in and the inner races got squished inward without the spacer to keep them in place. Oops. Not sure if I should be impressed with how strong this Raptor PLA is...or shocked at how weak these super cheap Chinese bearings are. (There bearings were $2 for 10 from wish.com I bought them mostly to see just how bad they were....they're better than I expected but still terrible bearings.)


But...I made more progress than just playing with wheels...going to split that into a second post though....
 

jhitesma

Some guy in the desert
Mentor
So...the further progress. I wanted to see if my 3D printed wheels would actually work so I started building a low rider to test them with :)

I haven't had a lot of luck doing actual milling with my MPCNC...it's a lot more work than cutting foam! Holding down the work is more involved, it's louder, messier, slower, and my Z issues get more annoying. But first try at cutting a Y plate came out great!

20170729_224837.jpg

In fact, My first cut was almost good enough but the right side didn't quite go all the way through the work. So I modified the g code to just do the final parting cut in one pass at full depth only slightly deeper. Remarkably I was able to restart the machine and cut again keeping it all aligned - never done that successfully before! Big win!

Second try....didn't go so hot:

20170729_223554 (1).jpg

I was trying much faster settings than on the first one, but that wasn't the problem. The problem was I only used 2 screws instead of 3 to hold down the work and one of them was right on the outside cut. So everything went well until that last parting cut...the router hit the holddown screw and bumped a little...but stayed on track. I didn't want to risk the bit breaking though so quickly added a new screw that wouldn't interfere and removed the one the router hit before the second pass. Phew.

Except the new screw I added then failed - it sheared off and the work shifted. If I had used 3 screws instead of 2 I would have still be ok. That's what I get for cutting corners :(


My next three tries at cutting a second Y plate didn't go any better. I used enough screws...but on the next try the router power cord got snagged as it was cutting the last hole in the plate causing it to miss steps.

Repositioned the work to a clean section and tried again. This time it looked good until it was 1/4 of the way through the first pass of the final cut when the router cord got pinched between an X roller and one of my center span supports. I stopped it quick enough the part was still salvageable so I tried the same thing I did on the first plate and just re-run that last cut.

And had the exact same thing happen again...apparently I'm not good at learning from my mistakes :p

So at that point I stepped away for a few hours and focused on printing parts instead.

By evening I had enough parts printed to test-assemble a Y plate...I used my second failed Y plate to mock it up...and it works!

20170730_223107.jpg

I have video I'll upload tonight of this actually rolling on my table!

With that success I went ahead and tried cutting the Y cover - and it went well:

20170730_233531.jpg

Still a few more pieces to print before it's done...but I'm getting hyped! I just hit HD for hardware since my nice wholesale bolt store isn't open on weekends - but they didn't have 5" bolts only 5.5" So ignore the overly long bolts.

Guess I will be converting my machine to a low rider next :D Then when I can afford another set of steppers I'll rebuild the 2' MPCNC as a 525 for smaller work ;)
 

rockyboy

Skill Collector
Mentor
Wohoo!! Great to see it coming together Jason!

I'll have the same 'half the bolts are a little long' look on mine - but as long as they don't interfere with movement I don't mind. And if they do interfere with movement, I have an angle grinder. :)

Where do you plan on sourcing the 1" OD tubing? (or do you have it on hand already) That looks like the most expensive part of the project I don't have yet.

Thanks,
 

jhitesma

Some guy in the desert
Mentor
Yeah, I figure I'll just grind the bolts down as well. Even if they aren't in the way I don't like them sticking out like that :D

I haven't really worried about the 1" tubing yet. I may just try conduit - take my calipers to the store and confirm it's the right OD first. If I have to go stainless then it will be a bit since I really don't have any budget for this machine right now.

In fact it wasn't until pretty late last night that I realized it was designed around 25.4mm instead of 23.5mm I had hoped I could just re-use some of the extra conduit I already have on hand but that won't work :(

I also still need to order bearings, belts, idlers and some other bits. But I'm in no hurry since my MPCNC works. I'll just take my time printing parts and assembling things while tucking a few $$$ a week aside until I've got the budget for the rest of the bits :D Probably need to rebuild my table as well - testing last night I found that my current legs interfere and I'd have less usable area with this than with my current MPCNC...plus I want to turn my top into a true torsion box sheeted on both sides instead of just one and switch from using 2x4 stock to 3/4" plywood so I can mount some stuff in/on one of the faces easier. And I won't be tackling that until at least late October when it cools down enough to work outside comfortably. So this is a very long term project for me despite the initial quick progress ;)
 

localfiend

I like 3D printers...
Mentor
I use masking tape and CA to hold down parts on my CNC. Worked great so far for mdf, acrylic and wood. No need to add bolts/screws and it's stupid easy.

Put some strips of masking tape on your table. Add some matching strips to your workpiece, then put CA on one side, and activator on the other.

Instant, super cheap, and super thin doublesided tape. And cleanup is way easier than most doublesided tapes too. Just pull the masking tape off.
 

jhitesma

Some guy in the desert
Mentor
I use masking tape and CA to hold down parts on my CNC. Worked great so far for mdf, acrylic and wood. No need to add bolts/screws and it's stupid easy.

Put some strips of masking tape on your table. Add some matching strips to your workpiece, then put CA on one side, and activator on the other.

Instant, super cheap, and super thin doublesided tape. And cleanup is way easier than most doublesided tapes too. Just pull the masking tape off.

I've heard of that method...I just have a hard time trusting tape. The CA I'd trust...it's masking tape I have problems with.

The heat here tends to do nasty things to it. Even when I keep it in the AC it just doesn't last. Within a year it's either not sticky anymore or too gummy and leaves a ton of residue.

When I lived in Ohio I LOVED masking tape, but since moving to the desert I've found it has a VERY short "shelf life" and half the time even fresh from the store it's unusable :(

I have used carpet tape for holding things down...but it's fairly expensive and also can be a pain to remove. Plus cutting through it leaves a mess on the bit :(

Maybe I'll give masking tape another go...just hate how quickly it gets nasty here.
 

rockyboy

Skill Collector
Mentor
Hopefully as more people build the LowRider he'll release some additional file versions that can use other conduit sizes, not just the 1" tubing. I ended up dropping an order with https://www.onlinemetals.com - they had the best pricing (especially on shipping). A good bit cheaper than my local option too!

So I'm getting 36" rails for the carriage to ride on, which should give me a usable cutting area right about 24" wide. 12" uprights (stock size) which will be about 3-1/2" vertical height - plenty of room to sneak in a vacuum hold down bed for the DTFB in the future :)
 

rockyboy

Skill Collector
Mentor
Carriage and x/z assemblies together now...

2017-08-01 19.39.47.jpg

Printing parts for the rolling side assemblies. Also finally emptied a semi-sucky roll of black PLA that would occasionally block and on to a much better purple roll.
 

localfiend

I like 3D printers...
Mentor
I've heard of that method...I just have a hard time trusting tape. The CA I'd trust...it's masking tape I have problems with.

The heat here tends to do nasty things to it. Even when I keep it in the AC it just doesn't last. Within a year it's either not sticky anymore or too gummy and leaves a ton of residue.

When I lived in Ohio I LOVED masking tape, but since moving to the desert I've found it has a VERY short "shelf life" and half the time even fresh from the store it's unusable :(

I have used carpet tape for holding things down...but it's fairly expensive and also can be a pain to remove. Plus cutting through it leaves a mess on the bit :(

Maybe I'll give masking tape another go...just hate how quickly it gets nasty here.

That's weird. I haven't noticed that at all, and I live out in the desert as well. Think it was only 103 here today though.

Maybe it's just a really crummy brand? I just use whatever's on hand. Almost always have a roll of blue painters masking tape around.
 

jhitesma

Some guy in the desert
Mentor
Looking great RockyBoy! Which tubes did you end up ordering from onlinemetals? I saw in a reply to my post about printing the parts on the vicious forum that Ryan said he's thinking about doing a 25mm version. But I doubt he'll do 24.5mm since this is designed to be larger and 3/4" conduit is really pushing it at that point. I plan on keeping my table 4'x4' anyway so I want to go SS since the rails will actually be a bit longer than my current long rails.

My printing has slowed down - I saw on the parts page he had seemed to say any infill so I had been doing most of my printing at my default 25%...but then noticed on the thingiverse page he suggested 55% like the MPCNC. So I upped my infill and things have slowed. I'll still use the parts I did at 25% but will keep an eye on them. I've been semi-destructively testing some PLA parts from my first go at the MPCNC that failed while printing by leaving them in my truck - along with some "normal" pla parts and some failed PETG MPCNC parts and "normal" PETG parts. As I suspected the PETG holds up much better - but in the summer heat here even the PETG parts get soft. The MPCNC parts though with their 55%+ infill hold up much better - even in PLA. In fact I'd say the high infill PLA parts hold up better than the low infill PETG....the low infill parts get soft and will deform under their own weight - picking them up then reshape like taffy. But the high infill parts tend to hold their shape even when poked and prodded - the surface may deform a bit and dent here and there - but overall they hold up much better than I expected.


Local Fiend - I've tried various brands of masking tape, no name generic, nice 3M, manco (the "duck" tape people who's factory is one town over from where I grew up in Ohio) and a few others. I have actually had decent luck keeping blue tape around but assumed you were talking about normal tan masking tape. I figured the blue wouldn't have enough strength for fixturing. But since I do have some decent blue tape maybe I'll give that a go and see how it does.

I'll just hide behind something in case the work comes flying at me :D (says the guy with a scar on his upper arm from when he was making blocks for his kid and one kicked back on the table after being cut saw and hit him.)
 

jhitesma

Some guy in the desert
Mentor
Well despite my CA being on it's last legs the blue tape worked great! I'm definitely going to have to pick up some more CA and kicker and start using that method regularly.

So have my 611 plate now!

20170801_212730.jpg

In fact...it seems that a good portion of the Z issues I've been having with milling are actually issues with how I've been holding down my workpiece. I was able to remove all of the MDF but leave the tape intact first try :cool:

20170801_213409.jpg

The 611 fits great. I do have a very slight issue with the holes for mounting it being very slightly too small...I used the helical drill tool but my router mount on the MPCNC isn't really rigid enough and I could see the whole tool wobbling a bit on the drills. I've been wanting to make a better mount....but with this machine in the works it's low priority. But with the tape and CA trick maybe I'll do more milling now....

I'm actually thinking this piece would be really nice done in Lexan so I see what's happening while cutting better...Just don't think 1/4" would be stiff enough for that..

20170801_212826.jpg

And my test insulator for the needle fits great....but I'm now questioning if the needle cutter design is really practical the way I did it. The issue is the 611 has to mount with the screws coming in from the bottom. And once the machine is setup accessing those screws won't be easy - you could raise the Z to work on them...but that seems like a pain and with only 3" of Z you'd need a mighty stubby screwdriver.

My original idea was to design the cutter so it would clamp into the 611 base....but then for some reason I thought that the low rider didn't use the base and the 611 motor unit mounted directly. I now realized that's not the case.

But...I don't see a way to fit the needle cutter into the 611 base :( At least not with a 2212 motor.

I might be able to do one that uses a 2204 or 2205 motor and make it designed so it just drops into the 611 base and gets clamped in....Going to sleep on the idea....
 

rockyboy

Skill Collector
Mentor
I ordered the 304 welded stainless tubes - total shipped w/ a new order coupon was about $70.


And yeah, I realized I was also running with 25% infill instead of the higher amount after getting a good number of parts printed. I've increased to the higher infill and only managed to get two spacers printed last night in a 1 hour 39 minute print run. This will really slow down progress for a bit.

For the router/cutter mounting I was planning to put in some blind t-nuts in the base so I could switch tools from the top. I left the bearing mounts with the bolt heads on the bottom, and plan to print / cut some thin slider feet for the base so it won't scratch up the work piece in case it comes down on it. Or I suppose I could just get some bolts that will countersink properly, but all I seem to have handy are button heads in that size.
 

jhitesma

Some guy in the desert
Mentor
I was thinking about blind nuts...but the holes on the 611 base aren't through holes, they're blind from the bottom. It would be possible to drill them through and tap them so it can be mounted from the top...but I don't really want to modify mine like that.
 

jhitesma

Some guy in the desert
Mentor
That's weird. I haven't noticed that at all, and I live out in the desert as well. Think it was only 103 here today though.

Yeah 103 is kind of cool for us right now :) I keep the AC in my shop at 86 but store tape inside where we keep the AC at 78 during the day. Even so it usually doesn't shut off :p

Facebook just reminded me of this photo I took 5 years ago this week:

217846_10150927946991805_1985695181_n.jpg

That was our cold water...in the morning before the heat of the day...after letting it run for a minute or two. Doesn't make for very refreshing "cold" showers this time of year :p

Though the monsoons have rolled in the past week so temps have dropped and we're maxing out around 105 right now...but humidity is up to about 60-70% and it's raining all around us (visible on the horizon) but of course skips over us.

I kind of miss a few weeks ago when the humidity was low even if my weather app would give me alerts like "High 110 today, expect significantly hotter temps tomorrow"
 

rockyboy

Skill Collector
Mentor
I was thinking about blind nuts...but the holes on the 611 base aren't through holes, they're blind from the bottom. It would be possible to drill them through and tap them so it can be mounted from the top...but I don't really want to modify mine like that.

Hmm... I haven't picked up a 611 yet and didn't know that... will need to keep noodling on this as I definitely want to be able to swap tools without needing to pull the whole carriage off to get at the bottom side.
 

jhitesma

Some guy in the desert
Mentor
Hmm... I haven't picked up a 611 yet and didn't know that... will need to keep noodling on this as I definitely want to be able to swap tools without needing to pull the whole carriage off to get at the bottom side.

Actually...I may be dumb. I just noticed that my own photo above shows the holes protruding out the top :p

So...not sure why I thought they didn't now. Must have been tired last night :D
 

rockyboy

Skill Collector
Mentor
I used to have a shirt that said "Sleep is for wimps. Happy, healthy, well rested wimps, but wimps nonetheless. :p"
 

jhitesma

Some guy in the desert
Mentor
Man that blue tape and CA works great. So glad localfiend brought it up and I decided to finally try it!

Before I was having issues where I'd cut well into the spoil board one one side and still have material uncut on my work on the other. With the tape mounting I'm now cutting accurately enough that I'm cutting through one layer of tape but not the other across the whole piece :D All this time I was convinced I had a Z issue and it turns out it was just poor work holding!

Still have to cut the second Y plate and cover...but actually looking forward to it now! (I'm being lazy and just cutting one piece a day.)

At this point my 611 plate is cut and all 3D printed parts for it are finished. One Y plate is completely finished and I have the leadscrew nut mount printed for the second one. And both XZ plates are cut with all but one printed part (CornerZ) done on one.

I've run out of 3/4" 6-23 screws though :( And my bearings won't be here until Monday (wasn't going to order them yet but saw the amazon link Ryan provides was for actual VXB bearings and $25 for 100 with prime shipping from Amazon was too good of a deal to pass up, that's less than I paid for generic china bearings off ebay on my MPCNC!)

This weekend I'll try and budget for some more 6-23 screws and the 1.25" 5/16's so I can mount up the bearings when they arrive on Monday. Also hoping to finish printing parts. I'm more than halfway through the fresh spool of PLA I opened for this though so looks like the second Y plate will probably have to be printed in a different color, oh well...I expected that. I knew from my MPCNC that 55% infill sucks down filament crazy fast!

I still haven't looked for rails. I'll probably measure some conduit at the store this weekend to see if it's close enough...or check out some shower curtain rods and such to see what I can find. (I remember one of the first 1" SS tubes Ryan found and tried were sold as shower rods.)

I'm also thinking more about my table. Instead of rebuilding my table I'm starting to think about building a smaller table to go on top of my existing table making the low-rider more portable. If I just want it for cutting foam then the X rails can be kept short and the machine could be built fairly compactly. Still undecided though...we'll see what I decide once I've looked into rail options better :D
 

moebeast

Member
I'm also thinking more about my table. Instead of rebuilding my table I'm starting to think about building a smaller table to go on top of my existing table making the low-rider more portable. If I just want it for cutting foam then the X rails can be kept short and the machine could be built fairly compactly. Still undecided though...we'll see what I decide once I've looked into rail options better :D

I was thinking of using a door slab as a table for a low-rider style machine. They are cheap, light, and flat. Sort of wasteful to cut it to length, but the left over piece could be used for another work table.
 

jhitesma

Some guy in the desert
Mentor
I was thinking of using a door slab as a table for a low-rider style machine. They are cheap, light, and flat. Sort of wasteful to cut it to length, but the left over piece could be used for another work table.

Hmm...I actually have 2 doors gathering dust in my shed. But they don't have flat surfaces...of course put some foam on there as a spoil board and who cares....

Except...I don't think they'd be big enough. I'll have to measure when I get home. Assuming a minimal 22"x32" work area (leaving a scant 1" on all sides for alignment oopsies) the low rider calculator says you need a 42" wide by 37" deep table. I don't think my doors are 37" deep. Though it may be possible to redesign the 611 plate so it takes up less space and costs less work area to enable it to fit only a needle cutter.

Along the same lines...I've been thinking about the Z on the low rider. 3" might actually be cutting it kind of close with a needle cutter. The migtip sticks out about 1". I only use 1/2" thick foam for my spoilboard and I use 5mm above the work for moves (or about 1/4") Add in 1/4" for the work and that's eating up 2 of the 3 inches already. It's probably possible to build a vac table into that last inch (or use some of the spoilboard to avoid taking up more space) but it might be worth thinking about sinking it into the table at that point.

Of course the cutter could be modified to raise itself up and have the mig tip flush with the bottom of the plate....but it does point out that worrying about countersinking the screws on the plate is probably not worth the effort.


I've also been thinking about the phlat printer style of approach and eliminating the table in one dimension moving the work instead. But...I use my foamboard right up to the edges very often and I'm having a hard time thinking of a feed system that would allow that.