My first swing at designing a plane... B-17

EDinCT

Member
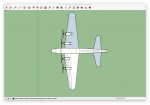
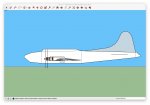
So I'm thinking roughly 75" span. The wing will be built in 4 sections joined by ply spars sandwiched between foam spars, and the fuse will have to be in two sections as well since I'm at about 40" length. (I've built plenty of balsa and ply planes like this- just need to figure out the best way to do it with the foam... maybe an internal doubler at the joint. I intend on keeping the first version squarish FT style. The pics below are still very rough but give the basic idea of what I'm thinking. The finished wing will have dihedral not yet drawn in. Thoughts??
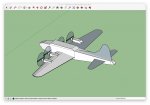
Untitled.jpg

Side.jpg

Top.jpg
 
Last edited:

EDinCT

Member
I am just about finished with the wing. I added a main spar and built the inner and outer engine nacelles. I redesigned an existing power pod that will slide in the nacelle and lock into the spar (kind of like the FT Sea Duck if you have built that). Because the inner and outer Nacelles are both slightly different, that also means the inner and outer power pods are both slightly different. I am also using a 3d Printed cowl that I downloaded for the Sea Duck that will fit this perfectly. Only thing left of the wing is to add dihedral and one more center spar.

Wing 1.jpg

Wing 3.jpg

Wing 2.jpg

I also started refining the fuse shape. First up was the windshield. Something doesn't quite look right. Im thinking of making the cabin top a separate piece that is a little narrower. Still a long way to go.

Fuse.jpg
 

EDinCT

Member
Some more work on the fuse. I think thats about as good as I'm going to get and still keep it FT style. Just about ready to flatten out and cut some foam.

Fuse 3.jpg
 

Attachments

  • IMG_6476.PNG
    IMG_6476.PNG
    318.1 KB · Views: 67
Last edited:

Tench745

Master member
Looks good. I would consider flattening your nose-cone just a little bit more. The point is a bit too severe at the moment. It might be bulkier and look better when made in foam though.
 

unrauv

Active member
Looks good, nice start. Its a major plane to start with but dive right in at the deep end!! My second design was an Avro Lancaster.
 

EDinCT

Member
Looks good. I would consider flattening your nose-cone just a little bit more. The point is a bit too severe at the moment. It might be bulkier and look better when made in foam though.

Appreciate the advice. I'm finding myself going crazy making a change here and there trying to get it to look more like a B-17. I think I need to remind myself that this will be a prototype and I can perfect #2.

I flattened the nose here... not sure if thats what you meant, but I can see it will make that piece a little easier to make. Also setup a "tool" to dimension and make my internal formers. The aft line will be where the two fuse pieces will join (based on 20x30 DTFB) and the front line is where the nose will slide off to access battery(s) and electronics.

Fuse 4.jpg
 
Last edited:

DamoRC

Elite member
Mentor
Looks great! Only comment would be that the ailerons look a little small, 75 inches will be a lot of wing to roll over.

I think the nose cone will look fine once you have actually made it. If you want to try a different approach to get a more round nose you could try something like this...

rounded nose.jpg

DamoRC
 

EDinCT

Member
Looks good, nice start. Its a major plane to start with but dive right in at the deep end!! My second design was an Avro Lancaster.

Thanks! At first I was worried I bit off more than I can chew.. But its the CAD part that scared me. Now on day 6 of using Sketchup Im finding it easier and easier. My last balsa plane was a Ziroli B-25 so the build part of this will be rather easy for me. (hopefully not famous last words.)
 

EDinCT

Member
Looks great! Only comment would be that the ailerons look a little small, 75 inches will be a lot of wing to roll over.

I think the nose cone will look fine once you have actually made it. If you want to try a different approach to get a more round nose you could try something like this...

View attachment 104287

DamoRC

Thanks! I Think you are right on the Ailerons. I like your idea with the nose, but I tried something like that to make a turret on top, but my CAD skills suck so far... I'll keep at it.
 

DamoRC

Elite member
Mentor
Thanks! I Think you are right on the Ailerons. I like your idea with the nose, but I tried something like that to make a turret on top, but my CAD skills suck so far... I'll keep at it.

For 6 days on the job, you are doing really nice work!

Here's an outline of what I do for this type of part

(1) Select the circle tool
(2) Note in the bottom right it says "Sides 24".
(3) Type "8" to change the number of sides to 8 (easier to work with for this example)
(4) Draw your circle base (after you click to start the circle you can just type the radius to size it, here I set the radius to 4"
(5) Select the Line tool
(6) Draw lines between the vertices to mark the center
(7) Draw a line perpendicular to the circle surface, in this example the line is the same as the radius
(8) Select the 2 point Arc tool. This is a "three-click tool".
(9) When you select the tool, the number of sides is shown in the bottom right, for this example I changed this by typing "8" (10)
(11) Click on a vertex, move the pointer to the opposite vertex and click again - this sets the base for the arc
(12) Click on the top of the vertical line - this sets the height of the arc
(13) You will end up with a semicircle running from one vertex to the opposite vertex
(14) Repeat this for all the vertex-pairs
(15) Using the line tool, draw lines to join the segments of the arcs
(16) The final dome.

How to Draw Round Noses.jpg

Hope this is helpful.

DamoRC
 

EDinCT

Member
DamoRC...

THANK YOU!!!! Now I get it!!!! That was perfect! Im going to keep my nose as is, but I made a turret. :)

There is a guy here that did a bunch of videos on how to use Sketchup. Thats what I used to learn the basics. Now I'm starting to get the hang of it. I just wish he finished the series...

Fuse 5.jpg
 

DamoRC

Elite member
Mentor
Glad it helped - turret looks good!

If you have any other questions on Sketchup, just post them. Folks are always willing to help out.

DamoRC
 

EDinCT

Member
Fuse Done

I think the fuse is now ready. I added all internal formers and If my math is right this should go together nicely.

Here is a final screenshot along with an exploded view to get an idea of how it will be built. I appreciate those that have been leaving feedback!!

Fuse 6.jpg

Fuse 7.jpg

Edit.. After posting I realized that a couple formers don't have tabs or corresponding holes to fit into... sooo.. Not quite done yet.
 
Last edited:

TEAJR66

Flite is good
Mentor
This is looking very good. A little more in depth build. If this is one of your first goes at Sketchup, you are doing very well.

I have a little bit of experience with SU and have a functional process. If you have specific questions, you could PM me and I might be able to help.

Are you using the Unwrap and Flatten Faces plug in? Two other helpful plug-ins are Bezier Curve, and Weld.

Keep up the great work. I can't wait to see your finished plane.
 

EDinCT

Member
Thanks! I played around with fusion 360 for most of the winter teaching myself how to make parts that I could print, so this wasn’t that bad to learn. The hard part was that I didn’t have a “process” in the beginning, so the fuse in the first post was completely scrapped once I realized nothing was lining up. I’m using a “box” drawn over the 3 view now that I use to keep all my critical dimensions square. Working great and much easier. I also needed to learn the difference between groups and components.. that was really messing me up. YouTube videos are a wonderful thing! I’m going to do the same thing with wing next. It looks ok from a distance but some things aren’t lining up. Now that I have somewhat of a clue what I’m doing I need to go back and fix it.

I need to find, install, and learn how to use whatever to unwrap/flatten. Any tips would be greatly appreciated. The video series I watched had a plug-in called flattery (?) but can’t seem to find it.

I always enjoyed the threads of guys building something from the ground up. So I wanted to try it!
 

EDinCT

Member
Well it seems I have hit a brick wall.

I loaded the flatten faces plugin only to find out that it unwraps automatically and randomly. It seems there is no option to manually flatten. Unless Im missing something that is useless.
I also loaded Flattery, but it doesn't work on anything newer than sketches 2015. crashes the program every time I try to use it.

Any ideas??
 

TEAJR66

Flite is good
Mentor
Flattery was nice. Only used it a couple times before it was outdated.

One key before flattening is to Orient Faces. Once all the inside faces and all the outside faces are the same, they flatten more as an unfolding than a squishing.

Another trick is to use it on smaller sections and join the sections again once they are flattened. For a fuselage, I do the top, then each side then the bottom.

The way the latest version (that I used) flattened, it made a new group and also left the original set that you flattened. I like to ungroup the new group and flatten those faces again. When you look at the new flattened faces there are two sets in the same spot, the ungrouped faces you flattened and the new group that the flatten operation made. I select the new group and drag it off to the side and use it.