Thomas-Morse S4C Scout: Flite Fest 2022 Dawn Patrol Build

Tench745

Master member
While it is a little known aircraft, it is probably the most well known American-built WWI fighter. I'm referring to Ithaca, New York's own "Tommy" Scout.
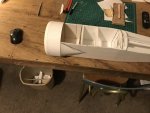
I found a set of plans for a free-flight model on Outerzone, scaled them up 150% to 1:6 scale and cut out a few pieces to understand how big this plane might be and whether I really want to tackle a build of this scale. Before I knew it I had a good start on a fuselage and was committed.
IMG_2034.JPG IMG_2035.JPG
On the firewall I had a mis-aligned layer on the first pass with my laser, but I caught and corrected it. Annoying, but not worth remaking the part.
IMG_2033.JPG
The face of the cowling is five layers of paperless DTFB sandwiched together and carved/sanded to shape. A wrap of foam forms the depth of the cowling.
IMG_2032.JPG IMG_2036.JPG IMG_2037.JPG
This landing gear, though it looks simple, was probably the most complicated wire bending I've yet done
. IMG_2039.JPG
I didn't have a complete plan when I started this (still don't), so I am making things up as I go along.
Underside of the fuselage box cut out for lightness before gluing on the lower turtledeck.
IMG_2045.JPG
Wing plans printed out and laid in place to visualize the size of this thing... Much smaller than my Spirit of St. Louis, but still not small.
IMG_E2046.JPG
I don't know yet how I want to build the wings, attach them to the fuselage, or actuate the ailerons.
I'm leaning towards a Clark-Y type airfoil with ribs and foam sheathing over wood spars. If I were to do an undercambered wing I would probably hotwire cut it because I don't know how else to achieve that. I want to do something a little more scale than an FT fold-over wing.
I'm thinking I want a central servo in the fuselage operating pushrods and torque tubes for the ailerons like on the full scale, but this will probably mean mounting the wing permanently which I'm not thrilled about.
I plan to do pull-pull cables for the rudder and elevator.
Last of all, I need a power system. I'm saving this one for near last so I can get a sense of how heavy the plane will turn out. Ideally I would like to swing a scale 16" prop, but that would require either a large(ish) motor or a reduction drive on a smaller one. The tinkerer in me wants to make a belt reduction drive, but I doubt I will have the time for that before FF2022.
As ever, I'm open to ideas and suggestions.
 

willsonman

Builder Extraordinare
Mentor
A 16" prop is doable on a smaller motor you just have to think more about thrust rather than speed. Remember that it's more critical that you achieve the correct power window for your model. The general rule of thumb is 100W/pound. 100W is 100W. So, if you have a 12x8 prop on 3S pulling 400W but then you throw on a 16x6 prop on the same motor but on 2S you will likely see close to the same 400W. It get tricky and some trial and error but the thrust you get is a nice tradeoff.

The other advantage here is you get a much more scale flight experience. The prop spinning at a lower and more scale RPM and then you are also forced to fly the airplane more, rather than flying the prop.

I've touched on this on a few of my builds over the years and I'm sure @wilmracer can attest to my approach here. Between the Fokker D.VIII, Gee Bee R-1, Curtiss P6-E Hawk, among many other of my builds that use much lower cell counts than expected, it's a tried and true approach. People hear "quarter-scale" and instantly think it HAS to have at least a 10S or 12S battery only to find out I'm using a 6S pack for a 22" prop. and getting tremendous efficiency flying for 10+ minutes on a 6000mAh pack.

All that said, you've got yourself a SOLID start on your project. I've always believed that Scouts are under appreciated. It's a simple but robust platform and a great subject for a first-time build of a biplane. I'm looking forward to your progress.
 

wilmracer

I build things that fly (sometimes)
Mentor
I've touched on this on a few of my builds over the years and I'm sure @wilmracer can attest to my approach here.

Agreed... It can take some testing and you need to make sure motors/ESC can work with the lower voltages but I'm doing the same thing with my Albatros. As long as I hit the Watts/Lb I want I should be GTG. I don't care much about top speed, as long as it has some headroom above stall speed :)
 

wilmracer

I build things that fly (sometimes)
Mentor
So I've added a few names to the list. If I've left you off I do apologize... there is a lot of building going on and it is tough to know for sure what is related to this challenge. If I have left your build off let me know and I'll get your name and build thread added to the list in the first post.
 

willsonman

Builder Extraordinare
Mentor
So I've added a few names to the list. If I've left you off I do apologize... there is a lot of building going on and it is tough to know for sure what is related to this challenge. If I have left your build off let me know and I'll get your name and build thread added to the list in the first post.
Hey Carl, I think this is your missing post from the other thread! :p
 

Beaver5150

Active member
While it is a little known aircraft, it is probably the most well known American-built WWI fighter. I'm referring to Ithaca, New York's own "Tommy" Scout.
I found a set of plans for a free-flight model on Outerzone, scaled them up 150% to 1:6 scale and cut out a few pieces to understand how big this plane might be and whether I really want to tackle a build of this scale. Before I knew it I had a good start on a fuselage and was committed.
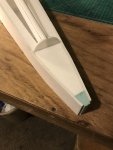
View attachment 223416 View attachment 223417
On the firewall I had a mis-aligned layer on the first pass with my laser, but I caught and corrected it. Annoying, but not worth remaking the part.
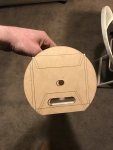
View attachment 223415
The face of the cowling is five layers of paperless DTFB sandwiched together and carved/sanded to shape. A wrap of foam forms the depth of the cowling.
View attachment 223414 View attachment 223418 View attachment 223419
This landing gear, though it looks simple, was probably the most complicated wire bending I've yet done
. View attachment 223420
I didn't have a complete plan when I started this (still don't), so I am making things up as I go along.
Underside of the fuselage box cut out for lightness before gluing on the lower turtledeck.
View attachment 223421
Wing plans printed out and laid in place to visualize the size of this thing... Much smaller than my Spirit of St. Louis, but still not small.
View attachment 223423
I don't know yet how I want to build the wings, attach them to the fuselage, or actuate the ailerons.
I'm leaning towards a Clark-Y type airfoil with ribs and foam sheathing over wood spars. If I were to do an undercambered wing I would probably hotwire cut it because I don't know how else to achieve that. I want to do something a little more scale than an FT fold-over wing.
I'm thinking I want a central servo in the fuselage operating pushrods and torque tubes for the ailerons like on the full scale, but this will probably mean mounting the wing permanently which I'm not thrilled about.
I plan to do pull-pull cables for the rudder and elevator.
Last of all, I need a power system. I'm saving this one for near last so I can get a sense of how heavy the plane will turn out. Ideally I would like to swing a scale 16" prop, but that would require either a large(ish) motor or a reduction drive on a smaller one. The tinkerer in me wants to make a belt reduction drive, but I doubt I will have the time for that before FF2022.
As ever, I'm open to ideas and suggestions.
I'm a fan of making it up as you go. Prop size for me usually boils down to ground clearance after landing gear is on fuselage complete with wheels. I figure motor and pitch later.
What's target AUW?
 

Baron VonHelton

Elite member
I'm a fan of making it up as you go. Prop size for me usually boils down to ground clearance after landing gear is on fuselage complete with wheels. I figure motor and pitch later.
What's target AUW?

As a historian, the prop must be the correct size as the real one was. I found a 6" prop is not the correct size for the Mighty Mini (1/12th scale), and that a 9" is more accurate.

(y)
 

Tench745

Master member
I'm a fan of making it up as you go. Prop size for me usually boils down to ground clearance after landing gear is on fuselage complete with wheels. I figure motor and pitch later.
What's target AUW?
I'm hoping for a flying weight of around 4lbs, but anything under 6 will be no issue provided I can get the CG correct.
 

Tench745

Master member
Any updates? Build is looking great!
Updates? Yes!
I just finished putting a new oil-pan gasket in my pickup in case I want to bring it to Flite Fest again instead of my little Pontiac Vibe. Lots more jobs like that to go, but I've been plugging away at the Scout a little every day after work and between the other projects.

So, where to begin. 3D printing has happened. I printed off @willsonman's wire spoke wheels. Initailly I made tires from some 1/2" foam rod. They looked good and were sufficiently springy/spongy, but they were a bit small for the width of the rims. Rather than buying some larger diameter foam rod and paying shipping from McMaster again, I decided to try out some flexible filament. I went with Ninja Tek Cheetah filament because it's supposed to be the easiest to print. I've got to say, it worked pretty well. I had a couple failures, but after turning down the cooling fan and adding supports, I had two successful prints.

Laced wheels without and with foam tires
IMG_2092.JPG IMG_2093.JPG

Comparison of the printed tires and the foam tires.
IMG_2191.JPG IMG_2193.JPG IMG_2192.JPG

The motor I ordered came in. It's a Dualsky 3520 510kv motor. This should let me run a scale 16" prop on a 3s battery. Testing is still in order.
With the motor in hand I was able to build the motor mount box and check fits. Everything looked pretty good, except that the included prop washer is too big to use the 3D printed crush plate I made earlier. I printed a larger one, but it just looks goofy. Speaking of printing, I also printed and painted a dummy LeRhone rotary for the cowling. I think it came out well but I still have to figure out how to mount it for flight. My one concern about it is material choice. I only had PLA at the time, so I worry about heat distorting it in flight. Again, motor testing will be required.
IMG_2194.JPG IMG_E2187.JPG IMG_2195.JPG IMG_2196.JPG

What else... Tail surfaces are installed and pull-pull lines have been run. I got a coil of small diameter nylon tubing from McMaster to run the lines through. This makes for a clean, low friction installation through the tail section and I can more easily run a replacement line if I ever have to.
IMG_2199.JPG IMG_2200.JPG IMG_2201.JPG

I had originally planned to glue the lower wing in permanently, but upon measuring my Vibe, I determined that this would not be feasible. The plane would fit, but there would be little room for anything else. As such, I had to cobble together a detachable lower wing mount. About this time I also realized that I had the incidence wrong on the lower wing and had to shim it. I'm not thrilled with the final result, but it seems to work. This gives me the added bonus of access to the underside of the servos when the wing is removed.
IMG_2197.JPG IMG_2198.JPG
This is where she stands now. I am currently adding blocking in the upper wing for the aileron cutouts. I need to decide if I'm doing torque tubes for the ailerons, or if I'm going to do things the easy way and just throw a pair of servos in. I'll also need to add some wood in the wing for the cabane to mount onto, and then I can set the upper wing incidence, trim the rear cabane, and solder on the attachment lugs.
IMG_2094.JPG IMG_2104.JPG

Also, I got some paint mixed up for later. Did you know that no one knows what color British WWI planes were? There is a military specification for a paint color; PC-10. It calls out the proportions of pigment to use, but the actual color of the pigments could vary from batch to batch and different carriers for the pigment would also change the color. And it changed color as it dried/aged over time. So depending on all these variables, PC-10 could be anywhere from almost khaki to light green, to chocolate brown.
Why does this matter for a US plane? Well simple, the US "olive drab" is a direct decedent of PC-10, matching it in WWI and gradually changing shades over the years to to the color we know today.

In case you were wondering or wanted to color match, I went with "Hindu Lotus" by Behr.
 

willsonman

Builder Extraordinare
Mentor
Oh. My. Goodness!!! Wow that’s some serious work you’ve been doing. I’m so glad you got the wheels worked out and printing TPU is not a huge deal if you’ve got the direct drive extruder. That learning curve is shallow but the dummy motor turned out just perfect! Loving what you’ve done and look forward to more.
 

The Fopster

Master member
Updates? Yes!
I just finished putting a new oil-pan gasket in my pickup in case I want to bring it to Flite Fest again instead of my little Pontiac Vibe. Lots more jobs like that to go, but I've been plugging away at the Scout a little every day after work and between the other projects.

So, where to begin. 3D printing has happened. I printed off @willsonman's wire spoke wheels. Initailly I made tires from some 1/2" foam rod. They looked good and were sufficiently springy/spongy, but they were a bit small for the width of the rims. Rather than buying some larger diameter foam rod and paying shipping from McMaster again, I decided to try out some flexible filament. I went with Ninja Tek Cheetah filament because it's supposed to be the easiest to print. I've got to say, it worked pretty well. I had a couple failures, but after turning down the cooling fan and adding supports, I had two successful prints.

Laced wheels without and with foam tires
View attachment 226068 View attachment 226069

Comparison of the printed tires and the foam tires.
View attachment 226072 View attachment 226074 View attachment 226073

The motor I ordered came in. It's a Dualsky 3520 510kv motor. This should let me run a scale 16" prop on a 3s battery. Testing is still in order.
With the motor in hand I was able to build the motor mount box and check fits. Everything looked pretty good, except that the included prop washer is too big to use the 3D printed crush plate I made earlier. I printed a larger one, but it just looks goofy. Speaking of printing, I also printed and painted a dummy LeRhone rotary for the cowling. I think it came out well but I still have to figure out how to mount it for flight. My one concern about it is material choice. I only had PLA at the time, so I worry about heat distorting it in flight. Again, motor testing will be required.
View attachment 226075 View attachment 226084 View attachment 226076 View attachment 226077

What else... Tail surfaces are installed and pull-pull lines have been run. I got a coil of small diameter nylon tubing from McMaster to run the lines through. This makes for a clean, low friction installation through the tail section and I can more easily run a replacement line if I ever have to.
View attachment 226080 View attachment 226081 View attachment 226082

I had originally planned to glue the lower wing in permanently, but upon measuring my Vibe, I determined that this would not be feasible. The plane would fit, but there would be little room for anything else. As such, I had to cobble together a detachable lower wing mount. About this time I also realized that I had the incidence wrong on the lower wing and had to shim it. I'm not thrilled with the final result, but it seems to work. This gives me the added bonus of access to the underside of the servos when the wing is removed.
View attachment 226078 View attachment 226079
This is where she stands now. I am currently adding blocking in the upper wing for the aileron cutouts. I need to decide if I'm doing torque tubes for the ailerons, or if I'm going to do things the easy way and just throw a pair of servos in. I'll also need to add some wood in the wing for the cabane to mount onto, and then I can set the upper wing incidence, trim the rear cabane, and solder on the attachment lugs.
View attachment 226070 View attachment 226071

Also, I got some paint mixed up for later. Did you know that no one knows what color British WWI planes were? There is a military specification for a paint color; PC-10. It calls out the proportions of pigment to use, but the actual color of the pigments could vary from batch to batch and different carriers for the pigment would also change the color. And it changed color as it dried/aged over time. So depending on all these variables, PC-10 could be anywhere from almost khaki to light green, to chocolate brown.
Why does this matter for a US plane? Well simple, the US "olive drab" is a direct decedent of PC-10, matching it in WWI and gradually changing shades over the years to to the color we know today.

In case you were wondering or wanted to color match, I went with "Hindu Lotus" by Behr.
That dummy motor is quite something. Fabulous!
 

Tench745

Master member
That dummy motor is quite something. Fabulous!
Thank you. It's a file from ianda217 on thingiverse. I resized it to 1/6 scale, printed it in black PLA, sprayed with chrome spraypaint. Went back over it with various colors; a rust brown for the crankcase, a little brown mixed into silver for lightly rusted parts, and some blue and silver for the front plate on the crankcase. I then followed up the color coats with a black wash and then some brown ink for that burnt-on castor oil look. The intake tubes were the only thing I used any filler on, then sanded smooth and painted with some Testors copper enamel. The pushrods are just bare music wire.
 

The Fopster

Master member
Thank you. It's a file from ianda217 on thingiverse. I resized it to 1/6 scale, printed it in black PLA, sprayed with chrome spraypaint. Went back over it with various colors; a rust brown for the crankcase, a little brown mixed into silver for lightly rusted parts, and some blue and silver for the front plate on the crankcase. I then followed up the color coats with a black wash and then some brown ink for that burnt-on castor oil look. The intake tubes were the only thing I used any filler on, then sanded smooth and painted with some Testors copper enamel. The pushrods are just bare music wire.
I’m printing the same model for my Sopwith Pup, but the detail finishing and paintwork won’t be to your standard. That’s amazing!
 

Tench745

Master member
Just did a power test and filmed the first bit of it to get a feel for performance.
Started with a fully charged 2200mah 20c 3s battery
Got the following numbers (approximate) from my watt meter.
1/2 throttle: 7.4 Amps, 12.18 Volts, 90 Watts
3/4 throttle: 18.3 Amps, 11.67 Volts, 213.5 Watts
Full throttle: 34.5 Amps, 10.9 Volts, 373.5 Watts
Voltage recovered to about 11.5 after the test.
4 lbs of thrust on the fish scale at full throttle. It's probably producing more but the resistance of the grass limits the force the scale sees.

I stopped recording and let the motor run at full throttle until I'd used 1000mah according to the Watt meter. That took about 2.5minutes total. At the end of this run the motor and ESC were only about 62° F.
There was noticeable voltage drop at full throttle, the battery became warm, and it started to feel a little spongy. So, I will likely want a bigger and/or higher C-rated battery for this. Might just run two of my 2200s in parallel, we'll see.
 

Tench745

Master member
Also, someone remind me to make a post about iteration and how important it is.
When doing things for the first time, you rarely get it right. Analyzing and correcting failure points is very important.