Archimedian
Member
This is an attempt to use aluminum tubing from a craft store to fabricate spring loaded landing gear for my DC3 winter build. rcfbaircraft.com offers a good set of plans for the airframe.
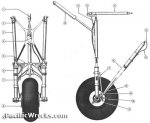
First, a detail of the DC3 undercarriage.


Supplies
Select two diameters of aluminum tubing that are only one size apart. One should be able to slide smoothly and snugly within the other. Try not to pick a bent piece.
A fine propane torch and some aluminum solder. This may not be necessary, but i wanted a crossbar to minimize twisting of the assembly.
Find springs from the inside of ball point pens. They vary in size, but as wide in diameter as possible seems to make the most sense. When completed, you can use a small scale to test the amount of load the spring will handle before bottoming out. Simply press the wheel into the scale until the assembly compresses about halfway through its range.
Small rubber bands.
Stiff, steel wire.
1/8th inch plywood, or your favorite hard-point material.
And your wheel of choice. Mine is just a paper mock up.
There are four elements to this arrangement. The plate, the upper tube, the lower tube, and the alignment members. The upper tube has a hole drilled through on one end, to hold it up against the plate, while allowing it to rotate slightly. The lower tube also has a hole drilled across its end, which is oriented at the bottom, and will accept the wheel axle. Placing the lower tube within the upper tube, you can now visualize the suspension tube. A spring is inserted into the larger tube, where it comes to rest against the pin. The inner tube slides in and meets it. (you may need to close of the end of the inner tube so that the spring doesn't slip through it. So now it works, but it would just fall off after liftoff. For this reason, a rubber band is strung inside the tube, where it hangs from the axle below and the axle-like pin above. Finally, in order to prevent the gear from folding back on the upper pin, the alignment members are installed. In my case, instead of one Y shaped member, i made two straight ones. The members secure to the wheel-axle and another pin that is aft of the upper cylinder pin. I made mine out of the same tubing, but any material will do. This describes one half of the twin shock system.
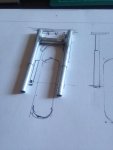
Pictured is the upper tubes and a crossbar to connect them. Because of the presence of the crossbar, i chose to use the larger diameter for the upper tubes. I soldered the crossbar on while the thinner tube was resting inside the larger tubes, to help dissipate heat and prevent the torch from blowing through the thin aluminum.

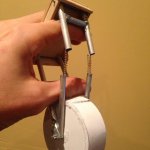
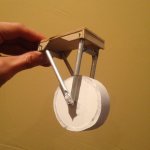
Completed prototype.


Thanks for reading, feel free to post your own scratch undercarriages, and ill keep working and keep you posted.
First, a detail of the DC3 undercarriage.


Supplies
Select two diameters of aluminum tubing that are only one size apart. One should be able to slide smoothly and snugly within the other. Try not to pick a bent piece.
A fine propane torch and some aluminum solder. This may not be necessary, but i wanted a crossbar to minimize twisting of the assembly.
Find springs from the inside of ball point pens. They vary in size, but as wide in diameter as possible seems to make the most sense. When completed, you can use a small scale to test the amount of load the spring will handle before bottoming out. Simply press the wheel into the scale until the assembly compresses about halfway through its range.
Small rubber bands.
Stiff, steel wire.
1/8th inch plywood, or your favorite hard-point material.
And your wheel of choice. Mine is just a paper mock up.
There are four elements to this arrangement. The plate, the upper tube, the lower tube, and the alignment members. The upper tube has a hole drilled through on one end, to hold it up against the plate, while allowing it to rotate slightly. The lower tube also has a hole drilled across its end, which is oriented at the bottom, and will accept the wheel axle. Placing the lower tube within the upper tube, you can now visualize the suspension tube. A spring is inserted into the larger tube, where it comes to rest against the pin. The inner tube slides in and meets it. (you may need to close of the end of the inner tube so that the spring doesn't slip through it. So now it works, but it would just fall off after liftoff. For this reason, a rubber band is strung inside the tube, where it hangs from the axle below and the axle-like pin above. Finally, in order to prevent the gear from folding back on the upper pin, the alignment members are installed. In my case, instead of one Y shaped member, i made two straight ones. The members secure to the wheel-axle and another pin that is aft of the upper cylinder pin. I made mine out of the same tubing, but any material will do. This describes one half of the twin shock system.
Pictured is the upper tubes and a crossbar to connect them. Because of the presence of the crossbar, i chose to use the larger diameter for the upper tubes. I soldered the crossbar on while the thinner tube was resting inside the larger tubes, to help dissipate heat and prevent the torch from blowing through the thin aluminum.

Completed prototype.


Thanks for reading, feel free to post your own scratch undercarriages, and ill keep working and keep you posted.

![WP_20171230_14_08_34_Pro[1].jpg WP_20171230_14_08_34_Pro[1].jpg](https://ftforumx2.s3.amazonaws.com/2017/12/168186_0ebe480fa676fbcba8de1f64032f45c3_thumb.jpg)
![WP_20171230_14_08_48_Pro[1].jpg WP_20171230_14_08_48_Pro[1].jpg](https://ftforumx2.s3.amazonaws.com/2017/12/168187_1b91e818fb69d8dae475eac6a1f8e9f0_thumb.jpg)


