
Grymlock73
New member
I've been watching FT videos for a long while and have always wanted to scratch build something soooo why not my favorite aircraft of all time? Build details are below the vids. ^_^
Thanks to Tim Rodriguez for catching him in the air for me.
Here's some of the early tries with my daughter's commentary :-D
Still tinkering with this guy, but here's the current iteration and measurements in case you want to try and build your own! He flies surprisingly well, though I haven't tried any acrobatics with him yet... maybe this weekend now that I have the parachute release working reliably. The parachute landing was necessary since he has no real way of landing softly because his CG is so far forward... landing gear was out of the question and he'd just come in hard and somersault onto his nose prompting repairs after every outing. I'm currently trying a re-design integrating some of the techniques that have been offered up so far and getting the CG further aft so I can land him on wheels. I really want to keep the proportions as close to this version as possible for aesthetic purposes. ^_^
*I just copy/pasted my post from my original thread and if you click on these images, it auto-downloads... If you want to avoid that, please visit the original post here. The build details are a few down from the top. =)*
https://forum.flitetest.com/index.php?threads/first-post-my-foamboard-snoopy-house-design.65753/
---------------------------------------------------------
Here are the measurements for the Snoopy build; sorry for the messy looking joints... this frame has been my OG version 2 and has been patched back together many times with several motor mount rebuilds.
Electronics used are:
-2307 1750kv motor spinning a 6" tri blade quad prop
-30a esc
-four 9g servos for reverse v-tail elevons, rudder and parachute release
-frsky 6ch receiver
-4s 850mah batt
-36-40" parachute will get you down softly enough to avoid damage
This is also the order in which I built the house:
Walls, airfoil for horizontal crossbeam, vertical supports, roof, control surfaces, and finally Snoopy. I freehanded Snoopy but I'll draw up a new one and add it to the uploads for printing. =)

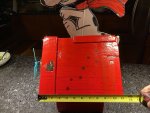
The sides and bottom are just 8"x8" squares; I cut a long 24"x8" section and did one of those fancy folds that I learned on FT") I believe I removed the section on the side walls to preserve the 8" width.
I believe I removed the section on the side walls to preserve the 8" width.


The cross beam is an airfoil... 6" long and 8" wide to fit the interior. I hot glued it in place about a 1/4" from the top of the side wall, flush with the front. The airfoil is two foam boards high, stacked on the interior.
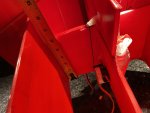

I then cut some foam for the vertical supports; the bottom one should be 5" deep and sit flush with the horizontal crossbeam vertically and from the rear since we'll be mounting the rudder to it. This is also where the parachute (if you choose to use one) will mount as well.

The top vertical support is a bit trickier and unfortunately I don't have any pics to illustrate exactly what I did here (I will update when I build a fresh one though since this air frame is pretty beat up)... The vertical support you want to measure roughly 4" to 4 and 1/4" high, and run the length of the airfoil. I had cut out a seam from the top of the airfoil, but not through the spar, and then notched the bottom of the vertical support to fit over the spar. Then just hot glued the support in place. This is what the peak of the roof is going to sit on.

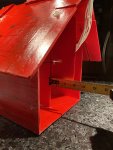
The roof I made out of single piece, cut down the middle to fold and sits equidistance front to back on the house. It measures 11" front to back and 9.5" down one side, or 19" for the full length. I also cut a 2"'ish wide piece to act as a step airfoil for the front and also so that the servos don't stick out and can sit flush.


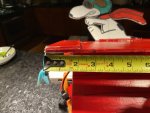
The motor pod/mount was something I struggled with a bit and though it went against my aesthetic desires, I had to poke it out from the front of the house to get the CG where I needed it to be. The battery is mounted underneath. It extends about 3-3.5" out from the front of the airfoil (not the roofline). I would even go as far as 4" just to give you some wiggle room on moving the CG back and forth. I have my battery flush with the front of the motor mount and it JUST gets me to where I need to be.
I stuck some popcicle sticks on the inside to give strength for the velcro strap and I 3d printed a motor mount for it. I'll take some more pics of the interior of the pod when I get a chance. Thingiverse has a ton of printable motor mounts, but this is the one I used:
https://www.thingiverse.com/thing:1522734

The strips that Snoopy sits on were added when I had him able to break away since I didn't want to keep making new ones everytime he landed (crashed) and probably aren't necessary.... I ran a carbon fiber rod through his entire body vertically which gives him enough stiffness to not suddenly bend mid-air... :-D Snoopy actually acts as a great vertical stabilizer to keep this wonky design from rolling on a dime.


Alrighty, control surfaces....
I have the servos waaay up front to help bring the CG forward; you'll see later just how far forward it has to be. =) The reverse v-tail elevons are about 6" long, 1.75" to 2" deep (I basically butted them up against the walls of the house). I ran the servo rods on the interior for aesthetics and durability.


The oversized rudder I very rarely use in flight, but was a great way to trim this guy out who pulls hard left due to the rotor torque.
The parachute release mechanism is a simple rubberband release. Two pins up top and the servo arm on the bottom. =) I have it mounted at the peak of the roof on the back via hot glued paperclip. I would pull up into a climb, pop the switch and the chute will just fall out the back.


And finally, the CG of this guy. It's only 2.75"-3" back from the front of the roofline. =)
I hope these images and details were helpful! I'll try get the Snoopy pattern up as soon as I can. =) Please respond or PM me with any questions! When I build a new frame, I'll document it much better and update. Enjoy!
Thanks to Tim Rodriguez for catching him in the air for me.
Here's some of the early tries with my daughter's commentary :-D
Still tinkering with this guy, but here's the current iteration and measurements in case you want to try and build your own! He flies surprisingly well, though I haven't tried any acrobatics with him yet... maybe this weekend now that I have the parachute release working reliably. The parachute landing was necessary since he has no real way of landing softly because his CG is so far forward... landing gear was out of the question and he'd just come in hard and somersault onto his nose prompting repairs after every outing. I'm currently trying a re-design integrating some of the techniques that have been offered up so far and getting the CG further aft so I can land him on wheels. I really want to keep the proportions as close to this version as possible for aesthetic purposes. ^_^
*I just copy/pasted my post from my original thread and if you click on these images, it auto-downloads... If you want to avoid that, please visit the original post here. The build details are a few down from the top. =)*
https://forum.flitetest.com/index.php?threads/first-post-my-foamboard-snoopy-house-design.65753/
---------------------------------------------------------
Here are the measurements for the Snoopy build; sorry for the messy looking joints... this frame has been my OG version 2 and has been patched back together many times with several motor mount rebuilds.
Electronics used are:
-2307 1750kv motor spinning a 6" tri blade quad prop
-30a esc
-four 9g servos for reverse v-tail elevons, rudder and parachute release
-frsky 6ch receiver
-4s 850mah batt
-36-40" parachute will get you down softly enough to avoid damage
This is also the order in which I built the house:
Walls, airfoil for horizontal crossbeam, vertical supports, roof, control surfaces, and finally Snoopy. I freehanded Snoopy but I'll draw up a new one and add it to the uploads for printing. =)

The sides and bottom are just 8"x8" squares; I cut a long 24"x8" section and did one of those fancy folds that I learned on FT
I believe I removed the section on the side walls to preserve the 8" width.


The cross beam is an airfoil... 6" long and 8" wide to fit the interior. I hot glued it in place about a 1/4" from the top of the side wall, flush with the front. The airfoil is two foam boards high, stacked on the interior.


I then cut some foam for the vertical supports; the bottom one should be 5" deep and sit flush with the horizontal crossbeam vertically and from the rear since we'll be mounting the rudder to it. This is also where the parachute (if you choose to use one) will mount as well.

The top vertical support is a bit trickier and unfortunately I don't have any pics to illustrate exactly what I did here (I will update when I build a fresh one though since this air frame is pretty beat up)... The vertical support you want to measure roughly 4" to 4 and 1/4" high, and run the length of the airfoil. I had cut out a seam from the top of the airfoil, but not through the spar, and then notched the bottom of the vertical support to fit over the spar. Then just hot glued the support in place. This is what the peak of the roof is going to sit on.

The roof I made out of single piece, cut down the middle to fold and sits equidistance front to back on the house. It measures 11" front to back and 9.5" down one side, or 19" for the full length. I also cut a 2"'ish wide piece to act as a step airfoil for the front and also so that the servos don't stick out and can sit flush.


The motor pod/mount was something I struggled with a bit and though it went against my aesthetic desires, I had to poke it out from the front of the house to get the CG where I needed it to be. The battery is mounted underneath. It extends about 3-3.5" out from the front of the airfoil (not the roofline). I would even go as far as 4" just to give you some wiggle room on moving the CG back and forth. I have my battery flush with the front of the motor mount and it JUST gets me to where I need to be.
I stuck some popcicle sticks on the inside to give strength for the velcro strap and I 3d printed a motor mount for it. I'll take some more pics of the interior of the pod when I get a chance. Thingiverse has a ton of printable motor mounts, but this is the one I used:
https://www.thingiverse.com/thing:1522734

The strips that Snoopy sits on were added when I had him able to break away since I didn't want to keep making new ones everytime he landed (crashed) and probably aren't necessary.... I ran a carbon fiber rod through his entire body vertically which gives him enough stiffness to not suddenly bend mid-air... :-D Snoopy actually acts as a great vertical stabilizer to keep this wonky design from rolling on a dime.


Alrighty, control surfaces....
I have the servos waaay up front to help bring the CG forward; you'll see later just how far forward it has to be. =) The reverse v-tail elevons are about 6" long, 1.75" to 2" deep (I basically butted them up against the walls of the house). I ran the servo rods on the interior for aesthetics and durability.


The oversized rudder I very rarely use in flight, but was a great way to trim this guy out who pulls hard left due to the rotor torque.

The parachute release mechanism is a simple rubberband release. Two pins up top and the servo arm on the bottom. =) I have it mounted at the peak of the roof on the back via hot glued paperclip. I would pull up into a climb, pop the switch and the chute will just fall out the back.


And finally, the CG of this guy. It's only 2.75"-3" back from the front of the roofline. =)

I hope these images and details were helpful! I'll try get the Snoopy pattern up as soon as I can. =) Please respond or PM me with any questions! When I build a new frame, I'll document it much better and update. Enjoy!
Last edited: