
You are using an out of date browser. It may not display this or other websites correctly.
You should upgrade or use an alternative browser.
You should upgrade or use an alternative browser.
Twitchity quad with power board - test build
- Thread starter jhitesma
- Start date
Can't wait to see how yours does. I'm really curious to see how those emax blheli ESC's do.
I am running these on my Twitchity hex and my Polakium quad. These ESCs have little red LEDs on the underside. I Love the LEDs on the booms and the narrow profile fits narrow booms like the Warpquad or Twitchity hex well.
I like the UV LED on the booms idea!
Last edited:
Test flight this morning went pretty well.
Replacing that rough motor made a big difference. I suspect that once I get my replacement bearings in and replace the rest of them I'll be a LOT happier with it. May go up to the park this afternoon for some faster testing - but it's going to be over 110 today and I'm a bit concerned about how hot the motors got after just 3 minutes of playing around in the front yard. They're definitely running hotter than they were on simonk and I'm not sure what to try adjusting first to address that. Turning off regen is easy but I'm wondering if pushing motor timing to high may help a bit or if that would make things worse.
Replacing that rough motor made a big difference. I suspect that once I get my replacement bearings in and replace the rest of them I'll be a LOT happier with it. May go up to the park this afternoon for some faster testing - but it's going to be over 110 today and I'm a bit concerned about how hot the motors got after just 3 minutes of playing around in the front yard. They're definitely running hotter than they were on simonk and I'm not sure what to try adjusting first to address that. Turning off regen is easy but I'm wondering if pushing motor timing to high may help a bit or if that would make things worse.
It's still a bit less stable than I'd like when cutting throttle - but definitely way better than it was. A bit of tweaking on my throttle curve should get things where I like it.
It's not quite as stable as it appears in the video - there's still a bit of wobble that didn't used to be there. Based on the change swapping bearings on one motor made though I'm 95% sure fresh bearings in all four will give it back the rock solid stability I expected. I could probably do some more tweaking on the PID's to help...but I'd like to eliminate all physical hardware issues before digging in with software fixes.
And 120 isn't that bad on temps considering it was almost 100 out - so that's only 20 degrees over ambient which isn't unexpected...but they do seem to be running hotter than before. If it wasn't so gusty today I'd take it to the park for some real fun. Maybe this evening I'll catch some calm air and go give it a run.
Twitchity
Senior Member
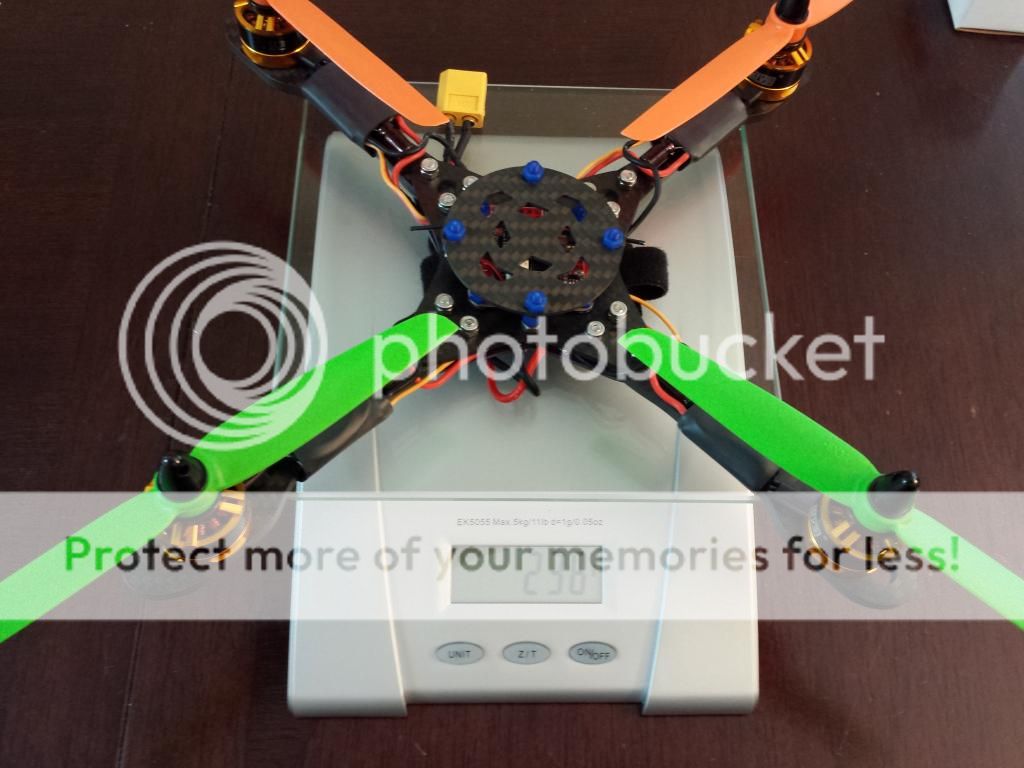
Just finished my quad and I'm waiting on a battery to go take it for a maiden(ish) flight. I had all of the electronics hooked up to the prototype so they just transferred over. I did have to re-calibrate the ESCs though. AUW without battery came in at 236g.
1.5mm cage plate, 2mm top frame plate, 4mm arms, 1.5mm G10 PDB. I'll post more photos later
1.5mm cage plate, 2mm top frame plate, 4mm arms, 1.5mm G10 PDB. I'll post more photos later
Twitchity
Senior Member
Scrap pieces from another project I finished yesterday ") That CF tears through the bits I was using though, good thing they are roughly $1 per bit. On the other project I had to change the bit after every other arm that was cut or else the edges started to look rough. Same for the frame pieces.
That CF tears through the bits I was using though, good thing they are roughly $1 per bit. On the other project I had to change the bit after every other arm that was cut or else the edges started to look rough. Same for the frame pieces.
Here's a close-up of the 4mm arms. I couldn't be happier with the finish on them.
Also, video of maiden just finished uploading. I'm really impressed with these HQ 6030's. The difference between the 5030 and these is night and day.
That CF tears through the bits I was using though, good thing they are roughly $1 per bit. On the other project I had to change the bit after every other arm that was cut or else the edges started to look rough. Same for the frame pieces.Here's a close-up of the 4mm arms. I couldn't be happier with the finish on them.
Also, video of maiden just finished uploading. I'm really impressed with these HQ 6030's. The difference between the 5030 and these is night and day.
Looks great Twitchity! Those 6x3 HQ's really are better than the 5's I'm only using the 5's right now because I fully expected some crashes and would rather trash them than my supply of 6x3's. And for front yard flying the 5x4's are acceptable I've heard that some people have measured and the HQ 5x4's are actually more like a 5x3 which is why they're so disapointing. I'd love to try a real 5x4.5 on these motors. The cut down 6x4.5's still seem a bit borderline aggressive for these motors to me.
That CF came out really nice! Glad to hear you're finally getting the CNC to play nice with it even if it does go through bits fast.
Your motors sound like mine did at first too. One more bit of data pointing at the bearings in mine just going south fast. Just not sure if it's because they're cheap bearings or if it was due to the early crashes I had.
If I do get up to the park tonight I'll swap over to the 6x3's and see how they do with the newly flashed ESC's....
I've heard that some people have measured and the HQ 5x4's are actually more like a 5x3 which is why they're so disapointing. I'd love to try a real 5x4.5 on these motors. The cut down 6x4.5's still seem a bit borderline aggressive for these motors to me.That CF came out really nice! Glad to hear you're finally getting the CNC to play nice with it even if it does go through bits fast.
Your motors sound like mine did at first too. One more bit of data pointing at the bearings in mine just going south fast. Just not sure if it's because they're cheap bearings or if it was due to the early crashes I had.
If I do get up to the park tonight I'll swap over to the 6x3's and see how they do with the newly flashed ESC's....
Twitchity
Senior Member
Your motors sound like mine did at first too. One more bit of data pointing at the bearings in mine just going south fast. Just not sure if it's because they're cheap bearings or if it was due to the early crashes I had.
Mine have never seen dirt (yet). I believe its M2 that's causing the noise since it's the one that causes the most vibrations when testing it on baseflight.
While grocery shopping at the local mega mart today I swung through the hardware section and picked up an aerosol can of plastidip. I had a dip can of it that I used two years ago to protect the nose of a balsa "rocket glider" - but it dried up in the can. I figure the aerosol should last a bit longer since it's never exposed.
First two coats or so just seemed to soak into both the foam and the strap, but I was doing very light coats. Did three heavier coats on top of that and it seems about perfect. To the touch it doesn't seem that much different. But if I hold it against the table and try to slide it the uncoated bits slip all over while the coated bits stay put.
You can see where I masked off the strap - I only coated the bit that is actually in contact with the battery:

I also coated the battery side of my foam pad...but I think this may have been overkill:

Now I can strap the battery in lighter than before and it doesn't go anywhere. Before I'd strap the heck out of it and it would still get moved around in high G moves leaving me worried I'd knock it loose if I really got flying aggressively.
Hopefully winds will be calm in the morning. And hopefully I'll be feeling better. Been a bit sinusey all weekend trying to convince myself it was just allergies and I wasn't getting sick. But before dinner I was feeling really hot and checked my temp - yep...running a 99.9f fever No wonder I've been so out of it today and haven't felt like doing much.
Still need to add a header so I can disconnect the afro easily and want to try switching motor timing to high to see if I can pull it off. But couldn't bring myself to do it all day. Going to get some rest for tomorrow...got invited to a BBQ at one of my daughters friends houses and she'll be upset if I'm too sick to take her!
First two coats or so just seemed to soak into both the foam and the strap, but I was doing very light coats. Did three heavier coats on top of that and it seems about perfect. To the touch it doesn't seem that much different. But if I hold it against the table and try to slide it the uncoated bits slip all over while the coated bits stay put.
You can see where I masked off the strap - I only coated the bit that is actually in contact with the battery:

I also coated the battery side of my foam pad...but I think this may have been overkill:

Now I can strap the battery in lighter than before and it doesn't go anywhere. Before I'd strap the heck out of it and it would still get moved around in high G moves leaving me worried I'd knock it loose if I really got flying aggressively.
Hopefully winds will be calm in the morning. And hopefully I'll be feeling better. Been a bit sinusey all weekend trying to convince myself it was just allergies and I wasn't getting sick. But before dinner I was feeling really hot and checked my temp - yep...running a 99.9f fever
No wonder I've been so out of it today and haven't felt like doing much.Still need to add a header so I can disconnect the afro easily and want to try switching motor timing to high to see if I can pull it off. But couldn't bring myself to do it all day. Going to get some rest for tomorrow...got invited to a BBQ at one of my daughters friends houses and she'll be upset if I'm too sick to take her!
FinalGlideAus
terrorizing squirrels
The motors will run with timing high but keep an eye on temps as they'll probably run hot.
The motors will run with timing high but keep an eye on temps as they'll probably run hot.
Ok, I may not try it then as they already seem to be running hotter than before just at medium-high. I was talking to Fyathyrio on RCG and he shared some of his test data and it looked like he was getting cooler temps on medium-high than on lower timing settings. But he didn't have numbers for high.
Guess I need to get that jumper added so I can disable the afromini and tweak my ESC's without having to heat up the soldering iron then do some tests....
Twitchity
Senior Member
Alrighty, busy weekend but I finally have some time to post my build of the Twitchity Quad Super Ultra Mega Deluxe Ver 2.14.51.9 Rev 3 with PDB official name TBA (seriously... I'm horrible with these names). The main difference between my build and jhitesma's is recessing the FC in the top frame to get the lowest profile possible.
When I first thought of this idea, I was a little skeptical at how the strength/rigidity of the frame would be affected by not having the arms go into the frame more, and a large hole cutout of the top plate. To my surprise, the frame felt rock solid when assembled; my concerns as far as rigidity are gone, and with the abuse jhitesma has put it through, I'm feeling confident about its durability too.
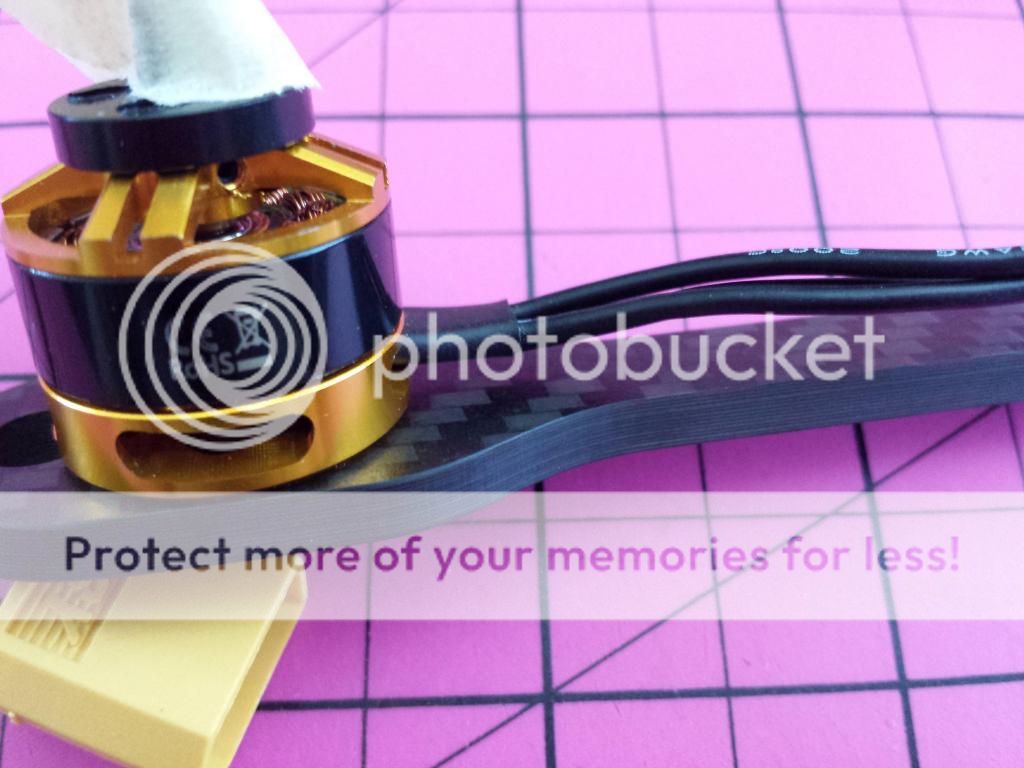
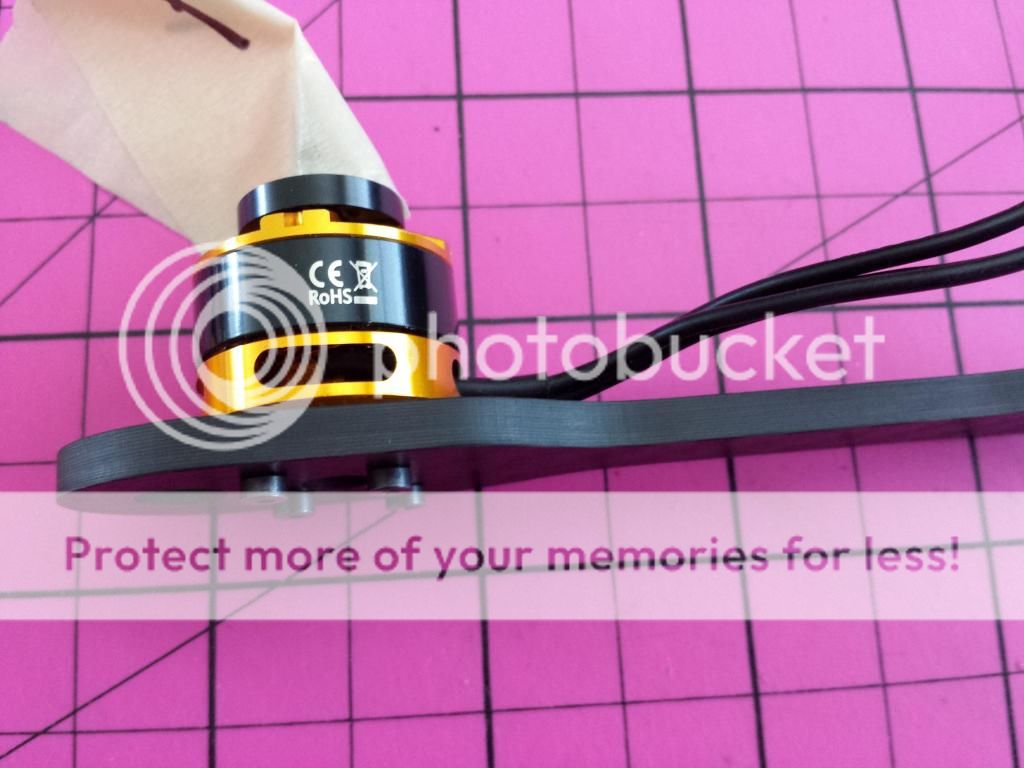
The first step/problem I ran into was how fast the CF ate through the bits I was using to cut the material on the CNC machine. Every bolt hole (except the first one drilled) has to be enlarged with a round diamond file. This took the better part of the build process to complete, but I was able to slowly enlarge the holes so the bolt would barely slide through with a little resistance. Once that was completed I used some 400 grit wet/dry sand paper and knocked off the sharp edges on the CF pieces. Here are a few close-up shots of the 4mm CF used for the arms. The CF is twill weave with a matte finish.
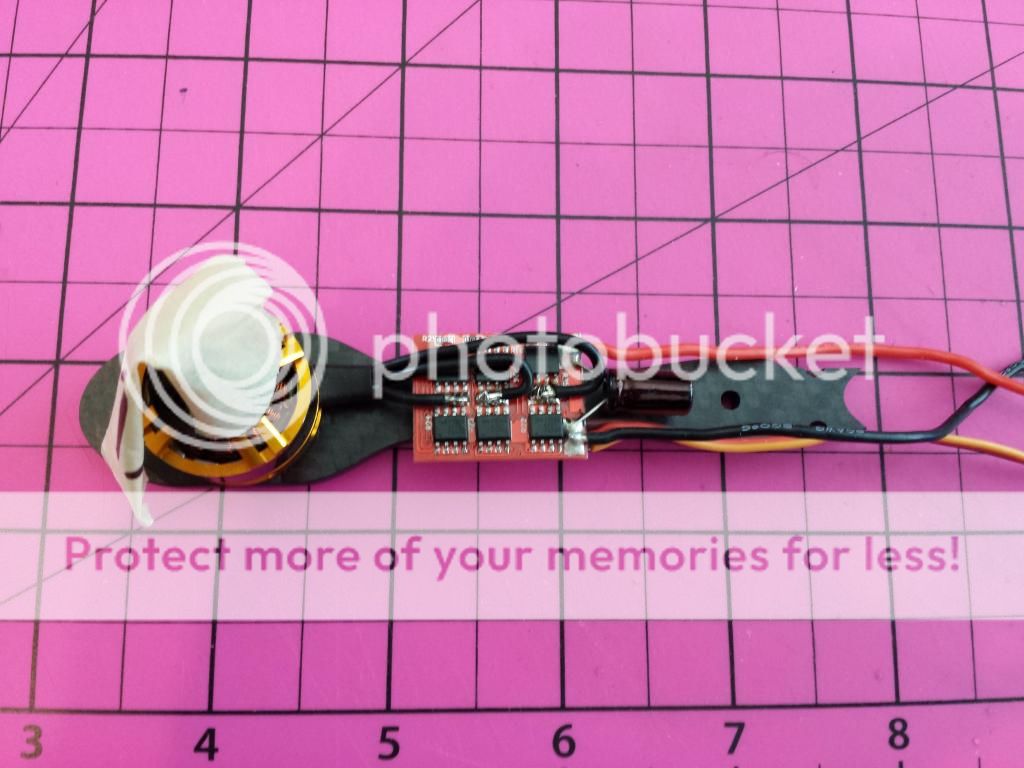
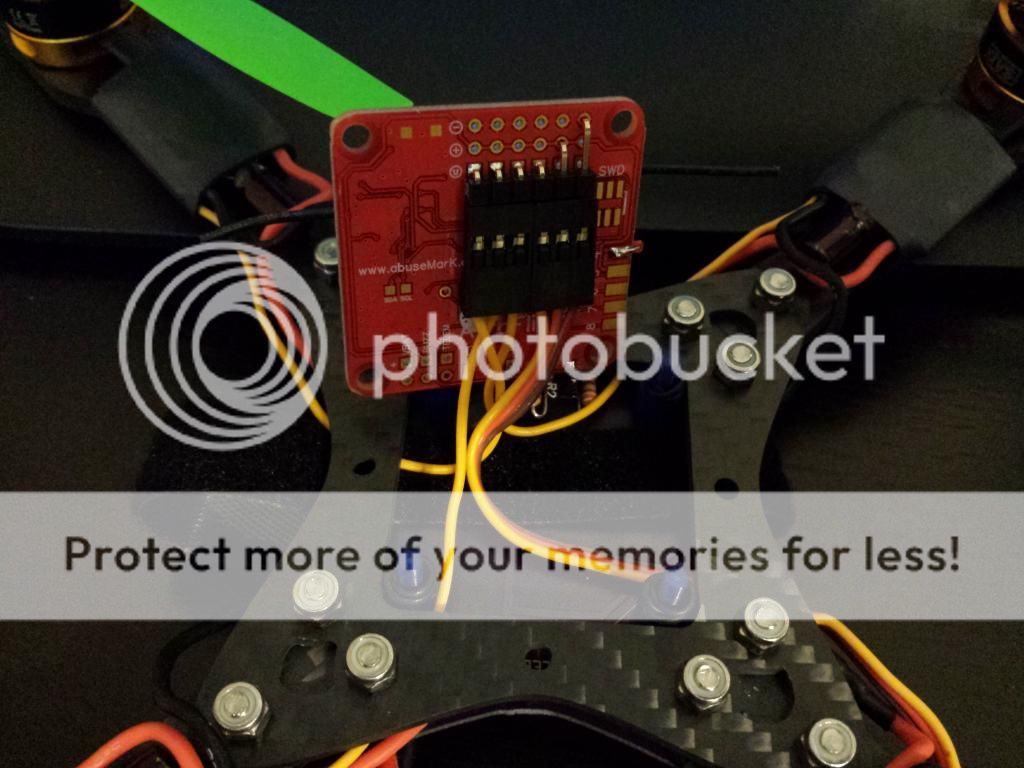
With the CF all finished and motors mounted to the arms, I began preparing the PDB. All of the motor pads were pre-tinned with solder, LED's soldered in place, and some big resistors were temporarily installed until my package comes in from jhitesma with the proper sized resistors. I must say, soldering those little LED's on was the worst part of this build due to their size.

Everyone's seen these pictures before. Motor wires shortened and soldered directly to the ESC's. I like to keep everything as neat as possible here.
And heatshrink. Since all of the electronics was removed from my prototype frame, I wasn't worried about getting the wires mixed up. I unsoldered one at a time and put it back in its place. Each motor was marked so I know where it would go back on the new frame.

Motors all wired, ESC's heat shrunk down, and arms held in place by a few bolts and nuts; time to wire up the PDB. If you notice on M4 (front left) there is some heatshrink on both power wires going to the ESC's. I didn't check when I cut the wires thinking the pos and neg wires would line up with the pads, but with the EMAX ESCs they were on the opposite sides. Easy enough to fix, just needed to solder on the pieces I just cut off and cross them over the arm. If I didn't already solder on the LED's (they are polarity sensitive), I would have just reversed the wires for the battery connection so I could have ran the ESC wires straight to the solder pads.
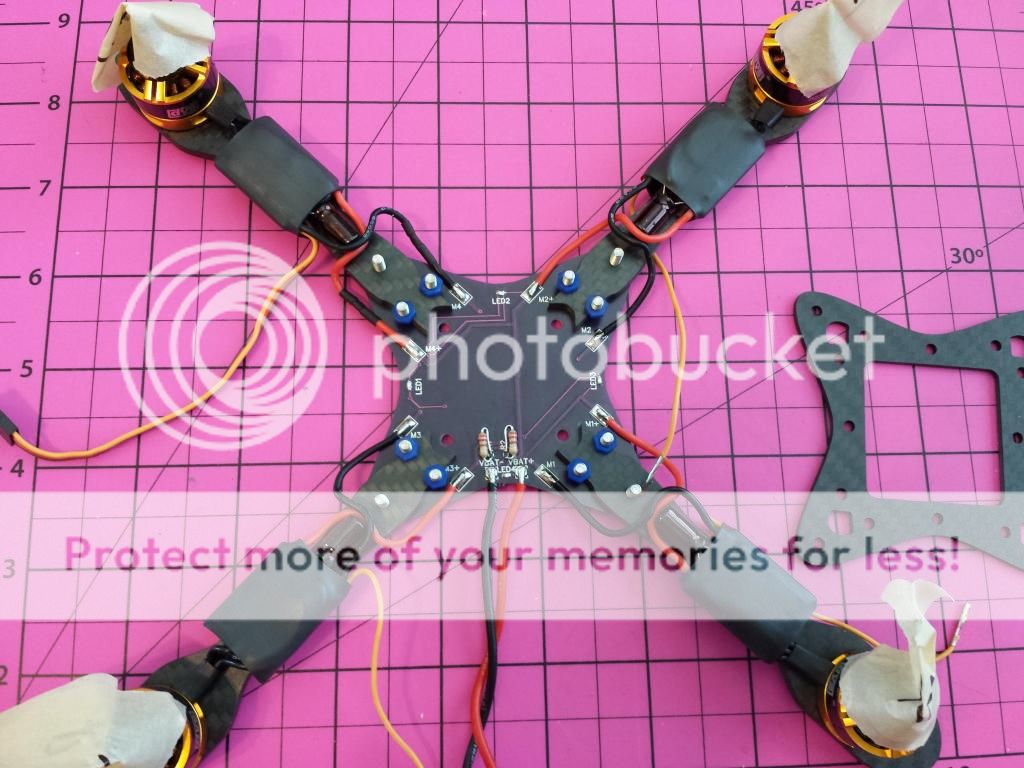
Everything is wired up and the top plate is installed. I routed the ESC signal wires into the center of the frame, and connected M1, M2, and M3 to a single servo connector so they can be plugged right into the Naze32 (not pictured).
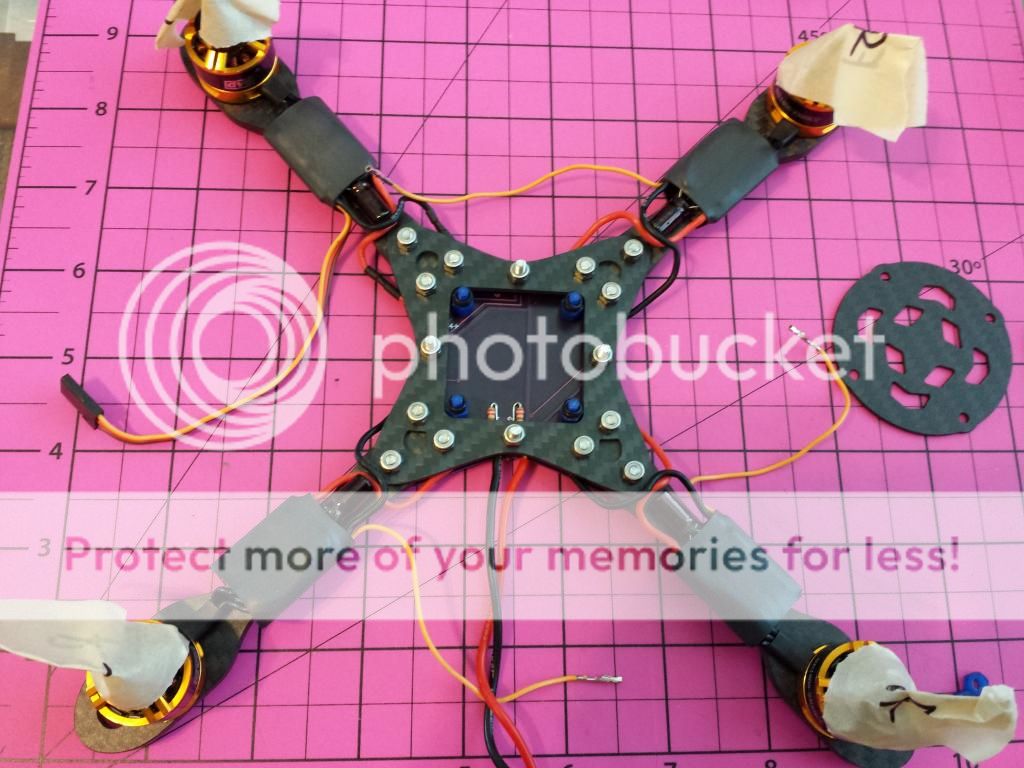
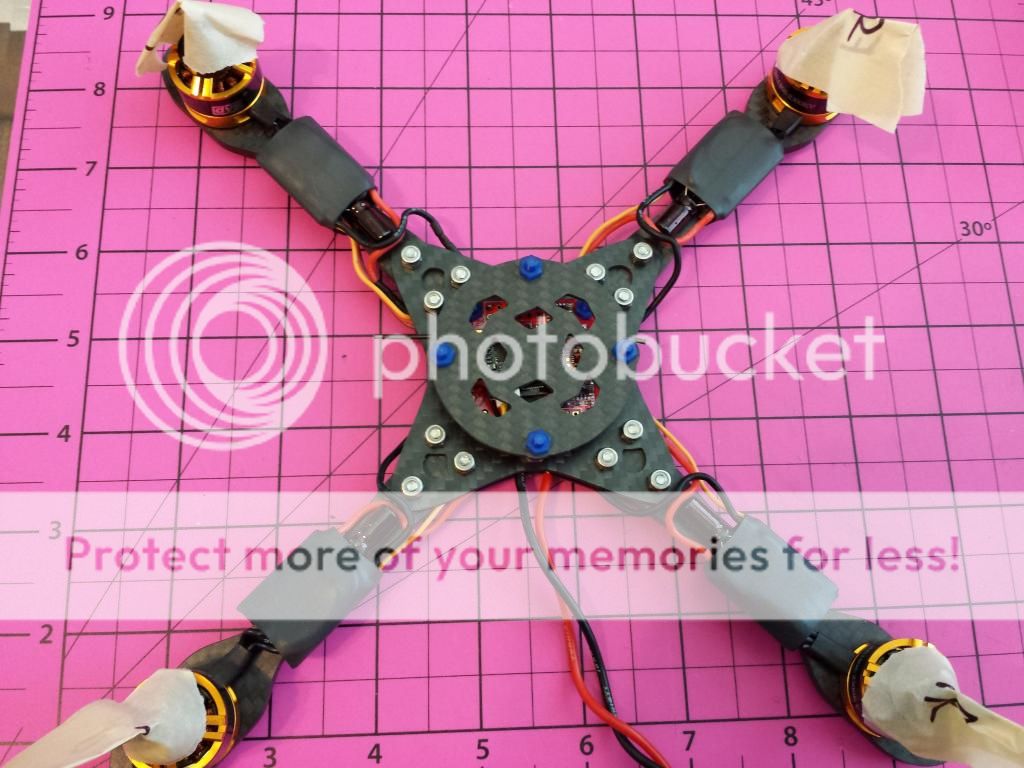
Finally the top cage plate is installed and the build is complete. It wasn't until I went to perform the ESC calibration that I noticed an issue... The rear bolt for the cage blocks the USB port on the Naze32... It's easy enough to fix as I can just dismount the Naze32 to connect it to my computer, but I'll probably end up running the quad without this cage since the motors stick up further than the FC. I might redo the design for the cage so it uses one bolt on each arm to mount to the frame since I like the protection it gives to the FC.
So far I've only taken it for its maiden flight since I was out of town most of the weekend. I hope to get some more flight time in tonight after work and will be adjusting some settings in baseflight.
This will be my quad I use to learn flips and rolls. I will be flying in horizon mode to help out with the recovery out of a flip/roll, but as far as the other settings go (rate, expo, PIDs), where should I start?
When I first thought of this idea, I was a little skeptical at how the strength/rigidity of the frame would be affected by not having the arms go into the frame more, and a large hole cutout of the top plate. To my surprise, the frame felt rock solid when assembled; my concerns as far as rigidity are gone, and with the abuse jhitesma has put it through, I'm feeling confident about its durability too.
The first step/problem I ran into was how fast the CF ate through the bits I was using to cut the material on the CNC machine. Every bolt hole (except the first one drilled) has to be enlarged with a round diamond file. This took the better part of the build process to complete, but I was able to slowly enlarge the holes so the bolt would barely slide through with a little resistance. Once that was completed I used some 400 grit wet/dry sand paper and knocked off the sharp edges on the CF pieces. Here are a few close-up shots of the 4mm CF used for the arms. The CF is twill weave with a matte finish.
With the CF all finished and motors mounted to the arms, I began preparing the PDB. All of the motor pads were pre-tinned with solder, LED's soldered in place, and some big resistors were temporarily installed until my package comes in from jhitesma with the proper sized resistors. I must say, soldering those little LED's on was the worst part of this build due to their size.
Everyone's seen these pictures before. Motor wires shortened and soldered directly to the ESC's. I like to keep everything as neat as possible here.
And heatshrink. Since all of the electronics was removed from my prototype frame, I wasn't worried about getting the wires mixed up. I unsoldered one at a time and put it back in its place. Each motor was marked so I know where it would go back on the new frame.
Motors all wired, ESC's heat shrunk down, and arms held in place by a few bolts and nuts; time to wire up the PDB. If you notice on M4 (front left) there is some heatshrink on both power wires going to the ESC's. I didn't check when I cut the wires thinking the pos and neg wires would line up with the pads, but with the EMAX ESCs they were on the opposite sides. Easy enough to fix, just needed to solder on the pieces I just cut off and cross them over the arm. If I didn't already solder on the LED's (they are polarity sensitive), I would have just reversed the wires for the battery connection so I could have ran the ESC wires straight to the solder pads.
Everything is wired up and the top plate is installed. I routed the ESC signal wires into the center of the frame, and connected M1, M2, and M3 to a single servo connector so they can be plugged right into the Naze32 (not pictured).
Finally the top cage plate is installed and the build is complete. It wasn't until I went to perform the ESC calibration that I noticed an issue... The rear bolt for the cage blocks the USB port on the Naze32... It's easy enough to fix as I can just dismount the Naze32 to connect it to my computer, but I'll probably end up running the quad without this cage since the motors stick up further than the FC. I might redo the design for the cage so it uses one bolt on each arm to mount to the frame since I like the protection it gives to the FC.
So far I've only taken it for its maiden flight since I was out of town most of the weekend. I hope to get some more flight time in tonight after work and will be adjusting some settings in baseflight.
This will be my quad I use to learn flips and rolls. I will be flying in horizon mode to help out with the recovery out of a flip/roll, but as far as the other settings go (rate, expo, PIDs), where should I start?
I assumed you were just going to use the Naze mounts to mount the cage. But yeah, it doesn't give that much extra protection with everything that low already. It does make a nice mobius platform but really needs to be a bit higher for that to get the props out of the frame. I'm going to be putting some taller spacers on mine to try that out.
My bearings didn't come today as I had hoped, they did arrive in Yuma just a few minutes ago though so hopefully I'll have them tomorrow. Been too sick to fly the past few days though. Some kind of head cold or sinus infection messing with my ears - not even going to try putting anything in the air since I can barely stand straight without wobbling
Haven't even felt like picking up a soldering iron to finish adding a way to disconnection power to the afromini.
You're going to have a blast with it. Hardest part about doing flips is working up the courage to try and then committing to it. The #1 reason I crashed when first learning was because I'd freak out and try to bail but it was too late. If you're ok with the way it's flying then don't worry about the PID's. You'll want to turn the RC Rate up a bit but it's the PID rates that really help with flips in my experience. If it gets too twitchy once you turn up the RC Rate then some expo can help compensate for that around mid-stick.
Just make sure you have enough altitude since you'll loose some height in flips at first. Don't even worry about the throttle if you've got the rate high enough. Just push that stick ALL THE WAY and it will flip if your rates are high enough. Then once you've got a feel for it you can work on blipping the throttle to keep from loosing altitude.
Horizon is a nice crutch since you don't have to worry about recovery - but once you get a taste of how it feels when it flips you'll have a much easier time flipping in acro.
Look forward to some more flight videos. Would love to see some details of the naze in there and how it's wired without the cage on top too.
Twitchity
Senior Member
Sorry to hear you're feeling under the weather while I'm out in the hot weather flying the quad well not really, it's too hot outside to be there for more than a few minutes.
I took your advise and adjusted my Naze32 settings to what you recommended. I believe I had to set the pitch/roll to .75 and the RC rate to 1.25 to get it to perform a flip.
Now what's confusing me is it will roll fine to the left, but doesn't want to roll at all to the right (see video below), and yes I am 100% committed on the stick to do a roll... It just wants to bank right and go straight.
I changed the design to mount the cage to the actual frame not so much as to provide protection from the FC (it sits pretty low under the motors anyways, but to increase the strength of the frame since there was a big hole cut out from the center of the top plate.
I have the satellite receiver soldered directly to the Naze32 (same way I did on my FPV quad), and have a low profile pin setup on the bottom where the Naze receives power from M5, and ground from M6. I still need to solder in a buzzer, but that's for another day, and when I have a second one to install.
Here's the wire connections for the ESCs
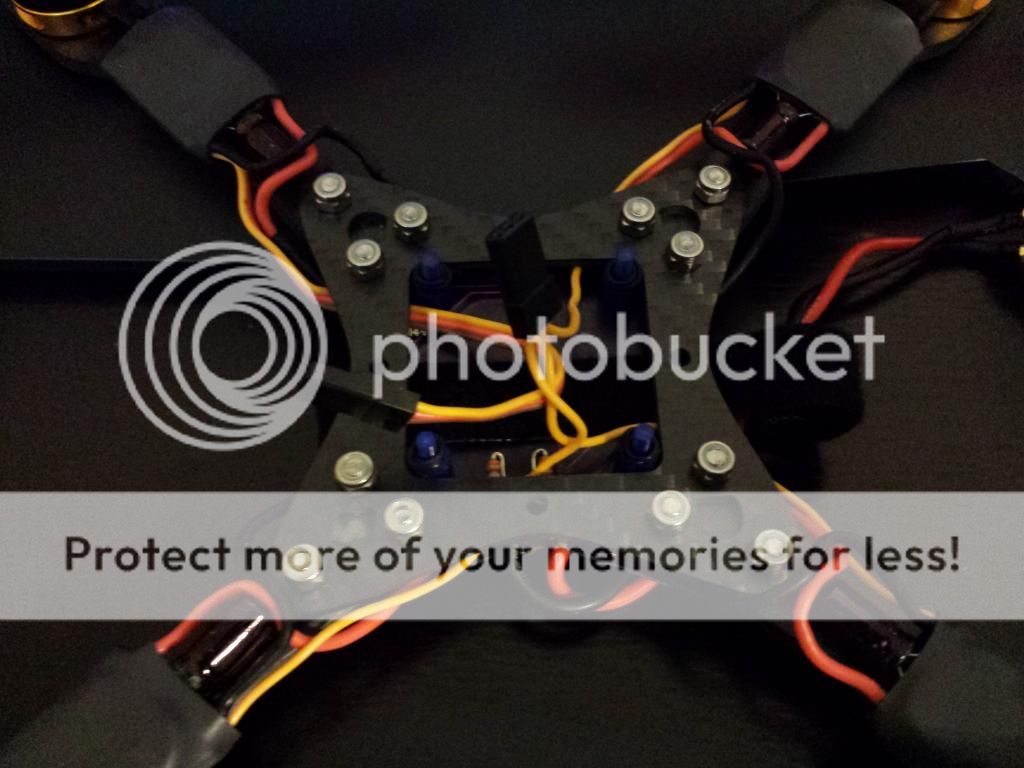
And connected to the Naze
And here's the video of the roll attempts. If you listen closely, you can hear the stick hitting the side of the transceiver when I try to do a roll to the right. I face-planted straight into the ground on an earlier attempt and broke one of my cutdown 6045 props, so I threw on my 6030's and gave it another go.
well not really, it's too hot outside to be there for more than a few minutes. I took your advise and adjusted my Naze32 settings to what you recommended. I believe I had to set the pitch/roll to .75 and the RC rate to 1.25 to get it to perform a flip.
Now what's confusing me is it will roll fine to the left, but doesn't want to roll at all to the right (see video below), and yes I am 100% committed on the stick to do a roll... It just wants to bank right and go straight.
I changed the design to mount the cage to the actual frame not so much as to provide protection from the FC (it sits pretty low under the motors anyways, but to increase the strength of the frame since there was a big hole cut out from the center of the top plate.
I have the satellite receiver soldered directly to the Naze32 (same way I did on my FPV quad), and have a low profile pin setup on the bottom where the Naze receives power from M5, and ground from M6. I still need to solder in a buzzer, but that's for another day, and when I have a second one to install.
Here's the wire connections for the ESCs
And connected to the Naze
And here's the video of the roll attempts. If you listen closely, you can hear the stick hitting the side of the transceiver when I try to do a roll to the right. I face-planted straight into the ground on an earlier attempt and broke one of my cutdown 6045 props, so I threw on my 6030's and gave it another go.
Sorry to hear you're feeling under the weather while I'm out in the hot weather flying the quad
Too hot? My weather app says 88f in Orlando right now...that's jacket weather to me
I'll admit though you guys have that horrible damn humidity to deal with (My aunt lives in Clearwater...I visited once in December and found the Humidity oppressive and that was when I still lived in Ohio!) I can't wait until we get back to daily highs of 91f. We're at a nice refreshing 106 today though it may get up to 109. But with humidity down around 15% I don't mind the heat usually. With a 100F fever today though I could do without it.I took your advise and adjusted my Naze32 settings to what you recommended. I believe I had to set the pitch/roll to .75 and the RC rate to 1.25 to get it to perform a flip.
Now what's confusing me is it will roll fine to the left, but doesn't want to roll at all to the right (see video below), and yes I am 100% committed on the stick to do a roll... It just wants to bank right and go straight.
That is confusing. I'm not sure what could be causing that. Have you tried it in acro? What about forward/backwards flips? I'll have to think about that one...nothing is coming to mind. It almost looks like it's in angle mode and hitting it's limit...but you can flip in the other direction so you must be in Horizon....
I changed the design to mount the cage to the actual frame not so much as to provide protection from the FC (it sits pretty low under the motors anyways, but to increase the strength of the frame since there was a big hole cut out from
the center of the top plate.
Admittedly I'm using the solid "bottom" plate as my top...but I'm thinking even with the cutout that top plate is strong enough. With nylon standoffs that cage isn't adding that much strength to the frame anyway.
Looks good other than whatever is causing that limit to the right which is a real head scratcher. I admit I'm a bit out of it and not thinking my clearest today but that one has me stumped right now.
I suspect the issue is related to where center is set and your channel range. If you center at 1500 and your range is from 1000 - 1700, you may not have enough throw (I know this is not the right term but I can't place it right now) to flip to the right.
I noticed this for the first time on my WarpQuad. I can flip and roll in all directions but in two directions the flip or roll is MUCH quicker than the other two. I always wondered why and I think this may be the answer. Now, how to fix it...
Nice shiny new motors you have there Twitchity.
I noticed this for the first time on my WarpQuad. I can flip and roll in all directions but in two directions the flip or roll is MUCH quicker than the other two. I always wondered why and I think this may be the answer. Now, how to fix it...
Nice shiny new motors you have there Twitchity.
Twitchity
Senior Member
Nice shiny new motors you have there Twitchity.
They won't be shiny and new for too long
I'll have to check the endpoints. If I remember right, mid is 1500, low is 1050(ish) and high is 1850(ish) so that would be 450 going left, 350 going right which would make sense...That is rather frustrating, now I need to figure out how to fix that, or just do left rolls.
Similar threads
- Replies
- 11
- Views
- 1K
- Replies
- 4
- Views
- 648