
You are using an out of date browser. It may not display this or other websites correctly.
You should upgrade or use an alternative browser.
You should upgrade or use an alternative browser.
Cutting foam sheets... with a needle!
- Thread starter dkj4linux
- Start date
I'm going to answer this even though I unfortunately cannot supply any source files (embarrassingly I seem to have lost them). What I did was create a little circuit board using my CNC that allowed me to hook up an Arduino to my CNC break out board (your RAMPs board in this case). It reads the 0-100% PWM signal from my controller and converts that to a servo pulse output which the ESC uses to drive the BLDC motor. The attached picture is all I have left of the 'design' in electronic form. Thankfully it just keeps on working.How do I connect the needle cutter motor esc to the ramps board so It will turn off when it is done cutting
Attachments

The setup to control the ESC from RAMPS is pretty simple. I posted details back in this thread two or three years ago.
As already stated you just use the servo headers on the RAMPS board. They aren't enabled by default so you have to go into the marlin config and enable the one you're going to use then reflash the arduino with the updated Marlin.
Then it's just a matter of adding the M340 lines to start and stop it in your CAM software at the start/end code sections. I added a slight delay after the start command to give it time to spin up and stabilize RPM's and I don't stop it until after it's parked. It's probably safe to stop it before it returns to home...but I was nervous about it possibly stopping with the needle all the way down and not clearing when homing (though it really should have plenty of clearance, I was just still having trust issues with my machine at the time I set it all up.)
I'm just finishing up the MPCNC & need to start printing the needle cutter. My wife asked what i wanted for my Bday and after all the bad influences going on here I answered a laser. The funny thing is that the day after I told her they all disappeared from Amazon. Not a single one. That seems extremely strange to me.
BTW thanks for influencing me to build these.
BTW thanks for influencing me to build these.
Just saw this on Make's video channel, looks like the foam cutter David made from his Timsav kit:
But...they're charging 350 euro (which works out to about $390USD)
https://www.polyshaper.eu/
Can't figure out of they charge for shipping or not...even with it set to english most of the site is in Italian.
And they're advertising proprietary software as a feature? (which Make even calls them out for not being very polished.)
dkj4linux
Elite member
Hey, Jason! Good to hear from you.Just saw this on Make's video channel, looks like the foam cutter David made from his Timsav kit:
But...they're charging 350 euro (which works out to about $390USD)
https://www.polyshaper.eu/
Can't figure out of they charge for shipping or not...even with it set to english most of the site is in Italian.
And they're advertising proprietary software as a feature? (which Make even calls them out for not being very polished.)
The Polyshaper machine is simpler yet. It's basically just one TimSav-type machine with TWO "Y"-towers on opposite sides of the "X"-carriage... where my TimSavX2 is TWO "near stock" TimSav machines, standing on edge about 10"-12" apart, and electrically slaved together. TimSavX2 has longer extrusions so a larger XY capacity (800mm x 600mm)... and because of the greater separation between towers it can handle thicker materials than the Polyshaper machine. Otherwise, it looks as though they operate exactly the same. And their "proprietary" software doesn't appear to do anything that can't be done readily with free/open software... these are really just TWO-axis machines, so any software that can generate center-line/engraving toolpaths for laser/needle/etc can be used. Any third-axis commands -- Z-axis movement, or laser control -- can be left in the gcode file and is just ignored.
There's really just not a lot to these hot-wire machines until you start playing with independent towers and having to generate different gcode for each end of a wing-taper, etc. These minimalist machines (Polyshaper and TimSavX2) are just way too flimsy for anything more than straight-through (slaved) cutting and, knowing what I know now, I certainly wouldn't pay what they are asking for their machines. And the price difference they are asking between models just seems ridiculous to me...
They are fun machines to play with for a while but really not something I would be playing with daily. As soon as SIL's big foam project is complete I suspect I'll be dismantling TimSavX2. IMO it'll be more useful/fun as a more conventional, minimalist, CNC machine to play with...
-- David
dkj4linux
Elite member
With only a couple of pieces yet to be hot-wired for my SIL's big foam project, I've been playing with FoamRipper and the laser...
While the Blackstripes stylized svg stuff I’ve done in the past is both fun and fast, it isn’t suitable for showing the detail of real photos, of course. Grayscale and various dithering methods are normally used to handle photo images… and recently, inspired by Jim Williamson (aka @Bulldog) over on the Lightburn forum, I’ve been playing again with Lightburn and my 2.5 watt Eleksmaker lasers and I am starting to see some pretty encouraging results… though my efforts still pale in comparison to the stunning results @Bulldog is getting.


Scarier, I wanted to see what I could get out of my very poor avatar pic…


Here are a few craft-stick images that take only about 10 minutes to do. Still have a long way to go learning to get photos ready for engraving…

Even R&P MPCNC is getting in on the act…


These are all dithered (mostly Jarvis) images from Lightburn generated gcode, engraved on cereal-box chipboard and craft-sticks (birch?) with a 2.5 watt Eleksmaker laser. I’m still playing around with this stuff and trying to move on to different materials… eventually hoping to try my hand a the ceramic tile stuff @Bulldog is doing. Hopefully soon I’ll be able to get out and get the supplies I need to give that a shot…
– David
While the Blackstripes stylized svg stuff I’ve done in the past is both fun and fast, it isn’t suitable for showing the detail of real photos, of course. Grayscale and various dithering methods are normally used to handle photo images… and recently, inspired by Jim Williamson (aka @Bulldog) over on the Lightburn forum, I’ve been playing again with Lightburn and my 2.5 watt Eleksmaker lasers and I am starting to see some pretty encouraging results… though my efforts still pale in comparison to the stunning results @Bulldog is getting.
Scarier, I wanted to see what I could get out of my very poor avatar pic…
Here are a few craft-stick images that take only about 10 minutes to do. Still have a long way to go learning to get photos ready for engraving…
Even R&P MPCNC is getting in on the act…
These are all dithered (mostly Jarvis) images from Lightburn generated gcode, engraved on cereal-box chipboard and craft-sticks (birch?) with a 2.5 watt Eleksmaker laser. I’m still playing around with this stuff and trying to move on to different materials… eventually hoping to try my hand a the ceramic tile stuff @Bulldog is doing. Hopefully soon I’ll be able to get out and get the supplies I need to give that a shot…
– David
dkj4linux
Elite member
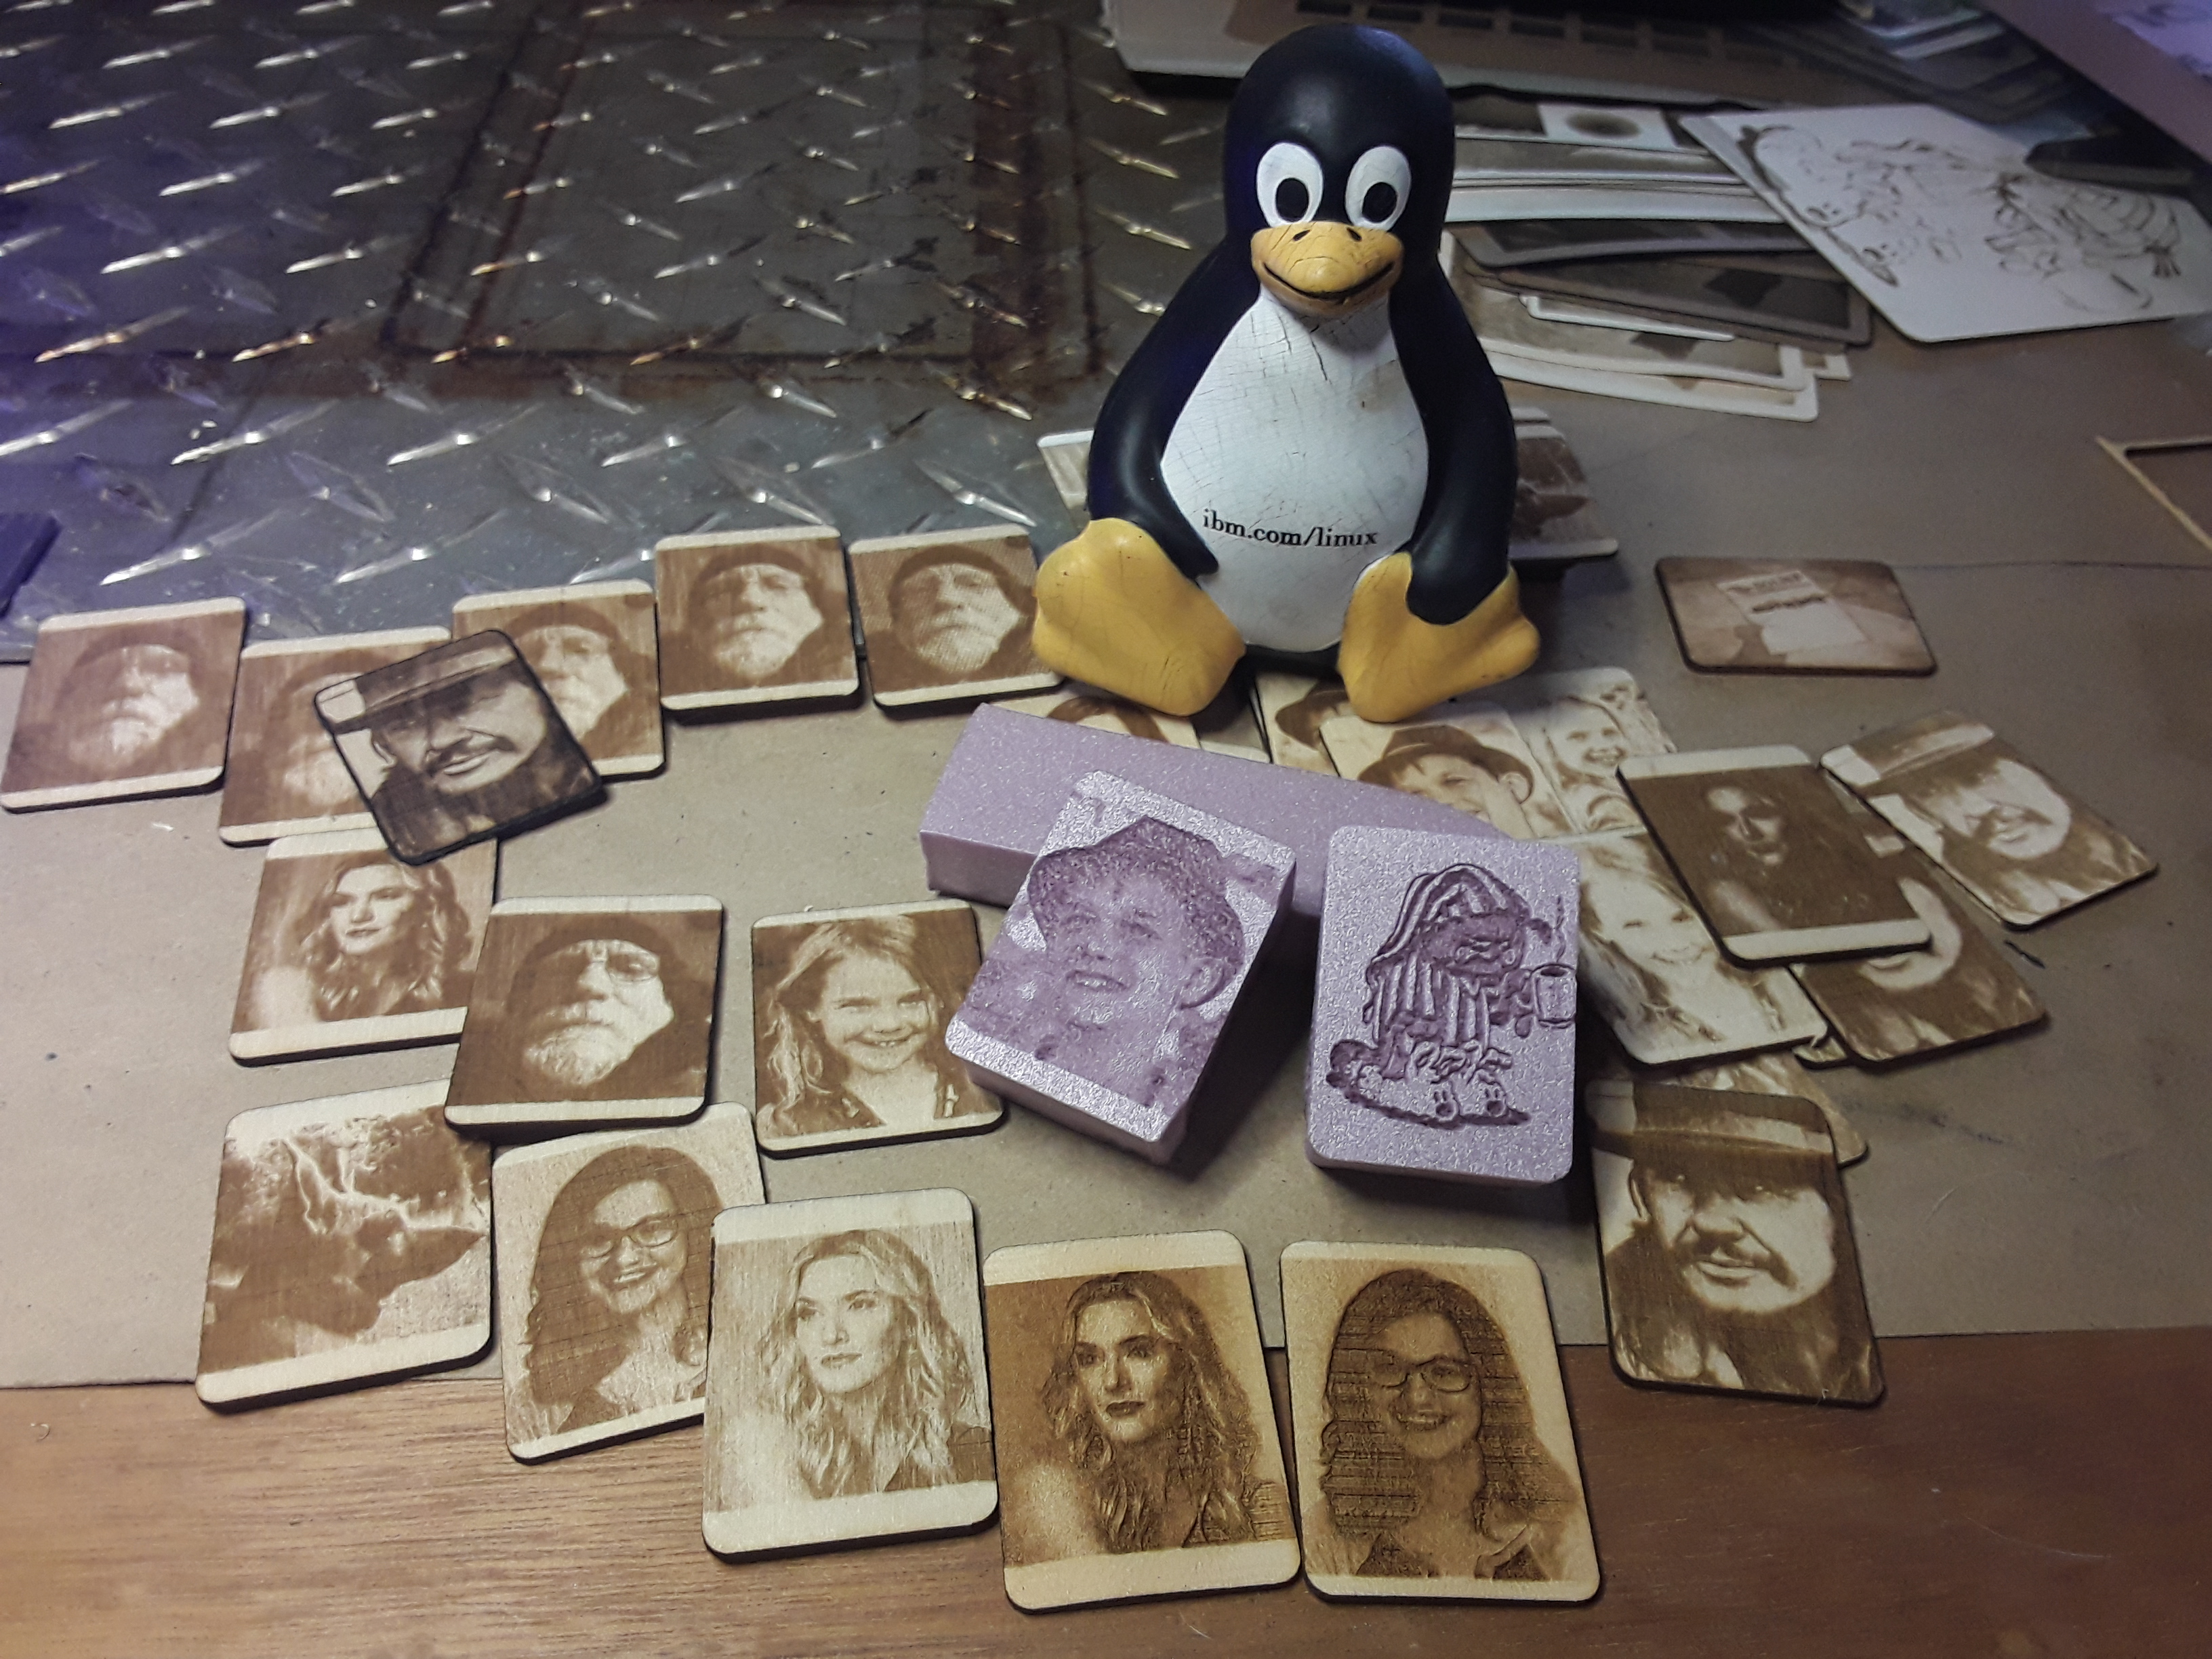
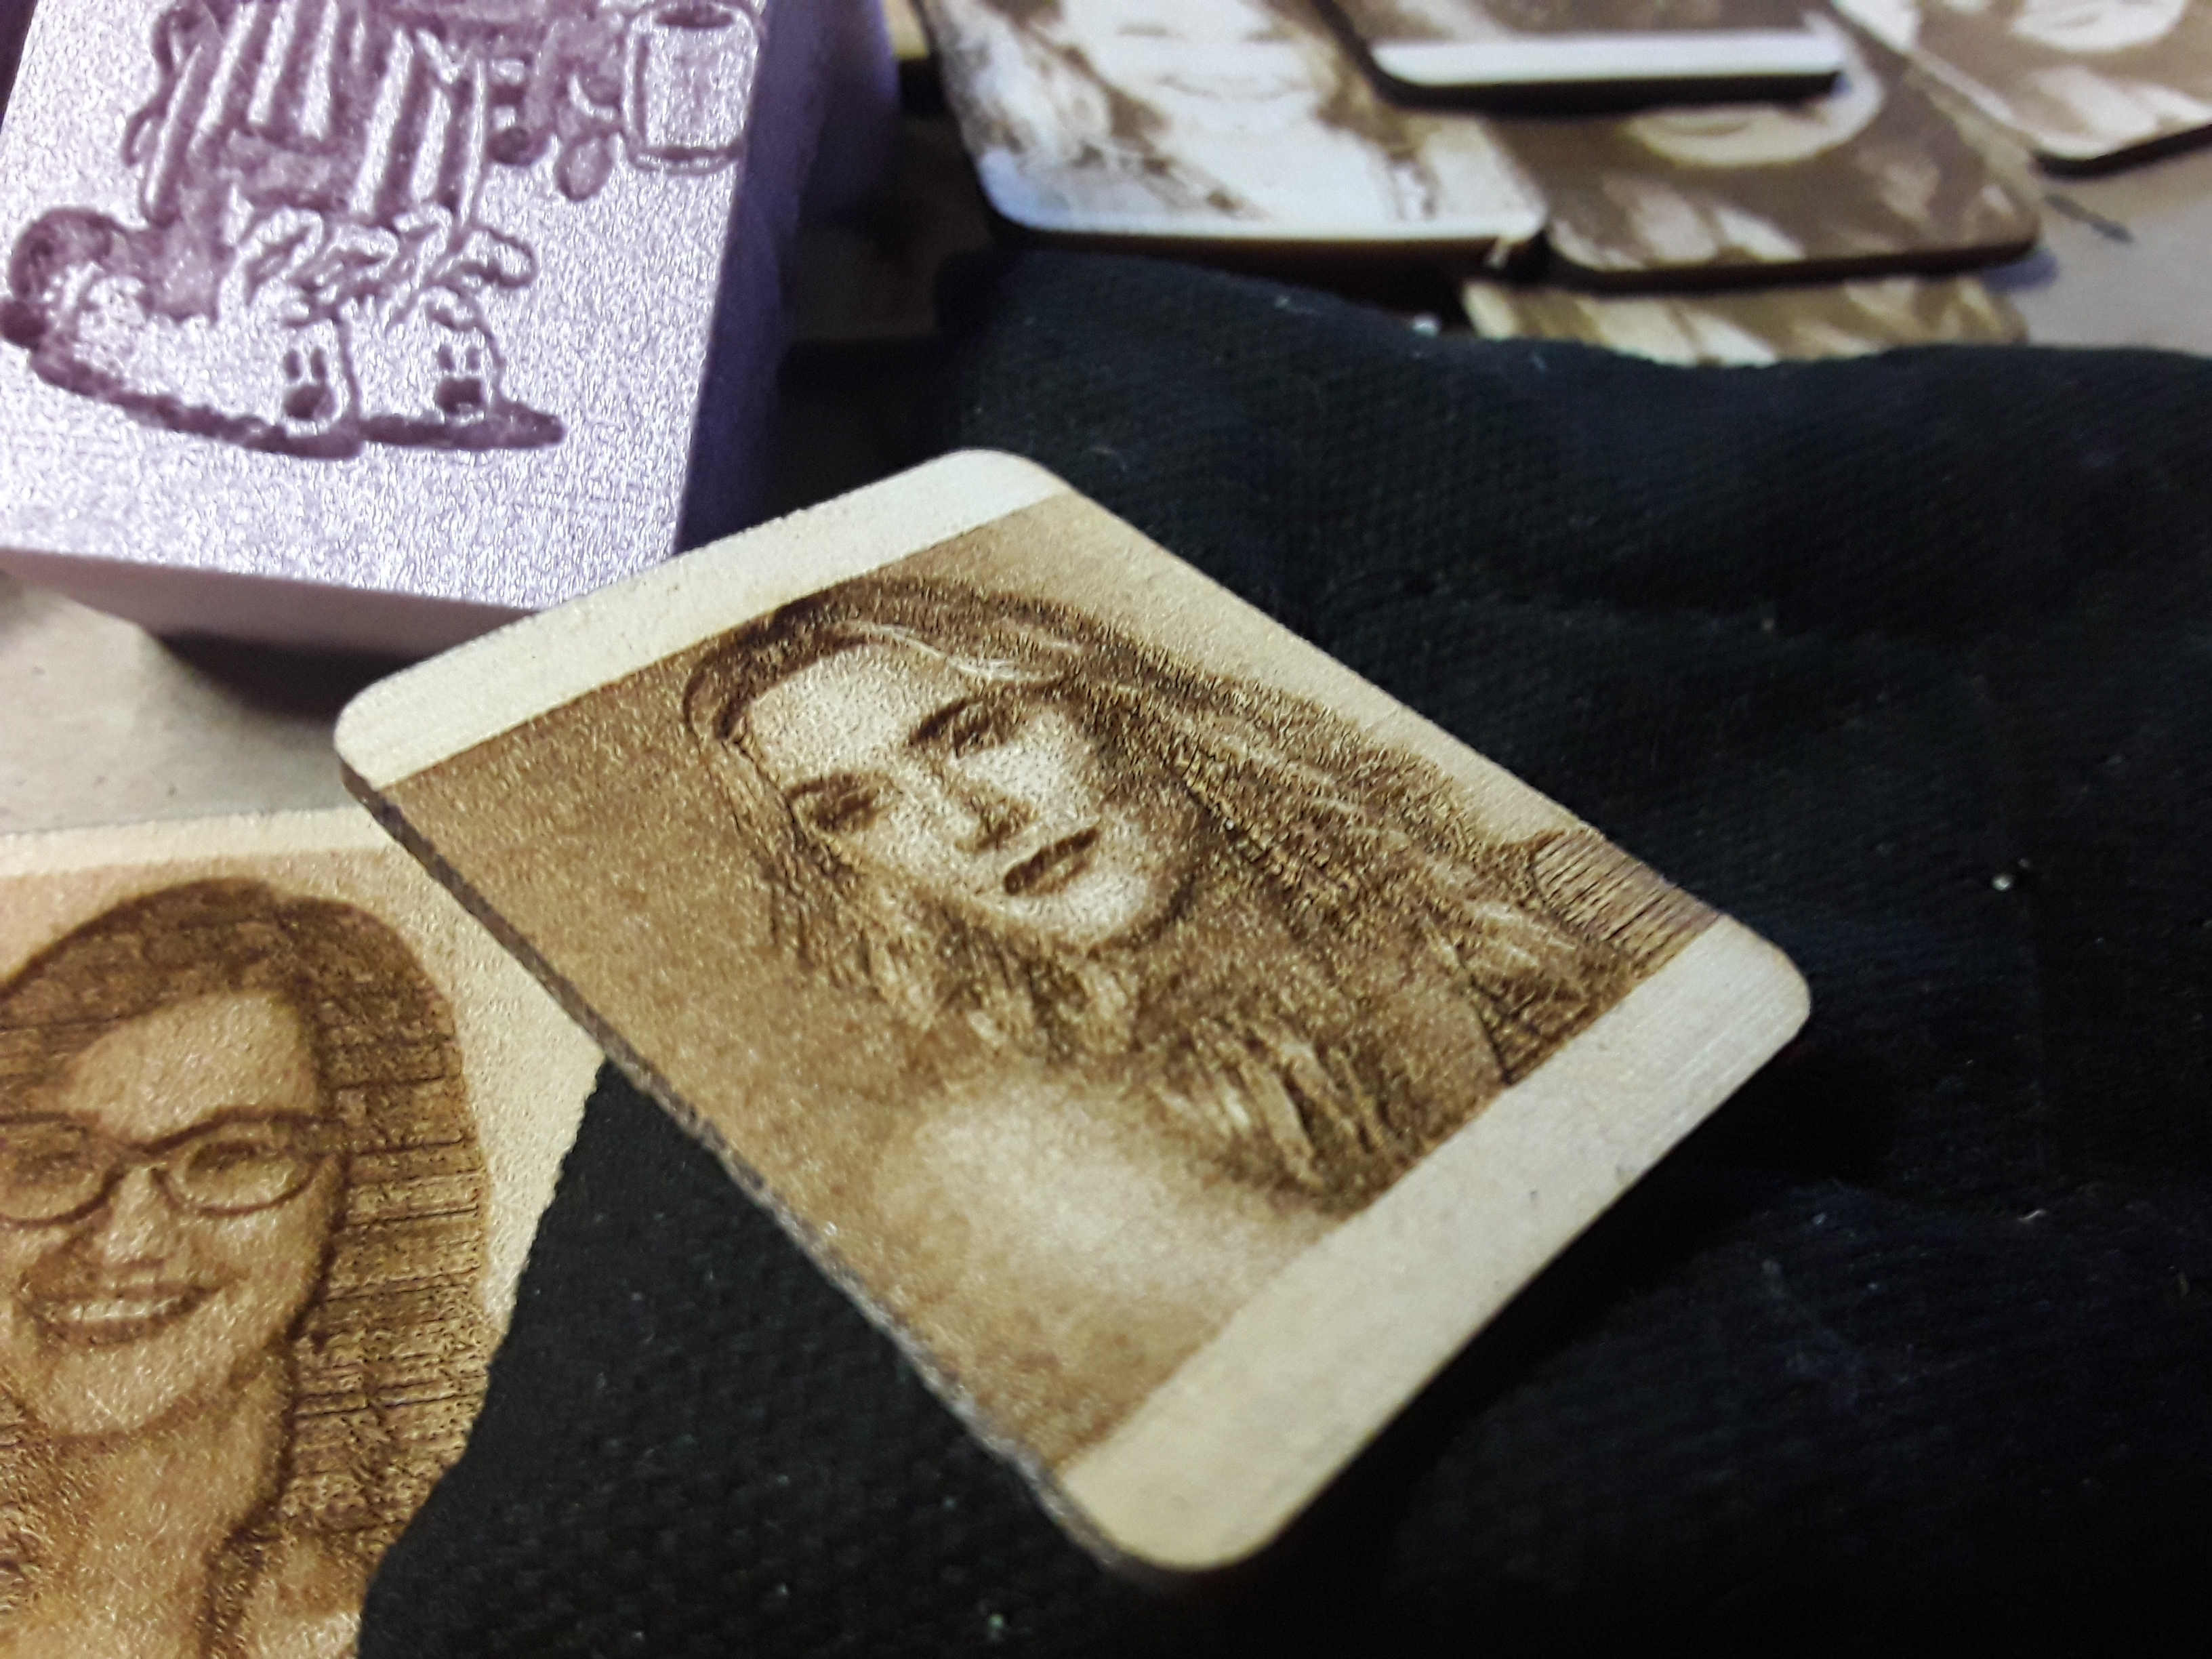
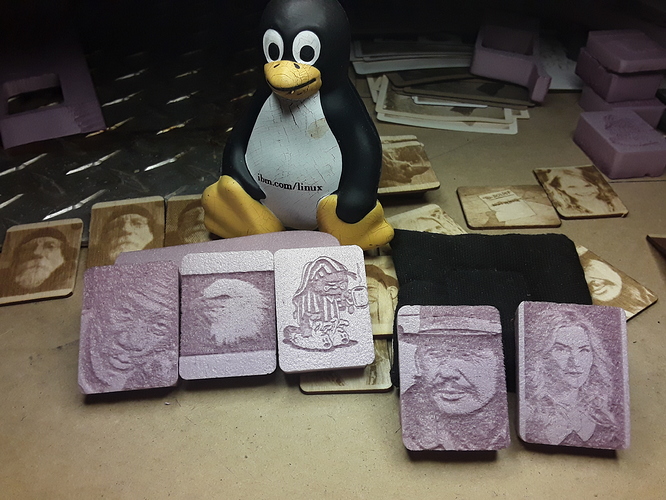
Playing with a bunch of Lightburn’s settings and various photos and materials, we (Tux, the dog, and I) are starting to see some interesting effects…


and some are almost 3d… craft-stick and even some structural foam


Oh, in case I haven’t mentioned it before… Kate (I call her “Kate”) and I… we’re just like


and some are almost 3d… craft-stick and even some structural foam

Oh, in case I haven’t mentioned it before… Kate (I call her “Kate”) and I… we’re just like
dkj4linux
Elite member
Pretty happy with images on chipboard…

so I decided to give the Norton method and piece of ceramic tile a try, as promised.
Had a small broken corner piece of off-white ceramic tile, cleaned it with paint thinner, lightly coated it with flat-white paint, allowed it to dry, and then the image was lasered with 2.5 watt diode laser (Jarvis-dither, 1200 mm/min, 85% power, 254 dpi) …
Image lasered but paint not yet removed…

Poured on a little paint thinner, scraped pretty vigorously with metal putty knife, and… voila!


It could be darker yet but I am happy with this as a first attempt! And that image is indeed fused(?) somehow into the ceramic… no scratches from the metal scraper at all. Amazing!
– David
so I decided to give the Norton method and piece of ceramic tile a try, as promised.
Had a small broken corner piece of off-white ceramic tile, cleaned it with paint thinner, lightly coated it with flat-white paint, allowed it to dry, and then the image was lasered with 2.5 watt diode laser (Jarvis-dither, 1200 mm/min, 85% power, 254 dpi) …
Image lasered but paint not yet removed…
Poured on a little paint thinner, scraped pretty vigorously with metal putty knife, and… voila!
It could be darker yet but I am happy with this as a first attempt! And that image is indeed fused(?) somehow into the ceramic… no scratches from the metal scraper at all. Amazing!
– David
dkj4linux
Elite member
I still had paint on the broken tile, so decided to see if I could do it again…

Lasered good friend Kate’s likeness on old paint…

image before removing paint…

paint removed…

and everybody approves!

Who am I to say different? I’m counting this a success!
A3 (plane) photo: Eleksmaker 2.5 watt laser - Lightburn, Jarvis dither, 1200 mm/min, 85% power, and 254 dpi
Kate Winslet photo: Eleksmaker 2.5 watt laser - Lightburn, Jarvis dither, 1200 mm/min, 100% power, and 300 dpi
– David
Lasered good friend Kate’s likeness on old paint…
image before removing paint…
paint removed…
and everybody approves!
Who am I to say different? I’m counting this a success!
A3 (plane) photo: Eleksmaker 2.5 watt laser - Lightburn, Jarvis dither, 1200 mm/min, 85% power, and 254 dpi
Kate Winslet photo: Eleksmaker 2.5 watt laser - Lightburn, Jarvis dither, 1200 mm/min, 100% power, and 300 dpi
– David
May be we could get some inspiration from it, thanks!
https://www.pintuu.com/
https://www.pintuu.com/
dkj4linux
Elite member
I'm not sure what "it" is... or who "we" are. What are you talking about?May be we could get some inspiration from it, thanks!
https://www.pintuu.com/
Last edited:
Looks good David. I was just shocked at how much that polyshaper costs for what definitely looked like a similar or lesser machine. Personally I consider proprietary software a big reason NOT to invest in any given bit of hardware
I'm still around...just haven't had much time to play with my machines or do any flying still. I had my back room cleaned and was ready to do some minor remodeling to make room for my CO2 laser project...but then COVID-19 hit and the person who was going to help me with the construction went back to Alaska to ride it out. Now my back room is a mess again since it's doubling as my office as well as "hobby room" and the summer heat has hit so I'm not in the mood to go cutting holes in my outside walls for a few more months.
I did manage to get a new pull down staircase installed in my shop and that let me get a bunch of junk down from the attic up there and out to the trash, which made room to move some of the stuff that started to clutter up the downstairs but wasn't junk up into the attic. I still don't have the shop clean enough to go do projects out there again...but at least it's clean enough I can walk around out there and make progress on cleaning. But - since I can't arrange any play dates for my daughter I don't have much time to be alone out there cleaning so it's slow progress.
I've been spending a lot of time since March playing radio again to keep me sane/busy. I assembled a 20m FT-8 Phaser back in January and designed and 3D printed a case for it (which I posted about in one of these threads but I can't remember which.) Then started having fun making contacts with it using some temporary portable antennas. Was amazed at how well it was doing with just 4w of power and minimal antennas...so when it became apparent lockdowns were coming I got a nicer wire dipole and strung it between the peak of my office and a pole mounted to my carport. It's only up about 25' but made that 4w even more effective. It was starting to look like I may even be able to get a QRP (low power) WAS (Worked all states) award...but...couldn't leave well enough alone.
I realized that while it was designed to operate on a fixed frequency with a button to switch to an alternate frequency...the way it was built there was no reason it couldn't also be frequency agile only the "brain" was limiting it. So building off work someone else was doing I pulled out the PIC chip brain and patched in an arduino UNO with LCD panel:

It worked. I was able to tune it to different portions of the 20m band! For FT-8 you don't need this ability....but it's still nice to have since you can shift your frequency up and down slightly to keep your signal in the "Sweet spot" of the transciever within the 3k section of the band used for FT-8.
But the UNO was a bit clunky. And the Phaser runs at 3.3v so I had to use a level converter....Next I swapped the big clunky LCD for a OLED display and ditched the buttons since the end goal was to let the FT-8 software on the computer control the frequency over USB anyway:

Better...but the UNO is still too clunky. I got it running on an Arduino pro mini and on an arduino nano. The pro mini was nice since it ran at 3.3v. But it has no native USB ability and needs a separate FTDI adapter which I didn't want to deal with. The nano is smaller and has built in USB...but...runs at 5v so needs the level shifter. So I wasn't super happy with either of them.
I'd been wanting to play with STM based boards since they're now supported in arduino and the Adafruit trinket M0 caught my eye. Not much I/O - but I don't need it for this. Built in USB, Tons of memory, more power than the arduinos (not that either is needed...but memory was getting tight once I added the libs for the OLED) cheap at <$10 and tiny so I could build it right into the case I designed.
Unfortunately I'm having issues with getting the trinket to work reliably and can't figure out why. And while hooked up a frequency counter to track down the issue I slipped a shorted out something I shouldn't have letting some magic smoke out of the Phaser
While I worked on figuring out what happened to the phaser I got my stimulus check and decided I was having enough fun with radio having a real antenna up again that maybe I'd splurge and get a new radio. Saw that the Icom 7300 is a pretty amazing rig and it was on sale for $950 with an additional $100 mail in rebate....which was an offer I couldn't say no to:
.jpg")
And this radio has blown me away. Just incredibly how much radio it is for the price. I'm now just 1 state away from completing that WAS (no longer all QRP unfortunately...but about 60% of it was QRP...then rest I bumped my power up to 25w since I can now.) I'm also <6 states on both 40m and 20m from having WAS individually on each band. If the one contact I had in Maine would QSL I could claim that WAS...until he does I keep listening for one more Maine station to contact and seal it! I've also worked almost 30 different countries since Late March.
Considering that it's the bottom of the solar cycle right now so radio propagation is at it's worst I'm pretty happy with that
Also gave in a treated myself to a new Fluke DMM which let me finally finish the 50w amplifier I was building for my other QRP radios:

That's the amp in the lower left.
So...been having fun pushing electrons and RF around...but I'm really itching to melt more plastic and blast some photons at things. Just...unlikely to make much more progress on that until after summer now.
I actually seriously considered one of those little mini mills just for fun since they're so crazy cheap now....but....I can't think of many projects I can do that are smaller than the 4"x6" working area they have. And I don't want that kind of noise and dust in the house and if I could go out to my shop I have the MPCNC waiting for me. (which will probably get an upgrade when Ryan finishes the new update he keeps teasing.)
But basically still around and still keeping busy - just not making much progress on projects that are on topic here
I'm still around...just haven't had much time to play with my machines or do any flying still. I had my back room cleaned and was ready to do some minor remodeling to make room for my CO2 laser project...but then COVID-19 hit and the person who was going to help me with the construction went back to Alaska to ride it out. Now my back room is a mess again since it's doubling as my office as well as "hobby room" and the summer heat has hit so I'm not in the mood to go cutting holes in my outside walls for a few more months.
I did manage to get a new pull down staircase installed in my shop and that let me get a bunch of junk down from the attic up there and out to the trash, which made room to move some of the stuff that started to clutter up the downstairs but wasn't junk up into the attic. I still don't have the shop clean enough to go do projects out there again...but at least it's clean enough I can walk around out there and make progress on cleaning. But - since I can't arrange any play dates for my daughter I don't have much time to be alone out there cleaning so it's slow progress.
I've been spending a lot of time since March playing radio again to keep me sane/busy. I assembled a 20m FT-8 Phaser back in January and designed and 3D printed a case for it (which I posted about in one of these threads but I can't remember which.) Then started having fun making contacts with it using some temporary portable antennas. Was amazed at how well it was doing with just 4w of power and minimal antennas...so when it became apparent lockdowns were coming I got a nicer wire dipole and strung it between the peak of my office and a pole mounted to my carport. It's only up about 25' but made that 4w even more effective. It was starting to look like I may even be able to get a QRP (low power) WAS (Worked all states) award...but...couldn't leave well enough alone.
I realized that while it was designed to operate on a fixed frequency with a button to switch to an alternate frequency...the way it was built there was no reason it couldn't also be frequency agile only the "brain" was limiting it. So building off work someone else was doing I pulled out the PIC chip brain and patched in an arduino UNO with LCD panel:
It worked. I was able to tune it to different portions of the 20m band! For FT-8 you don't need this ability....but it's still nice to have since you can shift your frequency up and down slightly to keep your signal in the "Sweet spot" of the transciever within the 3k section of the band used for FT-8.
But the UNO was a bit clunky. And the Phaser runs at 3.3v so I had to use a level converter....Next I swapped the big clunky LCD for a OLED display and ditched the buttons since the end goal was to let the FT-8 software on the computer control the frequency over USB anyway:
Better...but the UNO is still too clunky. I got it running on an Arduino pro mini and on an arduino nano. The pro mini was nice since it ran at 3.3v. But it has no native USB ability and needs a separate FTDI adapter which I didn't want to deal with. The nano is smaller and has built in USB...but...runs at 5v so needs the level shifter. So I wasn't super happy with either of them.
I'd been wanting to play with STM based boards since they're now supported in arduino and the Adafruit trinket M0 caught my eye. Not much I/O - but I don't need it for this. Built in USB, Tons of memory, more power than the arduinos (not that either is needed...but memory was getting tight once I added the libs for the OLED) cheap at <$10 and tiny so I could build it right into the case I designed.
Unfortunately I'm having issues with getting the trinket to work reliably and can't figure out why. And while hooked up a frequency counter to track down the issue I slipped a shorted out something I shouldn't have letting some magic smoke out of the Phaser
While I worked on figuring out what happened to the phaser I got my stimulus check and decided I was having enough fun with radio having a real antenna up again that maybe I'd splurge and get a new radio. Saw that the Icom 7300 is a pretty amazing rig and it was on sale for $950 with an additional $100 mail in rebate....which was an offer I couldn't say no to:
And this radio has blown me away. Just incredibly how much radio it is for the price. I'm now just 1 state away from completing that WAS (no longer all QRP unfortunately...but about 60% of it was QRP...then rest I bumped my power up to 25w since I can now.) I'm also <6 states on both 40m and 20m from having WAS individually on each band. If the one contact I had in Maine would QSL I could claim that WAS...until he does I keep listening for one more Maine station to contact and seal it! I've also worked almost 30 different countries since Late March.
Considering that it's the bottom of the solar cycle right now so radio propagation is at it's worst I'm pretty happy with that
Also gave in a treated myself to a new Fluke DMM which let me finally finish the 50w amplifier I was building for my other QRP radios:
That's the amp in the lower left.
So...been having fun pushing electrons and RF around...but I'm really itching to melt more plastic and blast some photons at things. Just...unlikely to make much more progress on that until after summer now.
I actually seriously considered one of those little mini mills just for fun since they're so crazy cheap now....but....I can't think of many projects I can do that are smaller than the 4"x6" working area they have. And I don't want that kind of noise and dust in the house and if I could go out to my shop I have the MPCNC waiting for me. (which will probably get an upgrade when Ryan finishes the new update he keeps teasing.)
But basically still around and still keeping busy - just not making much progress on projects that are on topic here
dkj4linux
Elite member
Jason,
It's so good to hear from you... that you're well and keeping busy. The Navy gave me my initial electronics training and I spent the rest of my enlistment maintaining airborne radar and comm/nav equipment. After getting out, got my 2nd class FCC license, worked as a radar tech at an executive aircraft service outfit at Love Field in Dallas, met/married my wife, and then used the GI Bill to go back to school and eventually get my EE degree. While in school, learned that the world was going "digital"... and decided that it was so "cookbook" (chasing "ones" and "zeros" vs analog "volts" and "amps") and easier to learn that I left most of the RF "voodoo" behind. So, 50+ years in the rear-view mirror, most of what you're talking about is totally foreign and like a different language to me. But I can certainly appreciate you who are "into" it and am glad you're enjoying yourself.
Looking at those pictures of your workbench really brings back memories, however. I have a scope and breadboards and a lot of digital logic parts to play with but I'm afraid my powers of concentration have waned to the point I need more "instant gratification" and keeping things reasonably simple. But I remember spending hours upon hours building circuits and small boards that ultimately were only a small part in an overall much larger system... and, today, those entire systems can be had on a single chip for just a few dollars. So, I usually talk myself out of getting back into the electronics business and stay with the CNC-related stuff, where I can have stuff moving around in pretty short order.
I'm weathering the quarantine pretty well. I've been pretty much self-quarantined since moving to be near (next door) my daughter anyway... so little has changed for me during all this. About the only thing I've noticed is that it's taking longer to get stuff I've ordered online, delivered. I've not been driving and getting out... but I'm afraid that when I do, if ever, I'll find it terribly uncomfortable and confusing to abide by a whole new set of "social rules". I am a bit concerned about all that... not knowing how to "behave" in public.
It's so good to hear from you. Please don't make yourself scarce. And don't worry about being on/off topic here... this thread has long since gotten away from being just about foam- and needle-cutting. There's enough of that still that the occasional side-track or "just visiting" is a welcome diversion.
Take care.
-- David
dkj4linux
Elite member
Still playing around. A comparison between "white-washed", painted, and bare wood. Same gcode, same laser... on craft-stick (probably "birch"?)

Left-most is "white-washed"... wood wetted with paint thinner, sprayed with paint, allowed to sit for a couple of minutes, and then wiped of most paint, and allowed to dry. Center is painted... simple light coat of paint, allowed to dry. Right-most is bare (unpainted) wood. The paint definitely seems to give a "grainy" look to the image.
Maybe I need to roll it with a lint roller...

That definitely helps with the contrast and "grainy-ness"... now you can see the "whites of their eyes".
-- David
Left-most is "white-washed"... wood wetted with paint thinner, sprayed with paint, allowed to sit for a couple of minutes, and then wiped of most paint, and allowed to dry. Center is painted... simple light coat of paint, allowed to dry. Right-most is bare (unpainted) wood. The paint definitely seems to give a "grainy" look to the image.
Maybe I need to roll it with a lint roller...
That definitely helps with the contrast and "grainy-ness"... now you can see the "whites of their eyes".
-- David
Last edited:
dkj4linux
Elite member
Speaking of diversions...
SIL asked for a print. Can't refuse... he's married to my daughter. And I gotta stay on her good side because... well, she looks after me...


I was pretty proud it turned out so well with all that support. And, then... SIL gets ahold of it. And he always messes up my stuff...


Dagnab him! It hardly even looks like it was _printed_ anymore
-- David
SIL asked for a print. Can't refuse... he's married to my daughter. And I gotta stay on her good side because... well, she looks after me...
I was pretty proud it turned out so well with all that support. And, then... SIL gets ahold of it. And he always messes up my stuff...
Dagnab him! It hardly even looks like it was _printed_ anymore
-- David
Last edited:
dkj4linux
Elite member
Another diversion...
My grand-daughter celebrated her 15th birthday yesterday… and while we all sat around visiting (they’re just next door), somehow the subject of stereograms (“magic eye” pictures) came up. The grandkids had never seen such a thing so we had a lot of fun passing them around and seeing what the kids could, and couldn't, see.
We started looking online and found a wealth of examples and information. I then wondered how they were made and decided to see if they could be laser engraved and still be be recognizable as stereograms. Got your “magic eye” on?
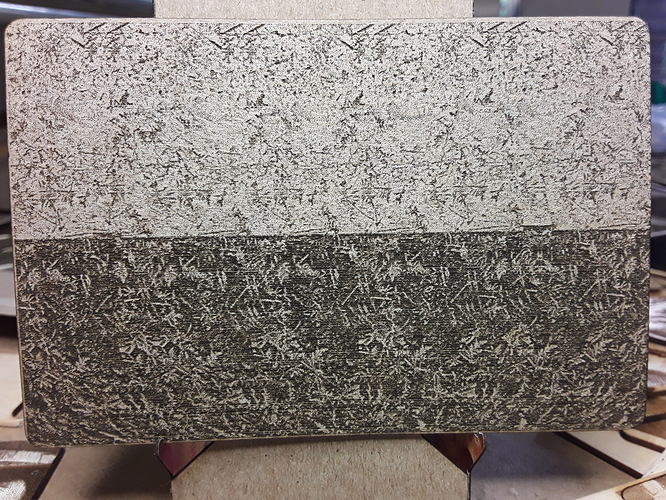
Chipboard (cereal box), Lightburn, Jarvis dither, 1500 mm/min, 50% power, 300 dpi, 100 mm wide.
– David
Haha, been a while since I've done one of those!Another diversion...
My grand-daughter celebrated her 15th birthday yesterday… and while we all sat around visiting (they’re just next door), somehow the subject of stereograms (“magic eye” pictures) came up. The grandkids had never seen such a thing so we had a lot of fun passing them around and seeing what the kids could, and couldn't, see.
We started looking online and found a wealth of examples and information. I then wondered how they were made and decided to see if they could be laser engraved and still be be recognizable as stereograms. Got your “magic eye” on?
Chipboard (cereal box), Lightburn, Jarvis dither, 1500 mm/min, 50% power, 300 dpi, 100 mm wide.
– David
Similar threads
- Replies
- 6
- Views
- 1K
- Replies
- 8
- Views
- 1K
- Replies
- 6
- Views
- 734
- Replies
- 0
- Views
- 305