BobW55
Member
LONG post......... I will be adding to this, may take a day or two to complete.
For starters, if you want to laser out foam board, and have the money, get a Co2 laser. That is what Flite test uses, but they are expensive when you get into a size that can handle a full sheet of foam board.
That being said. I wanted to be able to cut my own FT aircraft. While Flite test graciously provides FREE plans for all their kits, it can be time consuming and costly to go that route.
1) Download the plans.
2) Print out the TILED plans on your own printer, tape and glue them to the foam board. Hope your knife does not slip while you try to follow the lines.
3) Alternatively you could take the PDF plans to a printing place that has the ability to print them full size for you. I am sure this could be a few dollars per print, plus you will ruin the prints in the process of cutting them out.
Requirements for my needs:
1) Could handle a full sheet of foam board.
2) Could be repeated quickly and with no cost other than the foam board.
3) could be used with a older laptop computer.
4) Could be used for other things.
The gantry or CNC machine:
This is the part that will move the laser around and control the laser power.
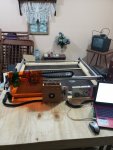
I went with the Openbuilds Acro 1010 Acro 1010.
I pretty much came with everything needed minus the controller board. For that I also used the Openbuilds controller: Controller
The kit came with all the wiring, I added two additional limit switches for end stops. I had a few issues, but openbuilds support was excellent and had me running in no time. Took me about 6 hours total to assemble, mainly from trying to figure out how I wanted to run all the wiring and getting the wires inside the drag chains
For the Diode laser:
This part took some research. Many of the Chinese companies out there seriously inflate the power output of their laser system. Buyer beware.
Good reliable source on Laser Diode info
I went with an Endurance 10 watt 455nm laser kit :Laser Kit
I paid less that what he shows on his web page. He is from Russia, the actual Laser comes from the USA. His assembly instructions are a bit lacking, but I have electronic experience and got everything put together.
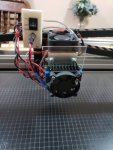
The Laser unit consist of a laser diode module mounted in a large heat sink, that is placed into a rectangular can. This is cooled by a top mounted fan. The laser os powered by a DC-DC converter that converts the 12VDC in to a regulated 4.9 VDC @4.8 amps, and is also fan cooled. (Front facing fan)
To prevent burn throughs from burning up the wood table top, I used spray adhesive to mount a sheet of aluminum to the table top. I then painted this flat black and etched a 10mm x 10mm grid into it the size of a sheet of foam board.
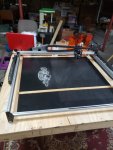
Yes I had to give tribute to Flitetest while I was at it.
For controlling the laser:
I went with Lightburn software, https://lightburnsoftware.com/
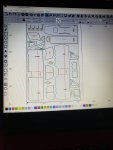
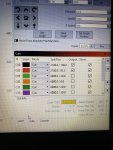
It was very easy to learn, has terrific support, via Email, and Forum. This is a screenshot of lightburn with a plan ready to laser.
I went through 5 sheets of foam board just learning the controls and figuring out the correct power/speed combinations.
I can now accurately reproduce 3 different types of cuts.
1) Etch: Just mark the top surface of the paper. This is good for fold types (A, B, C) or part identification.
2) Surface cut: Just cut the top layer of paper. This is good for cutting the lines along where foam will later be removed, or scored such as those used to fold a wing over and produce a leading edge, or where a hinge will be placed.
3) Deep cut: Although I can only cut 1.5mm deep, it leaves a nice easy to trace with a knife line. Very easy to complete the cut and remove the parts from the sheet of foam board. I learned tons about knife control and using a cutting mat.
ISSUES:
NO I can not cut 100% all the way through white core foam board. Black core is no problem, can do 100% cuts all day.
Dollar Tree (White paper) and Flite test (Brown paper) require different power and speed settings. Black paper black core requires even different settings.
Why the difference???
It all boils down to wavelength or the color of the laser. At 455 nm (blue in color) white reflects much of the laser light, the white core acts more like clear acrylic to the laser so it melts more than cuts. I could triple the power and pretty much have the same result.
I am looking at trying out a 405 nm laser (purple in color), although the best I can find is only 1.5 watts, the wavelength is better absorbed by the white foam core, and should cut better.
Am I happy with the out come?
Oh hell yes. In about 10 minutes I can take one of Sponz's plans, and have it laid out ready to laser. No more printing plans. No more taping, gluing them in place. No more Opppsss my knife slipped. (still possible much less likely). Crashed and broke a part, no problem, can just laser out the required part. Want to scale it up or down? On every plan sheet is a scale/ruler. Just figure out how much larger, re-arrange a few things and go for it.
In Conclusion:
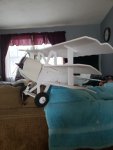
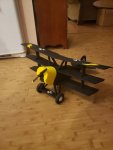
I am very happy. I have yet another new facet to this hobby. My DR1 is not 100% perfect. few things I did not mark or have cut that I should have. ( have fixed it on my lay out for next time) Not sure what I want to try next, still have my FT A-10 kit to finish.
 View attachment 126473
View attachment 126473
View attachment 126473
For starters, if you want to laser out foam board, and have the money, get a Co2 laser. That is what Flite test uses, but they are expensive when you get into a size that can handle a full sheet of foam board.
That being said. I wanted to be able to cut my own FT aircraft. While Flite test graciously provides FREE plans for all their kits, it can be time consuming and costly to go that route.
1) Download the plans.
2) Print out the TILED plans on your own printer, tape and glue them to the foam board. Hope your knife does not slip while you try to follow the lines.
3) Alternatively you could take the PDF plans to a printing place that has the ability to print them full size for you. I am sure this could be a few dollars per print, plus you will ruin the prints in the process of cutting them out.
Requirements for my needs:
1) Could handle a full sheet of foam board.
2) Could be repeated quickly and with no cost other than the foam board.
3) could be used with a older laptop computer.
4) Could be used for other things.
The gantry or CNC machine:
This is the part that will move the laser around and control the laser power.
I went with the Openbuilds Acro 1010 Acro 1010.
I pretty much came with everything needed minus the controller board. For that I also used the Openbuilds controller: Controller
The kit came with all the wiring, I added two additional limit switches for end stops. I had a few issues, but openbuilds support was excellent and had me running in no time. Took me about 6 hours total to assemble, mainly from trying to figure out how I wanted to run all the wiring and getting the wires inside the drag chains

For the Diode laser:
This part took some research. Many of the Chinese companies out there seriously inflate the power output of their laser system. Buyer beware.
Good reliable source on Laser Diode info
I went with an Endurance 10 watt 455nm laser kit :Laser Kit
I paid less that what he shows on his web page. He is from Russia, the actual Laser comes from the USA. His assembly instructions are a bit lacking, but I have electronic experience and got everything put together.

The Laser unit consist of a laser diode module mounted in a large heat sink, that is placed into a rectangular can. This is cooled by a top mounted fan. The laser os powered by a DC-DC converter that converts the 12VDC in to a regulated 4.9 VDC @4.8 amps, and is also fan cooled. (Front facing fan)
To prevent burn throughs from burning up the wood table top, I used spray adhesive to mount a sheet of aluminum to the table top. I then painted this flat black and etched a 10mm x 10mm grid into it the size of a sheet of foam board.

Yes I had to give tribute to Flitetest while I was at it.
For controlling the laser:
I went with Lightburn software, https://lightburnsoftware.com/
It was very easy to learn, has terrific support, via Email, and Forum. This is a screenshot of lightburn with a plan ready to laser.


I went through 5 sheets of foam board just learning the controls and figuring out the correct power/speed combinations.
I can now accurately reproduce 3 different types of cuts.
1) Etch: Just mark the top surface of the paper. This is good for fold types (A, B, C) or part identification.
2) Surface cut: Just cut the top layer of paper. This is good for cutting the lines along where foam will later be removed, or scored such as those used to fold a wing over and produce a leading edge, or where a hinge will be placed.
3) Deep cut: Although I can only cut 1.5mm deep, it leaves a nice easy to trace with a knife line. Very easy to complete the cut and remove the parts from the sheet of foam board. I learned tons about knife control and using a cutting mat.
ISSUES:
NO I can not cut 100% all the way through white core foam board. Black core is no problem, can do 100% cuts all day.
Dollar Tree (White paper) and Flite test (Brown paper) require different power and speed settings. Black paper black core requires even different settings.
Why the difference???
It all boils down to wavelength or the color of the laser. At 455 nm (blue in color) white reflects much of the laser light, the white core acts more like clear acrylic to the laser so it melts more than cuts. I could triple the power and pretty much have the same result.
I am looking at trying out a 405 nm laser (purple in color), although the best I can find is only 1.5 watts, the wavelength is better absorbed by the white foam core, and should cut better.
Am I happy with the out come?
Oh hell yes. In about 10 minutes I can take one of Sponz's plans, and have it laid out ready to laser. No more printing plans. No more taping, gluing them in place. No more Opppsss my knife slipped. (still possible much less likely). Crashed and broke a part, no problem, can just laser out the required part. Want to scale it up or down? On every plan sheet is a scale/ruler. Just figure out how much larger, re-arrange a few things and go for it.
In Conclusion:
I am very happy. I have yet another new facet to this hobby. My DR1 is not 100% perfect. few things I did not mark or have cut that I should have. ( have fixed it on my lay out for next time) Not sure what I want to try next, still have my FT A-10 kit to finish.
 View attachment 126473
View attachment 126473
View attachment 126473

Last edited:


