TBS Discovery 3-Axis AP Build Log - Snarls

Snarls

Gravity Tester
Mentor
Hey all, it is time for another multirotor build. I have been planning this one for the past few months. My first multirotor was a home built 600mm AP rig with a large gimbal for a pocket size camera. It flew, but pretty poorly and the footage was never really any good. So last winter I designed a new frame and gimbal, and got a simple, but promising flight controller. I managed to get good footage at times, but the flying was still poor and unsatisfactory. So now I coming back for round three and diving in with all new components. Third time's a charm right?


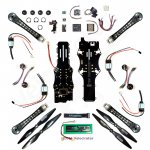
This build centers around the TBS Discovery frame. I decided to actually buy a frame instead of make one because I am tired of the inconsistencies and fragility that a DIY frame brings. The Disco seems like the best frame for AP/FPV purposes using GoPro sized cameras. I will also be upgrading from a two axis gimbal to a three axis gimbal. The Disco was made for a two axis gimbal, but I have seen some beautiful modifications to fit a three axis on board. I will also be ditching my previous multiwii based flight controllers for the Pixfalcon flight controller, as I have seen some incredible stability come from Pixhawk based platforms. I have down the calculations on ecalc and picked the components so this build has the greatest flight time possible:
ExplodedW.jpg
Full Parts List:

Copter:
Frame
Body - TBS Discovery Link
Frame Arms - DJI Style Arms Link

Flight Controller
- Pixfalcon Autopilot with M8N GPS Link

Motors - Sunnysky 2212 980kv Link

ESCs - Rotorgeeks 30a BLHeli Link

Battery - Multistar 5200mAh 4S Lipo Link

Props - Quanum 10x3.8 DJI Style CF Prop Link

Receiver - FrSky X8R Link

Voltage Regulation - Mini Step-Down Regulator Link


Gimbal:

Gimbal Controller - Storm32 Micro 3-Axis Gimbal Controller Link

Gimbal Frame - Custom Homebuilt/3D Printed

MISC - Rubber Tube Supports Link
MISC - Tarot 10mm 3K Carbon Tubes Link

I am looking forward to sharing this build with you all and hearing your thoughts and feedback!

-Sam


Snarls

Gravity Tester
Mentor
To start off this build I have the parts all layed out. My goal is to make a multirotor that is as light and stable as possible. High speed and aerobatics are not key factors, although it would be nice to have some degree of sportiness.

Parts.jpg


DiscoBox.JPG

The TBS Discovery frame comes in a nice thick paper box that is perfectly sized for the frame plates and hardware. The plates themselves look very well made. There is a space in the front of the bottom plate to solder in an integrated OSD, but I decided to opt out of that purchase. The power lead with XT60 comes pre-soldered to the bottom frame which I did not expect. I am not sure I can use the integrated receiver pinout location in the back of the top frame because the battery might be a tight fit. To actually assemble the frame you use the red standoffs in the hardware bag along with DJI mounting style arms. There are some custom extended arms with lights and whatnot available, but I decided to go with the classic DJI flamewheel arm design made with a stronger plastic from Diatone.

DiscoPlates.JPG
 
Last edited:

Ocean

Member
Looks like a great build!

Guess its a bit late now..but 3DR are selling 2213 950kv Tigers for $3.

I've always been interested in 3d printing a gimbal, however I always thought that there would be a lot of slop to deal with and it wouldn't be rigid enough to get high enough P Gains. I remember RCFlightTest used to make gimbals from angled aluminium and rigid plywood and it seemed to work pretty well.
 

Snarls

Gravity Tester
Mentor
Guess its a bit late now..but 3DR are selling 2213 950kv Tigers for $3.

I've always been interested in 3d printing a gimbal, however I always thought that there would be a lot of slop to deal with and it wouldn't be rigid enough to get high enough P Gains. I remember RCFlightTest used to make gimbals from angled aluminium and rigid plywood and it seemed to work pretty well.

That's crazy, I wonder why they are selling them off so cheap.

Yeah I am concerned about the rigidity of the 3D printed plastic, but I guess it is worth a try.
 

Snarls

Gravity Tester
Mentor
The next thing I did was get the motors and ESCs installed. I originally wanted the ESCs completely inside the frame plates so that they would not be exposed to the elements if I flew in the rain or snow. Initial mock up design showed that the ESCs would not fit nicely in the frame and I was worried they could interfere with the flight controller. So in the end I decided to mount the ESCs to the arms like everyone else does.

The Sunnyskys come with bullet connectors attached and the EScs come with leads already soldered on. To reduce weight and remove excess wiring, I removed the bullets from the motors and the leads from the ESCs. Like in my ZMR250 build, the motors are directly soldered to the ESCs. With the 30a Rotorgeeks ESCs if you remove the shrink tubing and the heatsink you will find that there are two motor leads that attach to the top of the board and one on the bottom.

MotorSolder.jpg

Luckily the 30a Rotorgeeks ESCs are a little easier to solder to than the 12a ones. The challenge was that the wires from the motor to the ESC had to pass through the arms if I was to mount the ESCs on the bottom of the arms. No problem, although if I break an arm I will have to repeat this soldering process.

MotorsAttached.jpg

The motor mount holes on the arm were a little tight, but a quick drill loosened them up and the Sunnyskys fit perfectly. I placed the heatsinks back on the ESCs and put some new shrink tube on. For this build I decided to use some flexible straps to hold the ESCs to the arms rather than zip ties. I think they will hold the ESCs better and plus I don't have any zip ties big enough. This completed the arms for attachment on to the frame.

ArmsDone.jpg
 

nilsen

Senior Member
Looking good! I love my discovery, but was thinking about the ZIP ties as well, they're too stiff and I think they could damage the ESC's at some point. Good thinking with the flexible tie.
I look forward to seeing more progress.
 

Snarls

Gravity Tester
Mentor
Thanks nilsen! I'm taking your build as some inspiration for my own :)

With my builds, RC related or not, I really like to make everything as neat and compact as possible. Following the TBS Discovery folding mod, I took a great amount of time measuring the ESC power wires out so that they could allow the arms to fold while being as hidden as possible with the arms fully secured. Soldering the ESCs to the pads on the frame was a bit of a pain with the ESCs already attached to the arms. Despite this I got the arms attached cleanly.

IMG_3196.JPG

I also soldered on a mini stepdown regulator from Rotorgeeks. The power system is going to run off of 4s while the FPV equipment, mainly the camera, can only tolerate 3s. I decided to put it in the spot where the TBS core would go since I am not using it and that spot is close to the FPV camera.

I then embarked on the hardest, most time consuming part of the build: the flight controller wiring. Now it is actually not that difficult to hook up all the wiring to the Pixfalcon, but it is if you want to keep the wiring as cleaned up as possible. The Pixfalcon comes with a motor output harness that is basically 8 female jr/servo connectors going to one small connector. Using this harness results in wires strung throughout the frame and four connectors that are hanging around unused. I decided to make a custom harness with some straight pin headers, plexiglass, and an extra six pin small connector that fits into the Pixfalcon. Also with all the major wires coming out of the falcon I decided to use some paracord to keep them neat and give some style.

PixfalconWiring.jpg

I powered up and...nothing from the Pixfalcon. After some research and reading the small manual that comes with the controller, I concluded that the falcon can only be powered through its USB or through the power module port. I am not using the power module because it is basically a 36 x 36mm PDB that is clearly intended for miniquad sized electronics and frames. The PDB on the Disco is enough for me, but the Pixfalcon needs power through the power module port, not the motor port where the ESC BEC feeds into, which is unfortunate. After some more research and questioning on RCGroups, I rigged up some wiring to bring 5v and ground from the BEC to the power module port. Plug in the battery and the pixfalcon powers up! One thing the aforementioned power module does is report voltage and current to the flight controller. This is something I may want to have so in the future I may pick up a more traditional APM power module which works in place of the supplied power module. In addition I am hoping to get the battery voltage on my Taranis so I don't have to use a lipo alarm. Looks like I'll have to pick up a special Frsky voltage sensor for that.
 

nilsen

Senior Member
Thanks nilsen! I'm taking your build as some inspiration for my own :)

With my builds, RC related or not, I really like to make everything as neat and compact as possible. Following the TBS Discovery folding mod, I took a great amount of time measuring the ESC power wires out so that they could allow the arms to fold while being as hidden as possible with the arms fully secured. Soldering the ESCs to the pads on the frame was a bit of a pain with the ESCs already attached to the arms. Despite this I got the arms attached cleanly.

I then embarked on the hardest, most time consuming part of the build: the flight controller wiring. Now it is actually not that difficult to hook up all the wiring to the Pixfalcon, but it is if you want to keep the wiring as cleaned up as possible. The Pixfalcon comes with a motor output harness that is basically 8 female jr/servo connectors going to one small connector. Using this harness results in wires strung throughout the frame and four connectors that are hanging around unused. I decided to make a custom harness with some straight pin headers, plexiglass, and an extra six pin small connector that fits into the Pixfalcon. Also with all the major wires coming out of the falcon I decided to use some paracord to keep them neat and give some style.

You know, the layout is a pain but it is very rewqarding when you end up with a nice clean build. Did you by any chance get the "upgraded" screw set? With the folding mod, do you simply remove the screws and then fold the arms, and vice-versa? I ask because the screws which came with mine and many others were so soft that they stripped very easily, they released a pack of "upgraded hardware" so that they wouldn't fall apart as they did.

Will you use 2 camera's as well and then get a video switcher? I have the one from hobbyking on a different build and it works like a dream, really easy and functional.

I have 2 of those batteries in your initial image, tehy are so cheap but the wires are very, very thin, the batteries don't have the grunt of a TBS or other battery, they cannot handle the punch outs (the onboard current sensor shows 60 amps at WOT). But they handle fine for normal flying and filming.

What I love about the Discovery is the fact that you can fly it as fast or slow as you want, it's no mini-quad but it is so fast and agile compared to my hex.

I look forward to seeing more progress.
 

Snarls

Gravity Tester
Mentor
Did you by any chance get the "upgraded" screw set? With the folding mod, do you simply remove the screws and then fold the arms, and vice-versa? I ask because the screws which came with mine and many others were so soft that they stripped very easily, they released a pack of "upgraded hardware" so that they wouldn't fall apart as they did.

I am not sure. The threads seem pretty tough, although the bolt head does not seem to like neither my metric nor imperial allen wrenches.

Will you use 2 camera's as well and then get a video switcher? I have the one from hobbyking on a different build and it works like a dream, really easy and functional.

I haven't really considered two cameras, but now that you mention it I may want to be able to switch from FPV camera to gimbal camera to frame a shot.

I have 2 of those batteries in your initial image, tehy are so cheap but the wires are very, very thin, the batteries don't have the grunt of a TBS or other battery, they cannot handle the punch outs (the onboard current sensor shows 60 amps at WOT). But they handle fine for normal flying and filming.

Yeah that makes sense looking at the C rating of the Multistar battery. Punch outs would be nice, but overall this build is about having a reliable AP platform that is more agile than a phantom. Saying that, I tend to fly things like I stole it.
 

nilsen

Senior Member
Yeah that makes sense looking at the C rating of the Multistar battery. Punch outs would be nice, but overall this build is about having a reliable AP platform that is more agile than a phantom. Saying that, I tend to fly things like I stole it.

And this thing begs to be flown fast and hard :)
 

Snarls

Gravity Tester
Mentor
Well I took it out yesterday for a 'maiden.' I took off in acro mode and immediately there were oscillations as fast as a person getting electrocuted. That was about all I could get before the sun went down. Usually I would automatically call out high P gain, but I'm not use to having such bad oscillations on stock settings. I'll turn down the P gain and see if I can get it in a state good enough for autotune. I'll post some pics later.

I'm also wondering if I should flash the pixhawk apm firmware to the pixfalcon instead of PX4
 
Last edited:

Snarls

Gravity Tester
Mentor
Well finally got a chance to do a 'real' maiden today. Turns out my ESCs weren't properly calibrated last time and that was the main cause of the fast oscillations. Today things went a lot smoother. It was quite cold out so I only flew for a few minutes. Took off and the thing flies like, well, an untuned quad. The yaw is weak, but no surprise there. There was just a hint of oscillations so I dialed the P gain down slightly. Overall it feels loose rather than locked in, about the same if not better than my previous AP quad. I'm looking at low I gain as the culprit, but I think I will wait till I get out to a more open area to do an autotune.

One thing I forgot to mention is that I am using 1045 props on these X2212 Sunnyskys because the 1035 carbon props I got do not have shaft adapters. I will 3D some later.

I have a maiden video, but I'm not sure I'll post it because it is nothing very interesting. I will get some nice pics of the finished build though so look forward to that.
 

nilsen

Senior Member
When I first fired up the discovery with the pixhawk it was super jittery and I had to drop the gains substantially, after the autotune it was worse, locked in as superglue but jittery on stick-release.

Later it was mad on fast forward flight and that was becuase of too high "I" on the pitch axis, which I also resolved, I'm quate happy now and find with a 2-axis gimbal I prefer the Yaw a bit soft as I want smooth turns, with your 3-axis I don't think it'll be a problem at all.

Side note, I always assumed people put APM on the PX4, I didn't realise there was a separate flight stack, how is it? Is it well supported and used?
 

Snarls

Gravity Tester
Mentor
Side note, I always assumed people put APM on the PX4, I didn't realise there was a separate flight stack, how is it? Is it well supported and used?

I'm actually using APM on this board. I got confused because some things in configuration are labelled for PX4 and some for Pixhawk and Hobbyking refers to the pixfalcon with both PX4 and Pixhawk. From what I've read both flight stacks have their own dev teams and look to be well developed. APM is obviously more used though so maybe it is more user friendly.
 

Snarls

Gravity Tester
Mentor
Finally some pictures of the flyable product! It's not technically done because the gimbal and fpv system still needs to be sorted out, but it is ready to start flying and get tuned.

Final.jpg

DiscoFront.jpg

DiscoSide.jpg

DiscoDoor.jpg

DiscoNight.jpg
 

nilsen

Senior Member
Nice man!

The cable covering looks great on the GPS etc. cables.

Looking forward to some video of it in action.
 

Snarls

Gravity Tester
Mentor
I want to update this thread with what the build looks like now. Over the winter and into the spring I designed a 3D printed 3 axis gimbal to put on the disco. You can read about that project here. The gimbal is attached to the copter using the 3 axis gimbal mod I found here.

The disco is flying incredibly well. Acro mode feels solid, and position hold is great. I have even been running autonomous missions for mapping, panoramas, and general fun. With the 4s 5200mAh battery flight times are around 18mins.

IMG_3464.JPG

IMG_3465.JPG


LitterBug

Techno Nut
Moderator
Looks really nice. What are your current motor, prop, and weight Specs for 18 minutes of fly time? I have some Sunnysky x2212 980KV motors on my A450 but am currently only running 3S. Need to upgrade ESCs to go 4S.

Cheers!
LitterBug
 
Last edited:

Snarls

Gravity Tester
Mentor
Thanks LitterBug! Motors are the same Sunnyskys as you. Props are these carbon fiber 10X3.8 DJI style props. It is slightly overpropped for 4s and the motors will get hot on a hot day, but flying slowly or on colder days the motors are cool. Weight is around 1650g if I recall. I might try out some Graupner E props or HQ E props because I suspect the props I have may be giving too much vibration.
 

LitterBug

Techno Nut
Moderator
Thanks for the info Snarls! I recently got a set of rails, gimbal, and replaced the bulky 6 channel PWM RX with a diversity PPM RX for my 450. Running crappy 1045 plastic props and am looking to make it more efficient. This gives me a good baseline to shoot for.

Cheers!
LitterBug