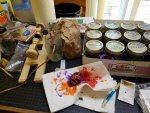
As some of you who've followed some of my other threads already know this time of year my projects tend to get pushed aside to make room for a few weeks of egg decorating. My family has both Ukrainian and Polish roots and has been doing pysanky egg decorating since long before I was born. I picked it up at a young age and now every year look forward to cranking out a few eggs. I dug out the supplies and did a quick test egg a week ago:

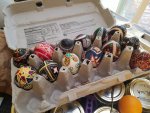
And a quick shot of some eggs from past years that have survived:

It's a fun process and dealing with the batik style building of colors helps break my mind out of a rut and think differently. I have some modern electric kistas which give extremely fine consistent wax control - but also still enjoy breaking out the candles and using traditional handmade kistas that are a little less predictable.
And while I'm a fan of tradition I'm also a gearhead and techie who loves to try new things. I heard about the egg-bot years ago and have considered making one for a long time because while I respect the work that goes into producing a kit there's just no way I can justify spending $200+ on one. A few years ago I rigged up a simple manual egg lathe to help me lay down guidelines - but it wasn't very effective. A year after that my mom got me a molded plastic egg lathe and I've since gotten hooked on the nice accurate guidelines it gives me. But it's still kind of tricky to use.
When I got my 3D printer a few weeks later I saw a printable egg-bot design and immediately bookmarked it. At the time I didn't think my printer was up to tackling it and it looked like quite a long print. Since then however I've got my printer dialed in and I've tackled many longer prints. So with the egg dyes out I figured it's time to finally make an egg bot!
I tried printing a fully printed version first but that didn't end well. So I went back to the original design I had seen. And then found an improved version of it and dug in.
Took me two evenings to print all the parts, and about $18 at the hardware store for the bits to assemble:

Then I realized I only had 1 stepper motor on hand. So...I ordered 2 new ones instead which was another $20. I already have a pile of spare stepper drivers (the RAMPS boards I bought for my MPCNC and Printer came with A7805 drivers but I replaced them with DRV8825's, plus ordered some spare DRV's in case I burned any out.) and I have a bunch of spare arduino's on hand. I ended up using a RAMPS/Mega setup since it simplified the wiring and I had one laying around as a spare...even though it is crazy overkill for this. I may wire up something with just some drivers and a nano board to clean it up later - but for now I just wanted it up and going.
The official eggbot uses a PIC microcontroller and a custom board that includes 2 stepper drivers...it's an open design but $50 to buy the board and given the ubiquity of arudino's and the number of them I had on hand I didn't really want to bother building a pic based solution. I found a number of arduino based software solutions - but most of them weren't directly compatible with the eggbot extensions for inkscape. Then I found eggduino: https://github.com/cocktailyogi/EggDuino There's a PR for it that adds some improvements and gets it to compile on newer versions of Arduino: https://github.com/cocktailyogi/EggDuino/pull/17 That was submitted a year ago and is still just sitting there - so I get the feeling that the developer has abandoned the project. But with a few tweaks of my own I got it running on the RAMPS:

First tests with a pencil proved promising so I hooked up a pen and gave it a go:

Not horrible...but not great either. I had it adjusted all wrong physically and the servo that raises and lowers the pen wan't adjusted correct at all so it dragged between moves. But...still a promising start!
I adjusted the height of the Y stepper and the length of the motion arm for it, dialed in the servo and:

Now we're talking!
I'm still fine tuning it - the steppers were running way too high current and getting hot - then I turned them down too low and the pen started dragging and stair stepping. But it's starting to do pretty well for me:

I'm just using extra fine sharpies which aren't all that fine after all as you can see by the nutrition label egg. I'm also still occasionally having some issues with the pen lift - but am learning how to get it setup better each egg.
Now I need to put some time into designs for it
Oh - and to keep it related...I bet I can also load up a spinner and do something cool to it

And a quick shot of some eggs from past years that have survived:

It's a fun process and dealing with the batik style building of colors helps break my mind out of a rut and think differently. I have some modern electric kistas which give extremely fine consistent wax control - but also still enjoy breaking out the candles and using traditional handmade kistas that are a little less predictable.
And while I'm a fan of tradition I'm also a gearhead and techie who loves to try new things. I heard about the egg-bot years ago and have considered making one for a long time because while I respect the work that goes into producing a kit there's just no way I can justify spending $200+ on one. A few years ago I rigged up a simple manual egg lathe to help me lay down guidelines - but it wasn't very effective. A year after that my mom got me a molded plastic egg lathe and I've since gotten hooked on the nice accurate guidelines it gives me. But it's still kind of tricky to use.
When I got my 3D printer a few weeks later I saw a printable egg-bot design and immediately bookmarked it. At the time I didn't think my printer was up to tackling it and it looked like quite a long print. Since then however I've got my printer dialed in and I've tackled many longer prints. So with the egg dyes out I figured it's time to finally make an egg bot!
I tried printing a fully printed version first but that didn't end well. So I went back to the original design I had seen. And then found an improved version of it and dug in.
Took me two evenings to print all the parts, and about $18 at the hardware store for the bits to assemble:

Then I realized I only had 1 stepper motor on hand. So...I ordered 2 new ones instead which was another $20. I already have a pile of spare stepper drivers (the RAMPS boards I bought for my MPCNC and Printer came with A7805 drivers but I replaced them with DRV8825's, plus ordered some spare DRV's in case I burned any out.) and I have a bunch of spare arduino's on hand. I ended up using a RAMPS/Mega setup since it simplified the wiring and I had one laying around as a spare...even though it is crazy overkill for this. I may wire up something with just some drivers and a nano board to clean it up later - but for now I just wanted it up and going.
The official eggbot uses a PIC microcontroller and a custom board that includes 2 stepper drivers...it's an open design but $50 to buy the board and given the ubiquity of arudino's and the number of them I had on hand I didn't really want to bother building a pic based solution. I found a number of arduino based software solutions - but most of them weren't directly compatible with the eggbot extensions for inkscape. Then I found eggduino: https://github.com/cocktailyogi/EggDuino There's a PR for it that adds some improvements and gets it to compile on newer versions of Arduino: https://github.com/cocktailyogi/EggDuino/pull/17 That was submitted a year ago and is still just sitting there - so I get the feeling that the developer has abandoned the project. But with a few tweaks of my own I got it running on the RAMPS:

First tests with a pencil proved promising so I hooked up a pen and gave it a go:

Not horrible...but not great either. I had it adjusted all wrong physically and the servo that raises and lowers the pen wan't adjusted correct at all so it dragged between moves. But...still a promising start!
I adjusted the height of the Y stepper and the length of the motion arm for it, dialed in the servo and:

Now we're talking!
I'm still fine tuning it - the steppers were running way too high current and getting hot - then I turned them down too low and the pen started dragging and stair stepping. But it's starting to do pretty well for me:

I'm just using extra fine sharpies which aren't all that fine after all as you can see by the nutrition label egg. I'm also still occasionally having some issues with the pen lift - but am learning how to get it setup better each egg.
Now I need to put some time into designs for it
Oh - and to keep it related...I bet I can also load up a spinner and do something cool to it


