Experimenting with Resin printing (MSLA) for detailed parts

jhitesma

Some guy in the desert
Mentor
So... why is resin printing great for detailed parts but a huge pain for things where you need accurate dimensions?

Well, a couple of reasons.

First there's shrinkage. Resins shrink as they cure. Some don't shrink much, some can shrink as much as 7% or more. Thankfully the resins I've tried so far don't seem to shrink much - maybe 1-2%. And they seem to shrink evenly (unlike FDM where filaments that shrink tend to shrink more in X/Y than in Z) so this isn't a huge issue and usually able to be dealt with by scaling the part before slicing. On the parts I've been printing when I model them to the exact dimensions I want I find with grey resin I can just print them as is...but with the black I have I need to increase them 1-2% before printing.

Next there are a couple of issues due to the physics of MSLA printing. With FDM a part is built up from the ground up. With MSLA you're "pulling" the part out of a vat of resin. The way it actually works is when a layer is cured it sticks to the build plate and the FEP plastic that makes up the bottom of the vat. Then for the next layer to be printed the build plate is lifted which should "peel" the part off the FEP. The FEP is taught but flexible so as the part is pulled the FEP will release at the edges first as the center lifts up. This can actually put quite a bit of force on the part pulling it down (which to the part is up since the build process is kind of upside down) in some cases this can deform the part. It can also pull the part off it's supports or the build plate if there's more surface area on the FEP than there is on the build plate or there are insufficient supports. This is the main way failures seem to happen with MSLA printing.

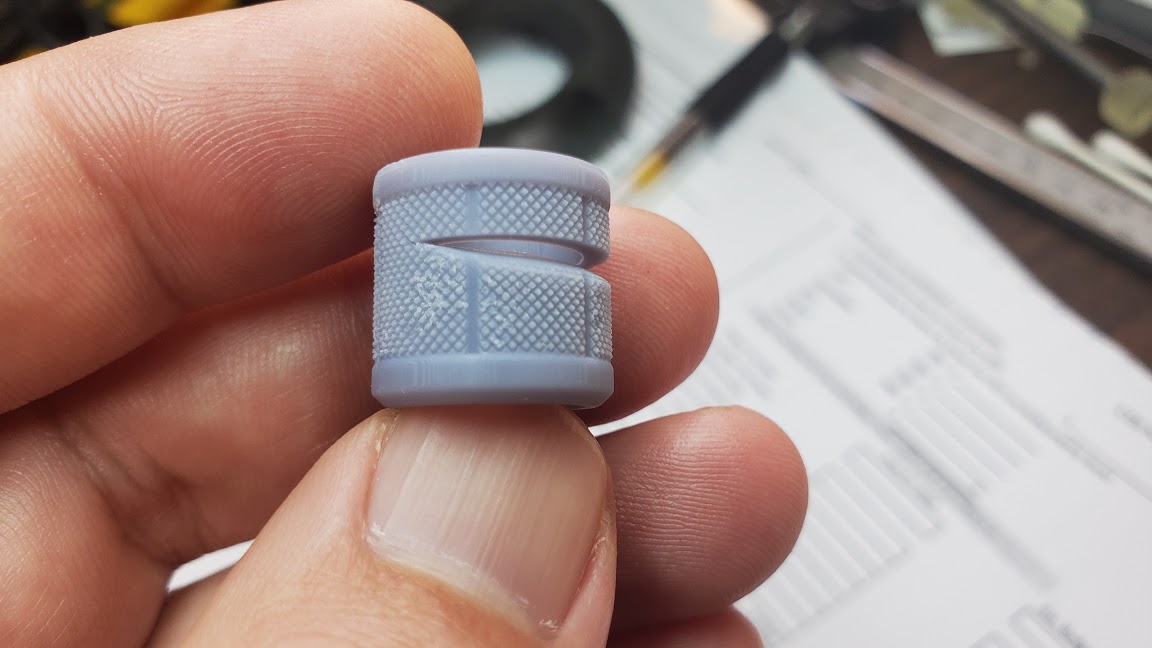
And - some parts can be much worse than others for this. Hollow parts can be particularly tricky because they can create suction. It's generally advised to leave a vent hole in a part to prevent this. That might be possible on a decorative figurine....but on a functional part it can be much trickier. Take my lower knobs for example:
20200714_162911.jpg


This is a failure I've seen a few times. The top of this image is where the part was adhered to the print bed. So you can see how after a few hundred layers the part stayed stuck to the print bed...but the new layers stuck to the FEP for part of it and didn't fully release. Eventually they did and this completed...but it left this deformity. At least that's my best guess for how this happened. Other parts on the build plate completed fine. It could have been an issue with the LCD...but it's a new printer so that seems unlikely. And I've had a lot of this part fail because of the suction issues printing a tube like this.

But...I can't just put a hole in the side of this part. I could add some extra material and make it taller and put a hole in there...but then I have to sand all that off in post and it wastes a bunch of resin. Lame.

So...how you do address this?

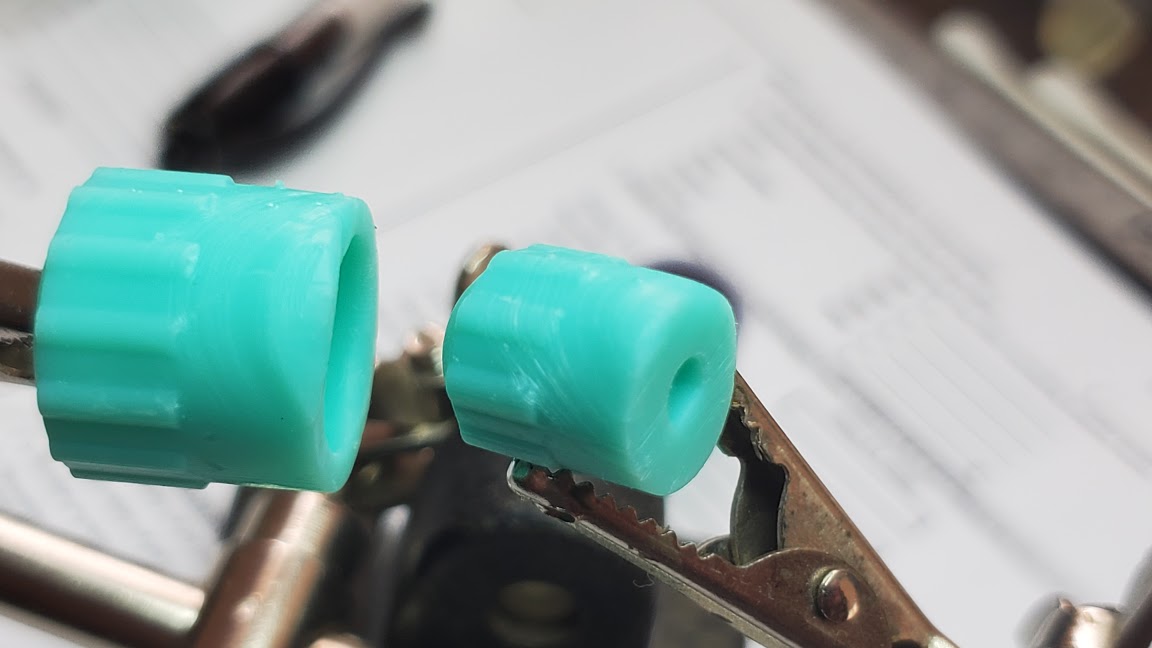
One popular solution is to print the part at an angle on supports. This prevents the closed tube that creates suction...it can also give you higher fidelity and hide some layer lines (not that they're very visible to begin with.) So let's try that!
20200714_164441.jpg


Ick. The part facing up is what was towards the build plate. You can see how the parts sagged. You can also see a few zits left behind from the supports. With some post-processing sanding these could be made to work...but they'd be cosmetically scarred unless you were going to paint them. Fine for decorative stuff...but no good for functional :(

So back to putting them flat on the build platform...But how do we make sure they stick? We increase the exposure on the first few layers to make them harder. Except then they get overexposed and you get elephant foot:
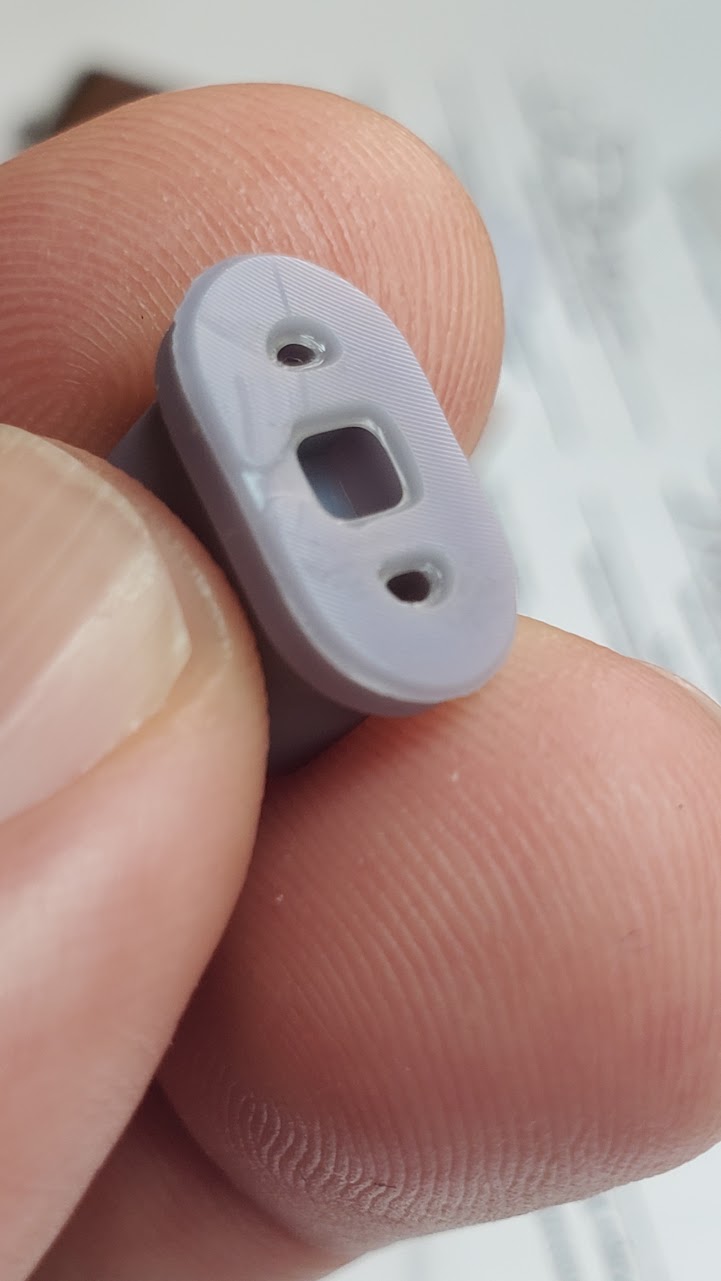
20200714_164936.jpg


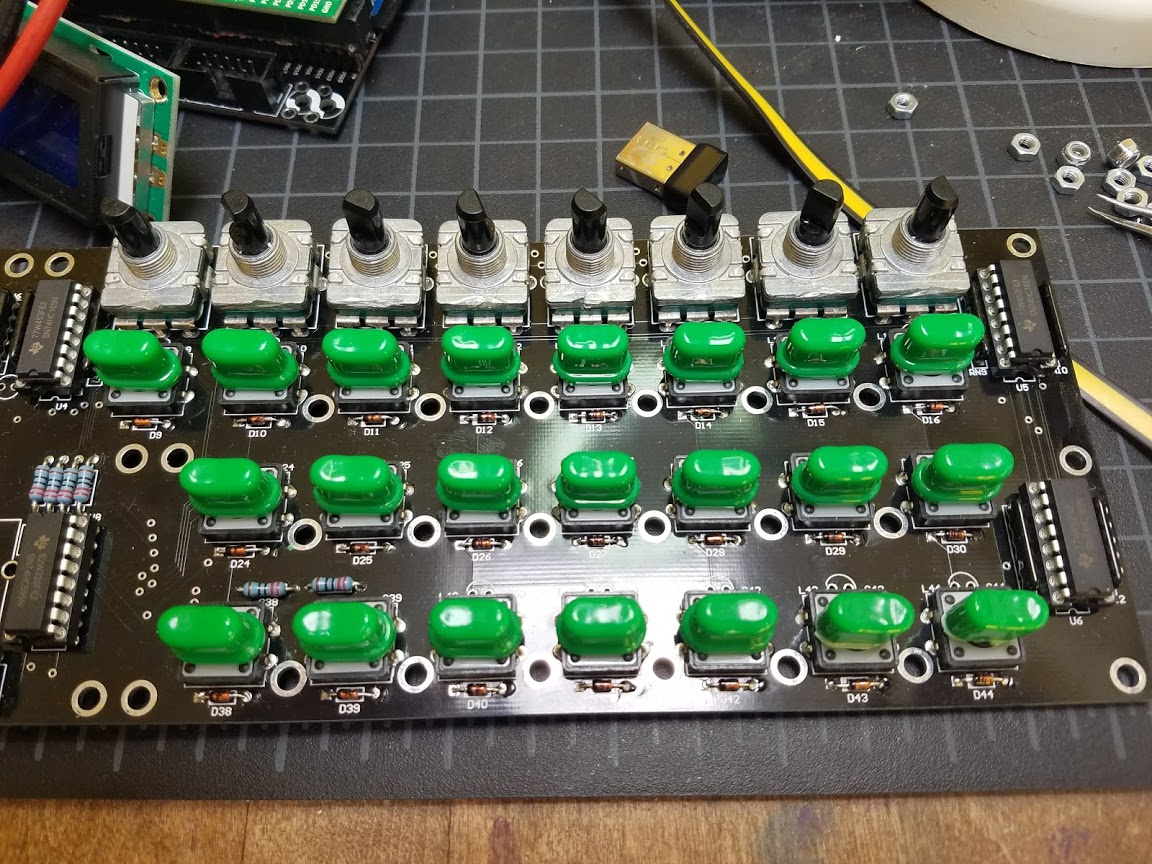
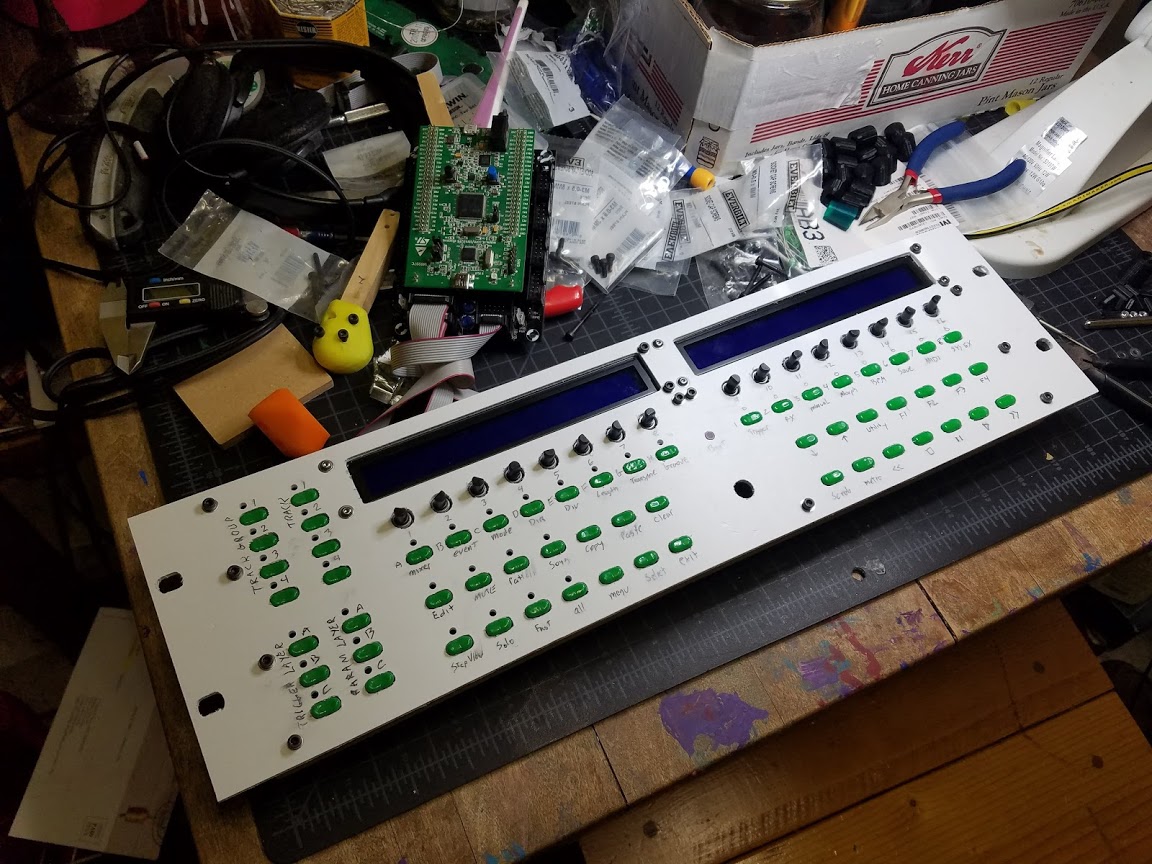
It isn't terrible on this one...but most of my tests of this switch cap were really bad. And that bottom shape needs to be accurate because these snap onto tactile switches. I've actually done these in FDM before and they work...but I had to make the openings oversized and print them in ABS and vapor smooth them to get them even close...and they still look lumpy and inconsistent so I'm not happy with them:
20180331_145428.jpg


20180413_223419.jpg


The lumpy, glossy, inconsistent buttons bug the heck out of me on this. I really want to replace them with nice clean resin prints!

So if printing right on the bed gives elephant foot and deforms the bottom...why not just add some supports?

Well...let's try "light" supports that leave the smallest marks on the print:
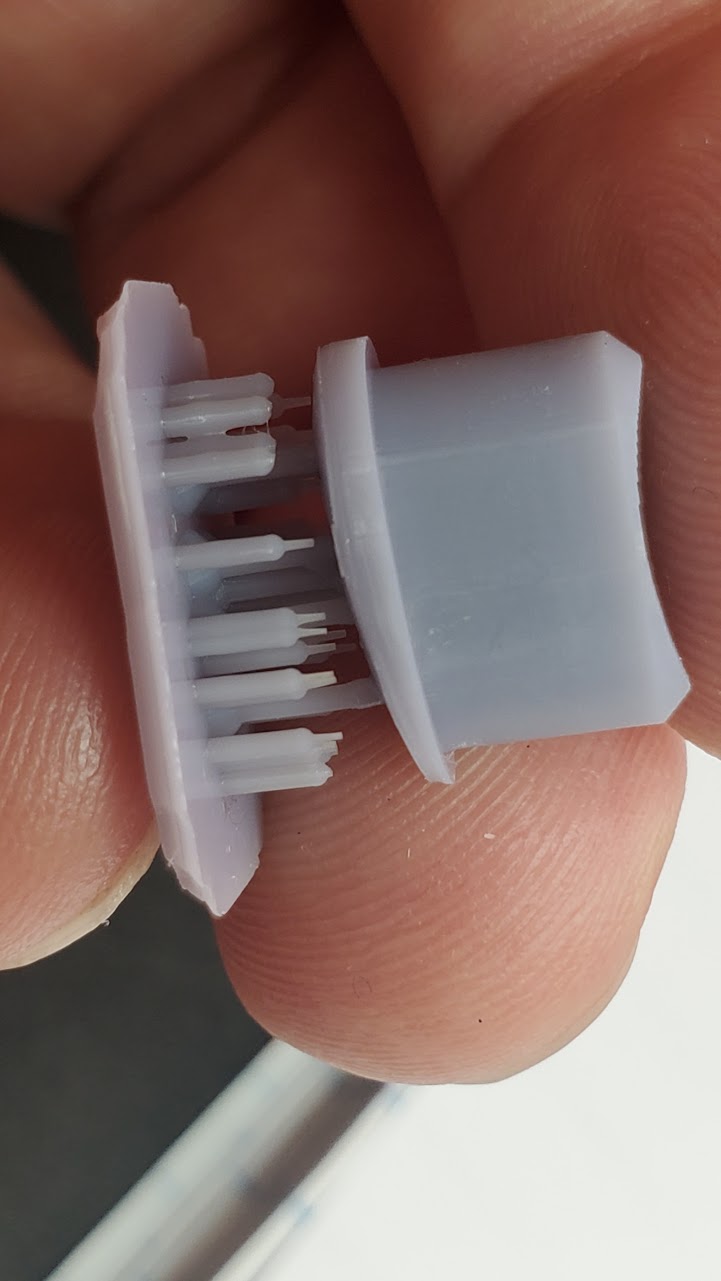
20200714_164948.jpg


Nope...the part warped in the peel process and pulled itself off. It stayed attached enough it didn't fail...but it's deformed :(

Ok...what about stronger "medium" supports:
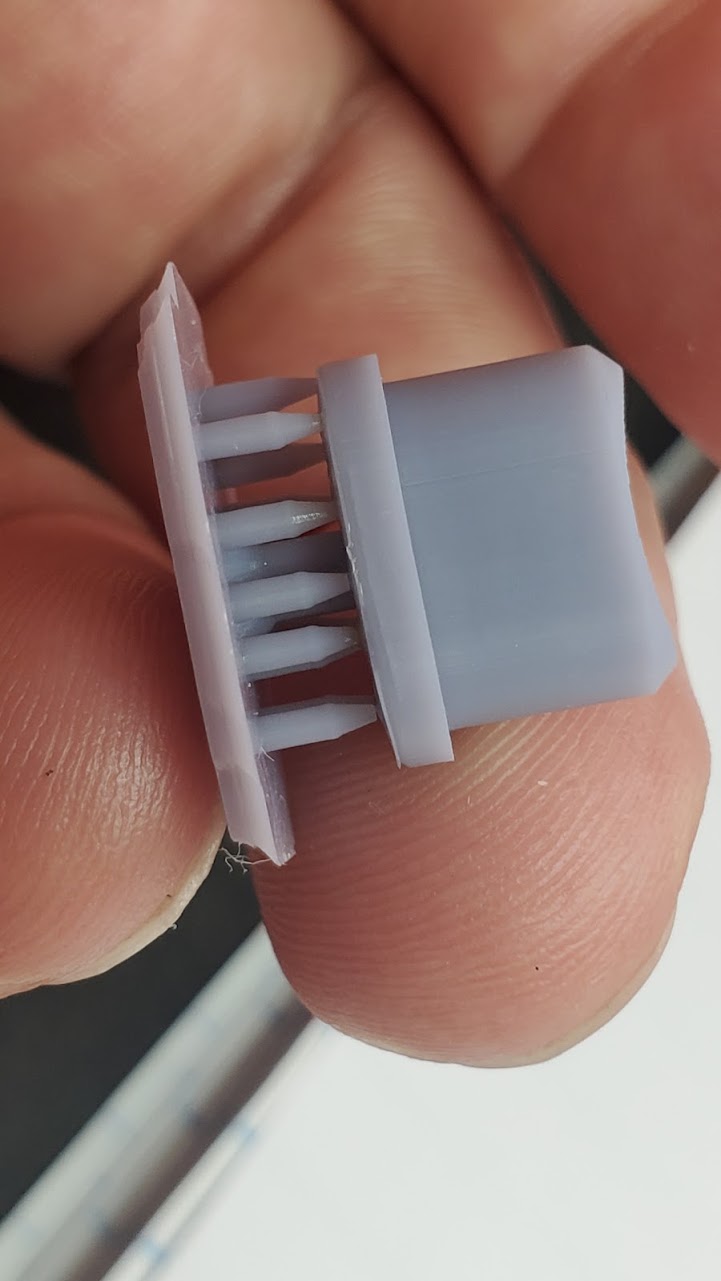
20200714_164954.jpg


Better...but it still came off and still deformed a bit. Ok....Heavy supports!
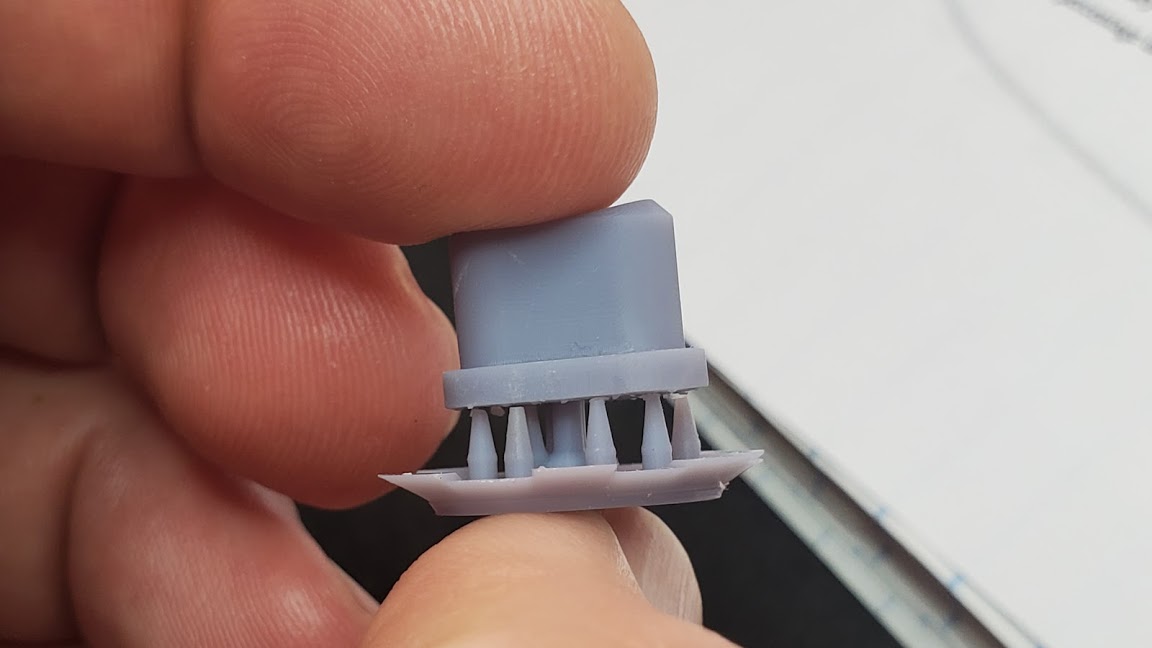
20200714_165004.jpg


This time it stayed attached (this is after I pulled it off the supports...I'm just holding it in place to compare) but....
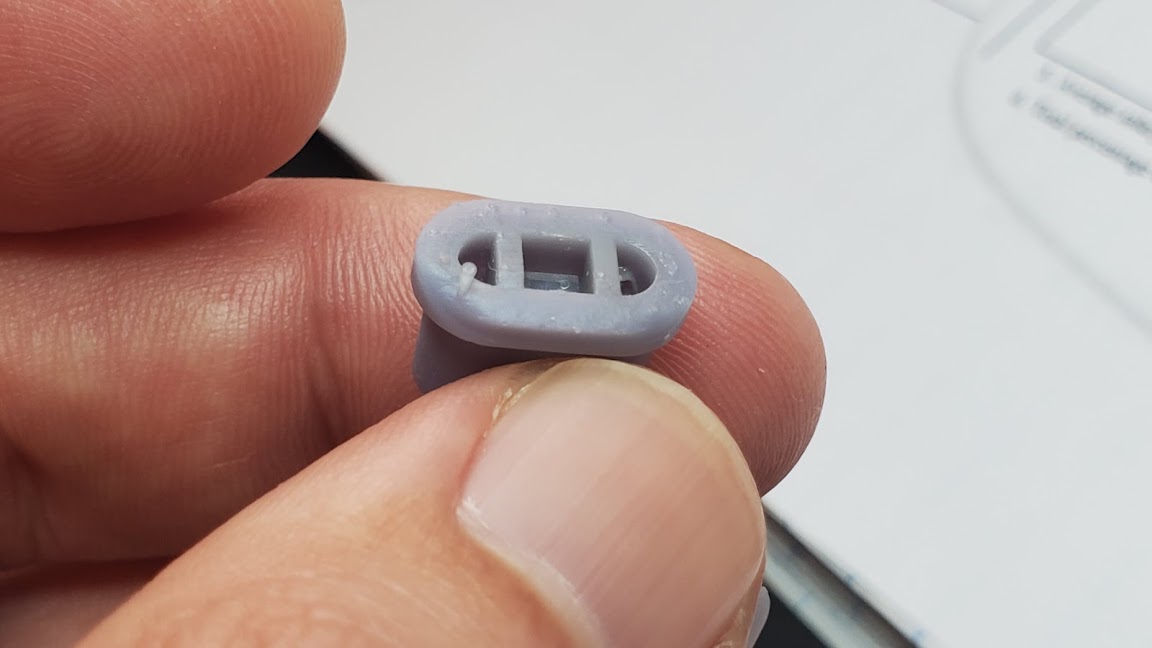
20200714_165013 (1).jpg


The bottom is all deformed between the supports. Again we're seeing the resin slumping as the first few layers were built up like we did with the angled knob.

I tried printing these switch caps angled as well and using supports from a different slicer...but they all came out with deformities in whatever was facing down. Adding more supports can minimize them...but then you have to remove the supports and the zits they leave...and it still doesn't result in a perfect result.

Arrgh! What can we do?
 

jhitesma

Some guy in the desert
Mentor
Well....we're designing these parts. So we can modify their design to compensate!

Like my upper knob. Printed flat on the bed the elephant foot makes it not fit into the lower knob and not fit on the shaft. But...if I add a 0.5mm chamfer aroudn the edges that absorbs the foot almost perfectly. I get a slightly rounded edge - but I'm ok with that.

20200708_214010.jpg


The top two were printed on supports...the bottom one was printed with the chamfer.

20200708_214616 (1).jpg


The concentric circles are the pattern machined into the print bed to help prints grip better.

So I was able to fix it!

The outer knobs were also able to hold on with the extra overexposure and a chamfer. So for this situation I solved it.

Now I just need to do the same for the keycaps. But that means I have to dig up the design files...and if I'm going to do that I need to also make sure the dimensions on the part that attaches are correct since I had resized it to compensate for the ABS deforming when being smoothed...and that means taking the whole device apart so I can measure the switches again....and....I just haven't had time to deal with that yet.

But - at least in this case I was able to overcome the issue and get things working for functional parts!
 

jhitesma

Some guy in the desert
Mentor
Hmmm...just saw @SP0NZ's new radial engine....

radial_sliced.PNG


6 hours doesn't bother me..., $2.39 in resin doesn't bother me...but...the support base not fitting on the print bed...that worries me. It might be ok...it looks like only some of the lip is out of the printable range...so the base should still be strong enough.

This is just with auto-supports though which usually don't work so great. I'd have to spend some time setting up manual supports before I'd actually try this. And I wish I could tilt it more...but this is really maxing out the size I can handle.

Note - this is on the Phrozen sonic mini, the mars pro would be a longer time - but since they have the same size print bed it would fit the same on both...as usual the shorter Z on the Phrozen isn't a limiting factor.

I almost wish I was broken into a center and separate cylinders. Would be a lot easier to print SLA that way....though I'm not sure of the best way to join SLA prints yet...apparently a lot of people just use resin like glue and set it with UV light....
 

jhitesma

Some guy in the desert
Mentor
I gave it a go. I redid the supports manually since auto-supports tend to overdo some areas and miss others completely. My version had the same print time (since it was the same height) but used 13g less resin saving me $0.35:

radial_sliced.PNG


And....it worked!

20200715_080217.jpg


Always nice to wake up to a successful print!

Gave it a quick bath in denatured alcohol. Then had to remove most of the supports to get it to fit in the ultrasonic bath. Thankfully 95% of the supports just pulled right off and left almost no scarring. The last few were little tiny ones between cooling fins in a few places I had to snip off with flush cutters. 3 minutes in 1:1 simple green and water in the ultrasonic cleaner, then a quick rinse in the sink to get rid of the worst of the smell of simple green...and....

20200715_084230.jpg


I would have used the ABS like grey since it would photograph better...but this aqua green resin has been my most reliable and I have a profile for it that works very well on the Sonic. So I went with it since it had the highest chance of success.

Note - this print on the Mars pro would have been 6 hours 49 minutes. So the extra speed of the Sonic only saved about an hour.

An original Mars or an Anycubic Photon are showing 9h 33m So - both the Sonic mini and the Mars pro are considerably faster than "1st gen" MSLA printers like those.

At the 0.2mm @SP0NZ suggests in his thingiverse post my Prusa MK3s reports 6h 3m. So resin is a little slower...but it's hard to argue with the quality :D

Here's a closer shot or trying to show the detail:
20200715_084246.jpg


It isn't a very detailed part...but it does look great. If SP0NZ modeled in more details - MSLA could easily show them :D


What about the less than idea parts?

Well, here's the scars left on the back by the supports. Not a huge deal since it's just the back:
20200715_084255.jpg


Also - in that shot you can see the holes I added in the back to allow resin to drain out. I printed this with 1.8mm thick walls. With the supports removed it weighed in at 61g. I could have gone with thinner walls and saved a bit more weight. It's pretty strong as it is would probably have been fine with thinner walls.

Here's the worst scarring left by the supports:
20200715_084308.jpg


Note - I haven't done any real cleanup of that yet. Just snipped off the bulk of the supports. A little bit of work with some sandpaper would easily clean this up. The cured resin sands beautifully.

And here's the most deformed part due to the orientation I had to use:

20200715_084342.jpg


This was what was facing down. You can see more support scars. And how a few of the fins aren't quite straight...as well as how "soft" or "wet" this area looks due to the slumping of the resin while printing. More support could prevent some of the slumping...but then would mean more support scars to clean up.

But overall it looks so much better than a FDM print and in use it would probably get a little bit of sanding and a coat of paint which would mask almost all of these flaws. And it's doubtful anyone would be looking at it as close as in these photos. From a foot away...it looks darn near perfect.
 

PsyBorg

Wake up! Time to fly!
Ok With these pics I think I can see how this works... The print doesn't build up and grow vertically. It looks as though as it prints it gets lifted out of the resin tank.

This really is a big step up in print quality over the 3d printers that use filament.
 

jhitesma

Some guy in the desert
Mentor
Ok With these pics I think I can see how this works... The print doesn't build up and grow vertically. It looks as though as it prints it gets lifted out of the resin tank.

This really is a big step up in print quality over the 3d printers that use filament.

Correct, the print is slowly lifted up out of the resin one layer at a time. Unfortunately since it's such a slow process it's kind of hard to show. For the first 2-2.5 hours there's nothing to see because the print that is getting built up is still down in the vat and blocked from view by the sides of the vat.

And yes, there is a big surface quality difference compared to FDM, and there are some strength differences. The layers fuse completely with resin printing so you get equal strength in all directions unlike FDM where parts are usually weaker in one dimension due to the layer bonding not being as complete. The resins are also more heat tolerant and harder - though along with that hardness comes brittleness (but as we've seen I'm getting ready to start experimenting with mixing regular and flexible resin to combat that.) The real trick seems to be that bigger thicker things are definitely strong...but small thin things are easily broken due to the brittleness.

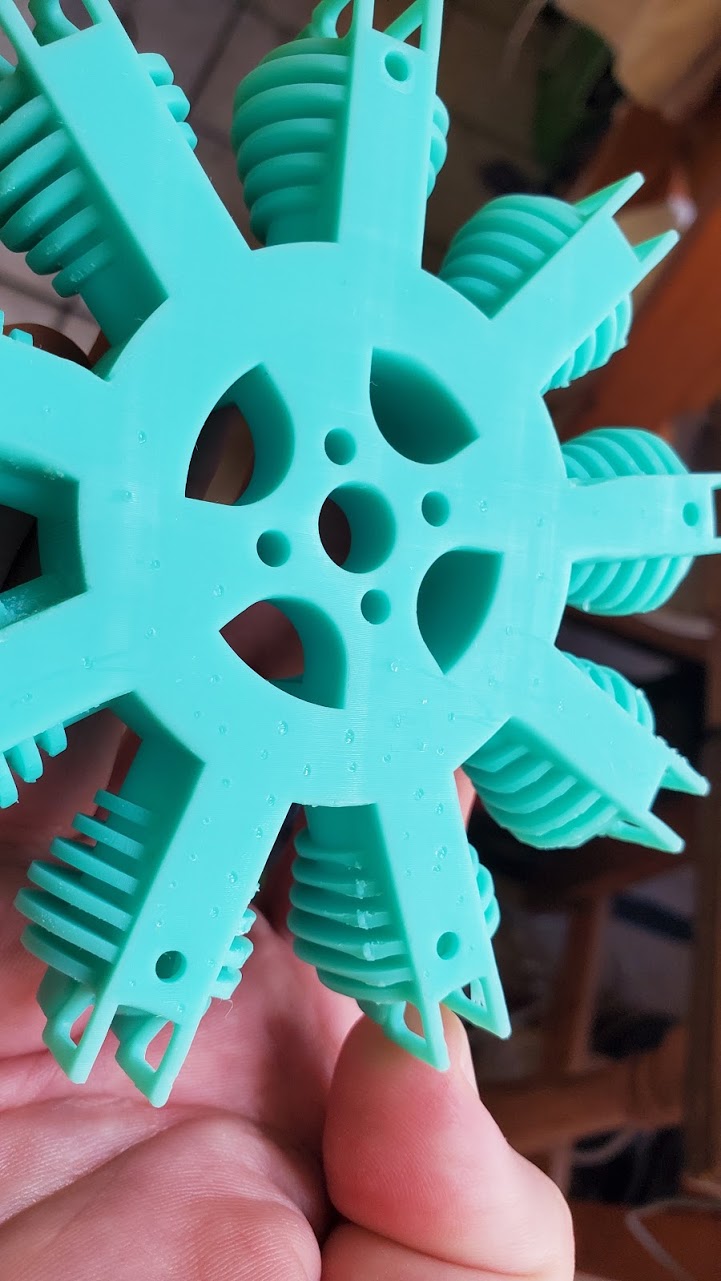
I decided to try printing @SP0NZ's warbird spinner since I saw him considering taking it down from Thingiverse since it can fly apart if not printed correctly and he was worried about the safety of it.

The nose cap was easy, it was small enough to place directly on the bed and print. The only issue was it wasted a lot of resin because it trapped it inside as it printed, and when I took it off the build plate all that resin made a mess:

20200716_083558.jpg


There's also a lip on the bottom due to elephant foot...but a little bit of sanding can fix that (you could try editing the mesh and adding a chamfer...but this is a slightly risk print due to it's tubular shape so it could pull off the bed due to suction and adding a chamfer would give it less bite into the build plate.)

The spinner itself is a bit more mixed. It was too bit to fit flat on the bed, so I had to print it tilted. So one side came out great:
20200716_083613.jpg


But the side that had to face down:
20200716_083625.jpg


Not so great. A bit of sanding will clear up most of it...but you can really see how curved surfaces facing down wind up pockmarked from supports and wind up loosing definition from the resin sagging between the supports.

Of course for a decorative part like this there would probably be some post-processing anyway...so a little bit of sanding and filling then pain probably isn't the end of the world:

Ugly side---but easily cleaned up with some sanding and paint:

20200716_083643.jpg


Pretty side:
20200716_083658.jpg


Still needs a bit of touch up...but not as much as the ugly side.

I'd put it on a motor and test it...but I don't have an appropriate sized motor on hand :( It felt pretty flimsy coming off the build plate...but once fully cured is nice and stiff.

Trying to get a feel for how strong it might be I was giving it a bit of a pull and a squeeze...and...oops:
20200716_084714.jpg


Due to the brittleness it's a fine line - it didn't start to feel weak or anything...just suddenly snap. Again, blending with some flexible resin would probably make a big difference here.

But you can see it didn't break along any kind of layer lines and looking closely at the break you can see how it's more like an injection molded part than a normal printed part:
20200716_084735.jpg


Honestly - if I had the right size motor I would give it a try. I'd stand a good ways back and probably behind something...but I'd be willing to give it a try and think it would be more likely to hold together than the same thing printed in filament even when it's this brittle. Though....I wouldn't expect it to survive a nose in landing.
 

jhitesma

Some guy in the desert
Mentor
Ok...enough of SP0NZ's stuff...I've got RC related designs of my own!

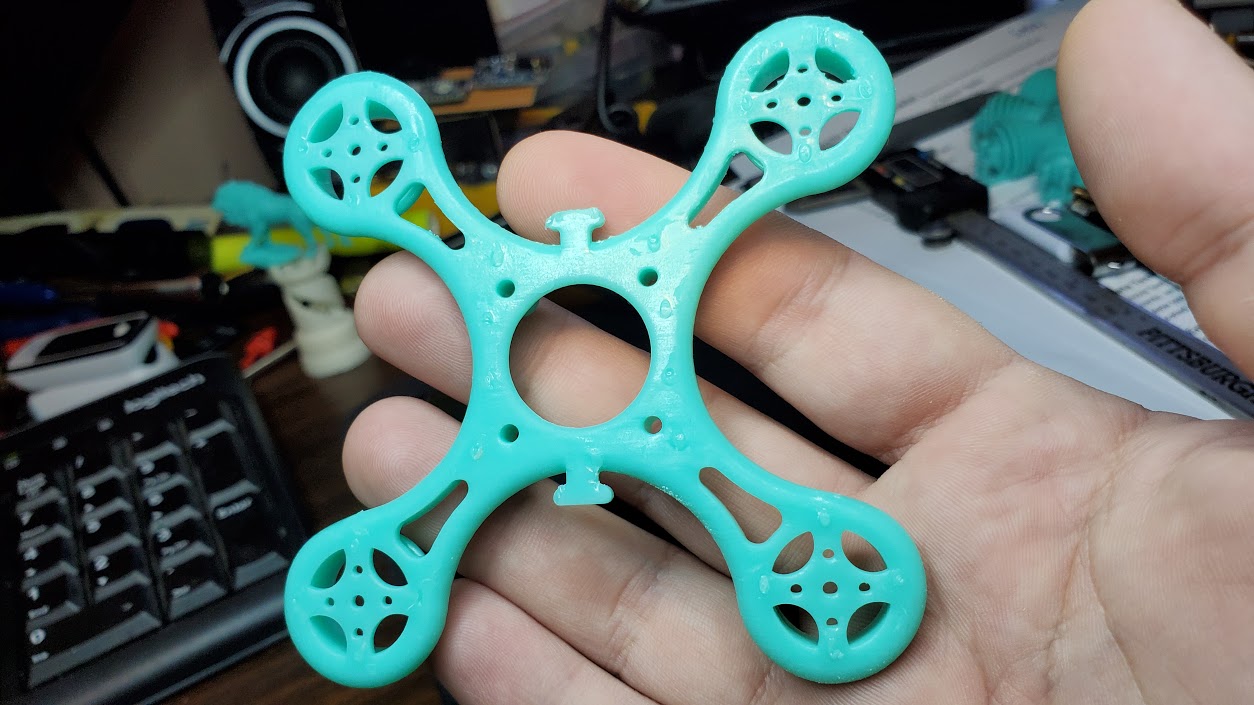
How about my 90mm gremlin quadcopter frame? That fits:
radial_sliced.PNG


4.5 hours on the Phrozen mini....quite a bit slower than printing it on FDM (1 hour 20 minutes at 0.2mm layers) but how does it come out...not bad!

20200716_085650.jpg


You can see a bit of deformity in the lower left corner since that was facing down. Again - pointy bits facing down...no problems...but flat surfaces or curved surfaces...they're just not going to come out accurately no matter how much support you throw at them.

But the unsupported bits:
20200716_085658.jpg


Gorgeous...that's how I pictured this when I designed it!

And even the minor deformity and scars from supports aren't THAT bad on this one:
20200716_085706.jpg


That's a zoomed in view...just looking at it in your hand those are very hard to notice.

I dug out a spare PLA and Nylon printed version to compare to - you can see them in the background - the green one is PLA, the white is Taulman Alloy 910 Nylon.

They're all very close to the same weight...my scale only does grams not tenths of a gram so I can't be sure...but they're all around 11-12g (right on the edge since I get slightly different readings each time - really wish I had a scale that could do tenths of a gram!)

What about durability? Would it hold up?

Well...I gave all three a gentle toss down about 15' down my hall where they impacted against a tiled step. PLA and Nylon stood up. FWIW - I've never managed to break a nylon version of this frame...PLA I've broken many times. The standard resin print:

20200716_085845.jpg


Dang. Never had one break quite like that before...usually they snap at the narrow point of the arms. The arm that isn't visible also broke off but I'm not sure where it went as I couldn't find it.

So...again...the plain resin is just a bit brittle for this kind of functional part. I can try it again in ABS like resin and when I finish this first bottle of aqua blue resin I'll have an empty bottle I can use to blend standard and flexible resin to try. I wouldn't try printing this entirely in flexible...the flexible is just too flexible I think and I doubt it would make for a usable print. It would certainly hold up...but it would be too flexible to fly well if at all.

And I'm close to trying blending. The last of this first bottle of aqua blue is in the vat and there's only about 1/8" of it left. So a few more prints and we'll see!

BTW - as for how much resin you need to do a print. Basically you need enough for the print and to keep the bottom of the vat covered. In my case that's a bit more than I'd like because the cart my printers are on isn't level - so I have more resin in one side of the vat than the other. If I leveled it out I could make due with less resin in the vat. Since layers are so thin if the machine is level you don't need a whole lot more than the part will take.
 

PsyBorg

Wake up! Time to fly!
I think once you find the right mix of the hard and soft resins 3d printing a 2 to 4 inch quad frame would be viable. Should be stiff enough to not resonate and freak out an FC yet have enough give to not shatter on impact. At the very least it should make for a stable grassy area frame proving the pilot does not face plant on a tree trunk.
 

jhitesma

Some guy in the desert
Mentor
4" would be tricky...unless it was printed in multiple parts. This little 90mm frame fits in the build volume...but just barely.

There are larger printers of course...but they're quite a bit more expensive. Elegoo recently released the Saturn which is basically a larger Mars with a higher resolution screen. But it sold out pretty much instantly and with the demand it's seeing will be hard to get a hold of for awhile.

Honestly, I may print another frame like this and fly it just for the heck of it. It should survive flight just fine...it's just crashes it won't handle with...but since I haven't flown in over 2 years...I expect a lot of crashes :D And i can't find what I did with my 90mm quad. Darn thing is so small it's easy to loose track of! I found the 2 spare frames...but can't find where I actually put the quad itself!

I'm really looking forward to experimenting with blending the resins though. And so close now...trying to print a few things today to use up the last of this first bottle of aqua blue. Just - don't want to print for the sake of printing so trying to find things I actually want/need and don't mind printing in aqua :D
 

PsyBorg

Wake up! Time to fly!
If you do a build try betaflight with all the fancy bells n whistles and filters turned off. Tune only pids. Works amazing on the 3 inch I just built. Id be interested in how good the frame turns out noise wise.
 

LitterBug

Techno Nut
Moderator
Somehow I picture a Cylon being printed and coming out of the Vat, then being post processed. Maybe I've seen the 2nd Battlestar Galactica too many times....
 

jhitesma

Some guy in the desert
Mentor
So over the weekend I gave my first try at blending resins. Based on what I found in various user groups I decided to try a 3:1 mix of standard resin to flexible tenacious by volume. So I measured out 90ml of Phrozen aqua blue and 30ml of tenacious. Poured them into the now empty jar and shook them well for 1 minute before pouring them into the vat and giving them a go.

Note I wasn't overly precise in my measurements, and the jar I used had some residual standard resin and the vat had some as well. So it wasn't an exact 3:1 blend. But...close enough for a first test.

I did a few small exposure tests...and...results were mixed. It seemed to go from under exposed to over exposed with just a second or so of difference. I should do more testing like this...but it's rather tedious with the machines out in my shop so I'm not as good about dialing it in perfectly as I'd like to be. But the test pieces definitely showed more resilience and flexibility than the straight standard resin. Test pieces done in the standard resin would tend to curl a bit...and even very slight attempts to flatten them would cause them to shatter. These didn't curl nearly as much, and could be easily flattened out. I could even flex and bend them quite a bit though they did eventually shatter with enough bending.

Since that seemed promising I decided that instead of dialing in the exposure "just right" I would go ahead and try a full print. So I tried my 90mm quad frame again. As soon as I took it off the build plate I could tell there was a difference. The supports were much harder to remove. With the standard resin 95% of them just pulled right off, but now I had to use clippers on almost all of them. Gave it a really good wash in denatured alcohol followed by 3 minutes in the ultrasonic cleaner with mean green - then a quick rinse in water to get off the mean green and put it under my curing lamp since it was night.

The print is noticeably different...it's glossier and almost seems like the resin wasn't washed off as well after printing...but I know it got a really good wash:
20200720_082924.jpg


The supports also left more scarring this time - not surprising since they were so much harder to remove:
20200720_082933.jpg


But - overall it still looks great few a foot or two away:
20200720_082940.jpg


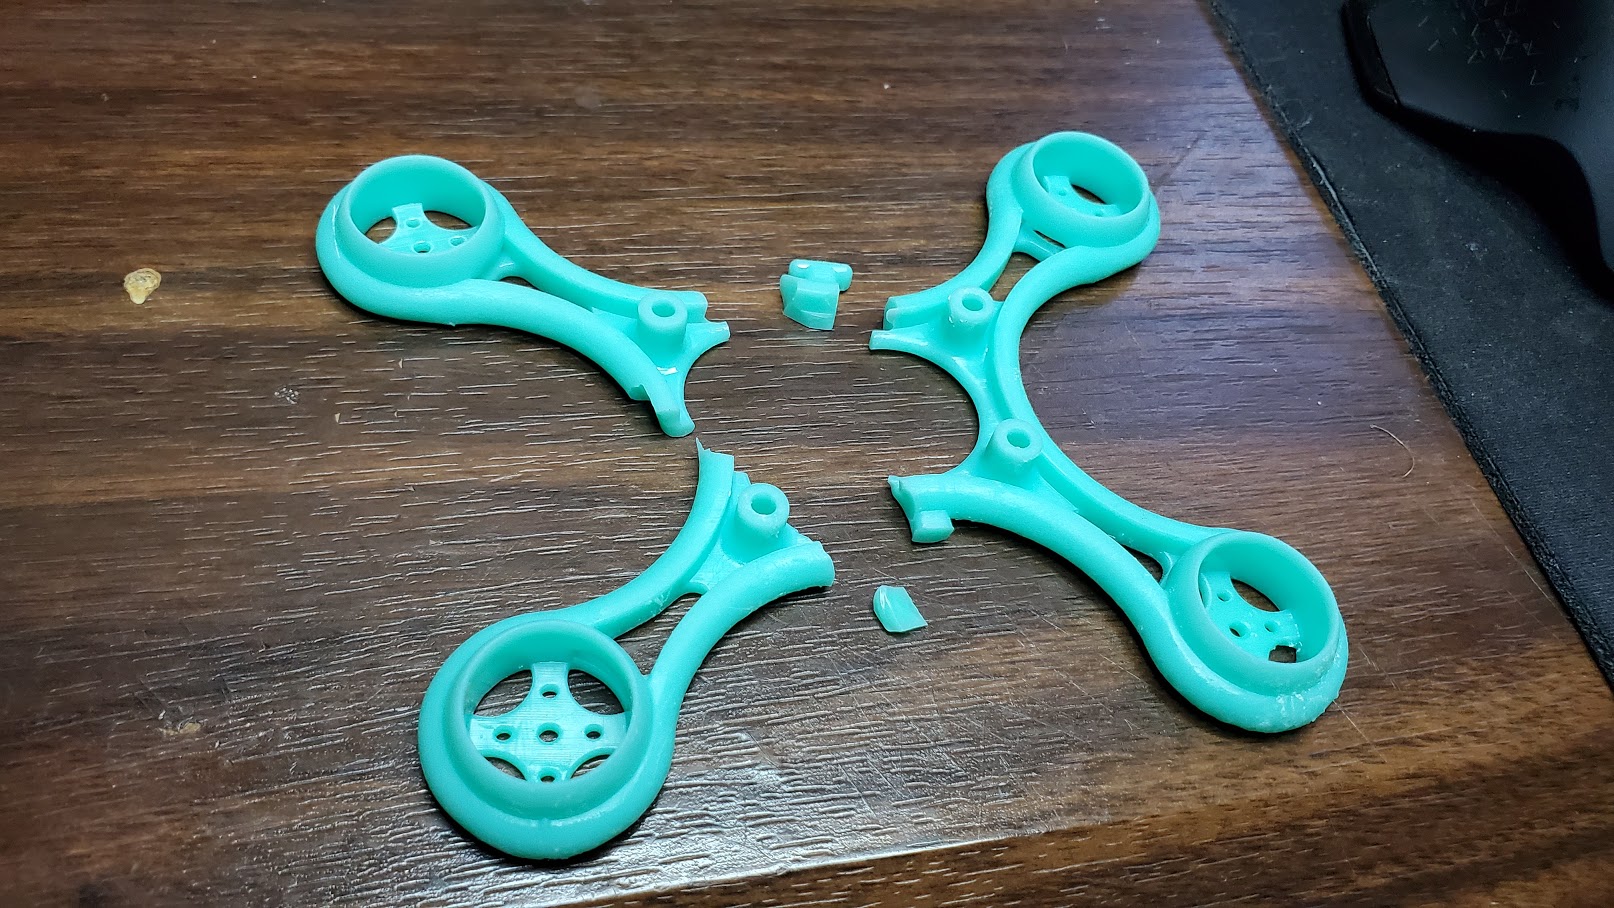
And - it now passes my toss test. In fact after 3 gentle tosses I gave it a few actual throws at the hard tile ground and it survived them just fine.

But eventually I tossed it hard enough it did break - but even PLA versions break if I toss them hard enough. And I know from when I developed this frame that without a FC installed it's a lot weaker and more prone to break like this:
20200720_090752.jpg


That center really gets a lot of it's strength from the FC and camera mount.

So I see this as VERY promising. I think a slightly higher flexible to standard ratio would do even better - I may try 2:1 but I'm worried that may be a bit too flexible and not stiff enough for a frame.

I'm also still trying to find what I did with the actual quad so I can try flying one of these SLA frames when I get a blend I'm happy with!
 

PsyBorg

Wake up! Time to fly!
That does seem more promising then the PLA. Just the fact you had to put effort into breaking it is impressive. That should be more then able to withstand a respectable hit as a working quad. Specially if you are not flying it over or into hard surfaces. It should make a decent back yard ripper even as it is.

Maybe not go full on 2:1 for the next attempt. Maybe 2.5:1 as I think you may get into low frequency resonance issues if you go too soft. But then again how low frequency can it employ with such a short wheel base.
 

jhitesma

Some guy in the desert
Mentor
Well, there are no non-hard surfaces around here to fly over :D Even the "Grassy fields" are rock hard compared to what most people probably think of when they think "grass". Ours are hard packed sand that you pretty much have to jackhammer through :D

I've flown the all nylon printed version a few years ago and it worked even though it was soft and it did well. So I think even if I printed this is full tenacious it would be ok....but I do like the extra stiffness I get from the plain resin.

I also ordered two more resins to experiment with - Siraya Fast which a lot of people rave about and say is easier to print than the resins I've been using and stronger than most "ABS like" resins. And Siraya Blu which is their super strong engineering resin. The Fast is about the same price as the elegoo and anycubic resins but the Blu is considerably more expensive like the tenacious. Apparently a blu/tenacious blend is pretty popular for extremely strong parts. So...we'll see how those do in a few days when I get them.

And...I could design a new frame that takes better advantage of this printing method. The existing design had a lot of little things about it designed to work well with FDM. With the right resin I suspect I could actually do what I originally envisioned and hollow out the arms leaving more of a tube like structure.

I just wish I could figure out where the heck I stashed the quad!
 

PsyBorg

Wake up! Time to fly!
Carnac says....... its stashed away with your daughters flying / rc toys. Most likely with the tiny whoov
 

jhitesma

Some guy in the desert
Mentor
Carnac says....... its stashed away with your daughters flying / rc toys. Most likely with the tiny whoov

Ha, first place I looked. It usually lives in this little plastic tub with the whoov:
20200720_193631.jpg


That power pod is 6 years old now I think? It was one of the very first I built shortly after FT started the swappables. The little FP heli was the 2nd or 3rd flying RC model I bought. The first is the other heli just peeking out under the balsa wings next to the boat, the possible 2nd is a Syma quad that's buried under that pile of servos that haven't made it out to my shop and into the servo bin yet. That landing gear is from a baby blender...and one of these days I need to fix the wing joiner on that folding wing plane...that thing was a lot of fun.

This is the corner of my back room that needs to be cleaned out so the laser can live there permanently. Just need to get a friend to help me remove the wall unit AC and then patch the hole in the wall and add a vent for the laser in it's place.

The other place the 90mm quad usually hangs out is on my shop desk....honestly it probably IS on my shop desk and I just can't find it...but I've given it a good search 4 or 5 times over...can't figure out why it might be missing:

20200720_165012.jpg


I really need to get out to my shop and do a deep cleaning again :D


Anyway...the experiments continue!

I've printed standoffs on my FDM machine many times in the past. So handy to be able to create a custom height standoff when I need them! But...they aren't super strong and tapping them is tricky since the friction of the tap creates heat and they can start to soften. Resin printed standoffs seemed like they may be considerably better:

20200721_094102 (1).jpg


And I'm really happy with them printed in 3:1 standard to tenacious. I only needed two...but tried printing them in a few different ways. I tried half with an ID sized to the drill size suggested for an M3x0.5 tap, and the other half I tried modeling the M3x0.5 threads in Fusion.

On one side I gave them the 0.5mm chamfer I found works to absorb the elephant foot - but I printed half of each set with the chamfer up to see how bad the elephant foot would actually be.

Turned out on small parts like this the foot isn't nearly as bad and the 0.5mm chamfer is too much. They printed...but the chamfer is still visible and was more than needed to compensate. The elephant foot side was minor enough it actually gave a better finish overall. If these were critical I'd redo them with a smaller chamfer...but for my needs they're ok.

They did turn out a little shorter in Z than I expected. I'm not sure why. maybe there's more shrinkage from the resin in that dimension after all? Maybe Z on my sonic mini is a bit off? Not sure...it's not a big difference. But still less dimensional accuracy than I'm used to with my Mk3s FDM printer.

I also tried my FT Dart power pods:
20200721_094117.jpg


The white versions were printed in Nylon. They're tough. Though enough I actually tried driving over one with my truck...turned out they weren't THAT tough...but still tough.

The SLA versions (in 3:1 mix) are 2g lighter and were pritned with thinner walls but still seem just as tough and almost like they could still be made lighter with thinner walls and still be plenty strong.

Side note - I really need to finish building the dart one of these days. Just need to wire it up. But wasn't sure if these 1306 motors would be enough to actually move it around or not and didn't have enough of the right sized wire so it's been sitting for over 2 years waiting on me to finish it.

The engineering grade Siraya blue and their standard "fast" resin should be here today. Was expecting them in about an hour but UPS just updated the delivery time pushing it to this evening :( Bummer. I'm pretty excited about trying both of those resins!

On a related note...and friend has convinced me to build one of these:

He built one himself and had a few spare PCB's left over, I had given him some SLA printed knobs for the radio interface we both built and he sent me one of the spare PCB's as thanks. I'm curious to see if printing some of the water handling parts with SLA will give better results. Like the anti-splash cone at the bottom. It easily fits on the SLA print bed:

spike.PNG


And definitely seems like something that would benefit from the smoother printing of SLA.

In fact...all of the parts will fit on the SLA bed...and look like they will probably print decently as SLA parts and a few look like they'll print better. So...will be an interesting experiment!
 

jhitesma

Some guy in the desert
Mentor
Yeah, those time fountain parts came out beautiful in resin:

20200721_135539.jpg


That little spike was even better before cleaning and curing...but it didn't survive my brushing and the ultrasonic cleaner - the very very fine tip broke off. I'm probably going to reprint it in black anyway so I'll try to be more careful then.

But this part just blows me away:
20200722_085942.jpg

It's hard to get a photo that does the finish on it justice. This black is actually slightly translucent. But this just doesn't look anything like a 3d printed part. The edges are so sharp and crisp, the definition on it just blows me away.

There were built in supports on the little ear near the top which aren't really needed with resin printing. But they were designed in and printed so fine that some of them just brushed away when I was cleaning the parts.

That white stuff around the edge...more on that in a bit.

How about the fancier Siraya resin was expecting yesterday? Well, UPS got delayed and it didn't get here until almost 9PM. I did mange to do a few tests with it today. First a few exposure tests to find out what settings would work best with it:

20200722_221345.jpg


For the Sonic mini siraya recommends a 4s exposure. But I found the exposure test seemed pretty underexposed. Notice how the finer bars are missing - and you probably cant' tell in the photo but the area between the positive and negative elements shows some gaps. So I bumped it to 6s.

Note - I broke the 4s one trying to get a feel for how strong the resin is. It's not as resilient as the tenacious which can be bent fully back on itself without breaking. But it's a lot tougher than standard resin for sure. I was able to flex it quite a bit without it breaking...but it's still stiff and not really flexible. It will be very interesting to try and mix of this and tenacious.

6s looked a lot better...but still not quite perfect so I tried 7s. And 7s looked pretty good. 7.5 might be better..but I was itching to try some prints at this point.

Except....the exposure time wasn't the only adjustment to the settings Siraya recommends for blu. They also recommend a higher lift between layers and a slower lift. The result being that this little test that usually takes about 8 minutes turned into 18 minute prints. So when I went to print my quad frame I found it was now a 12 hour print instead of a 3 hour print! Yikes!

So I tried some smaller parts first. I put another dart pod, a few standoffs and another piece I never really trusted in PLA onto a build plate and let it go.

Parts in this look pretty incredible...at least before they get the final cure. When they're wet they look like glass or hard candy...just amazing looking. After curing I'm getting a more matte finish though. I'm curing "in water" since Siraya recommends it to get faster curing...but tomorrow I'll probably try some dry curing. It's odd because their instructions first warn that you must let the cleaning alcohol evaporate before curing and parts should be dry...but then they also say parts should be cured in water for best results. Note the color difference on the 3 exposure tests. The 4s one was cured dry - the other two were cured in water. But even the two cured in water have slight color differences and I think it's from the washing process.

Which brings me back to the white cruft on the black part...you'll see some more of that in the next few photos. I think it's from my alcohol. It had got pretty saturated with resin by today. So after the first blu test I decided it was time to decant it and strain it. But what I found was after decanting there was still a lot of resin in the alcohol - and since I was working outside I could see the dissolved resin curing and settling in the alcohol while I worked. So I think a better process is to put the alcohol container out in the light to cure first - then decant and strain. But..the point is...my alcohol is so saturated with resin now that while washing parts they're picking up bits of dissolved resin in other colors.

I'd just let the alcohol evaporate and start with fresh...but...the stuff is expensive and hard to find right now. So the straining process is worth the mess and pain for now.

Ok, my first real prints in engineering quality resin.....

20200722_220617.jpg


The dart pod looks really nice. It was even better when wet and glossy...but still pretty cool. Here it is next to the same part in standard aqua green resin:

20200722_220626.jpg


If I can get this to wash better it should look more like it does when wet once fully cured.

The standoffs? Surprisingly even though this resin is rated for 6% shrinkage (by volume) they came out more accurately than the ones in standard resin. Though I found yesterday that the vat wasn't fully seated so that may have explained why some weren't printing to the correct height if the vat was pulling up instead of releasing sometimes.

20200722_220611.jpg


I did break one while tapping it. That was my fault for not cleaning out the tap - too much dust built up and jammed things up. But it let me get a look inside. The fully tapped threads on the one on the left are great. I don't think they're quite as strong as nylon standoffs...but definitely better than PLA or PETG.

And the last part on the build plate...something I never trusted in PLA?

20200722_220637.jpg


Yep. The little adapter I made for a helicopter toy from thingiverse so I could use a 2204 quad motor to launch them instead of a pullcord. The walls are so thin this thing always made me nervous in PLA. I was terrified of it blowing apart at those high RPM's. This one...I feel MUCH safer with. It also fits better and it's smoother so should work better. I'd love to print the prop loops this way as well...but...they're a bit too big to fit. I'd have to design some smaller ones - which I may do at some point.

Overall my first impression of BLU is a bit mixed. There's a lot of potential here but it's also a slower more difficult material to work with. I look forward to trying the Siraya fast and blending both this and the fast with tenacious.

Oh - and the quad frame is printing, it will go overnight and finish early tomorrow morning. So we'll see tomorrow how it handles the toss tests :D And if I can use some fresher alcohol and get a cleaner finish.
 

jhitesma

Some guy in the desert
Mentor
So the Siraya Blue "engineering grade" resin does seem tough. Here's what I woke up to this morning:

20200723_080417.jpg


This stuff is just amazing looking when wet.

But - despite cleaning in fresh alcohol and drying completely before curing as per manufacturers directions after curing it still comes out frosted. I think that's just the way it is though looking at prints other people have done in it.

20200723_084801.jpg


It's also not quite as stiff as I expected. The frame as a bit more flex than I was anticipating. It's about the same as a PLA frame - stiffer than my Nylon printed version but not as stiff as the standard resin.

But it does appear to be a lot tougher. I was eventually able to break it with my toss tests. But it took a lot more tosses than the prior versions and a lot more force. I was throwing it as hard as I can at the tile step and even so it took 3-4 full strength tosses before it broke. That's more than the PLA versions took to break and those held up great in actual use.

This I would strap the hardware to and fly...if I could find where I put the stuff...still eludes me where I put it!
 

LitterBug

Techno Nut
Moderator
I wonder how well some of these materials would look lighted with LEDs. Some materials seem to be better at "lighting up" than others. Part of it of course would be dependent on the resonant frequency of light.
 

jhitesma

Some guy in the desert
Mentor
I wonder how well some of these materials would look lighted with LEDs. Some materials seem to be better at "lighting up" than others. Part of it of course would be dependent on the resonant frequency of light.

Well, under the UV curing lamp they all glow - which makes sense since they're photo reactive at that wavelength.

As for a normal LED....here they are lit with my FW3A flashlight (which btw, is an amazing little flashlight for $40 that can pump out more light than anything this small has any right to - almost 3000 lumens.) It has SST-20 high CRI neutral white 4000k LED's:

20200723_104714.jpg


The blu lights up pretty well, but the light doesn't seem to "pipe" along it very far.

20200723_104734.jpg


Though part design seems to make a big difference there. The dart pod lights up really well lit this way...lit from the bottom the light still doesn't spread far.

20200723_104741.jpg


The standard resin is also somewhat translucent...but doesn't glow nearly as well.

20200723_104757.jpg


And how the part is printed plays a big roll. This is printed solid and the center gets no glow at all...even with the light turned up quite a bit brighter.

20200723_104815.jpg


Interestingly enough the black resin actually glows as well or better than the standard aqua blue. Though it kind of makes sense...if it wasn't somewhat translucent it couldn't cure well. So even the most opaque resins are still fairly transparent.