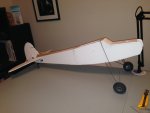
First Scratch Build, I have super powers!

nhk750

Aviation Enthusiast
After crashing my speed build Storch into a few trees (darn Washington State and all its trees!) I bought some $1 Adams board (I have dollar plus stores surrounding me), and starter my scratch build of the Storch Fuselage. I am just about finished and wow! I cant believe I built it with $2 worth of foam board. I feel like I have super powers! My wife is afraid to leave the house now that I have this new skill as it might be full of airplanes when she returns...

Am I the first person to post in this section? I think this is the appropriate section for this.
 

fixnfly

New member
After crashing my speed build Storch into a few trees (darn Washington State and all its trees!) I bought some $1 Adams board (I have dollar plus stores surrounding me), and starter my scratch build of the Storch Fuselage. I am just about finished and wow! I cant believe I built it with $2 worth of foam board. I feel like I have super powers! My wife is afraid to leave the house now that I have this new skill as it might be full of airplanes when she returns...

Am I the first person to post in this section? I think this is the appropriate section for this.

Yep, this is a brand new section. I requested it not long ago. Can you please share pictures of the crashed plane, and your new fuse? We may be able to teach you some new superpowers if the damage isn't to bad.
 

nhk750

Aviation Enthusiast
Storch crash and repair

Here is a link to the short youtube video of one of the crashes that day (the one that broke the tail off). I was experimenting with two small parks to fly in and quickly realized that small parks surrounded by trees are not good for larger planes like the Storch (probably ok for micro planes like my Taylorcraft).

https://youtu.be/eFV-tJwGKGs

Here is a pic of the main damage.

IMG_2171.JPG

There was also damage to the nose and a hole in the fuse (not concerned about the small hole). The wing had 0 damage amazingly...

Here is a pic of the repairs I made. I pretty much injected hot glue into the severed areas, reinforced with foam board, then also cut out a section of the bottom of the tail/fuse area and installed new foam board and paper over the top using hot glue. I also used a Dremel to sand down the paint to bare foam board so the hot glue would stick better.

IMG_2173.JPG

IMG_0082.JPG

It is kind of ugly, but very strong now. I also upset the weight and balance a bit, but when I reinforced the nose with bbq sticks and foam board, it balanced out better. Still nose slightly tail heavy though, what is the best way to add small amount of weight to nose? The battery is already all the way forward.

I don't have any pics of the new fuse yet, I have made some improvements with tips off the forum and going to install a Dubro tailwheel. I also made a few improvements of my own and will post pics when I finish it. So far the wing is holding up great so no new wing yet.

Overall, the repairs made the plane much heavier, but it will give me more use of the fuse while I improve my flying skills (that is the main purpose of the plane and also to learn building foam board). When I finally destroy this fuse completely I will use the new improved one.

Funny thing though, I have not actually crashed the plane with my flying skills, all my landings are perfect. The trees that keep jumping out in front of the aircraft have caused all the problems. It is like they don't like airplanes or something...
 
Last edited:

Grifflyer

WWII fanatic
what is the best way to add small amount of weight to nose? The battery is already all the way forward.

i like using pennies by digging out a little cavity the size of a coin put them in so that that they come flush or close to flush with the foam then glue something to cover it

here is a quick image of sorts help thing.png
 

nhk750

Aviation Enthusiast
I like the penny idea, lots of those laying around. Finally got some good weather today to get her out and fly. Also found a really big park nearby that a friend told me about. No ball fields just wide open lake and rolling hills. County park so it should be a good spot.
 

nhk750

Aviation Enthusiast
Got her flying today!

I managed to check out this park my friend mentioned that they fly quads at. It is pretty good, even has a mowed area with two landing cross strips! I am not sure if its mowed for rc planes, but it sure seems like a good grass runway. There are few trees around, but adds to the challenge a bit. Here is some video.


I had a problem with the last battery, the motor started to stutter, after 4 minutes of flight time, at full throttle and also loss of power. It is a new battery and I only flew about 5 minutes on it. So, I am not sure what is going on there. Could the ESC have gotten too hot? I did fly for 10 mins, then change batteries and fly again right away (I was pushing it pretty hard too, about 70-100% throttle). I am a nube, but do know how to take care of Lipos. See my pics for battery voltages and ohms reading on the battery after I landed. I try to never go below 3.7 - 3.8v.

Weird because when I landed and tested it on the ground it was fine, but in the air again it had problems...see video.

IMG_2193.JPG

IMG_2191.JPG
 
Last edited:

Hai-Lee

Old and Bold RC PILOT
You may have bent something in the motor and it is now drawing more current than it should, (possibly just a bent shaft). If the motor is trying to draw more current then the ESC will overheat and shut down the power going to the motor.

I have had similar problems often in the past. Check that the prop runs true. :black_eyed:
 

nhk750

Aviation Enthusiast
Just bench tested the power pod and no vibration, prop is balance and motor runs at 100% with no issues. I think it must have been going into a thermal cutback condition, the esc is kinda buried in the storch and I did run it back to back on battery changes with no cooldown. I will see on next flight when I get time and weather.
 

nhk750

Aviation Enthusiast
Yep, this is a brand new section. I requested it not long ago. Can you please share pictures of the crashed plane, and your new fuse? We may be able to teach you some new superpowers if the damage isn't to bad.


I am just finishing the fuse and decided to try forming the leading edges with an old iron. It works great and looks much better than the flat cut edges. It also seals and makes the paper stick well, its also super easy! FT should include this simple step in their flight vids.

IMG_2195.JPG

IMG_2196.JPG

IMG_1335.JPG
 
Last edited:

nhk750

Aviation Enthusiast
Build update

I decided to install a tailwheel but didnt make it a steerable one. I just locked it in place because I only land and takeoff with no taxi. Im mostly flying in a field, so no need to taxi.

Hopefully this will hold up....

IMG_0093.JPG

I made holes for the bolts after fastening them to a cut out section of paint stick, then hot glued it to the fuse. The long ends poked into the fuse with hot glue. Should be pretty solid.

IMG_0095.JPG
 
Last edited:

nhk750

Aviation Enthusiast
Finished Fuselage

Just finished the Fuselage this morning. Now to scratch build a wing... It weighs in at 286 grams with no power pod.

IMG_2227.JPG
 
Last edited:

nhk750

Aviation Enthusiast
Close to done

Finished with the airframe and just needs minwax and paint now.

987 grams with battery (2200, 40c) ready to fly, paint will add some weight too...

IMG_2259.JPG

IMG_2254.JPG

IMG_2260.JPG
 
Last edited:

nhk750

Aviation Enthusiast
Turnigy Aerodrive SK3 3530, 1340kv brushless outrunner.
Paired up with a Turnigy plush 40 amp speed controller with a 5 amp bec. Also using Turnigy 3S, 2650ah, Nanotech 35C battery. 9x6 APC prop.

I ran the motor calc program with the closest parameters I could find to my build and it came out pretty good.


View attachment Drive Calculator_ DCbase.pdf
 
Last edited: