FT Bushwacker BUILD

Maingear

Flugzeug Liebhaber
i made my gear out of stainless steel control rod, could not find carbon steel wire. Too soft. It took the impact and I was able to straighten it out. Wheels are awesome though! Most of my landings were very soft. Time to build another. FT power pack should be in soon. Paint should be dry by then...

That tape looks great, will not hold it back at all!

Justin
 
I flew mine this afternoon. I only got a few minutes on it when one of the servos went south and the rest went north. Anyway I got it down without any damage. Before the servo locked all the way oneway, the plane was flying great. I got to do a couple of loops, rolls, and one stall turn. When upside down the plane for some reason gets a little unstable. I think with the right trimming that can be improved.
Mine is set up with flaperons on a 3p switch. With 50% flaps takeoff was very short. With full flaps the landing speed is just a fast walk. This is going to be one fun plane to just take out and fly like you stole it. As easy as it is to build get 2 or 3 frames ready just in case you plant one. You don't want to be without one very long.
Peter, you did Good.

Jimmy
 

dews

Member
Anyone have issue with CG? Mine is about 60mm instead of 44mm with the battery as far forward as I can get it.

/G
 

Corbarrad

Active member
Anyone have issue with CG? Mine is about 60mm instead of 44mm with the battery as far forward as I can get it.

/G

There's a lot of foam behind the cg on this one. If your foamboard is a little heavier than the "genuine" ft stuff that might leave you tail heavy.
You could try cutting some holes in the lower fuselage tail plate and the cover em up with tape. should't lose any strength that way...
 

Balu

Lurker
Staff member
Admin
Moderator
Things that flashed through my head through the build video:

  • (has been mentioned:)) No glue between the two wing parts?
  • Isn't that part Peter called "Top" a C-Fold?
  • I migh have tried and install the landing gear thingies first to hold the gear at about 90°?
  • Why did he made the small spars on the wing extra and not just part of the wing that can be folded over (had to be cut from the other side probably?)
 

dews

Member
There's a lot of foam behind the cg on this one. If your foamboard is a little heavier than the "genuine" ft stuff that might leave you tail heavy.
You could try cutting some holes in the lower fuselage tail plate and the cover em up with tape. should't lose any strength that way...

Yeah. If it flies horrible I will swiss cheese the tail. :)

Thanks for your inout.

/G
 

Corbarrad

Active member
Things that flashed through my head through the build video:

  • (has been mentioned:)) No glue between the two wing parts?
  • Isn't that part Peter called "Top" a C-Fold?
  • I migh have tried and install the landing gear thingies first to hold the gear at about 90°?
  • Why did he made the small spars on the wing extra and not just part of the wing that can be folded over (had to be cut from the other side probably?)

I kinda had the same thought about the wing, but since he eliminated most of the gap in the foam by going inbetween the paper and with the box spar being glued full surface for the whole top surface of the wing I think the strength added by that one central bead of glue is pretty much negligible.
On the other hand if that bead of glue gives you peace of mind the added weight probably wouldn't matter, either.

Yep, I think that's been called a c-fold at times

I was kinda wary of the whole landing gear anyway, since it didn't seem to have much support laterally but it seemed to hold up fine in the review vid. Also,It's proably better to have the gear rip off cleanly if you hook it into something rate than ruining your fuse.
It might help during assembly, though if you hinge the foam struts onto the fuselage right after you dig out the channel in the fuselage. After that these flaps can be used to align the wire while gluing. (I think that's what you were describing...) The only disadvantage I see in that is that, at this point you will have a lot of hot glue floating around.

If there's room on the foam sheet I'd probably leave the trailing edge spacers attached to the wing as well. You would have to score cut them from the other side, though and the laser can't do that. (My good... Our robot overlords aren't without weaknesses after all... Prepare for the revolution!)
 

Strix

Member
Wow! This one just jumped to the top of my build queue. (Sorry nnP-39!)

Great design, Peter. Love the plans, Sponz! Very, very nice!

Re: gluing the wings together. My take is that it isn't necessary on this design because there is a solid box spar that spans both wings.

Most wing designs have a separate spar in each wing (with maybe a small connecting section like the Spitfire has). This one has a solid box spar to which both wings are very securely attached. So gluing the wings to each other isn't really necessary.

I'm going to finish mine in antarctic orange with RNZAF 'Kiwi' roundels.

I might even put these guys in the cockpit: The Bushwhackers
 

joker24458

Member
What props are you guys using? I want to use a GWS 10x4.7 because the diameter and pitch are good for 3D flying (better than the APC 9x6). However the motor shaft is larger than the hole on the prop so the prop won't even fit on the motor (I am using Emax GT2215/09 from Power Pack C).

I don't want to drill the props out because 1) I don't have a drill press 2) in my experience doing it with a normal drill never/very rarely gets perfect results. So what props are you guys using that fit the Emax GT2215/09 stock or with adapters?
 

Del-Dredd

New member
Use a Prop reamer, HK sell them, they step up in the usual prop shaft sizes along their length.

Although reaming out a GWS 10X4.7 will probably weaken it to much as not much meat to start with, it will also flex far to much under the power available from that motor, hence the use of APC or similar, they make 10X4.7's as well.
 

localfiend

I like 3D printers...
Mentor
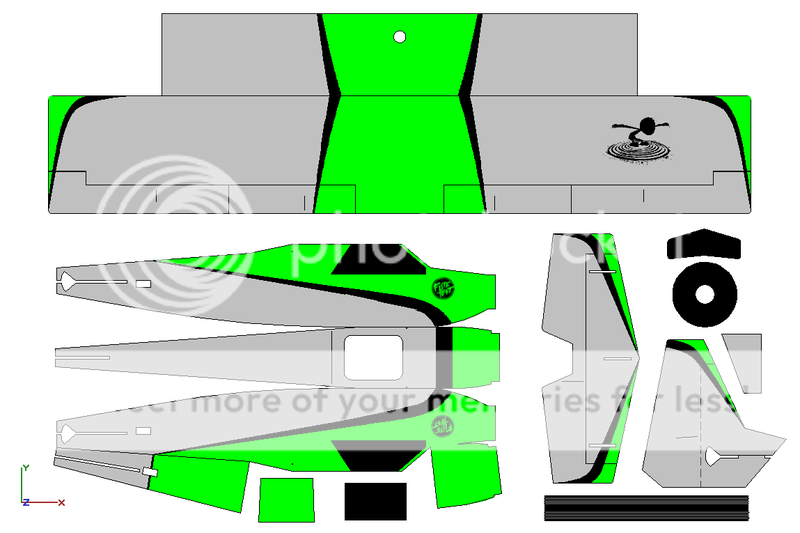
Finally got the Decal Plans completed in green and red. It's my take on one of the popular Highlander/Super STOL paint schemes.


FT Bushwacker Decal Plans - Full - Tiled Green

FT Bushwacker Decal Plans - Full - Tiled Red

Took me longer than I thought it would. 43 pages for the tiled version, and I couldn't get it any tighter. This plane is big. Now I can actually build one for myself.

If you want to learn how to use the decal plans go here:

http://forum.flitetest.com/showthread.php?21550-Decal-Plans-Everybody-Join-In
 
Last edited:

mactek

Member
Those decals look very good. I am going to have to try that out on a couple of my winter builds. For now my all red and yellow tape bushwacker will have to do.
 

SP0NZ

FT CAD Gremlin
Staff member
Admin
Moderator
Mentor
I posted updated v1.2 FT Bushwacker plans in my plans index (see link below).
 

SP0NZ

FT CAD Gremlin
Staff member
Admin
Moderator
Mentor
I just printed out V 1.1. Could you detail the changes so I don't have to print them out again?

Part #13/14 - Wings : Added CG marks to the wing panels.
Part #11 - Rim : Fixed the reference line (was a cavity, my mistake)

Added landing gear wire bending diagram with dimensions
Added missing cavity hatching on several parts
Added bevel lines and hatching on several parts


* I will start keeping a running change log for all future plans.