FT Style F-14 Tomcat

Matagami Designs

Master member
Hi all,

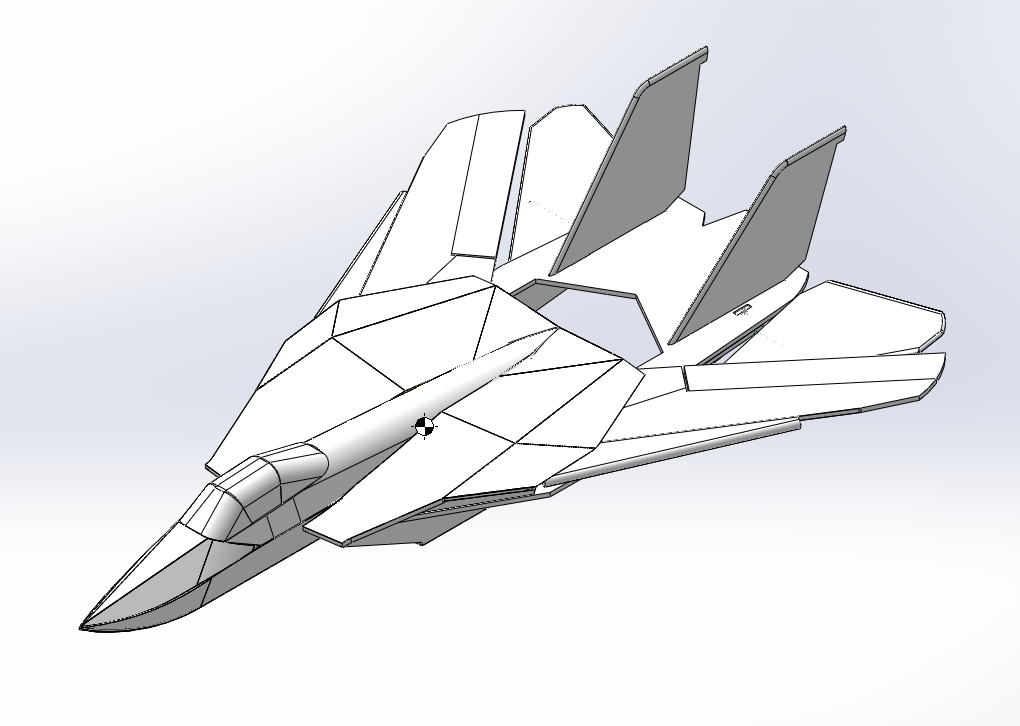
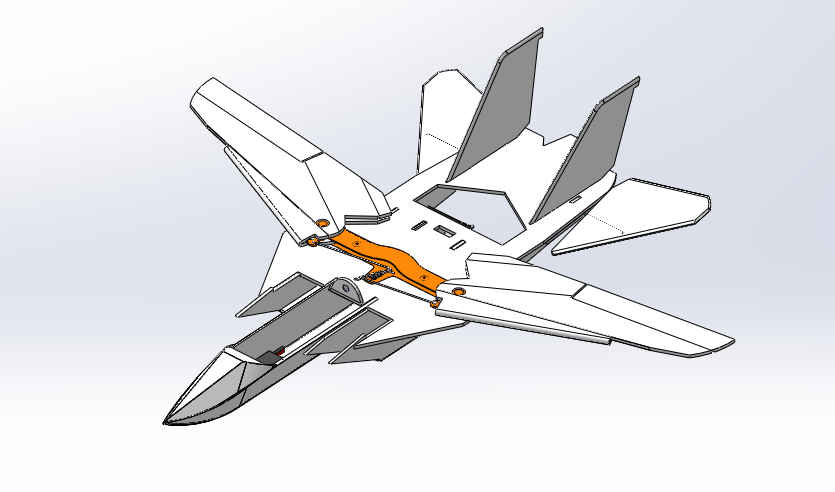
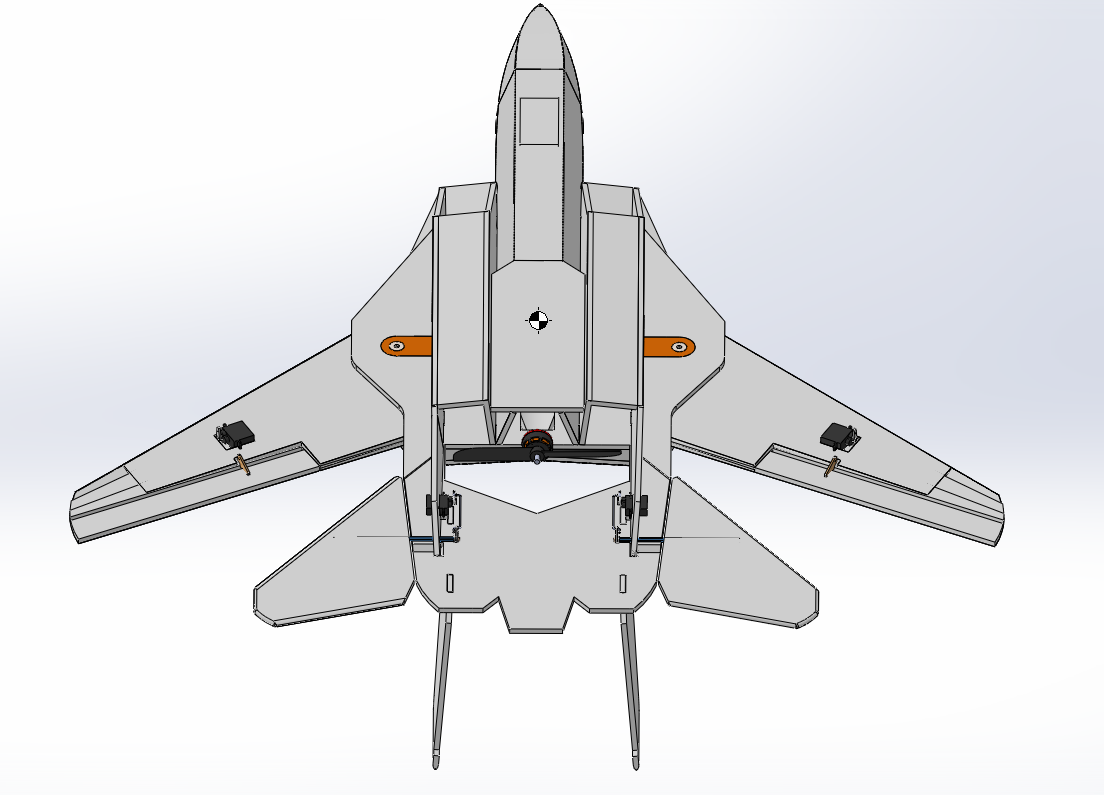
I have recently gotten into the hobby and realized how enjoyable it is to build. With that being said i wanted to take it to the next level and design my own version of a Flite Test style F-14. I have a background in engineering and access to Solidworks CAD program so i have spent a couple hours the last few weeks coming up with my design. The design is based on the Mesa RC version https://www.flitetest.com/articles/mf-tomcat but i have more or less modified everything but the scale.

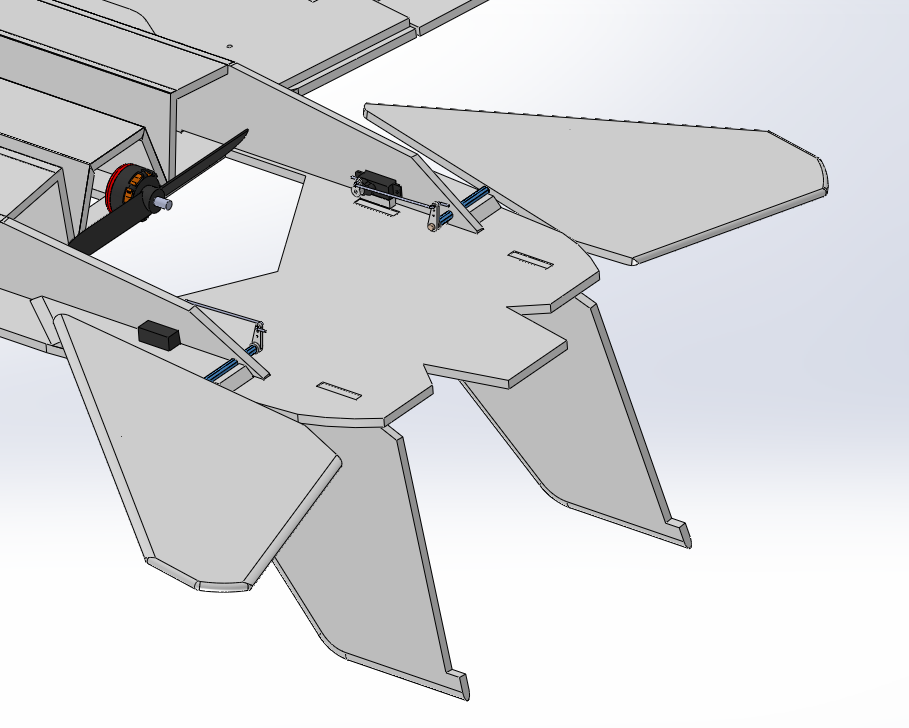
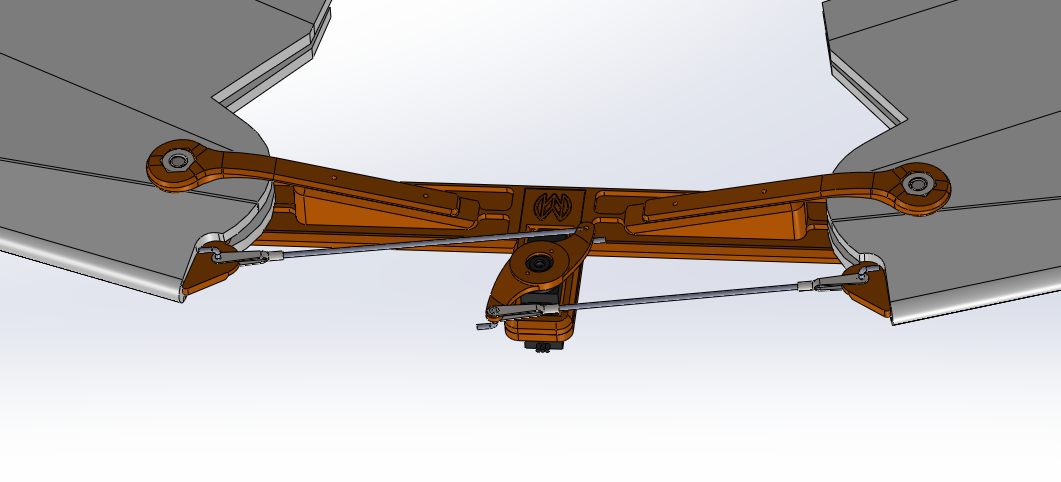
The main difference is the addition of a wing sweeping servo and different style hinge for tailerons.

Anyways I hope to start building this soon but was hoping to get some feedback first. I was planning on using the same electronics as the Mesa version which is the Grayson supersonic V2 motor. I am not sure what the weight of the airframe will be and have been using a density of 1.12 g/in cubed for the foam this gives about 450 g total which seems low to me. I saw in an article that Ross brand foam board was 134 g per sheet, i will need to invest in a scale.

Let me know what you think!
front v1.PNG
iso v1.PNG
taileron detail.PNG
wing sweep detail v1.PNG
 

Matagami Designs

Master member
So i revised the wing sweep box and am pretty happy with it in CAD. (although it seems pretty complex it should now be more serviceable) I don't have a lot of experience designing 3d printed parts, and usually they would be printed SLS. This will be the 1st time i have designed for FDM hopefully it isn't to difficult to print since i have asked a friend to try to print this on his Prusa Mk3. If all goes well i may be able to start on cutting and folding the wings.

wing sweep v1.1.PNG


Hopefully i didn't add too much weight with this redesign.
 

Matagami Designs

Master member
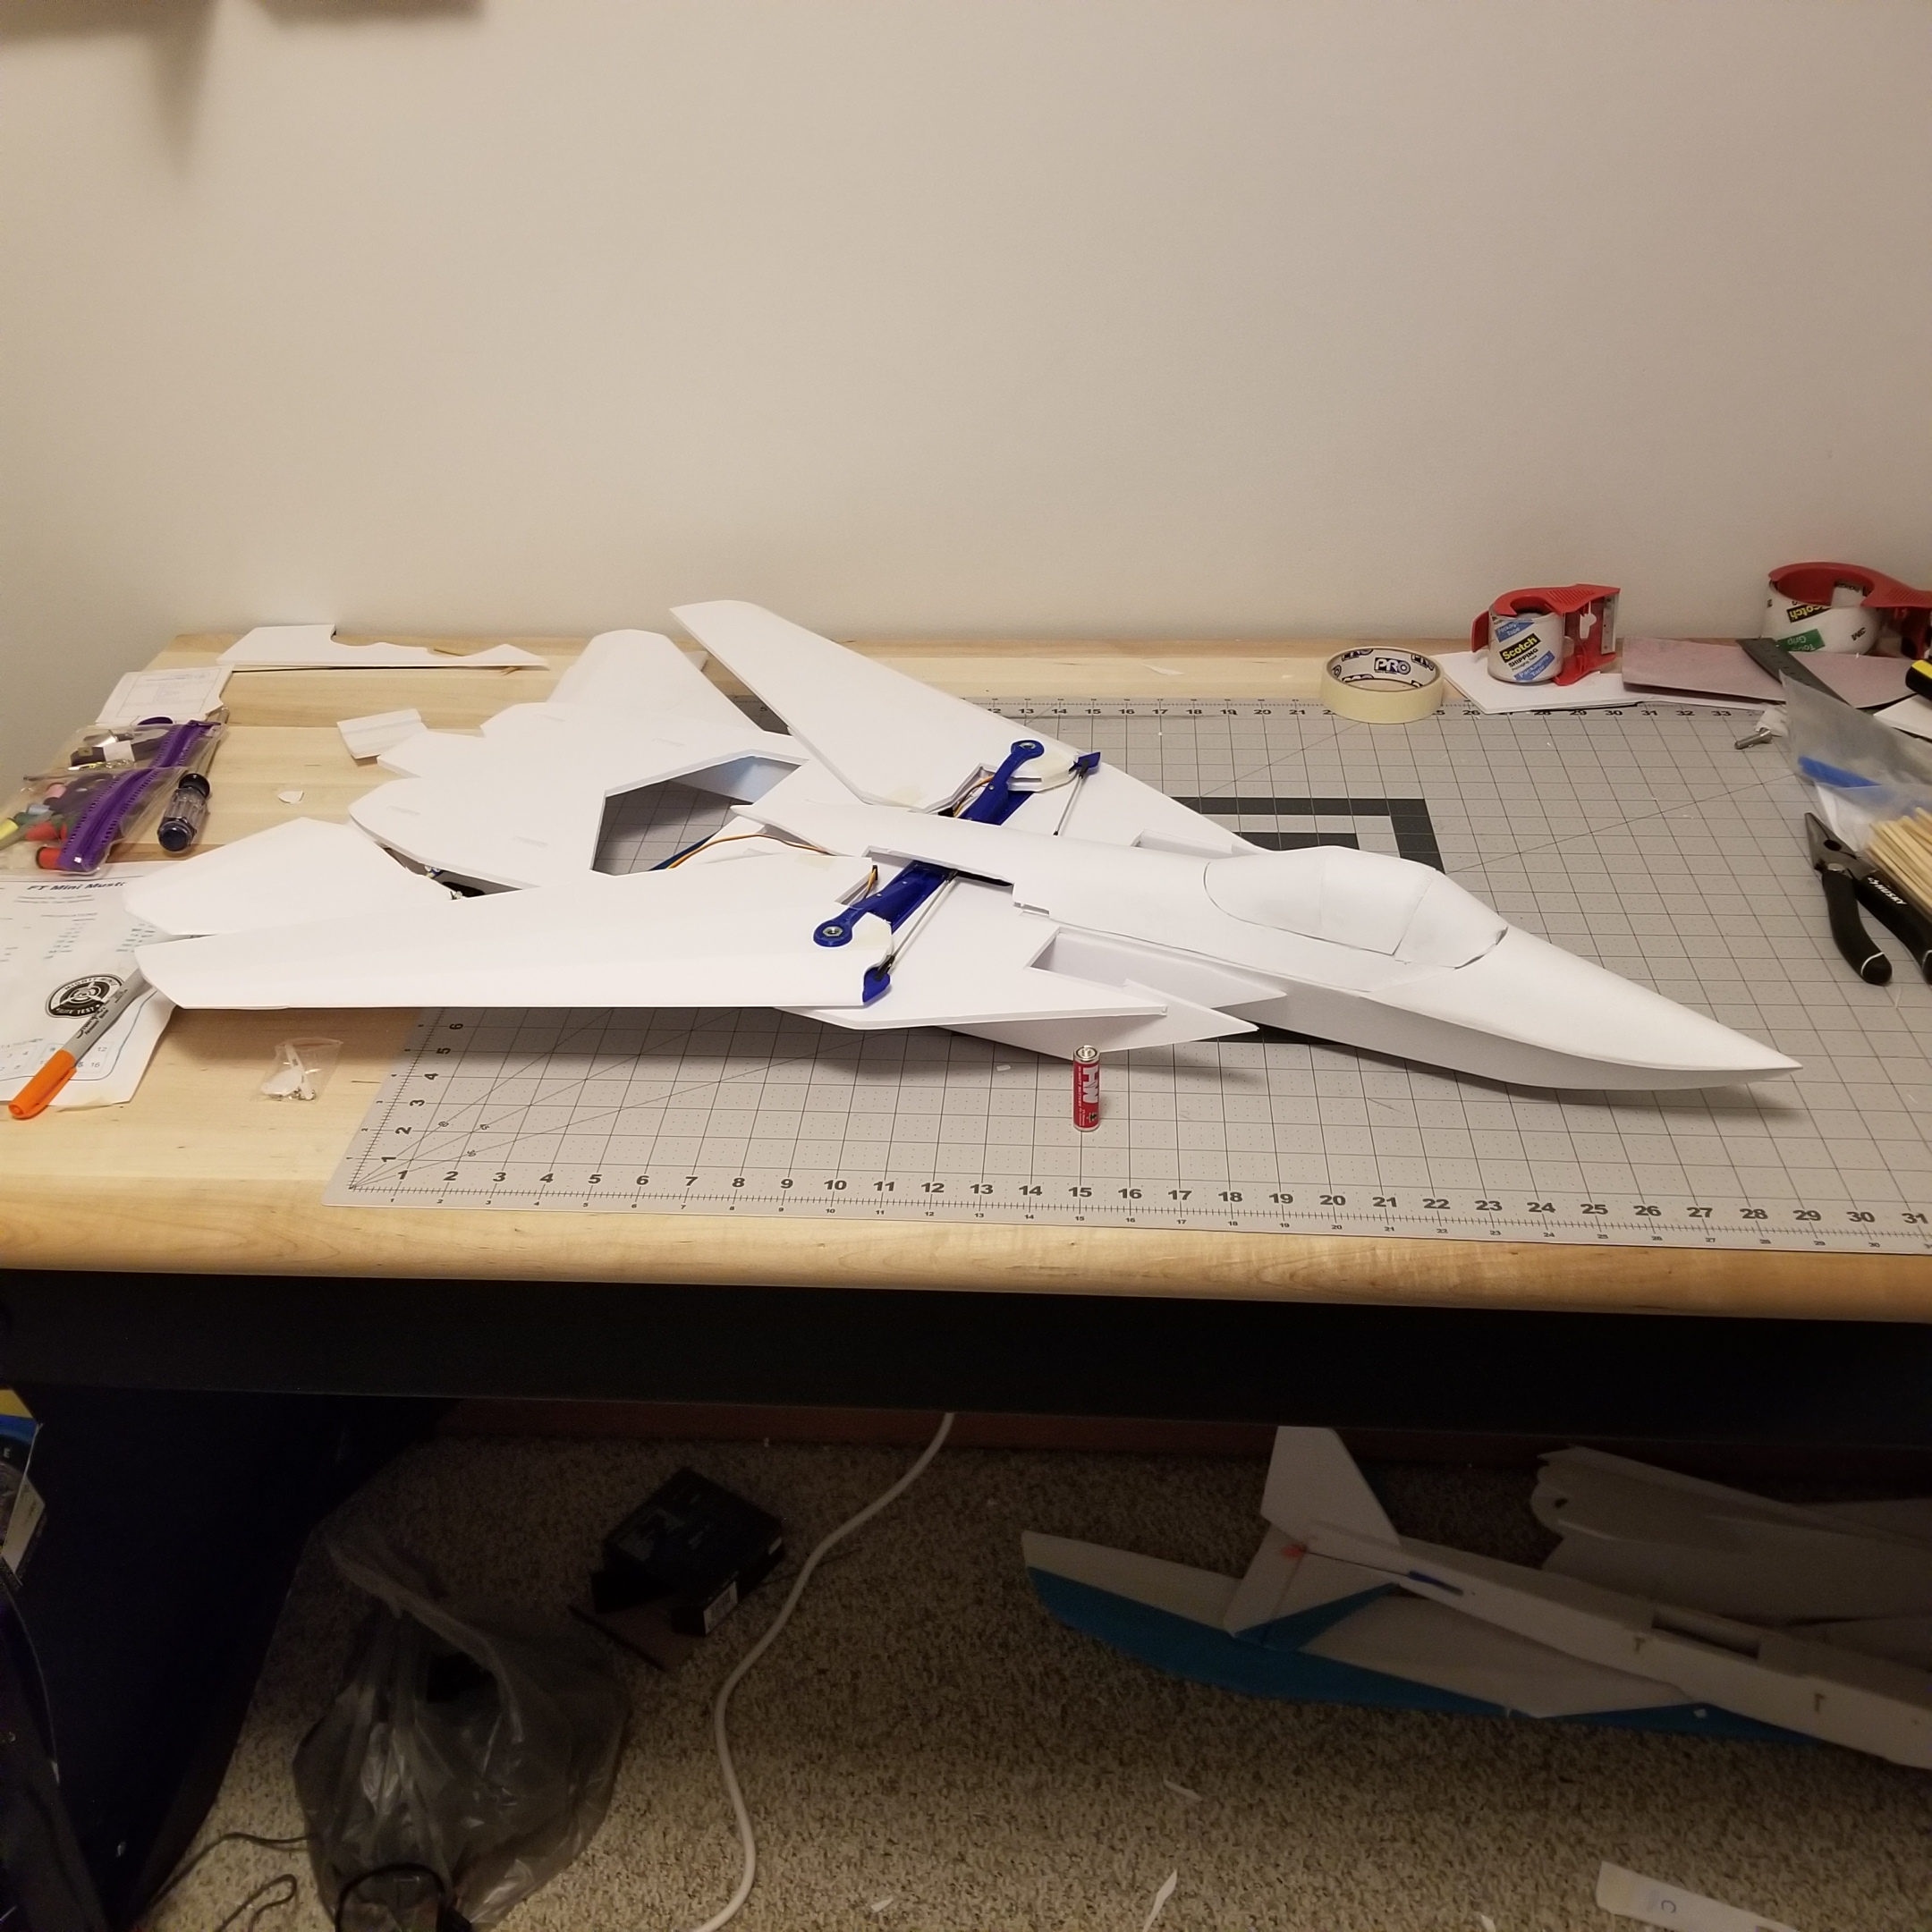
So i started building the wings and sweep servo box. The printed parts came out okay, all i had to do was a little sanding and opened up the holes more. My first attempt for the wings was too weak but i am fairly happy with this set. the wing itself has a fairly small camber, only about 5/8" at the root so getting any strength is a bit difficult. The sweep box works well i just need to swap the linkages for something a little more durable. I weighed the assembly and so far it is 170 grams not bad since CAD was saying 164. But its getting heavy rather fast although this is where most of the structure is.
20190617_203457.jpg
20190617_203623.jpg
20190618_223615.jpg


I also changed the bottom in the CAD and added a plate to stiffen the fuse. I was a bit worried it will flex between the center "tube" and outer intakes.

bottom v 1.1.PNG


2 questions:

1.) I was planning on using a 6 x 4 prop and grayson hobby supersonic v2 or something similar but am worried i will need to be near full throttle to stay in the air. https://graysonhobby.com/grayson-hobby-supersonic-v2-flight-pack-deluxe.html I think i can squeeze in a 7" prop in the slot if i modify the intakes to grow half way down the fuse but this will complicate the build. Should i stay the course and run the 6 x 4 or should i make room for the 7" and add a bit of complexity to the intake tubes. Right now i estimate the model will weight 600 - 800 grams adding the 7" also cuts down on the structure between the empenage and the rest of the fuse unless i reinforce it.

2.) I have never tried a taileron hinge like i have shown. My plan is to glue skewers along the leading edges of the control surfaces and then one along the pivot axis between the paper. This skewer will then rotate inside a cut down straw which acts like a housing. I'm not sure what forces to expect on this and feel i may be asking to much out of the skewer hinge. Normally i see this as a carbon fiber rod but i was trying to avoid exotic materials. I am afraid i will get unwanted tendencies with this setup if the forces are to high and the skewers bend to much.
Has anyone had any experience with this type of design?

Thanks!
 

Niez13

Elite member
So i started building the wings and sweep servo box. The printed parts came out okay, all i had to do was a little sanding and opened up the holes more. My first attempt for the wings was too weak but i am fairly happy with this set. the wing itself has a fairly small camber, only about 5/8" at the root so getting any strength is a bit difficult. The sweep box works well i just need to swap the linkages for something a little more durable. I weighed the assembly and so far it is 170 grams not bad since CAD was saying 164. But its getting heavy rather fast although this is where most of the structure is. View attachment 133946 View attachment 133947 View attachment 133948

I also changed the bottom in the CAD and added a plate to stiffen the fuse. I was a bit worried it will flex between the center "tube" and outer intakes.

View attachment 133949

2 questions:

1.) I was planning on using a 6 x 4 prop and grayson hobby supersonic v2 or something similar but am worried i will need to be near full throttle to stay in the air. https://graysonhobby.com/grayson-hobby-supersonic-v2-flight-pack-deluxe.html I think i can squeeze in a 7" prop in the slot if i modify the intakes to grow half way down the fuse but this will complicate the build. Should i stay the course and run the 6 x 4 or should i make room for the 7" and add a bit of complexity to the intake tubes. Right now i estimate the model will weight 600 - 800 grams adding the 7" also cuts down on the structure between the empenage and the rest of the fuse unless i reinforce it.

2.) I have never tried a taileron hinge like i have shown. My plan is to glue skewers along the leading edges of the control surfaces and then one along the pivot axis between the paper. This skewer will then rotate inside a cut down straw which acts like a housing. I'm not sure what forces to expect on this and feel i may be asking to much out of the skewer hinge. Normally i see this as a carbon fiber rod but i was trying to avoid exotic materials. I am afraid i will get unwanted tendencies with this setup if the forces are to high and the skewers bend to much.
Has anyone had any experience with this type of design?

Thanks!
I would personally go with the 7 inch prop to not only save weight but also get more power. Also for the elevator, I would say use hinge like the picture below. The black line and circle represents the barbecue skewer and point of rotation. With the servo connected to the front of the stabilizer it put less stress on the servo and makes the hinge stronger and more reliable. Be careful not to put the barbecue skewer too far back because the front of the stabilizer will act as a counter balance and make the plane fly wonky and out of control. If you want more deflection all you have to do is move the servo closer to the barbecue skewer hinge.
IMG_0101.JPG
 

Matagami Designs

Master member
I would personally go with the 7 inch prop to not only save weight but also get more power. Also for the elevator, I would say use hinge like the picture below. The black line and circle represents the barbecue skewer and point of rotation. With the servo connected to the front of the stabilizer it put less stress on the servo and makes the hinge stronger and more reliable. Be careful not to put the barbecue skewer too far back because the front of the stabilizer will act as a counter balance and make the plane fly wonky and out of control. If you want more deflection all you have to do is move the servo closer to the barbecue skewer hinge.
View attachment 133956


@Niez13 So i definitely am going to try and squeeze the 7" prop into this but am having trouble with the servo setup you have drawn out. I agree this will make for a more reliable hinge since the load path isn't limited by the skewer but i am not sure how to place the servo so that it doesn't either crash into the stabilizer or would be hanging off the bottom/top so far that it is positioned awkwardly. I'll see if i can figure something out but i'm not sure i will go this direction. Thanks for the tips!
 

Niez13

Elite member
@Niez13 So i definitely am going to try and squeeze the 7" prop into this but am having trouble with the servo setup you have drawn out. I agree this will make for a more reliable hinge since the load path isn't limited by the skewer but i am not sure how to place the servo so that it doesn't either crash into the stabilizer or would be hanging off the bottom/top so far that it is positioned awkwardly. I'll see if i can figure something out but i'm not sure i will go this direction. Thanks for the tips!
Sounds good and go with whatever works!
 

Matagami Designs

Master member
So all the foam work is mostly done i just need to glue the top "wing gloves" down. I ended up going with carbon fiber rod to support elevons in a 3-d printed housing. This is 10x better than before with bamboo skewers & straws.

Recently i am just fighting the Tx/Rx to get things to work. I purchased the Spektrum DXe and AR620 combo back when i got into the hobby and it has been fine for other basic FT models. I am able to setup elevon controls fine but am struggling with getting sweep and flaps set up. I am only able to get the "gear" channel to work in the programmer, channel 5 on the AR620. So far, my work around has been to bind the sweep to rudder channel. Since i am not using a rudder and this is same stick for throttle it may work. One issue this might have though is there is no mix with sweep and elevator. Ideally this would have a mix to add elevator as the wing sweeps back and it would just be on a 3 position switch.

The second problem is getting the flaps to work since the servos are mirrored it requires 2 channels. The advantage being able to trim separately but obviously using more channels. The thing is that the AR620 has enough channels it should work but i havent been able to get both flaps to work. I will need to either redo one wing so the servos move the same direction and use a y-splitter extension on channel 5, or spend a lot of money on a better transmitter.

I have the Supersonic V2 ready, i just need to come up with a motor mount. Shouldn't be too difficult, i just need to get a firewall structure 3-d printed to glue in place.

Please let me know your thoughts. Thanks!

20190630_110727.jpg
 

Erospace

Member
Looks great! I've been working on a similar setup in the form of an SU-34 (SU-27 derivative). I limited myself to a 6" prop and ended up using 3-blades to squeeze more power out of it. Have you given any thought to the change in CG when the wing changes? I was surprised to find out that it balances near the leading edge of the wing at the root.
 

Attachments

  • 20190630_165741.jpg
    20190630_165741.jpg
    4.1 MB · Views: 0
  • 20190630_165710.jpg
    20190630_165710.jpg
    3.4 MB · Views: 0

Matagami Designs

Master member
Looks great! I've been working on a similar setup in the form of an SU-34 (SU-27 derivative). I limited myself to a 6" prop and ended up using 3-blades to squeeze more power out of it. Have you given any thought to the change in CG when the wing changes? I was surprised to find out that it balances near the leading edge of the wing at the root.

@Erospace WOW! I'm a huge fan of the Su-34. That looks Great! I am hoping i will be able to balance it manually with a bit of elevator input.
I have seen similar examples that implement a slight mix to the elevator but cant afford a new Tx right now. The balance point is right behind where the small 1/4 -20 screws hold the wings (without battery and motor installed). When the wings sweep back it moves maybe 1/2" back with it so i may try to balance between these points.
 

mayan

Legendary member
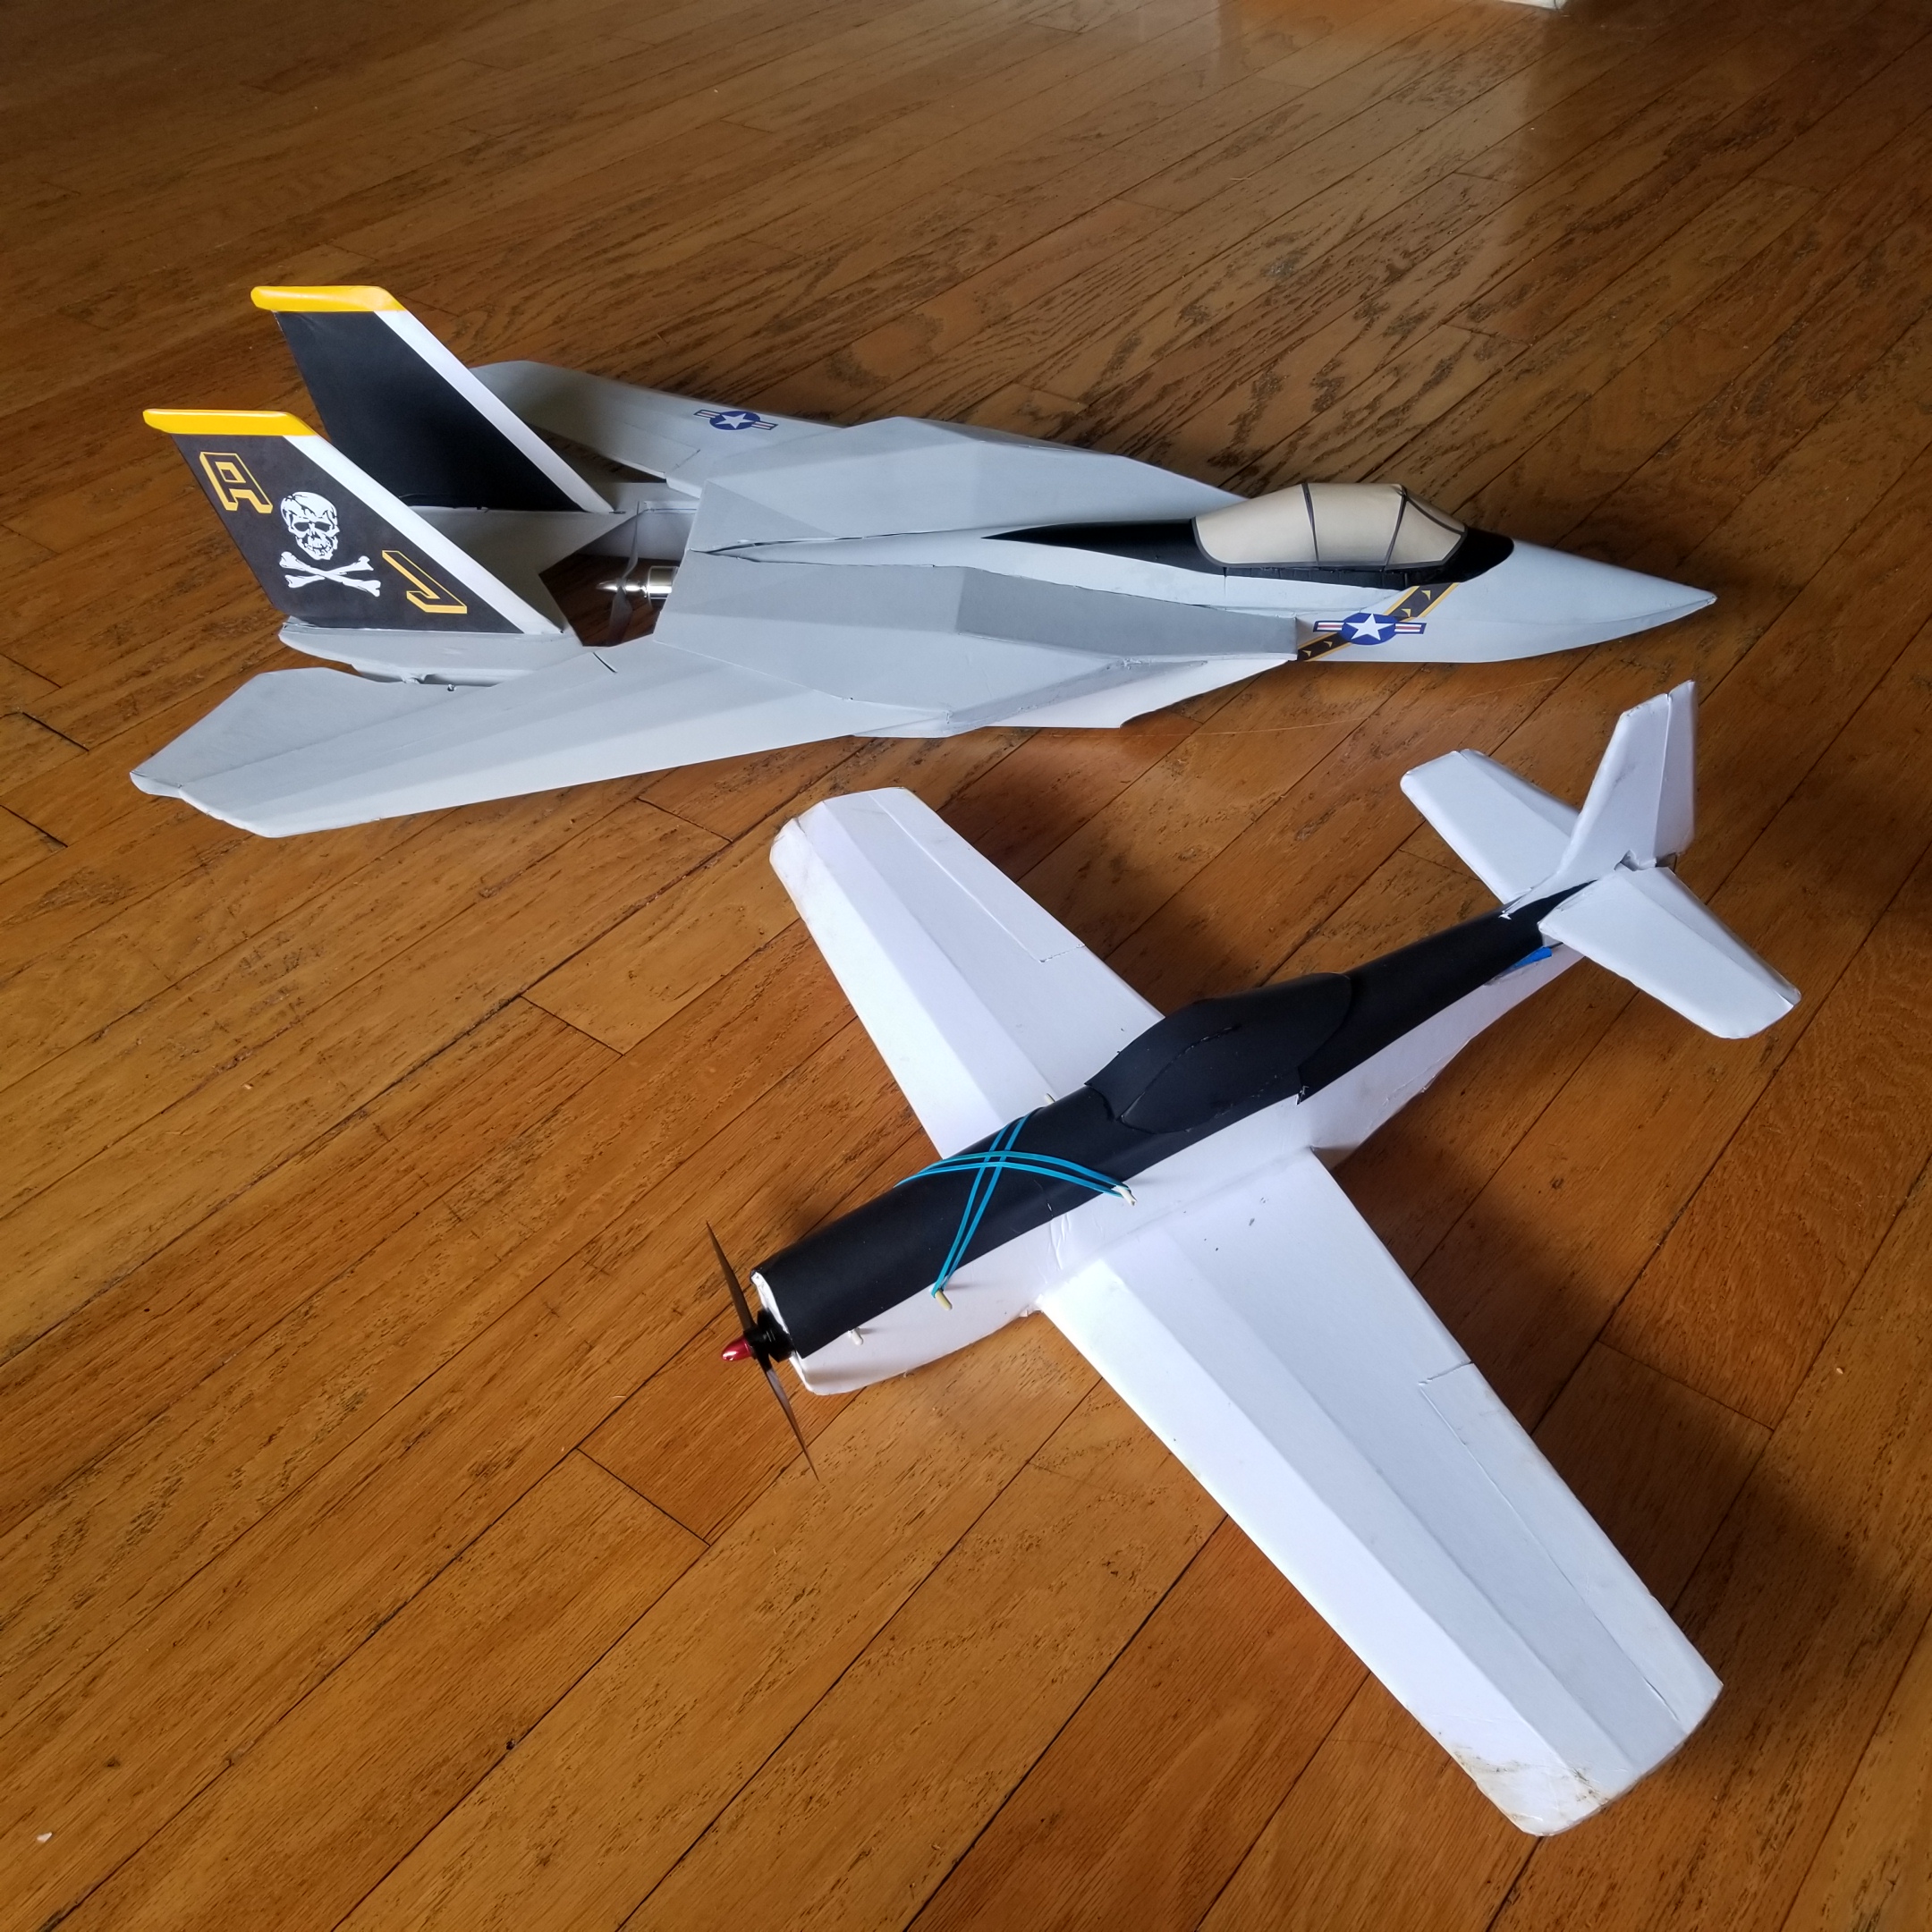
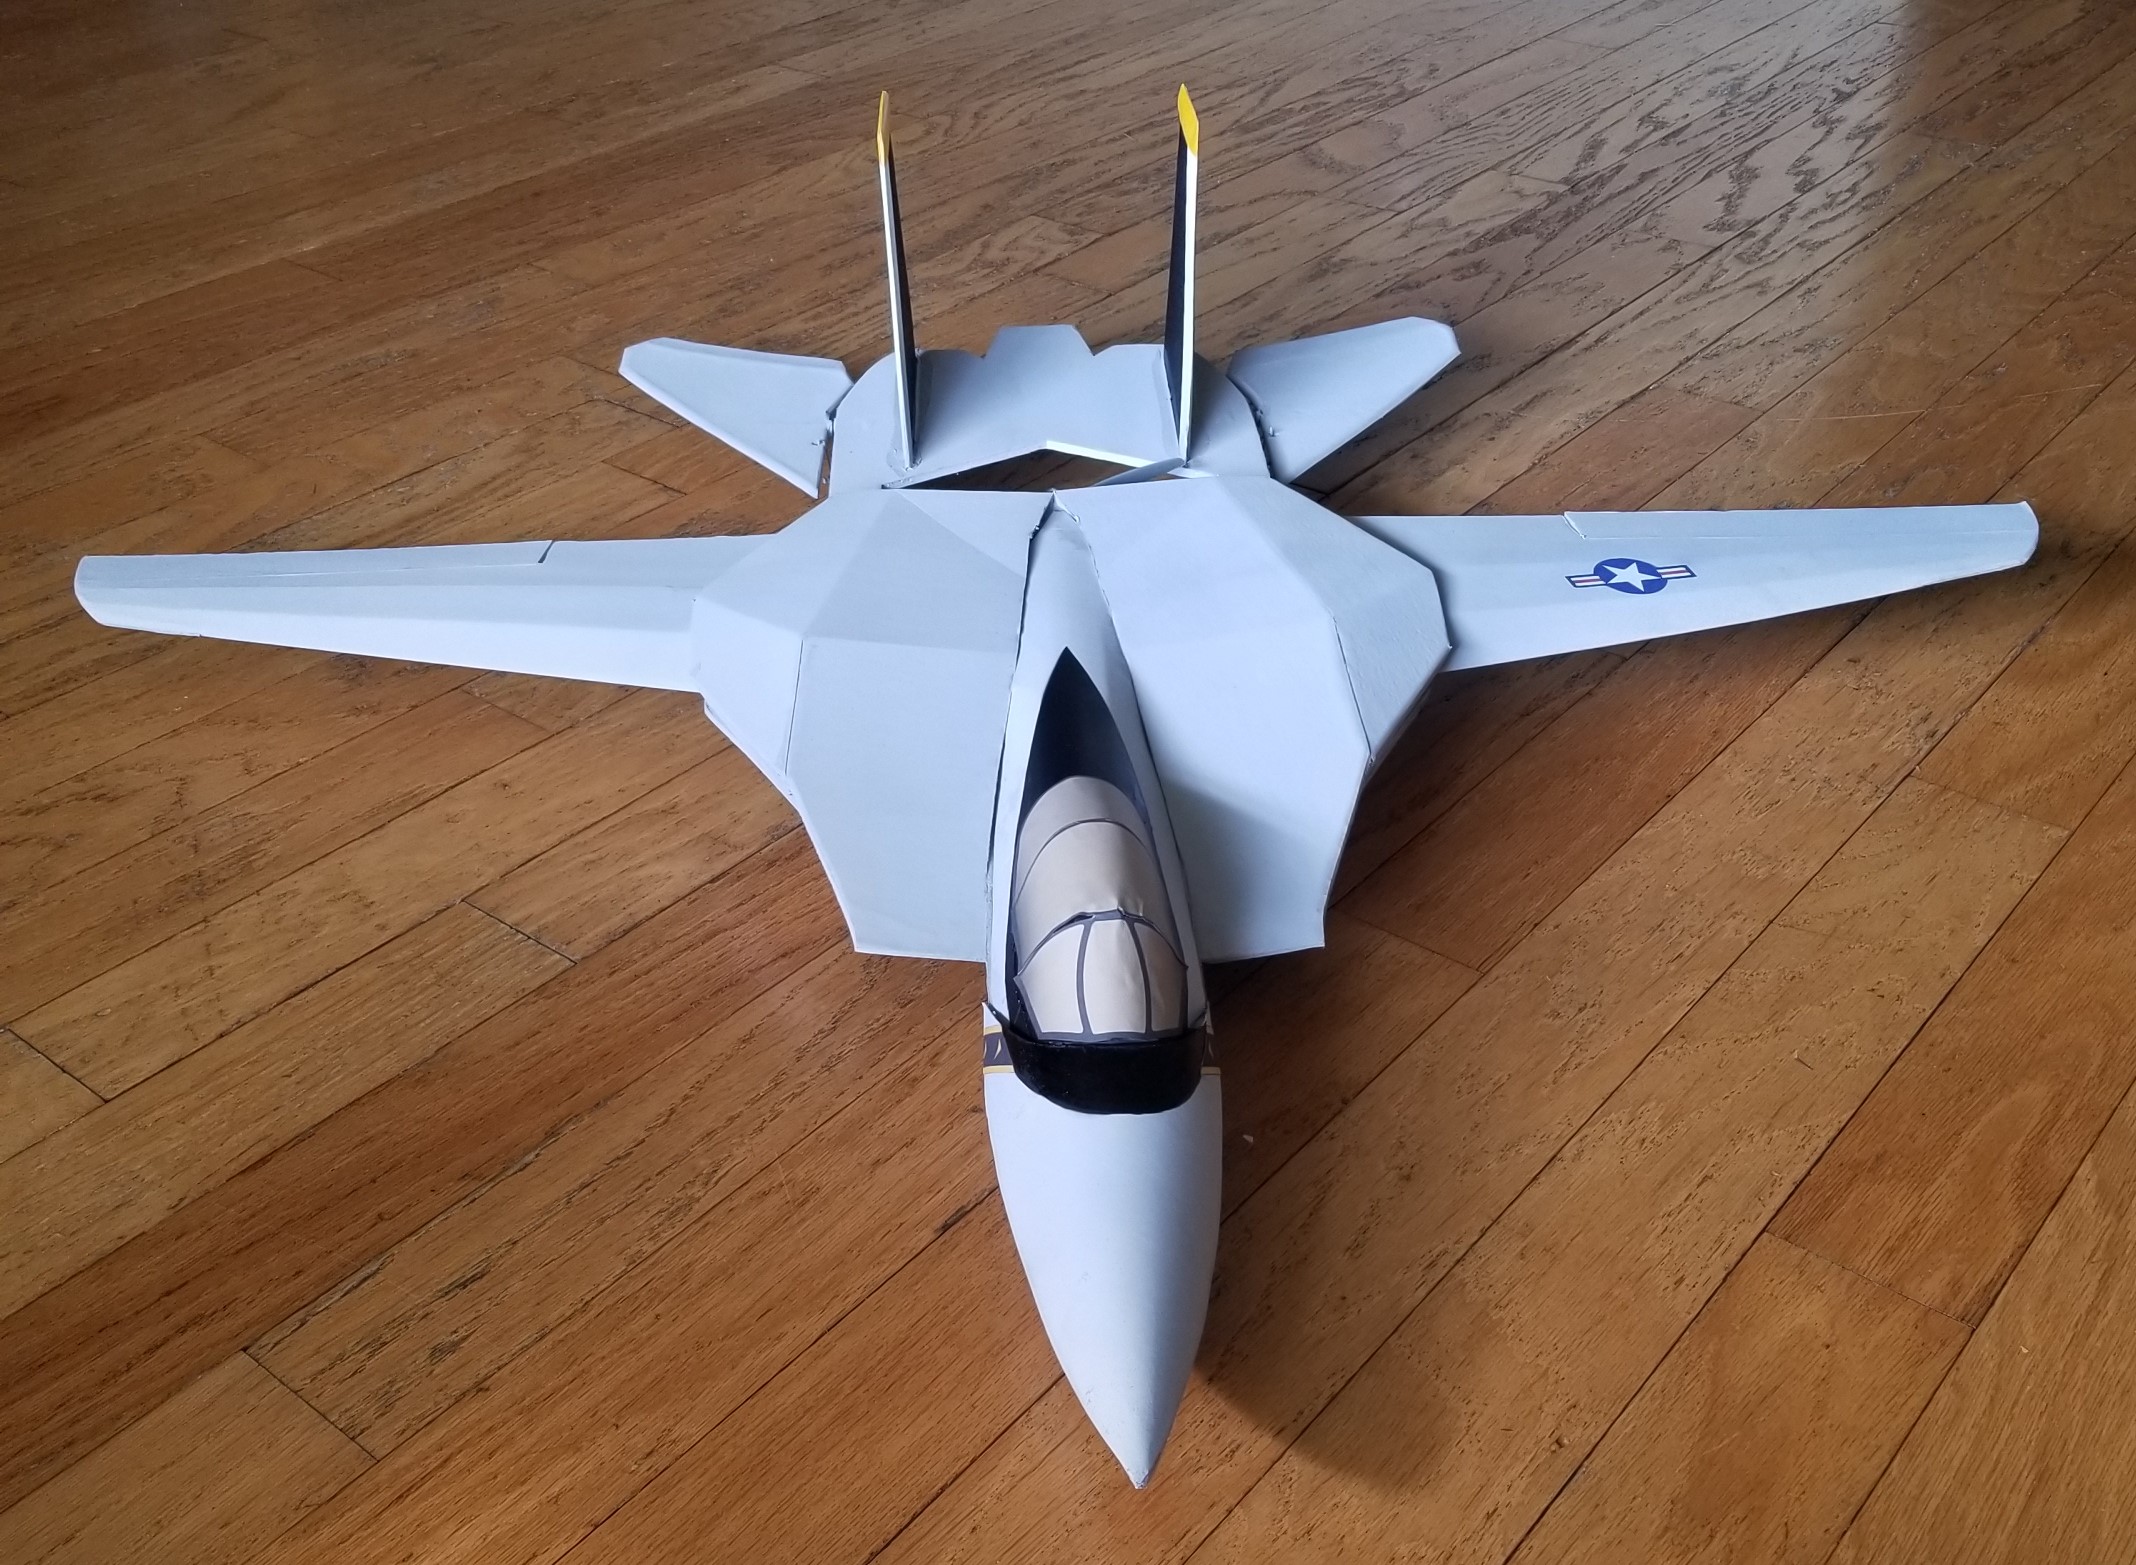
Added a VF-84 Jolly Rogers paint scheme.

View attachment 135574 View attachment 135575 View attachment 135576 View attachment 135577 View attachment 135578 View attachment 135579

Still waiting on XT-60 connector for the maiden. I'll likely hold off to improve my skills as well since i'm a noob pilot.

Anyways let me know if there is any interest in free plans.
Love how you finished them off great job. I would post the plans any how and let others have the option to try building your design.
 

Matagami Designs

Master member
Here is a run down of the specs and materials:

Length

35.5 in

902 mm

Wing Span (Forward)

40 in

1016 mm

Wing Span (Swept)

25 in

635 mm

Weight (No Battery)

22.2 oz

630 g


Motor

Grayson Supersonic V2

ESC

30 Amp brushless

Prop

APC 6x4

Tx/Rx

5 channels or better

Materials:
Foam board 3 sheets
PLA/PETG printed parts
1/4-20 x 1" flat head screw (x2)
1/4-20 jam nut (x2)
Dubro 2-56 push rods with kwik-link cut down to ~5.5" (recommended wing sweep linkage) (x2)
Hitec HS-85MG Servo (recommended wing sweep Servo) (x1)
Flite Test ESO8AII 9g analog servo (x4) (elevons & flaps)
0.156" carbon fiber rod or tube, cut to 5" (x2) (!make sure to glue these square!)
0.125 x 0.375 x ~6.5" basswood strip (x2) (wing spars)
Mighty mini control horns (x2)
.039 push rods
servo extensions x 4 and/or Y-splitter
Packing tape, CA glue, Hot Glue & cutting utensils, bamboo skewers, velcro
Sticker paper

The PDF should be printed as a poster (100% tile scale, only tile large pages)

I included an optional left wing in the plans with servo cut-out facing same direction to use a y-splitter for flaps, however i would recommend using the original mirrored layout and use 2 channels on this ( 6 channel Tx/Rx) as the wire routing and airfoil works better.

Here are some extra pictures to reference as well.

Let me know if you actually attempt to make one.
 

Attachments

  • MATAGAMI F-14 V1.pdf
    518.5 KB · Views: 0
  • Printed Parts 7.8.19.zip
    492.4 KB · Views: 0
  • 20190623_005847.jpg
    20190623_005847.jpg
    1.3 MB · Views: 0
  • 20190623_163014.jpg
    20190623_163014.jpg
    994.7 KB · Views: 0
  • 20190623_165223.jpg
    20190623_165223.jpg
    483.4 KB · Views: 0
  • 20190623_190439.jpg
    20190623_190439.jpg
    634.7 KB · Views: 0
  • 20190623_215409.jpg
    20190623_215409.jpg
    547.4 KB · Views: 0
  • 20190624_003037.jpg
    20190624_003037.jpg
    495.6 KB · Views: 0
  • 20190625_222926.jpg
    20190625_222926.jpg
    1.3 MB · Views: 0
  • 20190702_223851.jpg
    20190702_223851.jpg
    512.1 KB · Views: 0