
You are using an out of date browser. It may not display this or other websites correctly.
You should upgrade or use an alternative browser.
You should upgrade or use an alternative browser.
FTFC'18 WWII Kalinin K-12
- Thread starter FoamyDM
- Start date
-
- Tags
- concept ftfc'18 kalanin k-12 wwii
I keep forgetting to take copious amounts of pictures. Sorry. I have mounted the starboard junker flap and it looks good, if a bit far from the trailing edge. I will take plenty of photos of the Port side tonight. Here is a small Video of the wingtip drag flap action:
Thank you so much for the article Hai-Lee. The tip flex like a normal offset-remote push only servo arm. But the Exterior wingtip returns via tension rod. the rod flexes during deflection, and when pressure is removed, it returns the winglet to nuetral position. Nice!
@ DamoRC - A bit more complex than I was originally prepared for. But it has been a fun journey of learning both about Tailless Russian experimental craft and model building using common materials and basic method to create complex mechanisms that work.
I think i have my plan now. For the servo wiring, rod layout and bomb doors. I'll sketch that out and post it in a few.
'till then, enjoy!
I have a build article on the Rutan Vari-EZE which utilises wing tip drag rudders if you are interested!
Check out page 3. Rudders operate to help turns when ailerons are used.
!
Thank you so much for the article Hai-Lee. The tip flex like a normal offset-remote push only servo arm. But the Exterior wingtip returns via tension rod. the rod flexes during deflection, and when pressure is removed, it returns the winglet to nuetral position. Nice!
@ DamoRC - A bit more complex than I was originally prepared for. But it has been a fun journey of learning both about Tailless Russian experimental craft and model building using common materials and basic method to create complex mechanisms that work.
I think i have my plan now. For the servo wiring, rod layout and bomb doors. I'll sketch that out and post it in a few.
'till then, enjoy!
Junker/Reflex Flap attachment details
Below, find detailed photos from how I attached the second half of my reflex wing.
First lets cover what we're aiming for here.
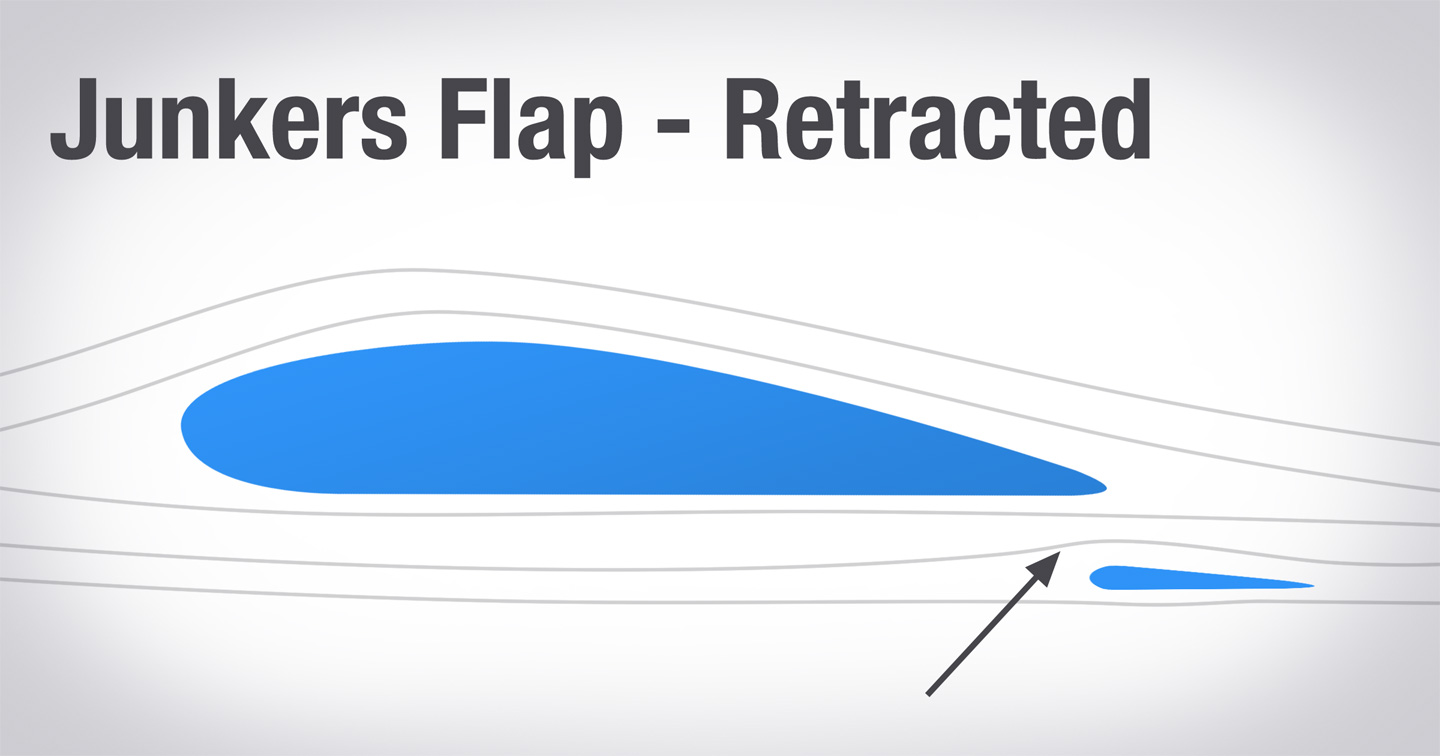
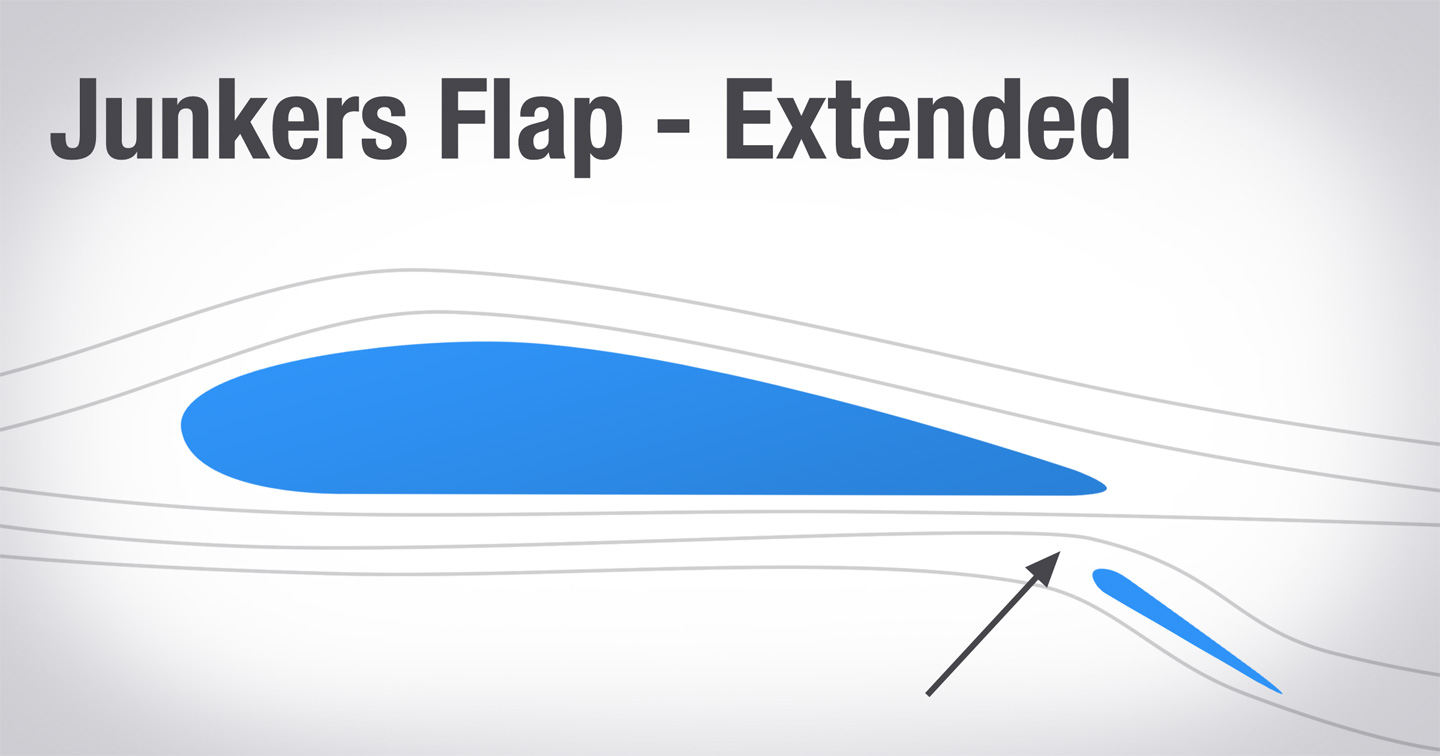
Here's the plan design(again):

Understanding the goal here, let's go through how I line up and connect this wing-edge long flap mechanism:

Start by placing the 3rd standoff in, at the bend in the wing -where the pen is pointing. Closeup below

Remember this section is the elevator flap.

Line the piece up and 50% score on each side of the standoff and remove the foam

Glue the first segment on.

Before the glue cools, level out the flap to be parallel with the wing underside.

Now move on to the outer wing flaps (ailerons). line up the leading edge of the flap with the trailing edge of the wing and make your cuts.

Now glue. add enough so it remains soft while you push the standoff in and adjust

once all the standoffs are in, adjust so the top of the flap and bottom of the wing are parallel

look down the flap/wing to check the alignment before the glue cools.

Here it is installed. Note that every other vertical link to the flap goes through for the servo linkage.

Here's a picture of the mini-flap reflex mechanism. This is very precise and uses small forces, and may be suitable for smaller finer wire.
I hope this helps anyone interested on how to install the Junker flaps in, and get ready to link to the servos.
Below, find detailed photos from how I attached the second half of my reflex wing.
First lets cover what we're aiming for here.
Here's the plan design(again):
Understanding the goal here, let's go through how I line up and connect this wing-edge long flap mechanism:

Start by placing the 3rd standoff in, at the bend in the wing -where the pen is pointing. Closeup below

Remember this section is the elevator flap.

Line the piece up and 50% score on each side of the standoff and remove the foam

Glue the first segment on.

Before the glue cools, level out the flap to be parallel with the wing underside.

Now move on to the outer wing flaps (ailerons). line up the leading edge of the flap with the trailing edge of the wing and make your cuts.

Now glue. add enough so it remains soft while you push the standoff in and adjust

once all the standoffs are in, adjust so the top of the flap and bottom of the wing are parallel

look down the flap/wing to check the alignment before the glue cools.

Here it is installed. Note that every other vertical link to the flap goes through for the servo linkage.

Here's a picture of the mini-flap reflex mechanism. This is very precise and uses small forces, and may be suitable for smaller finer wire.
I hope this helps anyone interested on how to install the Junker flaps in, and get ready to link to the servos.
Attachments


Thank you for the diagram Hai-Lee. Do you professionally diagram textbooks? you should. 
As discussed as part of my other FTFC'18 build project the SAM-7 Sigma, Have been trying to find a good springy passive return mechanism on the wingtip drag flaps. and had a Eureka moment described there. Short of it is to use Gift card plastic strips for springs.

I shall be returning to this project from the distraction of the FTFC'18 build project SAM-7 Sigma.
Wingtip Pushrod Installation:
I started to wire the control servos and horns up as well as trying to set up the Pusher sticks for the wingtips a couple nights ago. Here They are;
Servo Mount:

Travel Distance:

Starboard Wing Pushrod Setup:

Port Wing Pushrod Setup:

Spar Modifications:

Wing Setup:

Love to here your comments: Enjoy!
Progress and Setbacks
I made significant progress on the wing controls this weekend. The wingtip rudders are working great.
So great I glued on the outer spars and put in the dihedral.
(Ugh, I misspelled HEAR as here at the end of last post. )
I'm really happy how it looks.
I thought I might set it up as a elevon and give it a hop test. So I tested my other motors and one twitched. It wasn't doing that on a previous test. Hmm. I can move over the other one I used on the SAM-7, but I didn't want to. stinker. then I tested the control surface movements and realized, the port aileron servo is loose/never glued down?
I took it as a sign that it wasn't meant to happen this past weekend. Tonight some plane surgery, and patching - wall-board style. I would like to try a down the street hop test with this model. in a couple days, however it may have to wait given the storm heading up the East Coast.
I made significant progress on the wing controls this weekend. The wingtip rudders are working great.
So great I glued on the outer spars and put in the dihedral.
(Ugh, I misspelled HEAR as here at the end of last post.
)I'm really happy how it looks.
I thought I might set it up as a elevon and give it a hop test. So I tested my other motors and one twitched. It wasn't doing that on a previous test. Hmm.
I can move over the other one I used on the SAM-7, but I didn't want to. stinker. then I tested the control surface movements and realized, the port aileron servo is loose/never glued down? I took it as a sign that it wasn't meant to happen this past weekend. Tonight some plane surgery, and patching - wall-board style. I would like to try a down the street hop test with this model. in a couple days, however it may have to wait given the storm heading up the East Coast.
Here is a picture sizing up the Elevator controls:

And I'm considering an updated Flame Motif, as I will have a few of these by the time I'm done:
The First is the traditional Orage/red with yellow scales/flames:

With this Below:

The second is like this on top and Bottom:

The last is more like this... I like this one best:

With this Below:

Anyone have Skinning Tips? I will find the article out there, so anything past that?
Last edited:
I have attached the disconnected aileron Servo, and put in the elevator control rods from the flap to where the servo arms go. I
Here are the rods with panels, I also cut a thin notch for the control rod to pass in the elevator flap surfaces under the CR from the control horn:

Here's a general shot of the wing with cutout panels. If I had better forethought, I wound have marked where the original panels were, and cut there:

I'll have to attach the servo and work on the cockpit access hatch and battery storage shelf. Which will bring me to short hop time!


Worked on the electronics last night. made a xt-60 splitter and a parallel connector. I think I will get a Series one going too.
Take a look:


Tonight is D&D

so it's unlikely to get much more done until Sunday,as it will be a cub-Camporee weekend:
I need to get this Bird in the Air...
Take a look:


Tonight is D&D

so it's unlikely to get much more done until Sunday,as it will be a cub-Camporee weekend:
I need to get this Bird in the Air...
Thanks Agentkbl, you were probably working your illegal Squid fighting ring.
I ended D&D and talked with a player till the bars closed... so needless to say I didn't do a systems/control check last night. I almost got her hook on this hobby. Almost.
-FoamyDM
I ended D&D and talked with a player till the bars closed... so needless to say I didn't do a systems/control check last night. I almost got her hook on this hobby. Almost.
-FoamyDM
Last edited:
TurtlesThatFly
Member
hehe. don't tell anyone how you found out. I might be able to make it worth your while.
Those squids are from the wrong side of the tide pool.
I might be able to make it worth your while.
Well, there was this one Beluga named "knuckles",eyeing over the Flying Sub who was all shifty, and they're all white-on-white, so you know I oughta be wary.
What kinda *services* you talkin'? *shifty eyes*
Seriously - Among my favorite avatar-motto combos on the site... although with the new layout can't seem to see them anymore.
agentkbl
Illegal Squid Fighting?
FoamyDM said:Well, there was this one Beluga named "knuckles",eyeing over the Flying Sub who was all shifty, and they're all white-on-white, so you know I oughta be wary.
we'll take care of it.
Similar threads
- Replies
- 53
- Views
- 8K
- Replies
- 57
- Views
- 9K
- Replies
- 65
- Views
- 10K
- Replies
- 102
- Views
- 16K