FTFC23: Build-ruary by Inq: Inq'd FT MM DR1 Triplane

Inq

Elite member
Today's progress on the FT MM DR-1 Triplane

This portion has been done per the instructions in Josh's video... except I haven't done the Power Pod. I'm going to be using one of the cheap kits using an A2212 motor / 30A ESC / 6x3.5 Propeller. The A2212 is larger in diameter than what I guess is the standard motor. It will fit in between the sides, but it is lower than the centerline of the cowling. I'm still deciding about whether to put it at the same centerline and have to move it entirely in front of the fuselage front or create an new cowling that has the lower centerline.
PXL_20230208_132748822.jpg


I was going to take @Mr NCT 's advice on painting the DR-1 with the top and bottom wing off separate. It sounds like great advice. But then I realized, I haven't had a plane long enough to warrant painting it up nice. :oops: https://forum.flitetest.com/index.p...t-mighty-mini-dr1-triplane.71693/#post-739562 I did take his advice on scuffing up the brown paper ahead of time so I can paint it after a maiden flight (if it returns to Earth gracefully). I think I'll paint it using von Richthofen's 152/17 aircraft. I can spray paint the red and hand paint the olive drab portion. The olive drab paint on the original plane looks like it was painted with a big house brush with brush streaks of black to darken the green.
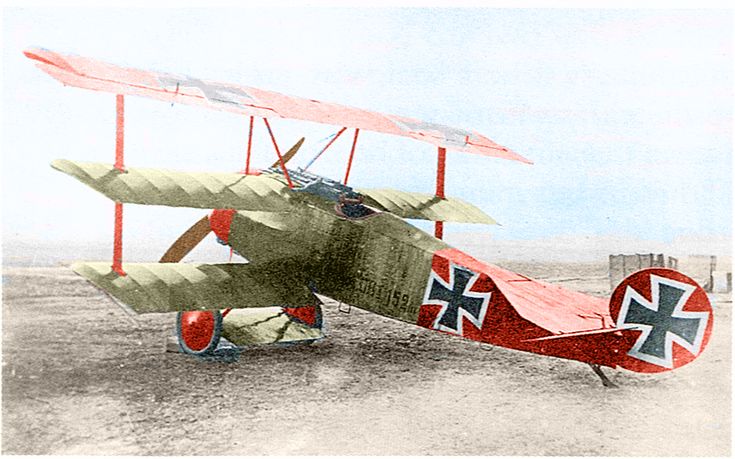
66b34d6168f0c84f1b155e6b1dd2c280.jpg
 
Last edited:

Inq

Elite member
Inq Embellishments

I wanted to dress it up a little with some 3D Printed pieces so that it will be more impressive when it goes into that final death spiral. If I can be so skilled (or lucky) for it to survive it's first flights, I'll paint it up nice and sweet. :cool:

The pieces I wanted to add to this FT MM DR-1 Triplane were really designed for my upcoming Fokker D.VIII. Both being radial engine'd Fokkers based on a squared cross-section tubular frame, the cowling and side fairings ought to be similar.
Fuselage2.jpg


The wheels are also scaled from Fokker D.VIII drawings. As my Fokker D.VIII is sized based on using one sheet of DTFB and has a wingspan of just under 30 inches, it is just a little bigger scale than the FT MM Dr-1 (7.5% larger scale) The wheels and machine gun are scaled down to be the proper size for this Dr-1.

DR1 Pieces.png


And the final assembly is done...
PXL_20230208_164525409.jpg


PXL_20230208_164457506.jpg


Oh... I can't take credit for Manfred. He... I found at the aerodrome (Thingiverse.com)
 

luvmy40

Elite member
I think this Clover Iron may be a great value.
I have not done anything with any of the vinyl coatings with this iron. The pics are of an older build that has already been coated with Valspar poly urethane.

P51 tail before:
P51 Tail Profile Before.jpg


And after 1 few minutes with the Clover Iron
 

Attachments

  • P51 Tail Profile After.jpg
    P51 Tail Profile After.jpg
    118.5 KB · Views: 0

Tench745

Master member
The pieces I wanted to add to this FT MM DR-1 Triplane were really designed for my upcoming Fokker D.VIII. Both being radial engine'd Fokkers based on a squared cross-section tubular frame, the cowling and side fairings ought to be similar.

The wheels are also scaled from Fokker D.VIII drawings. As my Fokker D.VIII is sized based on using one sheet of DTFB and has a wingspan of just under 30 inches, it is just a little bigger scale than the FT MM Dr-1 (7.5% larger scale) The wheels and machine gun are scaled down to be the proper size for this Dr-1.


And the final assembly is done...
That cowling makes the plane, well done.
 
  • Like
Reactions: Inq

Mr NCT

Site Moderator
Inq Embellishments

I wanted to dress it up a little with some 3D Printed pieces so that it will be more impressive when it goes into that final death spiral. If I can be so skilled (or lucky) for it to survive it's first flights, I'll paint it up nice and sweet. :cool:

The pieces I wanted to add to this FT MM DR-1 Triplane were really designed for my upcoming Fokker D.VIII. Both being radial engine'd Fokkers based on a squared cross-section tubular frame, the cowling and side fairings ought to be similar.
View attachment 234656

The wheels are also scaled from Fokker D.VIII drawings. As my Fokker D.VIII is sized based on using one sheet of DTFB and has a wingspan of just under 30 inches, it is just a little bigger scale than the FT MM Dr-1 (7.5% larger scale) The wheels and machine gun are scaled down to be the proper size for this Dr-1.

View attachment 234657

And the final assembly is done...
View attachment 234658

View attachment 234659


Oh... I can't take credit for Manfred. He... I found at the aerodrome (Thingiverse.com)
That looks fantastic! How does it balance with the larger motor? Do you have an all up weight yet? I'm with @Tench745 , that cowl makes the plane.
 
  • Like
Reactions: Inq

Inq

Elite member
That looks fantastic! How does it balance with the larger motor? Do you have an all up weight yet? I'm with @Tench745 , that cowl makes the plane.

These stubby nosed WW I planes must be hard to balance... leaning more toward being tail happy. Even in the video, Josh had to put the battery right up front under the motor. He couldn't put it any further without hitting the prop.
1675939971197.png
The FT parts I didn't use, weigh about 20 grams. The A2212 motor weighs 54 alone. The recommended 1806 only 18. Although I'm adding weight, it's all up front. I'm hoping I'll be able to put the battery back a little further back and put a set of 3D printed cylinders I created for the D.VIII.
D.png
Back to the subject at hand. Anyway, I'm assuming the "Dry Weight" listed in the plans (263 grams) is everything except the battery. My dry weight is 307 grams.
 

CappyAmeric

Elite member
Today's progress on the FT MM DR-1 Triplane

This portion has been done per the instructions in Josh's video... except I haven't done the Power Pod. I'm going to be using one of the cheap kits using an A2212 motor / 30A ESC / 6x3.5 Propeller. The A2212 is larger in diameter than what I guess is the standard motor. It will fit in between the sides, but it is lower than the centerline of the cowling. I'm still deciding about whether to put it at the same centerline and have to move it entirely in front of the fuselage front or create an new cowling that has the lower centerline.
View attachment 234653

I was going to take @Mr NCT 's advice on painting the DR-1 with the top and bottom wing off separate. It sounds like great advice. But then I realized, I haven't had a plane long enough to warrant painting it up nice. :oops: https://forum.flitetest.com/index.p...t-mighty-mini-dr1-triplane.71693/#post-739562 I did take his advice on scuffing up the brown paper ahead of time so I can paint it after a maiden flight (if it returns to Earth gracefully). I think I'll paint it using von Richthofen's 152/17 aircraft. I can spray paint the red and hand paint the olive drab portion. The olive drab paint on the original plane looks like it was painted with a big house brush with brush streaks of black to darken the green.
66b34d6168f0c84f1b155e6b1dd2c280.jpg
Big motor, short coupled tail surfaces, watch the torque on takeoff for the maiden.
 
  • Like
Reactions: Inq

Inq

Elite member
Big motor, short coupled tail surfaces, watch the torque on takeoff for the maiden.

I'll probably have to hand launch this at my field. I don't think the 2.25" wheels will roll on our turf. Are there any suggested techniques to hand launching this kind of airplane? Like use partial throttle, set some default rudder/elevator positions, launch level or inclined??? I've never hand launched any airplane. It will have a thrust to weight ratio of about 1.8:1 at full throttle.
 

Mr NCT

Site Moderator
I'll probably have to hand launch this at my field. I don't think the 2.25" wheels will roll on our turf. Are there any suggested techniques to hand launching this kind of airplane? Like use partial throttle, set some default rudder/elevator positions, launch level or inclined??? I've never hand launched any airplane. It will have a thrust to weight ratio of about 1.8:1 at full throttle.
For the DR1 I usually hold the plane from the top and give it an underhand toss at 45 degrees or so and a little to the right of the path I want it to take. I run the throttle up 'til it's starting to pull then go a notch or two higher. Your results may vary :p
 

Inq

Elite member
For the DR1 I usually hold the plane from the top and give it an underhand toss at 45 degrees or so and a little to the right of the path I want it to take. I run the throttle up 'til it's starting to pull then go a notch or two higher. Your results may vary :p

Thanks... this makes sense... enough thrust to make it go up, on thrust alone, yet minimizing torque.

I'll video the maiden and the judges can have pity if it flops over and augers-in.
 

Mr NCT

Site Moderator
Thanks... this makes sense... enough thrust to make it go up, on thrust alone, yet minimizing torque.

I'll video the maiden and the judges can have pity if it flops over and augers-in.
We'll dust off our score cards!!
 
  • Like
Reactions: Inq

mastermalpass

Master member
Thanks... this makes sense... enough thrust to make it go up, on thrust alone, yet minimizing torque.

I'll video the maiden and the judges can have pity if it flops over and augers-in.

I hold by the fuselage. If it's a tractor prop, I hold it from underneath, just behind the wings. My HalfPipe prop in slots could also be held in a similar way, 'cause their half pipe bellies protect your hands from the prop. My RC Powers parkjects were pinched on the fuselage from above and swung underarm - released part way through the movement so my hand could get clear of the prop.

Like with the others, I throttle up until I can feel it pull. I don't check what percentage throttle that is, 'cause the stick input/motor output ratio changes from 2S, 3S, 4S batteries and so on.
 

mastermalpass

Master member
Inq Embellishments

I wanted to dress it up a little with some 3D Printed pieces so that it will be more impressive when it goes into that final death spiral. If I can be so skilled (or lucky) for it to survive it's first flights, I'll paint it up nice and sweet. :cool:

The pieces I wanted to add to this FT MM DR-1 Triplane were really designed for my upcoming Fokker D.VIII. Both being radial engine'd Fokkers based on a squared cross-section tubular frame, the cowling and side fairings ought to be similar.
View attachment 234656

The wheels are also scaled from Fokker D.VIII drawings. As my Fokker D.VIII is sized based on using one sheet of DTFB and has a wingspan of just under 30 inches, it is just a little bigger scale than the FT MM Dr-1 (7.5% larger scale) The wheels and machine gun are scaled down to be the proper size for this Dr-1.

View attachment 234657

And the final assembly is done...
View attachment 234658

View attachment 234659


Oh... I can't take credit for Manfred. He... I found at the aerodrome (Thingiverse.com)

Looking good! You mentioned lacking confidence in masking. I've had my ups and downs with masking, but my most recent discovery has been you can avoid it all together: don't be afraid to ditch the spray cans and just brush on acrylics instead. Not only does acrylic leave less brush strokes on foam than you assume it would, you also have the benefit of being able to mix very precise colours with just a few tubes.

Loving those wheels by the way!
 

Inq

Elite member
Looking good! You mentioned lacking confidence in masking. I've had my ups and downs with masking, but my most recent discovery has been you can avoid it all together: don't be afraid to ditch the spray cans and just brush on acrylics instead. Not only does acrylic leave less brush strokes on foam than you assume it would, you also have the benefit of being able to mix very precise colours with just a few tubes.

Loving those wheels by the way!

Have never even touched an acrylic paint that I know of... you mean the brush strokes settle out? Does it stink bad? That's my other problem... can't do spray in the house and its too cold outside. If I could use brushes while at my desk... that'd be fantastic! I really need to go get some red and practice on something!
 

RedTwilight

Member
I painted this DR1 using Apple Barrel acrylics from Wal-Mart using one of those wide flat foam bushes. But note that the streaking was done intentionally for this one.
 

Attachments

  • DSC_0618.JPG
    DSC_0618.JPG
    135.2 KB · Views: 0
  • DSC_0615.JPG
    DSC_0615.JPG
    138.6 KB · Views: 0

mastermalpass

Master member
Those look great! I’ve ironed the edges of a couple planes recently. I did it on a Delta and it flies so well that I wonder if ironing may have made a significant improvement to the aerodynamics. It’s impossible to tell though...

If you're talking about the HalfPipe then yes, bevelling/sanding the wing leading edges massively effects pitch stability.

It uses a flatplate for a wing. Contrary to what one would assume, flat plates are not entitely 'airfoil-less'. With a slight positive angle of attack, the boundary layer on top of the wing causes a virtual airfoil effect, generating lift. Of course, with a slight negative angle of attack, this effect is inversed towards the ground. The HalfPipe Mk.II started with no bevelling or sanding on the edge which made airflow over the wing turbulent and the virtual airfoil would randomly shift between the top and bottom widly and randomly. You'd be flying straight and level and suddenly it would nosedown 30° in a snap.

The Mk.II then had BBQ skewers taped to the leading edge, which fixed this problem, making the airfoil change much more stable and gradual. The Mk.III simply had a bevel-cut, sloping 45° from top to bottom, to encourage the airfoil to stay on top. This version was even more stable while also being lighter and so the Delta got the same treatment.
 

mastermalpass

Master member
Have never even touched an acrylic paint that I know of... you mean the brush strokes settle out? Does it stink bad? That's my other problem... can't do spray in the house and its too cold outside. If I could use brushes while at my desk... that'd be fantastic! I really need to go get some red and practice on something!

It's simply not very thick. I mean as far as paints go, it's thicker than oil paints or enamel, but foam can be rough. I'm not saying there are NO brush strokes, but they are subtle. Oh and Accryllic paint has to be the closest to odourless I know a paint to be, maybe short of the powder water colours I used at primary school. Once it's dry, you have to put your nose up to it to smell it.

Your foam does have shiny paper on it, so test this on a scrap piece first. But I've seen a mini scout, that I think came from a speedbuilt kit, painted this way. Look for the Red mini scout on this page, it's an impressively smooth finish for brush work!
 
Last edited:
  • Like
Reactions: Inq

Foamforce

Elite member
If you're talking about the HalfPipe then yes, bevelling/sanding the wing leading edges massively affects pitch stability.

Great info! I was actually talking about the FT Delta in this case, but I think your comments are still applicable. My first FT Delta was overweight with no bevel. My second one was lightweight with a bevel. The old one required 110% attention to keep it in the air. The new one flies wonderfully. I think that most of the difference is probably in the weight reduction, but I suspect the bevel helped a bunch too. Thanks for the explanation!

Obligatory “dot in the sky” video…
 

mastermalpass

Master member
Great info! I was actually talking about the FT Delta in this case, but I think your comments are still applicable. My first FT Delta was overweight with no bevel. My second one was lightweight with a bevel. The old one required 110% attention to keep it in the air. The new one flies wonderfully. I think that most of the difference is probably in the weight reduction, but I suspect the bevel helped a bunch too. Thanks for the explanation!

Obligatory “dot in the sky” video…

Ah yes, that thing's not far off being a flying wing. With a flat plate I can see that one being very sensitive to a 'square-on' leading edge! Seems you dialled in there though, those slow passes are very graceful. Mad what a difference it makes, eh?