Lazy Bee 2020

GliderFlyer

Elite member
Horizon hobby had a sale a while back so I bought some pearl white monokote. I didn't think it would be so sparkly:eek:
Now I'm wondering what in the world am I going to use this for? The sparkles don't really appeal to me.
Nothing against your color choice, though. Maybe it will change my mind when its finished.
 

FoamyDM

Building Fool-Flying Noob
Moderator
1610477036769.png

o_O

simple, yet....mind blowing
 

rockyboy

Skill Collector
Mentor
Horizon hobby had a sale a while back so I bought some pearl white monokote. I didn't think it would be so sparkly:eek:
Now I'm wondering what in the world am I going to use this for? The sparkles don't really appeal to me.
Nothing against your color choice, though. Maybe it will change my mind when its finished.

This Micafilm is a very very different material from Monokote - I don't think they will look anything like each other (but I also haven't specifically used white pearl moneykote). But if you really don't have a use for it, lemme know. I might have something in my shop to mix it with ;)

View attachment 188979
o_O

simple, yet....mind blowing

Yeah, an old-timer in my club hit me with this idea a while back and my jaw hit the floor too! :ROFLMAO:

I made a little more progress tonight on covering - it takes longer than I'm used to as I need to keep pulling out the can of Stix-it and applying adhesive before adding the next piece (any place covering is going to overlap at a seam, it needs a little smear of goo and 30 minutes or so of drying time). But I've got the rudder complete and the bottom of the plane done now...

PXL_20210113_022827000_copy_1024x768.jpg

And it looks pretty cool with the shop lights turned off too :)

PXL_20210113_022802596_copy_1024x768.jpg


Of course now that I see it like this, I'm not sure I should have followed the instructions for a fully sheeted fuselage bottom... but oh well. It's going to be unique for certain!
 

The Hangar

Fly harder!
Mentor
This Micafilm is a very very different material from Monokote - I don't think they will look anything like each other (but I also haven't specifically used white pearl moneykote). But if you really don't have a use for it, lemme know. I might have something in my shop to mix it with ;)


Yeah, an old-timer in my club hit me with this idea a while back and my jaw hit the floor too! :ROFLMAO:

I made a little more progress tonight on covering - it takes longer than I'm used to as I need to keep pulling out the can of Stix-it and applying adhesive before adding the next piece (any place covering is going to overlap at a seam, it needs a little smear of goo and 30 minutes or so of drying time). But I've got the rudder complete and the bottom of the plane done now...

View attachment 189045
And it looks pretty cool with the shop lights turned off too :)

View attachment 189046

Of course now that I see it like this, I'm not sure I should have followed the instructions for a fully sheeted fuselage bottom... but oh well. It's going to be unique for certain!
Now that, my friend, is awesome! I’ve been getting more and more into the LED’s lately, so this is really cool to see. (y)
 

PsyBorg

Wake up! Time to fly!
This Micafilm is a very very different material from Monokote - I don't think they will look anything like each other (but I also haven't specifically used white pearl moneykote). But if you really don't have a use for it, lemme know. I might have something in my shop to mix it with ;)


Yeah, an old-timer in my club hit me with this idea a while back and my jaw hit the floor too! :ROFLMAO:

I made a little more progress tonight on covering - it takes longer than I'm used to as I need to keep pulling out the can of Stix-it and applying adhesive before adding the next piece (any place covering is going to overlap at a seam, it needs a little smear of goo and 30 minutes or so of drying time). But I've got the rudder complete and the bottom of the plane done now...

View attachment 189045
And it looks pretty cool with the shop lights turned off too :)

View attachment 189046

Of course now that I see it like this, I'm not sure I should have followed the instructions for a fully sheeted fuselage bottom... but oh well. It's going to be unique for certain!


Here is yet another dumb "Bill" question... You apply covering film to your plane. You take extra care to heat and shrink it evenly to not induce twisting or bowing of the wood frame. Then you put hot leds between those sheets in a focused area of heat. Would those leds over time not unevenly shrink the film even tighter along the light line? Also would the added heat not dry the wood even more and cause shrinking and expansion over time working glued joints free with humidity changes being more extreme?

Not poking at your work just something that makes my head go hrrrrmmmm as you know I have tons of time to think up useless things like this at 2 am.
 

rockyboy

Skill Collector
Mentor
Here is yet another dumb "Bill" question... You apply covering film to your plane. You take extra care to heat and shrink it evenly to not induce twisting or bowing of the wood frame. Then you put hot leds between those sheets in a focused area of heat. Would those leds over time not unevenly shrink the film even tighter along the light line? Also would the added heat not dry the wood even more and cause shrinking and expansion over time working glued joints free with humidity changes being more extreme?

Not poking at your work just something that makes my head go hrrrrmmmm as you know I have tons of time to think up useless things like this at 2 am.

This is the first time I've put leds this close to covering and I hadn't thought about that potential issue... (see - it's a good thing you're up at 2am thinking these useless things for us - I'd have missed it!)

With a little research, I found this site which claims that 12v and 24v led strip lighting will only get up to 154 degrees F which will be perfectly safe in this application - the adhesive doesn't activate until 220 and the micafilm doesn't begin to shrink until 240

https://www.waveformlighting.com/home-residential/how-hot-do-led-strips-get-is-it-normal

Whew!
 

rockyboy

Skill Collector
Mentor
As I was unrolling the Micafilm to cover the bottom of the wing yesterday, I hit the end of the roll, and had a panic attack - about 4 feet less of the Pearl white than I expected on the roll. :censored: I should have read the label more closely and not just expected it to be the same length as a Monokote or SolarFilm roll. So a white plane with red or yellow scallops like I pictured in my mind is right out. :cry:

After calming down a little, I did some browsing, hit this image, and felt a whole lot better. :)
Yellow_White_Lazy_Bee.jpg

So I'm switching to yellow as the base color since I was able to get a roll and a half of that in FibraFilm - which was the same manufacturer and product as MicaFilm, just sold through a different distribution network. I'll need to strip the covering off the rudder and part of the bottom of the fuselage to get things looking right, but that's not too much work and I still have enough white to cover the bottom of the wing all white (better for the led's to shine through and for daytime orientation).

So with a new covering plan firmly established, I covered the bottom of the wing in the pearl white, and then did a little more light testing. The illumination seemed a bit unbalanced front-to-back wise, so I decided to add an extra row of leds about 2/3 back from the leading edge to even things out. Adding these ones pointing straight down sticking to new spar is easier and less structurally damaging compared to a big hole in the ribs that far back.

PXL_20210114_033439177_copy_1024x768.jpg
 

rockyboy

Skill Collector
Mentor
Most of my hobby time last night was spent putting a coat of Stix-it across the top and edges of the wing. Then pulled the covering off the rudder with a heat gun and started on the first of the tricky covering parts.

First I used the covering patterns from the plans to cut out the white trim piece that creates the scalloped leading edge, and then traced out the edge of that on a larger piece of yellow base color covering using a dry-erase wipe off marker.

PXL_20210115_025014486_copy_1024x768.jpg


Then I cut the yellow base covering so it would create an "underlap" that gets a layer of Stix-it adhesive and ironed together
PXL_20210115_031328922_copy_1024x768.jpg


Then the combined covering piece is applied to the rudder - easy peasy!

PXL_20210115_032621711_copy_1024x768.jpg

I think it will benefit from a black pin stripe to better define the edge too, but I'll get to that step after the covering is on the rest of the plane.
 

rockyboy

Skill Collector
Mentor
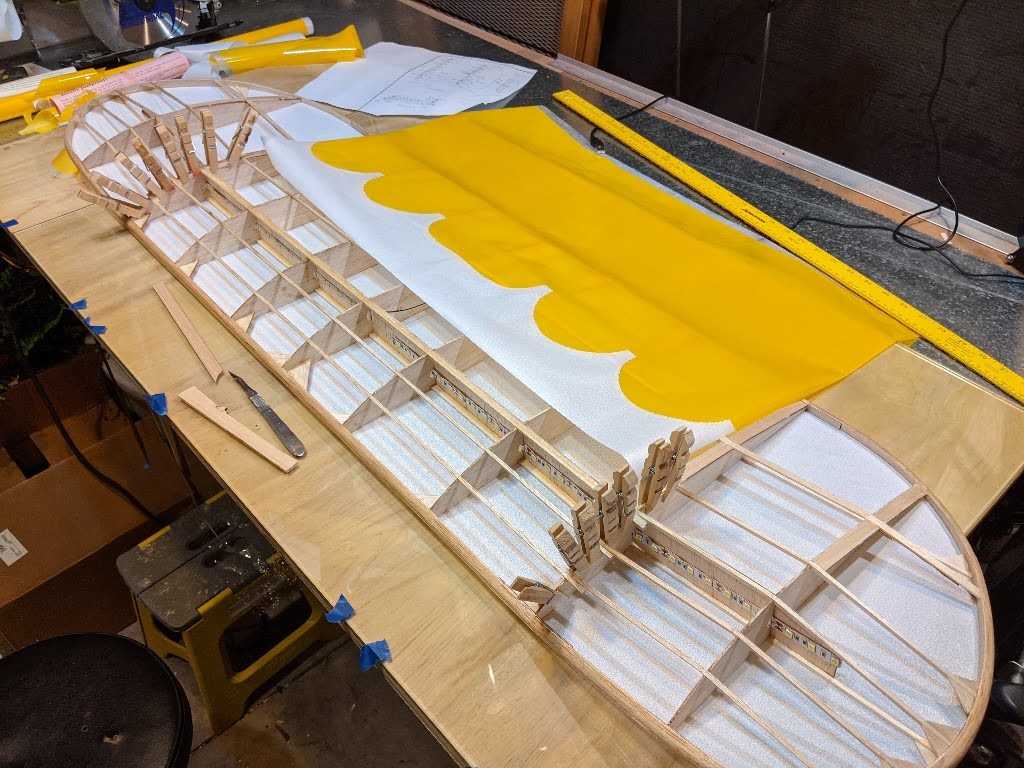
Focusing on the top of the wing next - since I have a limited amount of white left, I want to make sure I get these scallops done before planning out the fuselage sides. Strangely enough, the paper templates didn't match up with the actual wing...
PXL_20210121_161942868_copy_1024x768.jpg


So I just made the center scallop wider - cut this by folding the covering in half so it's nice and symmetrical.
PXL_20210121_182722132_copy_1024x768.jpg


Next I taped the two pieces together and using a dry erase marker did the cut lines on the yellow
PXL_20210121_183823300_copy_1024x768.jpg


After cutting the yellow (carefully leaving a 1/4" edge for overlap) and sticking them together with some Stix-it, I cut the center panel out for ease of applying it to the wing (and so it doesn't try to pull up when I shrink the covering).

And wouldn't you know, I cut the center panel about 1/4" too short. :poop:

PXL_20210122_022438616_copy_1024x768.jpg


So now I'm adding some supports and wider cap-strips on the front sections of the ribs to make the balsa fit the covering :)
 

TooJung2Die

Master member
I'm truly impressed. 😎👍 Putting a seam over an open area is not something I feel comfortable attempting. Wrinkle free is the best I hope for.
 

Bricks

Master member
I would think since that white is kind of a see thru it is the best way to keep it that way versus just putting the white over the yellow. At least I think that is why rockboy did it this way.
 

rockyboy

Skill Collector
Mentor
I would think since that white is kind of a see thru it is the best way to keep it that way versus just putting the white over the yellow. At least I think that is why rockboy did it this way.

Yeah, usually the best result is to do the darker color over the lighter color, but in this case the yellow is more translucent than the white. I did a test of each one on top with some scraps before getting started to and was surprised the white on top looked a lot better with these.