Lazy Bee 2020

rockyboy

Skill Collector
Mentor
Next project - one of Clancy Aviation's newly release, 2020 Lazy Bee kits! https://www.andyclancydesigns.com/

I picked up one of the first batch of "Original Lazy Bee" kits which means 3 channel - no ailerons on this girl. The post-man did his best to mash up the shipping tube, but everything inside arrived safely anyway. Inside are a full size set of plans, a bundle of sticks, a bundle of laser cut balsa sheets, some laser cut plywood, a small bundle of bamboo dowels & some landing gear wires, and instructions. I'll share a picture of the instruction book too - it's a classic hand-drawn late 90's "To Build a Bee" handbook, and a couple pages of a 2020 Laser Kit update instructions too.

PXL_20201027_220319099_copy_1024x768.jpg


PXL_20201027_220433427_copy_1024x768.jpg


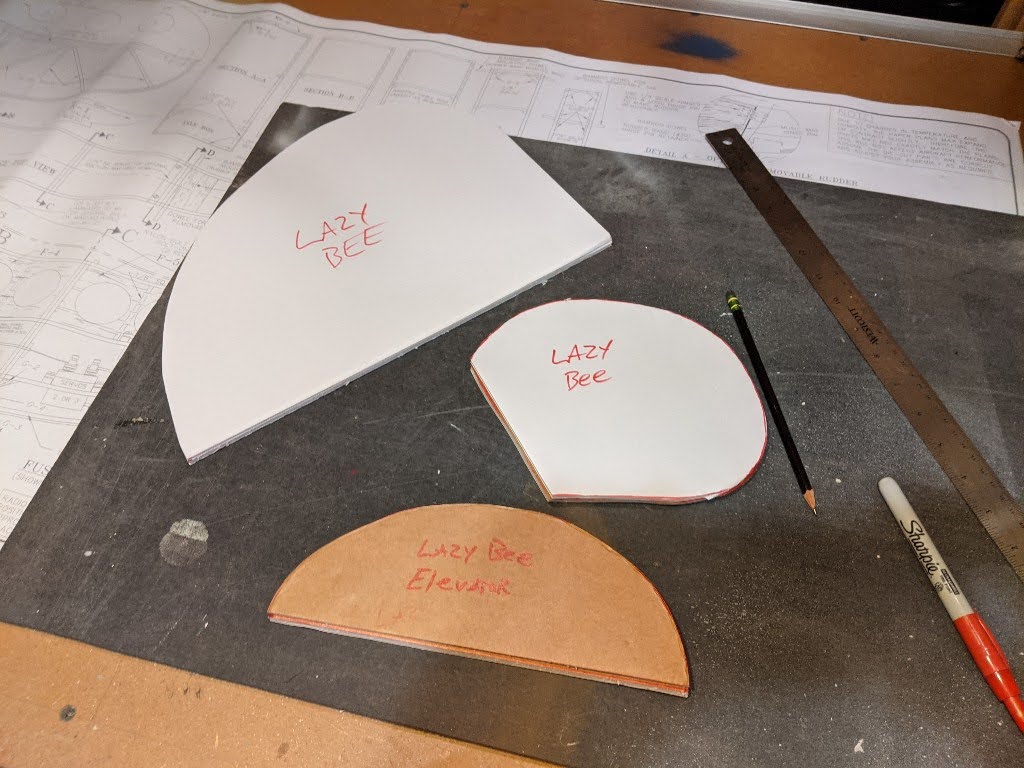
After reading all the way through the instructions, I am following his recommended build order and getting started on the laminations first. That starts with tracing the lamination form shapes onto foamboard (two layers hot-glued together in this case).
PXL_20201027_232121236_copy_1024x768.jpg


Then covering the edges with some sort of waterproof tape - aluminum ducting tape cause it was at the top of the tape stack.

PXL_20201028_000522148_copy_1024x768.jpg


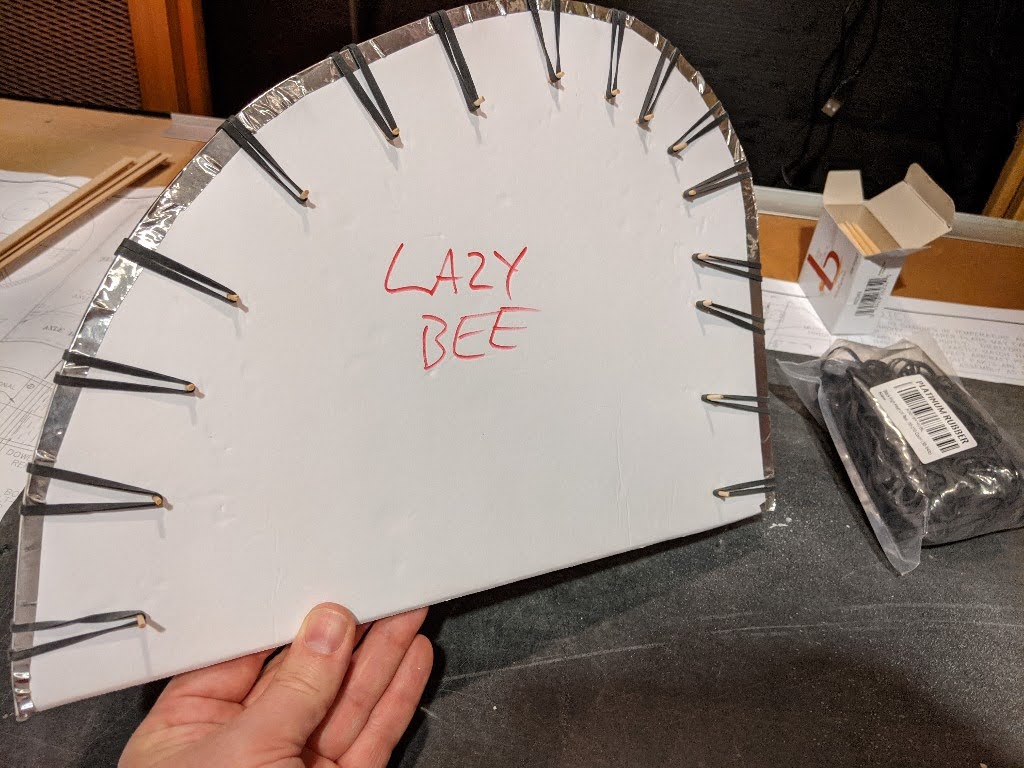
Next I stretched a rubber band around the edge and figured out where a toothpick would give a moderate amount of tension (maybe stretched to 1/3 additional length). Snapped a bunch of toothpicks in half and made sure they all hooked up nicely.
PXL_20201028_001101394_copy_1024x768.jpg


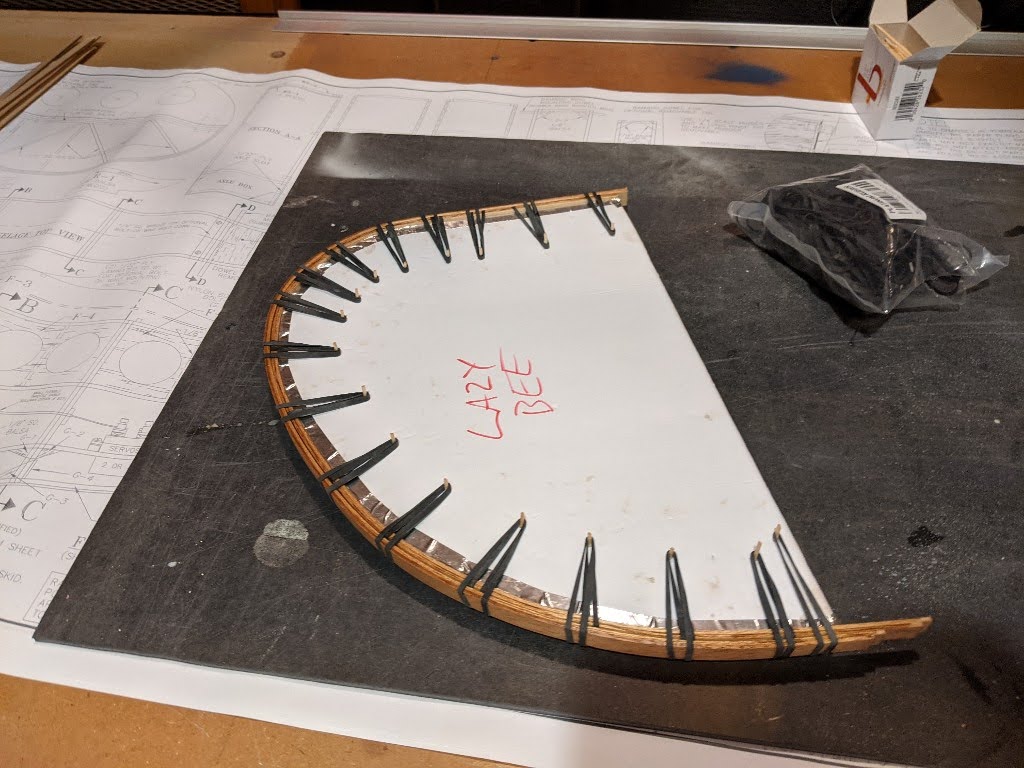
Finally some balsa get's involved! 1/8" x 1/2" strips in this case - I squirted them down with an ammonia/water mix (windex works great too) and rubbed that into the wood for a moment (and pulled the rubber bands off the template). Then starting from the most flat edge of the template that still gets wood, I bent and rubber banded my way around the form.
PXL_20201028_002026073_copy_1024x768.jpg


I did two strips first, and then did the second two strips on top of that so there is a layer of rubber bands trapped in the middle. Hopefully that won't cause some weird indentations in the wood, but I don't think the bands are stretched tightly enough for that.

Time to let this dry overnight - and do it a bunch more time on the other forms too.
 

The Hangar

Fly harder!
Mentor
Next project - one of Clancy Aviation's newly release, 2020 Lazy Bee kits! https://www.andyclancydesigns.com/

I picked up one of the first batch of "Original Lazy Bee" kits which means 3 channel - no ailerons on this girl. The post-man did his best to mash up the shipping tube, but everything inside arrived safely anyway. Inside are a full size set of plans, a bundle of sticks, a bundle of laser cut balsa sheets, some laser cut plywood, a small bundle of bamboo dowels & some landing gear wires, and instructions. I'll share a picture of the instruction book too - it's a classic hand-drawn late 90's "To Build a Bee" handbook, and a couple pages of a 2020 Laser Kit update instructions too.

View attachment 181864

View attachment 181862

After reading all the way through the instructions, I am following his recommended build order and getting started on the laminations first. That starts with tracing the lamination form shapes onto foamboard (two layers hot-glued together in this case).
View attachment 181863

Then covering the edges with some sort of waterproof tape - aluminum ducting tape cause it was at the top of the tape stack.

View attachment 181865

Next I stretched a rubber band around the edge and figured out where a toothpick would give a moderate amount of tension (maybe stretched to 1/3 additional length). Snapped a bunch of toothpicks in half and made sure they all hooked up nicely.

View attachment 181866

Finally some balsa get's involved! 1/8" x 1/2" strips in this case - I squirted them down with an ammonia/water mix (windex works great too) and rubbed that into the wood for a moment (and pulled the rubber bands off the template). Then starting from the most flat edge of the template that still gets wood, I bent and rubber banded my way around the form.

View attachment 181867

I did two strips first, and then did the second two strips on top of that so there is a layer of rubber bands trapped in the middle. Hopefully that won't cause some weird indentations in the wood, but I don't think the bands are stretched tightly enough for that.

Time to let this dry overnight - and do it a bunch more time on the other forms too.
Great project - I’ll be watching!
 

rockyboy

Skill Collector
Mentor
Great project. I have this on my build list for the winter. I cheated a little and bought the 72" short kit from Eureka Aircraft.

I was looking at that one for a while too (and some of their Baby Pattern Planes)- how's the quality of the kit look?

I need to build one of these things. Real funny lookin plane.

Yes you do, and yes it is! :)

So here's a copy of that neat hand-drawn and manually type set instruction manual I mentioned - it's a fun work of art!

PXL_20201028_031109633_copy_1024x1365.jpg


And here's the step I'm working on now...
PXL_20201028_031123384_copy_1024x768.jpg


Last night I did get the rudder and elevator laminations clamped up to dry. All three of these will be ready to glue today, and then I'll need to do another wing tip for the other side.
PXL_20201028_033238344_copy_1024x768.jpg
 

speedbirdted

Legendary member
How much do you have to wet the wood to get it to form like that without cracking or breaking? Next time you do something like this could you maybe film the process?
My technique for doing laminations is to let it soak in either water or acetone for 24+ hours beforehand which will loosen it up to the point where you can bend it like crazy with nothing bad happening. Acetone makes the wood softer, but water doesn't smell nearly as bad.

A side note on laminations is I've always been told to do them with the grain alternating with every strip. Plywood gets its stiffness from this, and if you think about it, making laminations is basically just making plywood but with balsa.
 

rockyboy

Skill Collector
Mentor
How much do you have to wet the wood to get it to form like that without cracking or breaking? Next time you do something like this could you maybe film the process?

I spray it with a 50/50 ammonia/water mix and then rub it in for about 30 seconds on 1/8" thick balsa. Since I've got a new (el-cheap-o) USB video camera, this will be a good chance to try making a little video on the last wing tip :)

A side note on laminations is I've always been told to do them with the grain alternating with every strip. Plywood gets its stiffness from this, and if you think about it, making laminations is basically just making plywood but with balsa.

Alternating grain direction is a great idea for additional stiffness! There are a lot of other places on this build with laminations that aren't bent that I'll try to ensure I'm it that way. :)
 

PsyBorg

Wake up! Time to fly!
I spray it with a 50/50 ammonia/water mix and then rub it in for about 30 seconds on 1/8" thick balsa. Since I've got a new (el-cheap-o) USB video camera, this will be a good chance to try making a little video on the last wing tip :)


Alternating grain direction is a great idea for additional stiffness! There are a lot of other places on this build with laminations that aren't bent that I'll try to ensure I'm it that way. :)

o_OOk you spray it and Ted soaks it...I will assume the amount and time varies by size and types of wood then. Make the video if you would not mind.. seeing clears up a lot of dead braincell blurred thinking in my case and would help a lot. :unsure: Once again thank you for fast answers too.
 

rockyboy

Skill Collector
Mentor
o_OOk you spray it and Ted soaks it...I will assume the amount and time varies by size and types of wood then. Make the video if you would not mind.. seeing clears up a lot of dead braincell blurred thinking in my case and would help a lot. :unsure: Once again thank you for fast answers too.

Ammonia - smells like hell but gets the job done. Windex works good too (some ammonia content) - needs longer to soak in but less personal poisoning
 

TooJung2Die

Master member
I use water and soak for an hour maybe two. You'll know as soon as you try to bend the wood if it is soft enough. It can take longer depending on the hardness and thickness of the wood. I don't soak the balsa sheeting on Willy Nillies wings at all. I've used Windex too but sometimes it gives the wood a blue tint.

This is a very unique, cartoonish looking airplane. It has a fat, stubby look that makes you smile. 😁
 

Turbojoe

Elite member
Just before I moved last month I found out Andy lived only two blocks from me. The kit wasn't available yet or I would have hounded him for an early one. ;)

I do have a Speedy Bee short kit that I bought on RC Groups several years back. Never got started on it though.

Joe
 

rockyboy

Skill Collector
Mentor
This is a very unique, cartoonish looking airplane. It has a fat, stubby look that makes you smile. 😁

Exactly why I felt this was the perfect plan to build now! Need some more of that going around.

Just before I moved last month I found out Andy lived only two blocks from me. The kit wasn't available yet or I would have hounded him for an early one. ;)

I do have a Speedy Bee short kit that I bought on RC Groups several years back. Never got started on it though.

Joe

Having Andy as a local flying buddy would have been very cool!

o_OOk you spray it and Ted soaks it...I will assume the amount and time varies by size and types of wood then. Make the video if you would not mind.. seeing clears up a lot of dead braincell blurred thinking in my case and would help a lot. :unsure: Once again thank you for fast answers too.

My first shot at video editing with new cheap USB camera and OpenShot (free video editing software) - lemme know what ya'll think! :)


I couldn't get the video capture software to grab audio yet, maybe on the next one....
 

PsyBorg

Wake up! Time to fly!
Exactly why I felt this was the perfect plan to build now! Need some more of that going around.


Having Andy as a local flying buddy would have been very cool!


My first shot at video editing with new cheap USB camera and OpenShot (free video editing software) - lemme know what ya'll think! :)


I couldn't get the video capture software to grab audio yet, maybe on the next one....

Ok that was more informative then expected. First I did not realize how big a form you were working with. I was thinking more in the 4 inch diameter range from the pictures posted earlier with no size reference. Second that works crazy fast. Here I was thinking it had to saturate and fester a bit before the wood would soften enough to bend. Third I thought you had to make each layer separate to from better with the previous one.

I may have to play around with this method on some non aircraft ideas I have had over the years for things I never tried because I thought it was super involved to form rounded and twisty shapes like that.

I use VSDC free video editor. simple and the audio section is super easy to work with. I split out my audio on everything to a separate track so I can manipulate it to match the video when cheaper cameras cant seem to match audio and video and you end up with kung fu theater tracks where lips move then sound then lips keep moving hehe. You can also export it and work with effects in other dsp based programs if you are doing music or multi tracking.

Thank you my friend that was SUPER helpful to me.
 

TooJung2Die

Master member
My first shot at video editing with new cheap USB camera and OpenShot (free video editing software) - lemme know what ya'll think!
That's a good demo video. It was better without any narration. I like how you fast forwarded through the repetitive parts. The only thing that was missing was taking it off the form and showing the final product. Do another vid gluing the layers together. 👍

When I switched to Windows 10 this year on all my computers I thought I lost Windows Live Movie Maker. It is still downloadable as part of the Windows Live Essentials 2012 package. It is not a powerful video editor but it has all the features I need, it's free and most importantly I figured out how to use it. 🙂
 
Last edited:

rockyboy

Skill Collector
Mentor
Thanks guys! If you are using straight water it is a multi-hour soaking - I haven't used acetone for this but it sounds like it might be somewhere in between ammonia and water in terms of "speed to bend". I have heard some people say the ammonia breaks down the wood fibers in some harmful way, but in my very unscientific testing and use on several projects so far, I haven't seen any strength reduction.

I am sort of digging on the "no narration" style too, but not thrilled with the look of the text overlays yet. Need to play with that some more :)

I plan to film the glue up process next, and rather than posting a part two of the video I'll just upload a new one that goes the whole way through.
 

PsyBorg

Wake up! Time to fly!
Most video editing allows you to manipulate and use various fonts. some have cutesy overlays to wrap around your text boxes. Thats why I use the VSDC editor. It has a lot of the "paid for" features as its base that other free stuff has. I have both the older and the newer. I like the older (probably because I am used to working in it) but the new one is more powerful processing management wise.
 

rockyboy

Skill Collector
Mentor
I'm getting more comfortable with OpenShot now - I like that it's a cross platform application so it'll run the same on my Linux and Windoze boxes and I don't have to learn something different or have separate project files for my shop vs. house computer.

So..... check this out and let me know what ya'll think. Added in the glue up and final part views.


rockyboy

Skill Collector
Mentor
More laminating...
PXL_20201028_135149527_copy_1024x768.jpg


Gluing together a pair of spars to form the leading edge - aligned so they curve into each other and should be pretty straight when dried this way.
PXL_20201029_214748037_copy_1024x768.jpg


Laminations dried up, time to start laying out the wing
PXL_20201029_214310923_copy_1024x768.jpg


Sanding the laminations flat - spray adhesive holding a full sheet of sandpaper to a smooth board works great for that.
PXL_20201030_003927718_copy_1024x768.jpg


Figuring out the angle of the cuts to trim the wing tips with the 2" of dihedral per the plans.
PXL_20201029_220210880_copy_1024x768.jpg


Everything trimmed to length and angles matching up nicely
PXL_20201030_004502124_copy_1024x768.jpg


Now gluing the dihedral braces to the leading and trailing edges (yes, it is a lot taller than the trailing edge especially - that might be a lot of sanding coming up....
PXL_20201030_005527273_copy_1024x768.jpg


Put the wing tips off to the side and time to start the wing ribs and gussets. Note the gussets are not flat to the building board, but lifted up to the middle of the ribs - that's so the bottom spar that goes across the ribs can still be fit into place later. I almost missed this in the build notes...

PXL_20201030_013257904_copy_1024x768.jpg