OMTech Lasers - 50w co2 laser engraver - build log and experience

thenated0g

Drinker of coffee, Maker of things
Mentor
****I started this over in the alofthobbies.com forums, they are my local hobbyshop. So this is a copy paste from the discusions over their. Ill try and keep this place updated now too.

I finally cracked and ordered a Chinese laser cutter from omtechlaser.com. They are a company down in the LA area i think, they import them and make sure they are working, so you have a US based company for any problems. Its a 50w (probably 40w as most of the Chinese lasers are rated at peak and you got to keep it at 80% of that). 12x20 cutting area, same as glow forge, but has passthrough. After shipping tax it comes out about $1,300 less than a glow forge. If you have any interest in the experience let me know. Im sure at some point ill do a little video about how well/not well it goes. I made sure to get one with a Ruida controller so i can easily transition over using the same Lightburn software I'm already used to on my little 5.5 diode laser engraver.

Here's the specific model i ordered with a 10% off coupon. Being in California the shipping was free which is usually $250-300.

https://omtechlaser.com/collections/co2-cabinet-laser-engravers/products/50w-usb-5b3r-us

Starting this thread here to document the experience.

Here's some related videos if you interested:

https://www.youtube.com/c/LightBurnSoftware/videos

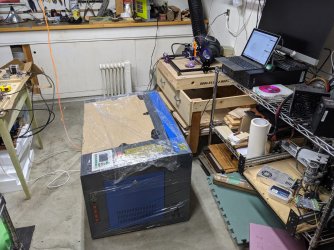
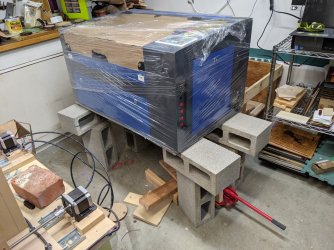
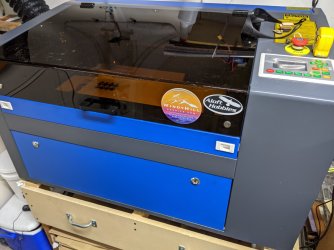
Made a base for the laser this weekend. The laser is 40" wide and 26x25 so it needs to be raised off the ground.
1608138692775.png


Here's some links to the additional stuff/upgrades i have ordered:

co2 rated safety goggles:
https://www.amazon.com/gp/product/B078HZZVZW/?tag=lstir-20
just a good idea. Plus i don't know that the viewing window is rated to stop any power from the laser.

Analog ammeter:
https://www.amazon.com/gp/product/B07F26M6M2/?tag=lstir-20
The reason for the above is that the laser i ordered has a digital ammeter which is harder to use, its not an instant read. The reason you need an ammeter is that there is no safety on the laser to stop you from damaging it by overdriving it. So with the ammeter you can find out what max power is (do a burn at 100%), note the amps used and than never go above 80% of that amps. Also the amps used and the speed used are the common "recipe" numbers people use to share cutting recipes online. Not percent of power which would be different on every machine.

Aquarium thermometer to monitor the temp of the cooling water system:
https://www.amazon.com/gp/product/B01A0TMS6Y/?tag=lstir-20
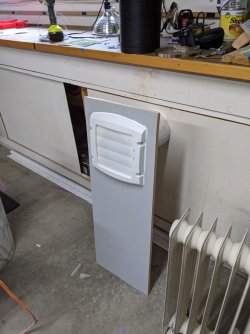
6" thru wall vent:
https://www.amazon.com/gp/product/B001AH5J8A/?tag=lstir-20

25" of 6" ducting
https://www.amazon.com/gp/product/B0791V19H7/?tag=lstir-20

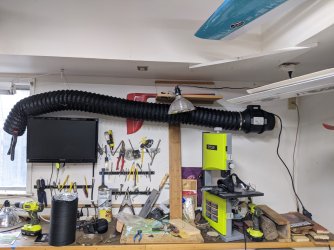
390cfm 6" Hvac blower:
https://www.amazon.com/gp/product/B01DXYMJ94/?tag=lstir-20
These blowers are much quieter than the included "pc fan" setup most lasers come with.

DSP version of lightburn software. I already had the lower version so it was only $40 to upgrade to dsp which is needed for these cabinet lasers (assuming you have the appropriate board in the laser).


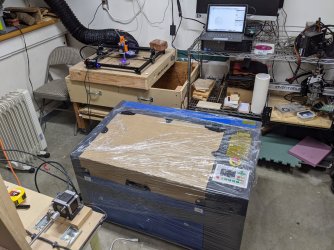
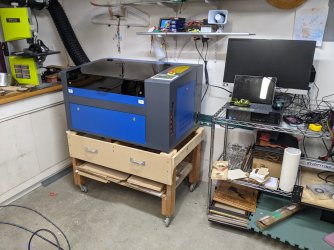
Got my exhaust system up and running.
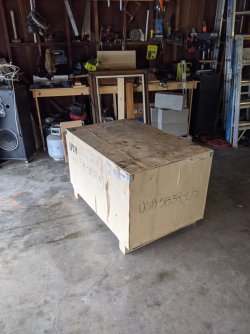

That was heavy


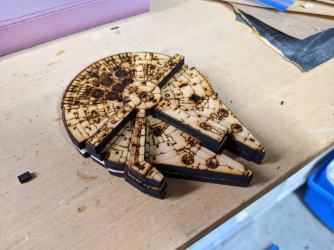
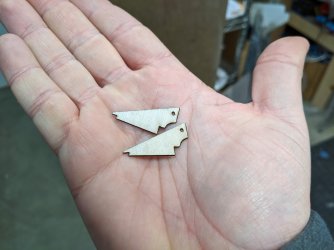
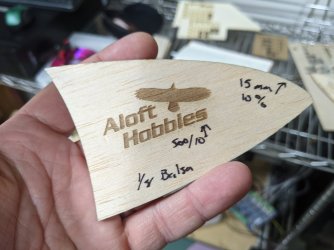
Working on recipes. 1/32 cuts very nice, seen in my hand below.
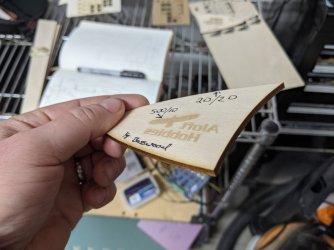
1/4 ACX construction ply is not going to cut thru, will grab some birch next time.
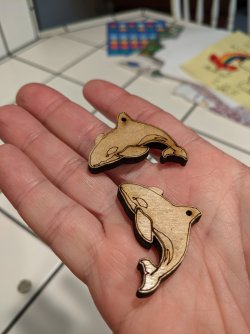
Mahogany 1/8 cuts nice.
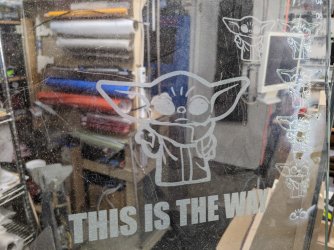
Also engraved some glass which was really quick and easy.


Pretty much made for balsa and basswood. Cuts so nice.


This is 1/8 mahogany, one pass.


On my todo list is to figure out if there is a "materials" library in lightburn i can start setting up. That way i can just select "Birch 6mm From aloft" instead of referencing my notes to input it every time. Also need to get some better/more LEDS inside and externally on the back of the cart. I have a rule in my shop that anything that heats up has bright lights that are on if the machine has power. That way i can easily glance around when leaving the shop to see if anything is on. One time i left a laminating iron on all day on my workbench and it scared me pretty bad.
 

thenated0g

Drinker of coffee, Maker of things
Mentor
So 3 days now of using it and really happy. Still working on recipes and i have found that the makeup of plywood has much more to do with its "cutability" than its thickness. IE 1/4 construction plywood is almost impossible to cut half way thru whereas 6mm birch ply cuts beautifully at 17mah (21 is my max power). I have used it to do a coaster engraving and it is noticeably finer/sharper than my little diode laser. In the picture below the bottom coaster is diode, top is Co2. I have only started one fire so far lol. Looked away for a second when testing foamboard and my default test quickly got past its ignition point.

The power percentage increase in Lightburn does not linearly match the mah output of the laser. Like 5% does nothing and at 8% all of the sudden its cutting thru. 100% power is 27mah and 60% power is 21mah, which is 80% of 27mah. So 60% in lightburn is my max setting. This is exactly why the first mod i did was an analog ammeter as linked in the first post.

As seen below i tested some 1mm craft foam (bottom of coasters), some 5-6mm leather. A monogram out of 1/8 Mahogany for the in laws, engraved coasters from the wood pile, 6mm birch and foamboard.

Foamboard and craft foam cut really nice and fast. Leather still smells like ass while burning, but the engraving is significantly better than my diode. that design to the left of my name was a big hot mess previously and now i can cut the design out, before i had to use a razer. Also this thing hauls booty while engraving. On my diode laser my max speed was about 2,500mm/minute, but on this im just setting it to 500mm/s which is 30,000mms? Is that math right? Its fast. Like 25 minute jobs down to 5 minutes.

Birch definitely is the way to go for the future when ordering materials, it cuts really nice. Still need to test fiberglass and carbon sheet goods.

Back to the workshop.


Did a long 45 minute burn last night. Was supposed to be 1/8 and i did 1/4. I can salvage it by redoing the decorative parts and stand out of 1/8. The part that was interesting to me was that it rasied the water temp in my bucket from 64f to 69f, so its definitely putting out some heat.


Finished some gifts for the in laws, love me some shellac.


And stickers are mutliplying


I was able to cut thru some 3mm fiberglass plate but it was extra crispy, not something i would want to use. Part was HOT. Will keep adjusting settings and see what i can get.

5mm leather engraves and cuts pretty nice, this is about 80mm across and 5mm thick.
index.php
 

Corsair714

Well-known member
I so want to get one of those. There's no way though. I can not afford that. I wish there was someone local I could just pay to lazer cut stuff for me.
 

thenated0g

Drinker of coffee, Maker of things
Mentor
I totally understand. $1,700 is not a small amount to drop on one tool. In my case I have an opportunity to create and sell some slope soaring kits. I will be able to cut out control horns, wingtips, elevons, parts needed for packing, and any number of other parts. For instance if i was going to purchase dubro (which are great and worth it) control horns it would add about $1.5 ish per kit whereas if i cut my own stuff out of birch its like 5 cents per kit. And when you take into account all the parts i would have to purchase vs making myself and trying to get a kit as cheap as possible...all those things add up.
 

FoamyDM

Building Fool-Flying Noob
Moderator
What is your itemized payback runtime or payback runtime cost? $1700/ (170?) hrs payback runtime period = $/min of Run-time. that's running ~60 hrs per year (15% waste time).
40 horns = (say) 20min = 0.5 min / horn x $ (therotically 0.25)/ minute = 13 cents / part

just curious on the business numbers. This is likely as much a hobby purchase as a business one.
 

thenated0g

Drinker of coffee, Maker of things
Mentor
Well the other part i didn't share in this build is that i have had a diode laser and been loving it for gifts and making things to sell. It really just tickled something in my brain that i had thought 3d printing was going to but didnt. Its just been really fun coming up with different projects on it. But i would repeatedly run into issues where i couldn't do something on the 5.5w it had. So i had been looking around at all the usual options like the glowforge etc before i even decided to start making models. Heres some of the diode stuff i have done in the past:

IMG_20200913_162923.jpg IMG_20200923_200738.jpg PXL_20200929_182533130.jpg PXL_20200930_224855971.jpg PXL_20201001_001559716.jpg PXL_20201004_212225596.jpg PXL_20201005_022259967.jpg PXL_20201010_150036949.jpg PXL_20201020_025140089.jpg
 

thenated0g

Drinker of coffee, Maker of things
Mentor
Got to test some colored paper, not cardstock but thicker than normal. Its some Martha Stewart paper pack from Michaels. Cuts super fast at low power.
PXL_20201217_142126542.jpg
 

CampRobber

Active member
I've had a CO2 laser for years and my favorite trick is one-off self-jigging monocoque components. Maybe any sane hobbyist would just 3d-print this, but if you design correctly, you can just dab it together with woodglue and wrap a bunch of rubber bands around it and have it come out perfect every time. With thin wood (this is 1/16" but nom. 0.050" Okoume) you can get modest curves too. The gears are also laser cut, acrylic, using Matias Wandel's gear generator program, with a laser cut servo spline.

N8_6812_Nacelle.JPG
 

thenated0g

Drinker of coffee, Maker of things
Mentor
That's awesome. Yeah laser cutting has really has really tickled something in my brain that i thought 3d printing would. I 3d printed a bunch of stuff for a week or so and just lost total interest but i have been doing laser cutting projects/engraving for almost every day for a few months now and am loving it.
 

thenated0g

Drinker of coffee, Maker of things
Mentor
Finally got all the "standard" chinese laser mods done. Already had done the exhaust system. This morning I added more LED, specifically pointing away from the door so you can see and record video. The built in one is in the back facing right towards you.


Surface mounted the ammeter.


And I picked up a magnetic 1/4 20 adapter for my camera.


thenated0g

Drinker of coffee, Maker of things
Mentor
Had some success cutting 2mm coroplast last night. I could never get the standard political sign stuff, around 5mm i think, to cut. Those vertical flutes would not cut thru and the back side would be melted out. This 2mm stuff cuts really nice, there is just enough material left to hold it in place making it very easy to "snap" out by hand.
PXL_20201222_014234864.jpg PXL_20201222_014242147.jpg
 

thenated0g

Drinker of coffee, Maker of things
Mentor
One interesting thing i have run into with the CO2 vs Diode while engraving is that the results are totally different. I haven't looked anything up yet, but my current guess is the visible light spectrum of the diode vs the infrared of the co2. The issue is that I was used to the diode leaving a nice dark char, making the engrave totally stand out. The co2 on the other hand leaves no char, its almost like a cnc bit in that regard, it just removes material. Now I'm not complaining, these two signs are similar in size, but the co2 did it in 10 minutes and is deeper whereas the diode RCafter hours one was like a 45 minute burn. Just need to adjust my process to either paint the surface first or in this case I'm going to do a test of sealing it and than put some watered down acrylic into the low spots and wipe the excess away.
PXL_20201020_025140089.jpg PXL_20201223_155259180.jpg PXL_20201223_155843318.jpg
 

thenated0g

Drinker of coffee, Maker of things
Mentor
Didnt get as much shop time over holiday as i thought i would, but did get some engraving and cutting in.
Machine loves anything in the 1/8 range. Engraving paint off stuff is a breeze and finally i can really bite into rocks. Its not super clean, but my daughter things its cool. And apparently it will remove bluing off of gun stuff and does plastic gun stocks very easily.
PXL_20201226_004945065.jpg PXL_20201226_005204483.jpg PXL_20201226_005209425.jpg PXL_20210101_220844456.jpg PXL_20210101_220903557.jpg PXL_20210102_003330057.jpg PXL_20210102_004000980.jpg PXL_20210102_200725072.jpg PXL_20210102_200737328.jpg
 

PsyBorg

Wake up! Time to fly!
That is cool stuff Nate.

The scenery pics remind me of what I used to do as a kid with the old wood burning stuff. I would cut out scenes like that and layer them to make a 3d or diorama type thing then accent the edges and details with wood burning.

I did one where the view was from a tree stand in the woods and it focused down to a huge Buck in the lower center distance. Last I knew that still hangs on the wall at my grandparents house.
 

jhitesma

Some guy in the desert
Mentor
Very nice! I'm actually looking at working on my 40w laser again I did a bit of work on it back in the spring...but mostly took a few steps back upgrading the mirrors and lens throwing the alignment totally out of whack then loosing patience trying to get it dialed back in.

It's funny though. I actually wanted a laser more than a 3D printer since I had lots of ideas what to do with a laser but only saw a 3d printer as a toy. But I've actually found I do WAY more with my 3D printer than my lasers. I actually have a hard time remembering the projects I wanted to do with the laser before I had one and find myself doing projects that were originally designed for lasers as 3D prints.

But...a large part of that is because the laser is just so much bigger and having to deal with the chilling and exhaust issues - neither of which I need to deal with when 3D printing.

The other part is because my 3D printers mostly live in my house (though the resin printers have been moved out to the shop - they're almost silent but very messy and stinky) and I just don't get a lot of time out in my shop anymore. But - that's also why I'm looking to revive my laser again. I've decided that instead of trying to make room for it in my back room and cutting a hole in the wall for exhaust I'm going to get rid of my large format plotter and put the laser out in my shop where the plotter was. Since I built the CNC I haven't used the plotter other than as an extra flat surface to put things on. The lasers footprint is almost identical so it should fit nicely there. And I'm much more inclined to cut an exhaust hole in the wall of my shop. I'll still have to deal with cooling. But the shop has it's own AC so that should help with that as well.

Honestly with a few years of FDM printing, about 6 months of SLA printing, and a few years of having lasers it's less a matter of me preferring one over the other - and more a matter of different tools for different jobs. Yeah - there are still things that could be done on laser or as 3D prints which I tend to go with prints on...but I really like having the option of all 3 processes since they all do different things better!
 

thenated0g

Drinker of coffee, Maker of things
Mentor
Strange i haven't had any issues with cooling or exhaust. But i have a finished shop in the back of my attached garage so i think it keeps the temp pretty moderate.
 

thenated0g

Drinker of coffee, Maker of things
Mentor
So after a very frustrating start to "lasering" this weekend i finally discovered a fundamental thing and i have a much better understanding of the different issues i have been experiencing lately. Basically what has been happening is i will do some smaller test cuts on the left side of the table. It looks amazing, no burning on top, cuts cleanly thru on the bottom. So i go to do a full table cut and the right half of the table looks like garbage on top, tons of shadow burns around the cuts, and the bottom almost doesn't even cut thru in most spots on the right. What i realized pretty quick was the wood was not the same thickness or was raised slightly and so i couldn't set my cutting depth the same for the whole table.

Problem number two is that omtech sold me this table with the specific feature of "dual passthrough doors" so you can put pieces in larger than the cutting area. Well the problem with that is the closest i can get the materials to the nozzle is about 112mm. But to get a good cut it needs to be about 8mm at most. So impossible basically in current setup. Yeah i sent some nasty grams to tech support. And they have zero answers for me.

I dont remember the exact google/youtube search that led me to the answer to this but basically what it comes down to is that i have a specialized lens for engraving. Here is a nice pdf that kind of goes thru the different types of lenses, ill kind of sum it up here:
https://www.engraversnetwork.com/files/Choosing-the-right-Laser-lens-tip-sheet.pdf

Basically there are different lenses for different tasks. They are rated in inches. The distance (focal distance) from the lens to the cutting material. On the one side you have 1.5 inches and on the other extreme you have 5 inches. Now there are others but these are the major ones.
1610394944833.png


Here's the major point that i came to while reading this pdf and watching a bunch of comparison videos. The closer the focal length, the smaller the depth of focus. So in the case of the 1.5" lens, that i have, the depth of focus, the area that it cuts, is tiny. This is why the wood raising up even a couple of mm would change how it was cutting. Im trying to cut with an engraving lens. As you go up larger in focal length, that depth of focus gets significantly larger. The 2.5" for instance is good for up to 5/8" thickness.

And now i know that with a 4" lens i can actually use the passthrough doors on my table. Basically omtech doesnt know how to use the tables they sell. I would buy from them again, but now my expectations have been set.

So trying to teach myself this on my own i am learning the hard way. But it looks like a lot of guys just have a full range of lens' so they can switch them out depending on the task. I have a 2.5" on order from amazon, they are like $22. I tested it this morning and it takes less than a minute to drop the old parts out and put the new one in.

I am also assuming units like glowforges have a more general use lens like a 2.5 as it can be used for up to 500dpi engraving and nice cutting up to 1/2" so this may be the lens i just keep in it from now on. Ill post once i get it installed.

As far as cool stuff i got to once i got over that slight bump, i got my lightburn camera installed, its pretty slick. Lets me place my designs on material using the camera, glowforge style:
PXL_20210111_165032802.jpg PXL_20210111_165052960.jpg PXL_20210111_165048767.jpg PXL_20210111_165021197.jpg PXL_20210111_165016885.jpg

And played around with some 1/8 acrylic this weekend as well. needs some leds.
PXL_20210110_015034253.jpg PXL_20210110_015021209.jpg PXL_20210109_192813773.jpg
 
Last edited: