80" PT-17: Flite Fest 2023 Community Challenge – Barnstormers!

Flying Farm Kid

Active member

Attachments

  • IMG_0292.jpg
    IMG_0292.jpg
    150.8 KB · Views: 0

wilmracer

I build things that fly (sometimes)
Mentor
Looks good I just started my stearman
I just finished cutting out the foam.
Here is my build thread.
https://forum.flitetest.com/index.p...rmer-challenge-pt-17-build.74125/#post-747578

Looking forward to watching your progress! The more Stearman the better!!!

Test prints for the Radial have started. So far so good and I'll grab some shots tonight. The CAD model is sized for a 10.8" diameter print. I expect with a decent printer you could get down to half that. I'll be giving that a shot once I get the big one printed. If I need to tweak the files for a 5.4" version I will. I want this to work for the standard size as well.

In related Stearman news a gentleman found me on facebook from a post in a Stearman Restoration group. Apparently he was the owner of N57TH back in the 90's. He'll be a great resource for info. He was the one who converted the front seat to the tandem seat with the larger windshield. He has some interesting stories, including that he was changing the fuel float gauge the morning of 9/11. Here is a picture he sent. Lucille had a spinner years ago. She had one when my uncle got her but he doesn't remember what happened to it. I'll keep my eyes open for one.

Look at that shiny, freshly overhauled engine!
 

Attachments

  • received_215199337881430.jpeg
    received_215199337881430.jpeg
    715.5 KB · Views: 0

wilmracer

I build things that fly (sometimes)
Mentor
Initial prints look pretty good. Looks like about 5.5 hours of printing per cylinder (front and back) so I'll be getting these printed first while tweaking the CAD model and working on the airframe. Planning to start on the cabane struts tonight.

On Edit: One more thing. I MIGHT not use it, but since I'll likely need the nose weight I picked up a 2 speaker sound system that includes the R-985 (aka Wasp Jr.) audio options. Hoping it is loud enough to add some realism to the model. We'll see!
 

Attachments

  • 20230424_223144.jpg
    20230424_223144.jpg
    809 KB · Views: 0
  • 20230424_174104.jpg
    20230424_174104.jpg
    588.7 KB · Views: 0
Last edited:

Flying Farm Kid

Active member
Initial prints look pretty good. Looks like about 5.5 hours of printing per cylinder (front and back) so I'll be getting these printed first while tweaking the CAD model and working on the airframe. Planning to start on the cabane struts tonight.

On Edit: One more thing. I MIGHT not use it, but since I'll likely need the nose weight I picked up a 2 speaker sound system that includes the R-985 (aka Wasp Jr.) audio options. Hoping it is loud enough to add some realism to the model. We'll see!
When do you think you will be releacing the engine files i have a seven cilinder engine printed out right now but a nine cilinder would be much better. It is also looking great I can't wait to see it fly.
 

wilmracer

I build things that fly (sometimes)
Mentor
When do you think you will be releacing the engine files i have a seven cilinder engine printed out right now but a nine cilinder would be much better. It is also looking great I can't wait to see it fly.
I'd like to get the first one fully printed before uploading the files, just in case modifications are needed. I'm betting 2 weeks or so, just given the prnt times involved at this size. Each cylinder takes 5.5 hours for both halves, so I'm at almost 50 straight hours of printing for just those.
 

Flying Farm Kid

Active member
I'd like to get the first one fully printed before uploading the files, just in case modifications are needed. I'm betting 2 weeks or so, just given the prnt times involved at this size. Each cylinder takes 5.5 hours for both halves, so I'm at almost 50 straight hours of printing for just those.
Ok let me know when they are out, and that is a lot of printing good luck!
 

wilmracer

I build things that fly (sometimes)
Mentor
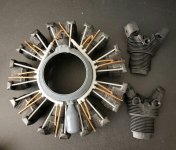
Almost done with the Cylinders. Printing 10 sets so I'll have a spare just in case. Hopefully on to other parts soon. I may have to pause the printing on the engine so I can print some parts related to the struts.

The finished engine in the picture is the one I designed for the B17. This one will be significantly bigger.
 

Attachments

  • 20230428_092456.jpg
    20230428_092456.jpg
    951.6 KB · Views: 0
  • 20230428_092547.jpg
    20230428_092547.jpg
    702 KB · Views: 0

wilmracer

I build things that fly (sometimes)
Mentor
Several days of printing in the bag, many more days to go. It will need the usual post printing cleanup but I'm happy with it so far.
 

Attachments

  • 20230430_084035.jpg
    20230430_084035.jpg
    2.1 MB · Views: 0

wilmracer

I build things that fly (sometimes)
Mentor
Quick update. Printing continues. Another day or two and I should have all the parts printed for this one. I've found a few tweaks I want to make but this may be good for this build. Lucille isn't what I'd call "pristine" and the imperfections I want to fix will probably be hidden under weathering and grime .

I may need to trim the intake pipes, or maybe print them at 96% or so. That would give me a touch of clearance before sanding (which I'll then lose when I paint). Included a shot of the rear of a wasp jr. I didn't go nuts with the supercharger connection to the intake pipes but it will hardly be visible and I didn't want to cut into interior space for the motor.
 

Attachments

  • 20230502_063604.jpg
    20230502_063604.jpg
    2.2 MB · Views: 0
  • 20230502_063630.jpg
    20230502_063630.jpg
    973.6 KB · Views: 0
  • 20230502_063500.jpg
    20230502_063500.jpg
    4.8 MB · Views: 0
  • 2256852638_af49c8c893_b.jpg
    2256852638_af49c8c893_b.jpg
    297.4 KB · Views: 0

wilmracer

I build things that fly (sometimes)
Mentor
Keeping the printer hot... My goal is to have all the core engine parts printed before this weekend and to finalize the strut mounts and struts/cabanes over the weekend. After that the rest is really simple stuff and detailing.
 

Attachments

  • 20230503_221725.jpg
    20230503_221725.jpg
    3.8 MB · Views: 0
  • 20230503_221555.jpg
    20230503_221555.jpg
    3.2 MB · Views: 0

Yankee2003

Well-known member
Keeping the printer hot... My goal is to have all the core engine parts printed before this weekend and to finalize the strut mounts and struts/cabanes over the weekend. After that the rest is really simple stuff and detailing.
Amazing work. I look forward to seeing this one.
I see your friends at the Flying Circus are having their opening weekend this Sunday. Any chance Lucille makes an appearance sometime this year?
 

wilmracer

I build things that fly (sometimes)
Mentor
Amazing work. I look forward to seeing this one.
I see your friends at the Flying Circus are having their opening weekend this Sunday. Any chance Lucille makes an appearance sometime this year?

Maybe! If not this year then next for sure. She won't be part of the show though, that's for sure.

She still needs a new tach cable installed before she's ready to fly, and I've still got quite a way to go before I'd be flying her there myself. She WON'T be making any aerobatic appearances there anytime soon though. I want to get some worn parts replaced before she's upside down again :D.
 

Yankee2003

Well-known member
Maybe! If not this year then next for sure. She won't be part of the show though, that's for sure.

She still needs a new tach cable installed before she's ready to fly, and I've still got quite a way to go before I'd be flying her there myself. She WON'T be making any aerobatic appearances there anytime soon though. I want to get some worn parts replaced before she's upside down again :D.
I will keep an eye out for her….
 

Flying Farm Kid

Active member
Keeping the printer hot... My goal is to have all the core engine parts printed before this weekend and to finalize the strut mounts and struts/cabanes over the weekend. After that the rest is really simple stuff and detailing.
Thar looks fantastic My printer has been busy to I am making a fully 3d printed Beechcraft rite now.
All I have left is the tail, and of course assembly
Those wheel suspension units look awesome I hope they will be out by the time mine is done.
IMG_0299.JPG
 

wilmracer

I build things that fly (sometimes)
Mentor
Thar looks fantastic My printer has been busy to I am making a fully 3d printed Beechcraft rite now.
All I have left is the tail, and of course assembly
Those wheel suspension units look awesome I hope they will be out by the time mine is done.
View attachment 237426
That looks great! What is the span?

Test print of the strut covers is on the printer right now. Tomorrow I need to model and print the spark plugs and consider the mount for the oil cooler. There are a few other parts left to model but I'll probably wait until I'm ready to mount it to design those.
 

Flying Farm Kid

Active member
That looks great! What is the span?

Test print of the strut covers is on the printer right now. Tomorrow I need to model and print the spark plugs and consider the mount for the oil cooler. There are a few other parts left to model but I'll probably wait until I'm ready to mount it to design those.
It is 72 cm here is the design
https://www.thingiverse.com/thing:4086018
It looks fantastic printed.
Just wondering the 3d printed landing gear parts, will they mount to the stock landign gear or do you have to custom make it for them?

Thanks!
 

wilmracer

I build things that fly (sometimes)
Mentor
It is 72 cm here is the design
https://www.thingiverse.com/thing:4086018
It looks fantastic printed.
Just wondering the 3d printed landing gear parts, will they mount to the stock landign gear or do you have to custom make it for them?

Thanks!

I designed the parts for the 200% and will validate everything works well for printed at 50% for the stock size. The gear covers just fit together over the bent gear wire and will be glued and clamped together. These are sized for 1/4" wire so I'd expect no issue with 1/8th wire. They could be sanded out further if needed, or secured with silicone to fill a gap if something thinner was used.

You will want to ensure that the tires you're using won't flex and rub, and you may want to use an extra wheel collet to make sure the hub doesn't rub on the printed part.
 

Attachments

  • 20230507_170557.jpg
    20230507_170557.jpg
    539.5 KB · Views: 0
  • 20230507_165636.jpg
    20230507_165636.jpg
    668.2 KB · Views: 0

Flying Farm Kid

Active member
I designed the parts for the 200% and will validate everything works well for printed at 50% for the stock size. The gear covers just fit together over the bent gear wire and will be glued and clamped together. These are sized for 1/4" wire so I'd expect no issue with 1/8th wire. They could be sanded out further if needed, or secured with silicone to fill a gap if something thinner was used.

You will want to ensure that the tires you're using won't flex and rub, and you may want to use an extra wheel collet to make sure the hub doesn't rub on the printed part.
Awesome I cant wait to see the finished product looks great
I am hopefully going to get my Stearman done or mostly done tonight I will try to post the photos on my build thread.
It goes together great thanks for all of the work you guys put into it!