Ft simple cub group build thread!

Hai-Lee

Old and Bold RC PILOT
I was having trouble with the whole build. Don’t worry, I’ll be back. Just need more experience. If I try again I won’t use the FT technique. I can do other easier techniques but I need to acquire more design, cutting & bonding skills. Simple is good for me right now. I might take the fuselage & re-cut it into another design. I’ve had good luck doing mods on existing designs to make them easier to build. Thanks

Additionally, I don’t like that trailing edge C fold. It goes against everything I was ever taught about aerodynamics. Trailing edges should be sharp, not flat, leading edges should be round, not sharp. 2 thicknesses of foam board is a lot, 3 seems too much, Experimental Airlines tapered trailing edges are best but not easy to do nicely.
The stepped underside of the trailing edge actually gives a little extra lift as you would find in an undercambered airfoil and also a little extra drag. The TE step is there to support the TE and to give the correct airfoil profile.

The molecules of air travel in all directions at around 900MPH at sea level and so the time it takes to fill the theoretical vacuum at the because of the blunt TE is very small and the drag increase is minimal especially as the TE upper and lower directions are identical.

Sharp TEs are OK but you need to consider structural rigidity. A TE that is razor sharp but flexible is useless and introduces a serious problem called flutter. Sure rounded LEs are recommended so that the airflow is split smoothly and so that you do not get sudden points of high pressure as the wing angle of incidence changes. Again a model does not have the high wing wing loadings and speeds of a commercial or full sized aircraft.

With the Reynolds numbers applicable to models the FT LE folds are plenty rounded and the TEs are plenty sharp. I have tried sharp TEs and more rounded and better curves for the wing profiles and LEs. The differences are not as great as you might think and I now reserve such details for those I want to either appear more scale or fly at the highest of speeds.

Just my thoughts!

Have fun!
 

Figure9

Elite member
The stepped underside of the trailing edge actually gives a little extra lift as you would find in an undercambered airfoil and also a little extra drag. The TE step is there to support the TE and to give the correct airfoil profile.

The molecules of air travel in all directions at around 900MPH at sea level and so the time it takes to fill the theoretical vacuum at the because of the blunt TE is very small and the drag increase is minimal especially as the TE upper and lower directions are identical.

Sharp TEs are OK but you need to consider structural rigidity. A TE that is razor sharp but flexible is useless and introduces a serious problem called flutter. Sure rounded LEs are recommended so that the airflow is split smoothly and so that you do not get sudden points of high pressure as the wing angle of incidence changes. Again a model does not have the high wing wing loadings and speeds of a commercial or full sized aircraft.

With the Reynolds numbers applicable to models the FT LE folds are plenty rounded and the TEs are plenty sharp. I have tried sharp TEs and more rounded and better curves for the wing profiles and LEs. The differences are not as great as you might think and I now reserve such details for those I want to either appear more scale or fly at the highest of speeds.

Just my thoughts!

Have fun!

No argument from here. Especially as applies to foam board RC model aircraft. My applications of full size are not equivalent to the science for models.
Given that the drag increase is minimal with 3 thicknesses at the trailing edge. Then if you have only the two thicknesses of the upper & lower wing surfaces at the trailing edge, assuming you have your desired airfoil profile & no aerodynamic or aileron flutter in flight, you’re good to go.
 

Hai-Lee

Old and Bold RC PILOT
No argument from here. Especially as applies to foam board RC model aircraft. My applications of full size are not equivalent to the science for models.
Given that the drag increase is minimal with 3 thicknesses at the trailing edge. Then if you have only the two thicknesses of the upper & lower wing surfaces at the trailing edge, assuming you have your desired airfoil profile & no aerodynamic or aileron flutter in flight, you’re good to go.
Not quite 3 layers of FB as there is a little feature of the airflow that many do not fully appreciate. Just as with a Spoiler, (rear or boot lip mounted wing), the air is circulated in the stepped area and thereby smooth out the airflow as if the step did not exist. It is the same phenomena that allows a KFM wing profile to fly as well as they do.

In summary your eye sees the step but the airflow doesn't.

Just my thoughts!

Have fun!
 

Figure9

Elite member
Not quite 3 layers of FB as there is a little feature of the airflow that many do not fully appreciate. Just as with a Spoiler, (rear or boot lip mounted wing), the air is circulated in the stepped area and thereby smooth out the airflow as if the step did not exist. It is the same phenomena that allows a KFM wing profile to fly as well as they do.

In summary your eye sees the step but the airflow doesn't.

Just my thoughts!

Have fun!

Agree.
 

"Corpse"

Legendary member
Okay, finished the plans for my 150% cub. I'm going with a "Combat Cub" theme. I'll have the flying shark mouth on the nose, an American flag on the tail, and plenty of armor. I also found a bigger motor for my Combat cub. It's a parkzone 480 motor. That should do the trick!

I increased the plan size, but am having trouble putting the parts on the foamboard. My tail plans extend about 5 inches off the long side, and the wings extend 1 inch off the short side. I thought about making the tail seperate, like the Edge 540. @The Hangar said to glue some more foam to the original foamboard. Any other suggestions?
 
Last edited:

The Hangar

Fly harder!
Mentor
Okay, finished the plans for my 150% cub. I'm going with a "Combat Cub" theme. I'll have the flying shark mouth on the nose, an American flag on the tail, and plenty of armor. I also found a bigger motor for my Combat cub. It's a parkzone 400 motor. That should do the trick!

I increased the plan size, but am having trouble putting the parts on the foamboard. My tail plans extend about 5 inches off the long side, and the wings extend 1 inch off the short side. I thought about making the tail seperate, like the Edge 540. @The Hangar said to glue some more foam to the original foamboard. Any other suggestions?
Go for the rimfire!!
 

"Corpse"

Legendary member
Here's what I've got for plans. Now to print 45 pages! I'll also have to mirror the spar by hand, which I can easily do.
 

Attachments

  • 150% Combat Cub pg1.pdf
    51.2 KB · Views: 0
  • 150% Combat Cub pg2.pdf
    53.6 KB · Views: 0
  • 150% Combat Cub pg3.pdf
    37 KB · Views: 0

sh0sey

Member
Took the cub out for some Easter Sunday flying. Perfect weather for it this morning in NC. Hope everyone had a fantastic holiday with family.

While flying today, I had a small issue that I thought I'd see if you guys could help me solve... Every so often, my receiver blanks out on me mid flight for 3-5 seconds. I'm flying along, and then all of a sudden I lose all controls and throttle, the plane goes into idle, and a few seconds later full control and throttle resumes and we're back in action. I don't notice it being an issue of distance from the transmitter as it has happened from near and far on separate occasions. I've never had it happen multiple times in one faith, and it generally only happens once every 2 or 3 flights (often enough to scare me, but not often enough to have figured it out).
It happens on all 3 receivers I use... (2) Admiral RX600s, and (1) OrangeRX R615X. Transmitter is Spektrum DX6e. All other electronics are from FT Power Packs (A, C, and F).

Anyone else experienced this or know how to fix it?
 

"Corpse"

Legendary member
Took the cub out for some Easter Sunday flying. Perfect weather for it this morning in NC. Hope everyone had a fantastic holiday with family.

While flying today, I had a small issue that I thought I'd see if you guys could help me solve... Every so often, my receiver blanks out on me mid flight for 3-5 seconds. I'm flying along, and then all of a sudden I lose all controls and throttle, the plane goes into idle, and a few seconds later full control and throttle resumes and we're back in action. I don't notice it being an issue of distance from the transmitter as it has happened from near and far on separate occasions. I've never had it happen multiple times in one faith, and it generally only happens once every 2 or 3 flights (often enough to scare me, but not often enough to have figured it out).
It happens on all 3 receivers I use... (2) Admiral RX600s, and (1) OrangeRX R615X. Transmitter is Spektrum DX6e. All other electronics are from FT Power Packs (A, C, and F).

Anyone else experienced this or know how to fix it?
One tip I have is to make sure your antennas are away from any other wiring. RX antennas use a polarized signal, so what you should do is put one antenna straight up and one forward or backward. It also helps to not point your antenna directly at the airplane. That is where the least signal is!
 

sh0sey

Member
One tip I have is to make sure your antennas are away from any other wiring. RX antennas use a polarized signal, so what you should do is put one antenna straight up and one forward or backward. It also helps to not point your antenna directly at the airplane. That is where the least signal is!

Great advice! Thank you!

I always wondered the best positioning for the two Rx antenna wires. I’ll be making that adjustment tonight.

Always found it curious about not being able to point the transmitter antenna at the airplane. Even when I bind the receivers, I can be 3 feet away, but if I point the transmitter antenna at the plane/Rx it won’t bind. Fascinating.
 

Hai-Lee

Old and Bold RC PILOT
Took the cub out for some Easter Sunday flying. Perfect weather for it this morning in NC. Hope everyone had a fantastic holiday with family.

While flying today, I had a small issue that I thought I'd see if you guys could help me solve... Every so often, my receiver blanks out on me mid flight for 3-5 seconds. I'm flying along, and then all of a sudden I lose all controls and throttle, the plane goes into idle, and a few seconds later full control and throttle resumes and we're back in action. I don't notice it being an issue of distance from the transmitter as it has happened from near and far on separate occasions. I've never had it happen multiple times in one faith, and it generally only happens once every 2 or 3 flights (often enough to scare me, but not often enough to have figured it out).
It happens on all 3 receivers I use... (2) Admiral RX600s, and (1) OrangeRX R615X. Transmitter is Spektrum DX6e. All other electronics are from FT Power Packs (A, C, and F).

Anyone else experienced this or know how to fix it?
Almost everyone has experienced it at some time but most do not recognise it and blame glitches, poor piloting, or even interference.
It is good that you appear to have a properly set Fail Safe at least. It also appears you have a lot of good luck!

To stop what is effectively a LOS, (Loss of Signal), there are many approaches but for me I purchased a radio system that had multiple Transmit and Receive antennas. I run primarily a Horizontal Antenna polarisation with the Rx antennas at right angles to each other and clear from all metal objects, including wiring.

The signal from an Antenna is maximum at right angles to the antenna. When you point the Tx antenna directly at your plane the direct radio signal almost disappears and any received signal you obtain is most likely just a reflected signal from the ground or another object.

With Spektrum, satellite antennas and compatible receivers are the recommended way to close coverage holes.

Getting a 100% reliable radio connection is a whole field of study in itself, and a career for some.

Have fun!
 

sh0sey

Member
Almost everyone has experienced it at some time but most do not recognise it and blame glitches, poor piloting, or even interference.
It is good that you appear to have a properly set Fail Safe at least. It also appears you have a lot of good luck!

To stop what is effectively a LOS, (Loss of Signal), there are many approaches but for me I purchased a radio system that had multiple Transmit and Receive antennas. I run primarily a Horizontal Antenna polarisation with the Rx antennas at right angles to each other and clear from all metal objects, including wiring.

The signal from an Antenna is maximum at right angles to the antenna. When you point the Tx antenna directly at your plane the direct radio signal almost disappears and any received signal you obtain is most likely just a reflected signal from the ground or another object.

With Spektrum, satellite antennas and compatible receivers are the recommended way to close coverage holes.

Getting a 100% reliable radio connection is a whole field of study in itself, and a career for some.

Have fun!

Good info to know! Thanks for sharing!
I've had unbelievable luck when this has happened. I've stood there with transmitter in hand, jaw dropped, thinking I just lost my plane to the ground, a light pole, or a group of trees only to regain control at the last moment and make a quick turn to safety.

Love learning some of the nuances of the hobby like this.

Previous to doing FT builds, I had only flown eflite BNFs and never have issues. The problem with not having problems though, is that you don't learn anything! What does Tony Robbins say? "Problems are a gift, without problems we would not grow."
This has been the most enjoyable part of the FT process and community. Failure, learning, success, repeat (and sometimes in any order!).
 

"Corpse"

Legendary member
Good info to know! Thanks for sharing!
I've had unbelievable luck when this has happened. I've stood there with transmitter in hand, jaw dropped, thinking I just lost my plane to the ground, a light pole, or a group of trees only to regain control at the last moment and make a quick turn to safety.

Love learning some of the nuances of the hobby like this.

Previous to doing FT builds, I had only flown eflite BNFs and never have issues. The problem with not having problems though, is that you don't learn anything! What does Tony Robbins say? "Problems are a gift, without problems we would not grow."
This has been the most enjoyable part of the FT process and community. Failure, learning, success, repeat (and sometimes in any order!).
Probably my favorite part of this hobby is using the science principles and using them to make your own machine that you are proud of. This doesn't come without problems, but it also doesn't come without learning!
 

"Corpse"

Legendary member
Ok, just finished the front end of the fuselage. This thing will be able to fit a huuuge battery in!
WIN_20200413_10_57_18_Pro.jpg
 

The Hangar

Fly harder!
Mentor
Well I was able to get my cub in the air yesterday and I got to fly another pack through it today! It flies good - not overpowered like I usually do, but it's nice and scale.
1587362735175.png
1587362794685.png


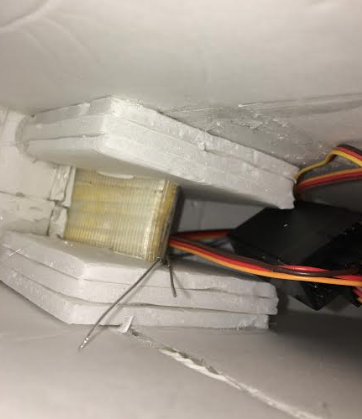
Let's start with the tail. I wanted to do a steerable tail wheel so I used one of the flitetest 1.1 inch mini wheels. I attached it to the rudder surface itself using .047 music wire, but I knew that the rudder hinge right under the slot for the elevator would be put under a lot of stress whenever I land or take off, so I went ahead and cut all the way through the hinge on the bottom part (the top part of the rudder I left normal and did a 45 degree bevel) and used a plastic hinge used for balsa models. After I glued the rudder in with the strengthened hinge, I bent up a piece of music wire and glued it onto the bottom of the rudder. Then I cut two small pieces of basswood to reinforce the rudder and keep the tail wheel glued in place.
1587363204485.png

On the LE of the rudder I left some extra paper and folded it over to make a nice clean seam. You can see the small change I did to the tips of the elevator extending the moving part. Other than that the elevatore is unchanged.
1587363314819.png

In this next picture, you can see how I made the fuselage in multiple pieces, all coming in to create a sort of boxy but smooth surface. I'm happy with how it turned out. The main wheels are 3.5 inch Du-bro bush tires - they work awesome! The landing gear is off of an old crashed balsa model I was given. You can also see what I did with the flap servo - more on that below after I finish showing the landing gear.
1587363629027.png

Although it's sideways, you can see the triplers I put in the fuse for the LG to slide into - and yes - it is removable. :D
1587363707300.png

Alright - here's a close-up on the flaps and ailerons. The ailerons were imbedded into the spar and are jus barely sticking out. That way they look really nice and clean! The flap servo was imbedded into the fuselage with a small slot sticking out as you can see from the picture. I was able to do it this way since I glued the wing into place. The flaps work awesome!! They really help slow the plane down a lot! The two flaps are hooked together with a piece of music wire very similarly to hte way @Grifflyer did on his shrubsmacker.
1587363933224.png

Here's the nose. I decided to do a fixed motor in this one as opposed to a swappable power pod. It's the old b pack motor swinging a 10x4.7 APC slow fly prop. As I mentioned earlier it's not overpowered and doesn't have unlimited vertical, but it's nice and scale.
1587364064367.png

As you can see from the pic I used an "ft elements" simple firewall. It works great!!
1587364138110.png

I made the whole windsheld hinge open which makes it super easy to put in and take out the battery. It's held down by one BBQ skewer. You can also see the battery tray I put in as well.

I'm not done yet though! I still have to add the wing struts, wheel fairings, and nose air intake things. And of course throw on an epic paint scheme similar to this!!
1587364712350.png
 

ScratchBuildMast

Elite member
Well I was able to get my cub in the air yesterday and I got to fly another pack through it today! It flies good - not overpowered like I usually do, but it's nice and scale.
View attachment 166663
View attachment 166664

Let's start with the tail. I wanted to do a steerable tail wheel so I used one of the flitetest 1.1 inch mini wheels. I attached it to the rudder surface itself using .047 music wire, but I knew that the rudder hinge right under the slot for the elevator would be put under a lot of stress whenever I land or take off, so I went ahead and cut all the way through the hinge on the bottom part (the top part of the rudder I left normal and did a 45 degree bevel) and used a plastic hinge used for balsa models. After I glued the rudder in with the strengthened hinge, I bent up a piece of music wire and glued it onto the bottom of the rudder. Then I cut two small pieces of basswood to reinforce the rudder and keep the tail wheel glued in place.
View attachment 166665
On the LE of the rudder I left some extra paper and folded it over to make a nice clean seam. You can see the small change I did to the tips of the elevator extending the moving part. Other than that the elevatore is unchanged.
View attachment 166666
In this next picture, you can see how I made the fuselage in multiple pieces, all coming in to create a sort of boxy but smooth surface. I'm happy with how it turned out. The main wheels are 3.5 inch Du-bro bush tires - they work awesome! The landing gear is off of an old crashed balsa model I was given. You can also see what I did with the flap servo - more on that below after I finish showing the landing gear.
View attachment 166667
Although it's sideways, you can see the triplers I put in the fuse for the LG to slide into - and yes - it is removable. :D
View attachment 166668
Alright - here's a close-up on the flaps and ailerons. The ailerons were imbedded into the spar and are jus barely sticking out. That way they look really nice and clean! The flap servo was imbedded into the fuselage with a small slot sticking out as you can see from the picture. I was able to do it this way since I glued the wing into place. The flaps work awesome!! They really help slow the plane down a lot! The two flaps are hooked together with a piece of music wire very similarly to hte way @Grifflyer did on his shrubsmacker.
View attachment 166669
Here's the nose. I decided to do a fixed motor in this one as opposed to a swappable power pod. It's the old b pack motor swinging a 10x4.7 APC slow fly prop. As I mentioned earlier it's not overpowered and doesn't have unlimited vertical, but it's nice and scale.
View attachment 166670
As you can see from the pic I used an "ft elements" simple firewall. It works great!!
View attachment 166671
I made the whole windsheld hinge open which makes it super easy to put in and take out the battery. It's held down by one BBQ skewer. You can also see the battery tray I put in as well.

I'm not done yet though! I still have to add the wing struts, wheel fairings, and nose air intake things. And of course throw on an epic paint scheme similar to this!!
View attachment 166672
Now you’re making me want to design a master series version, cuz your plane be shmexy!