
You are using an out of date browser. It may not display this or other websites correctly.
You should upgrade or use an alternative browser.
You should upgrade or use an alternative browser.
FTFC'18 WWII Vought XF5U "Flying Flapjack" designed by SP0NZ & LocalFiend
- Thread starter localfiend
- Start date
Thanks guys.
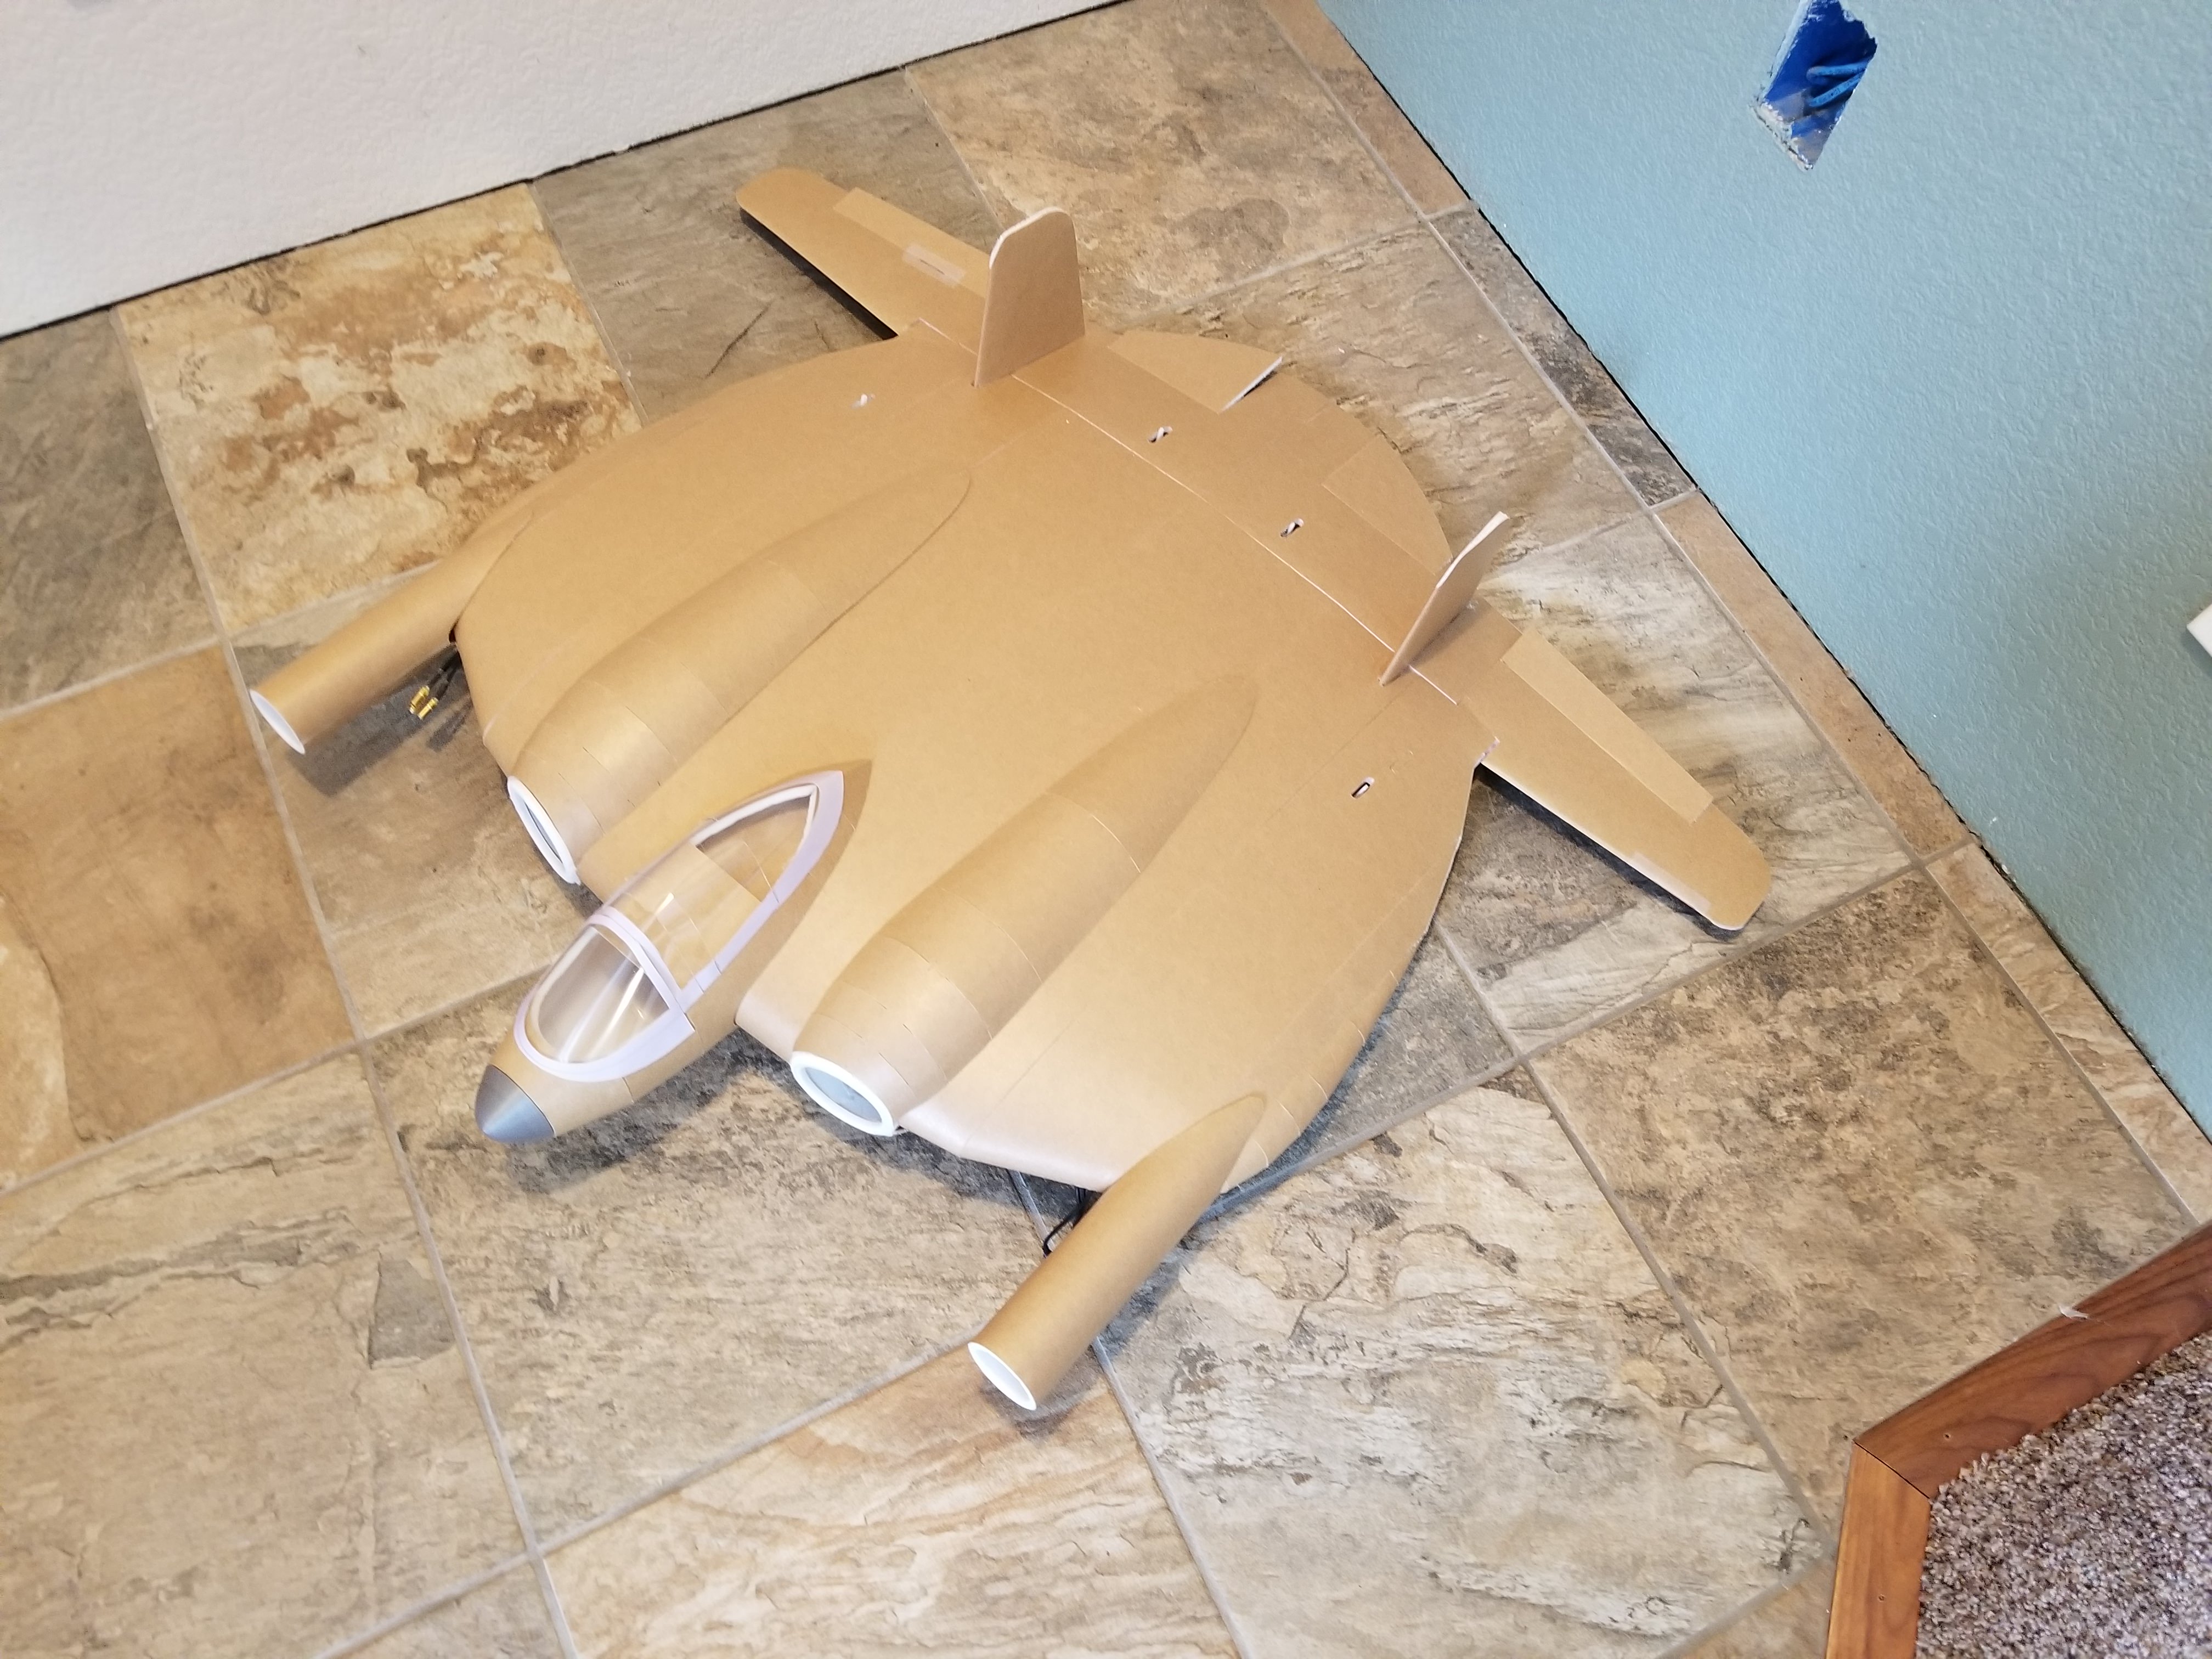
Got the rough prototype done. Just gotta add forward landing gear, and I think it will need to be skis. Just looked outside and we have an inch of snow with more coming down. Gonna start something printing so I can fly tomorrow.
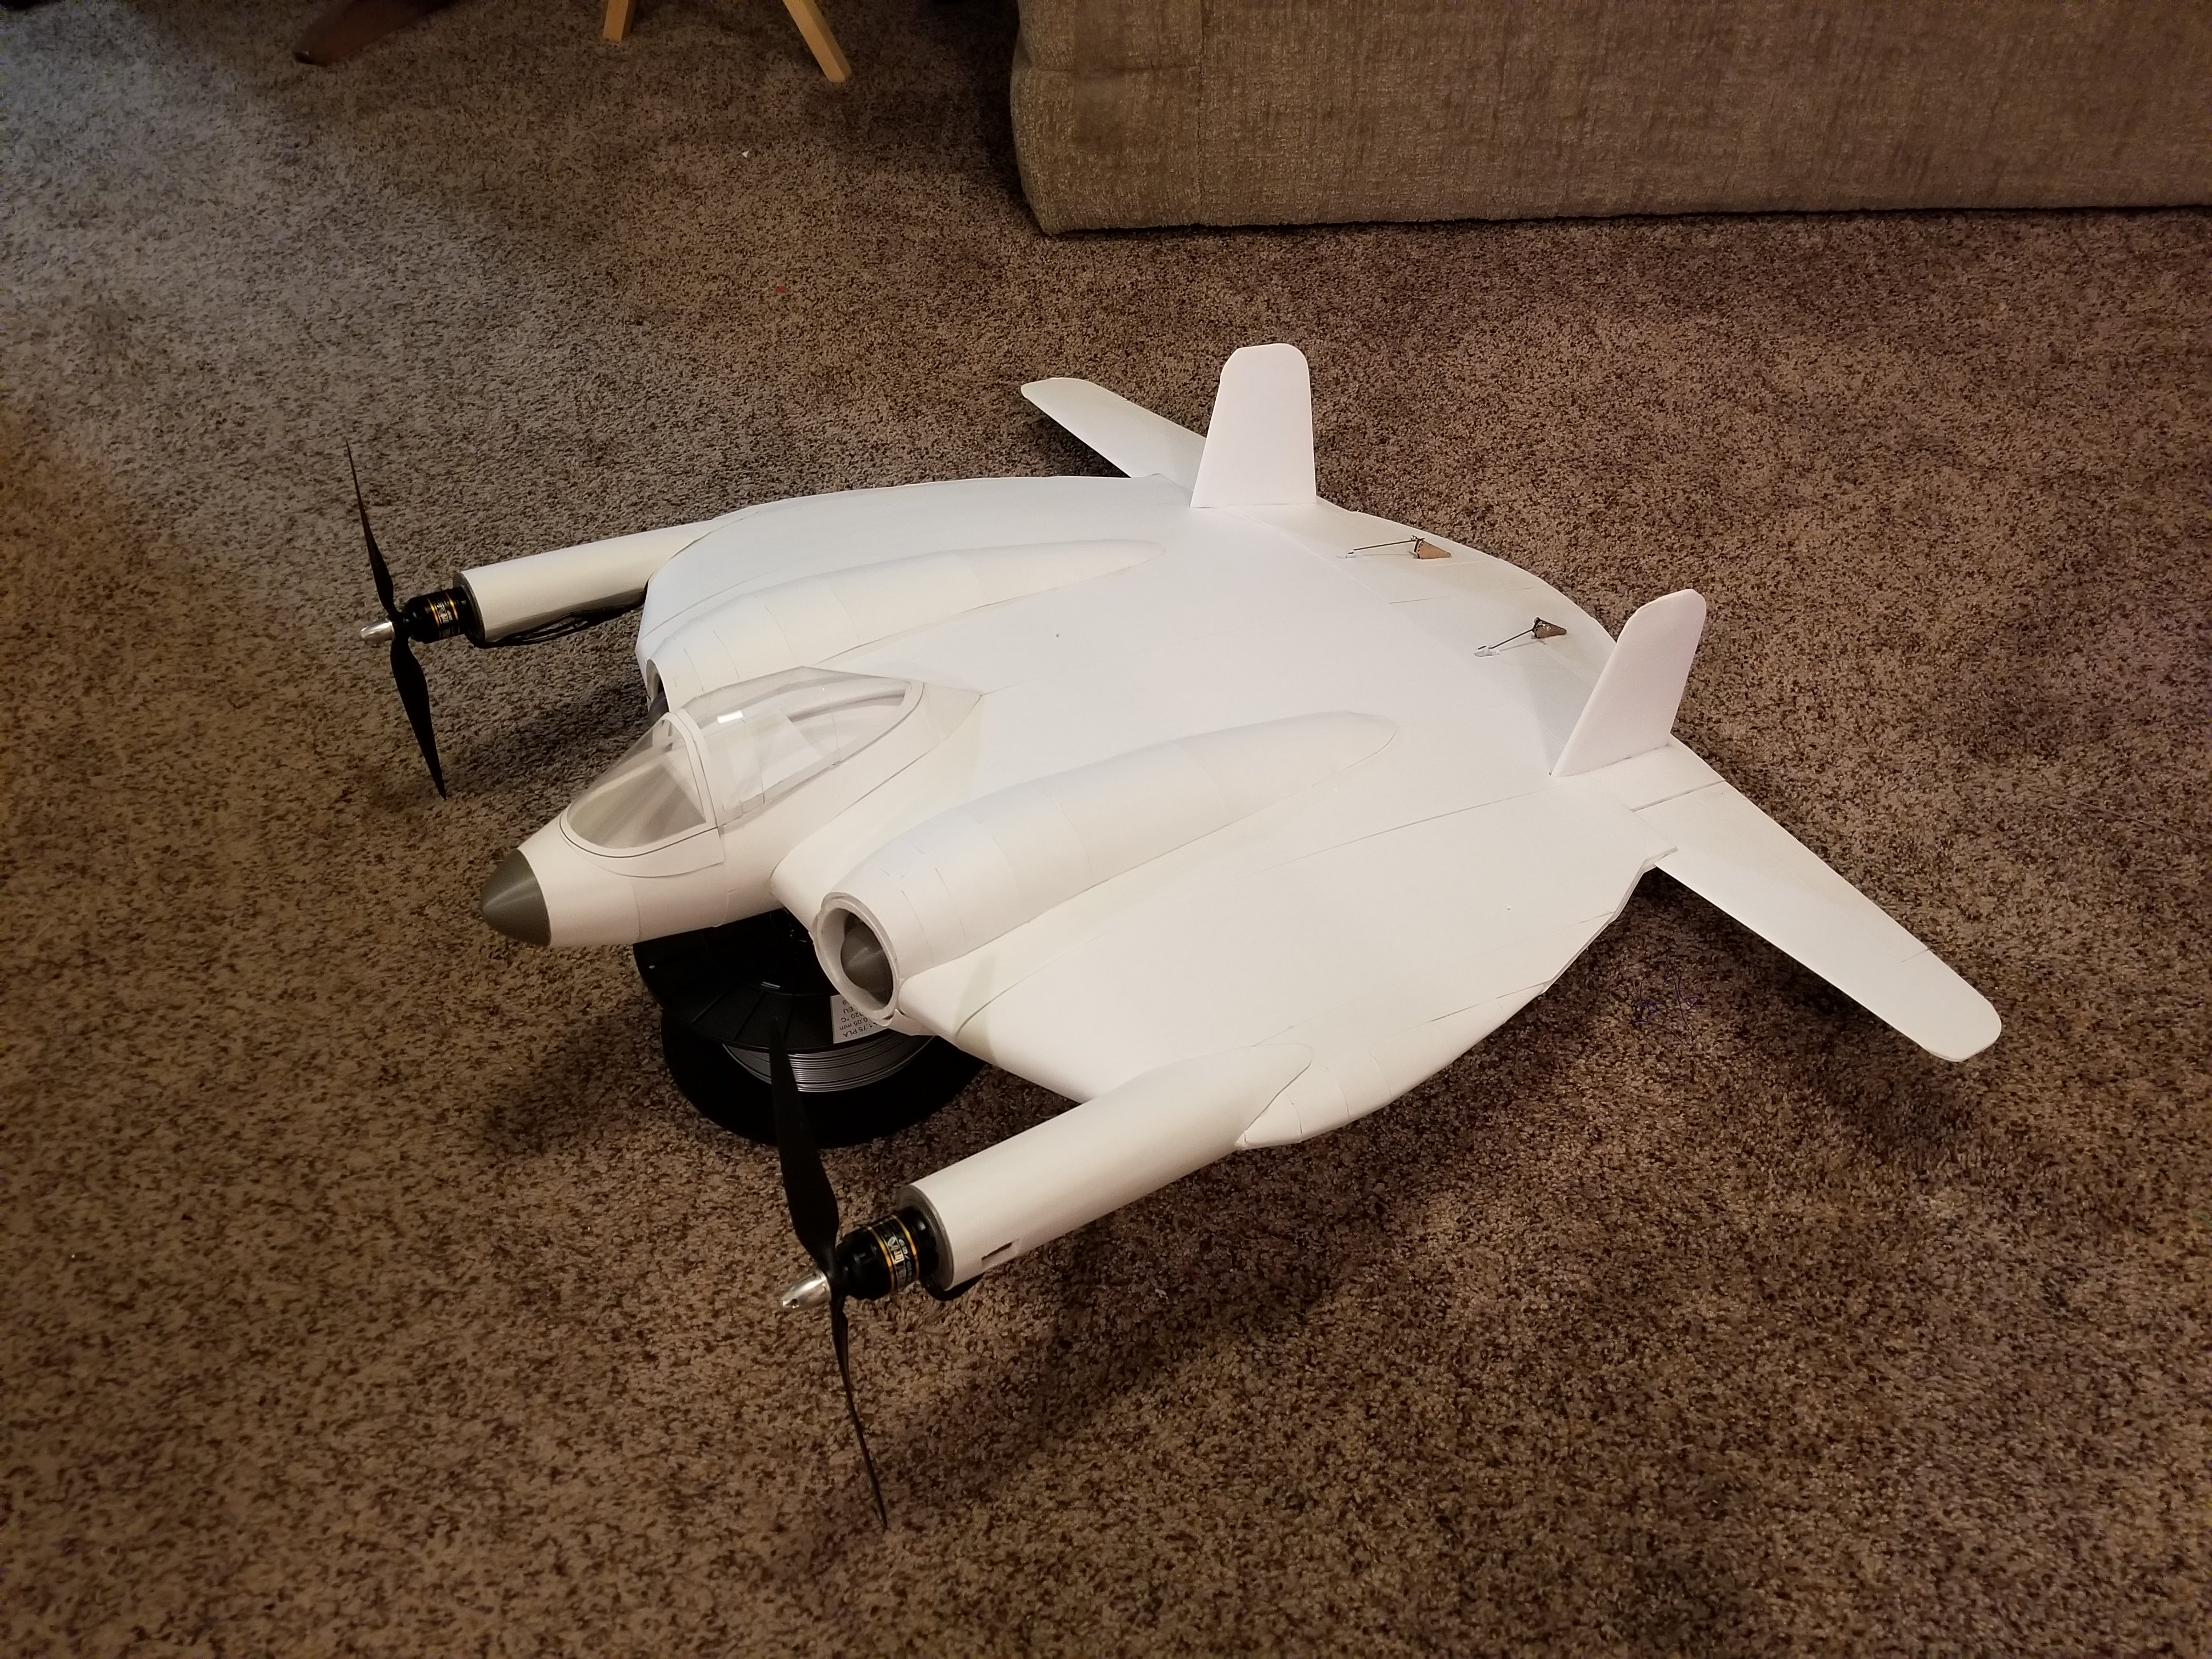
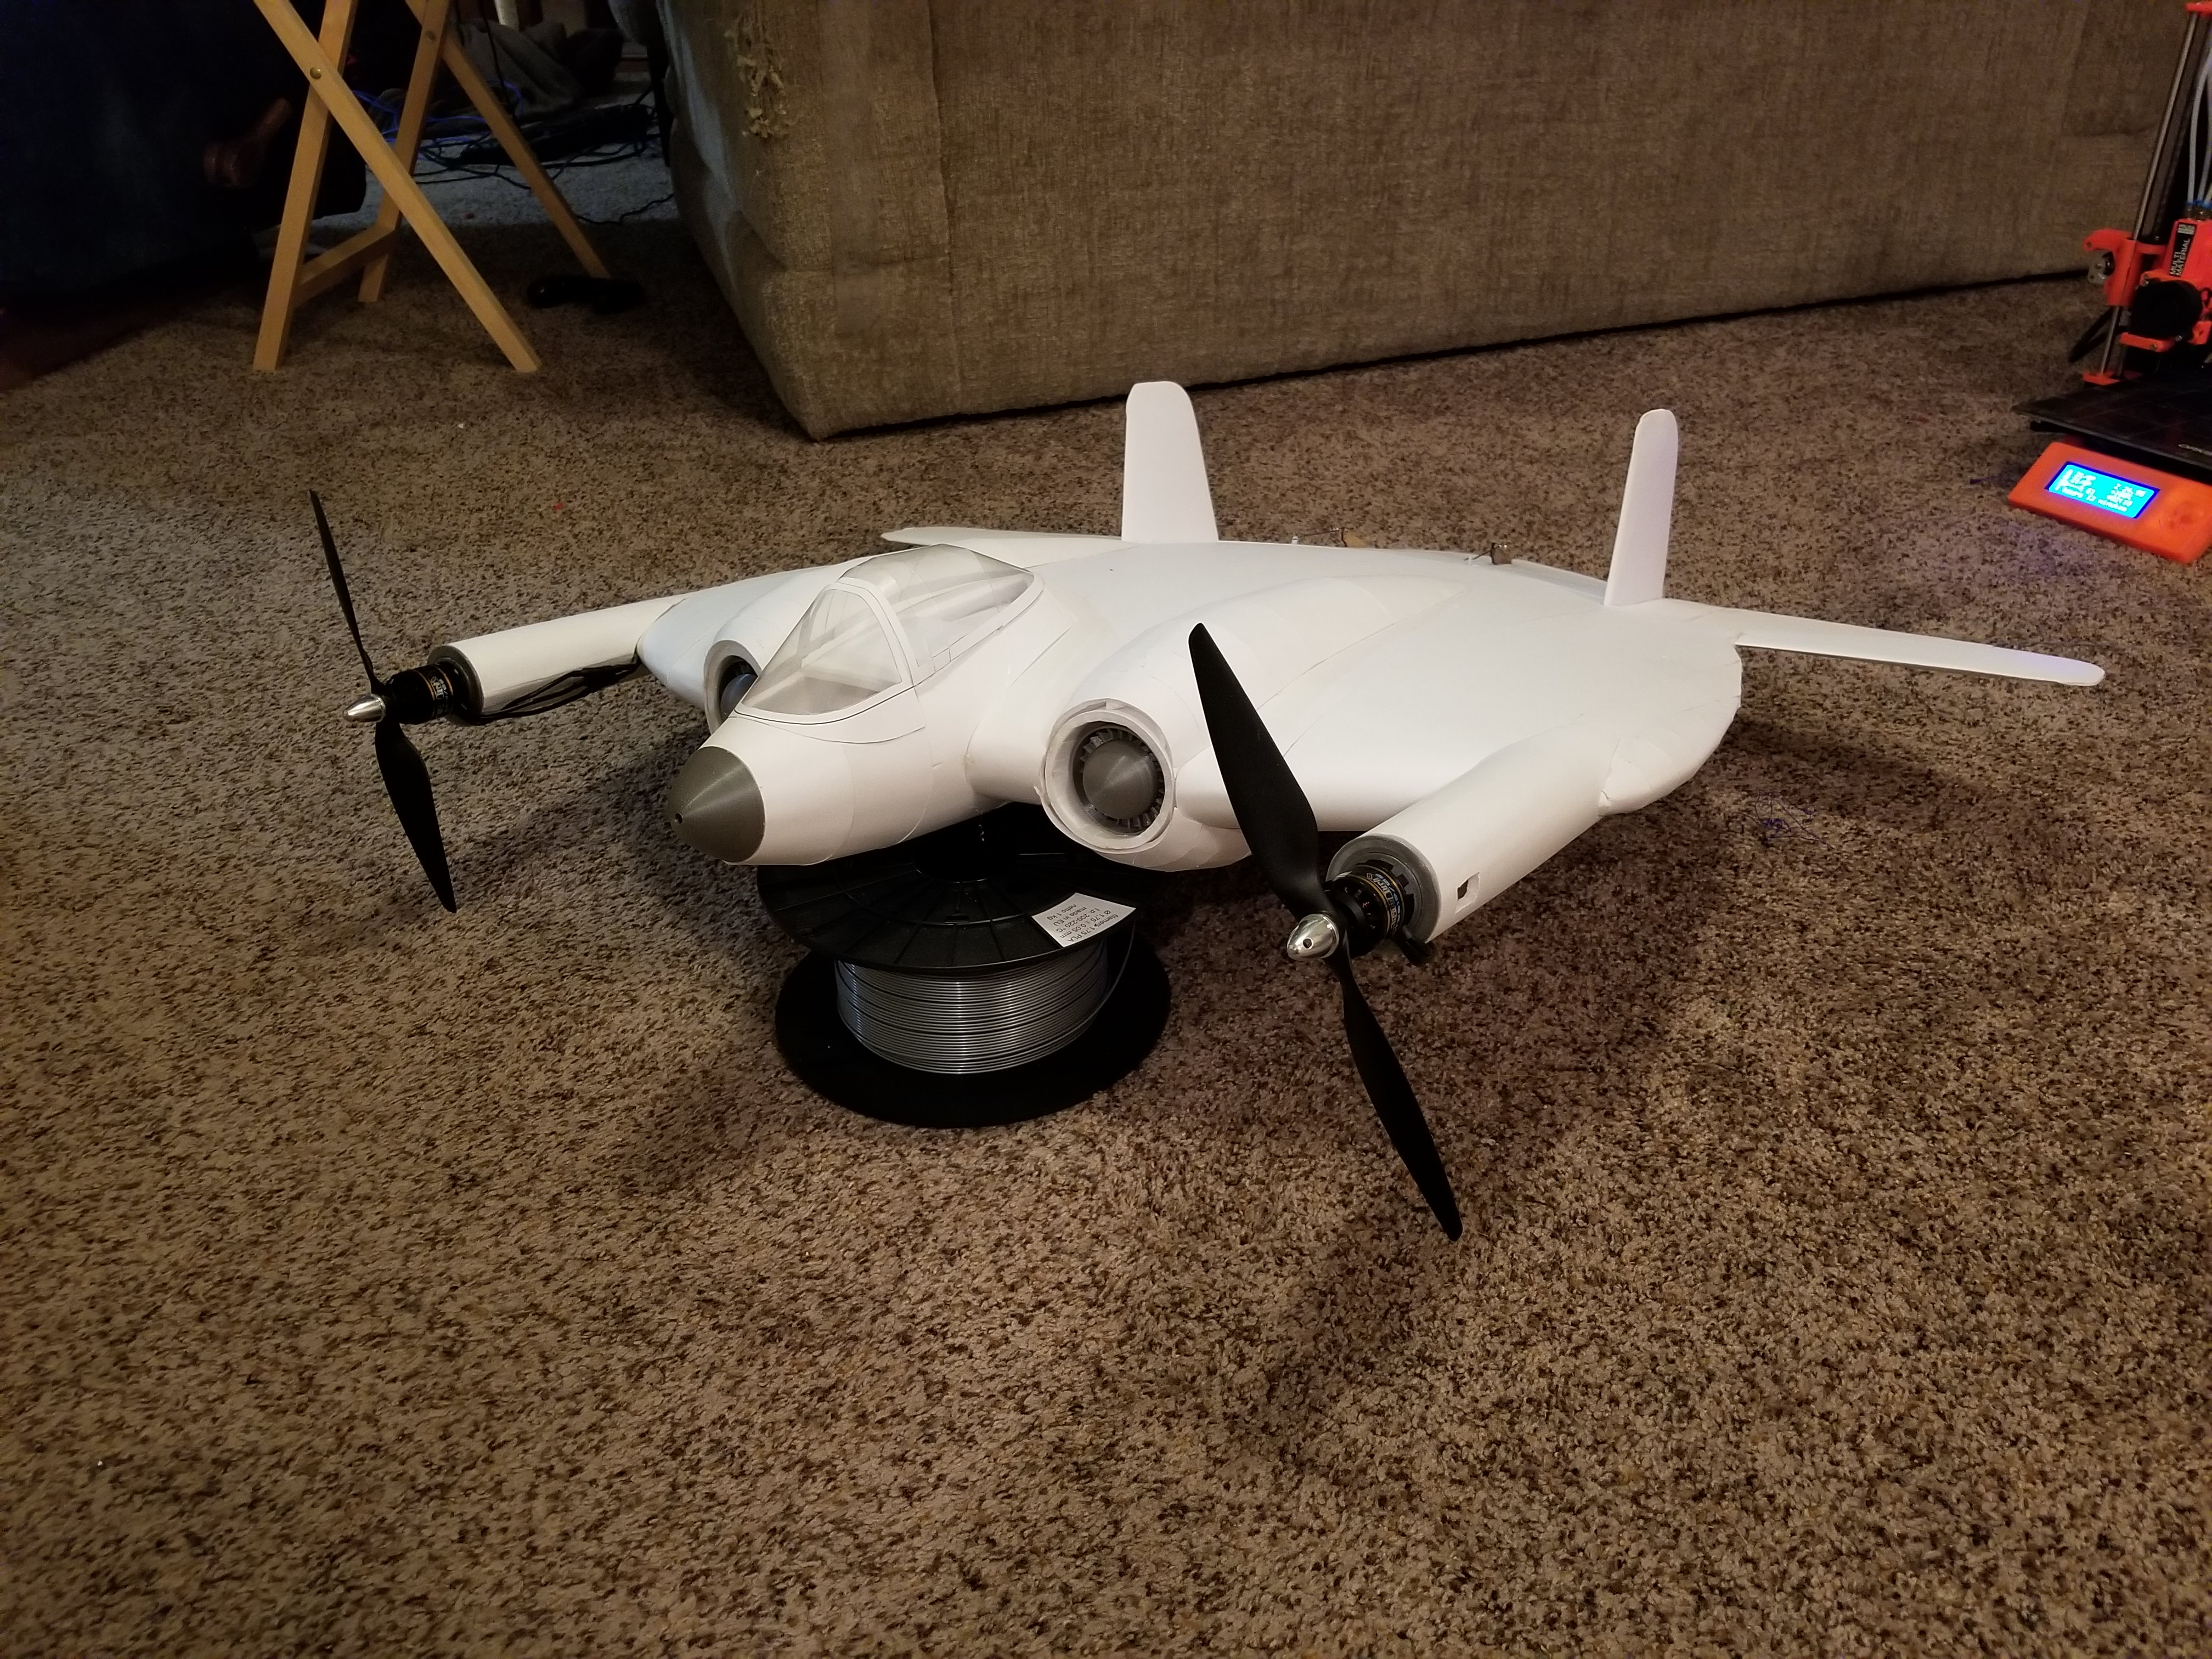
Got the rough prototype done. Just gotta add forward landing gear, and I think it will need to be skis. Just looked outside and we have an inch of snow with more coming down. Gonna start something printing so I can fly tomorrow.
So, I got a chance to maiden it yesterday:
Flew quite well aside from being too nose heavy, and a bit touchy in the roll axis. Note to self. Land plane and adjust CG before attempting flat spins.
https://youtu.be/dpCq73Z9HaQ
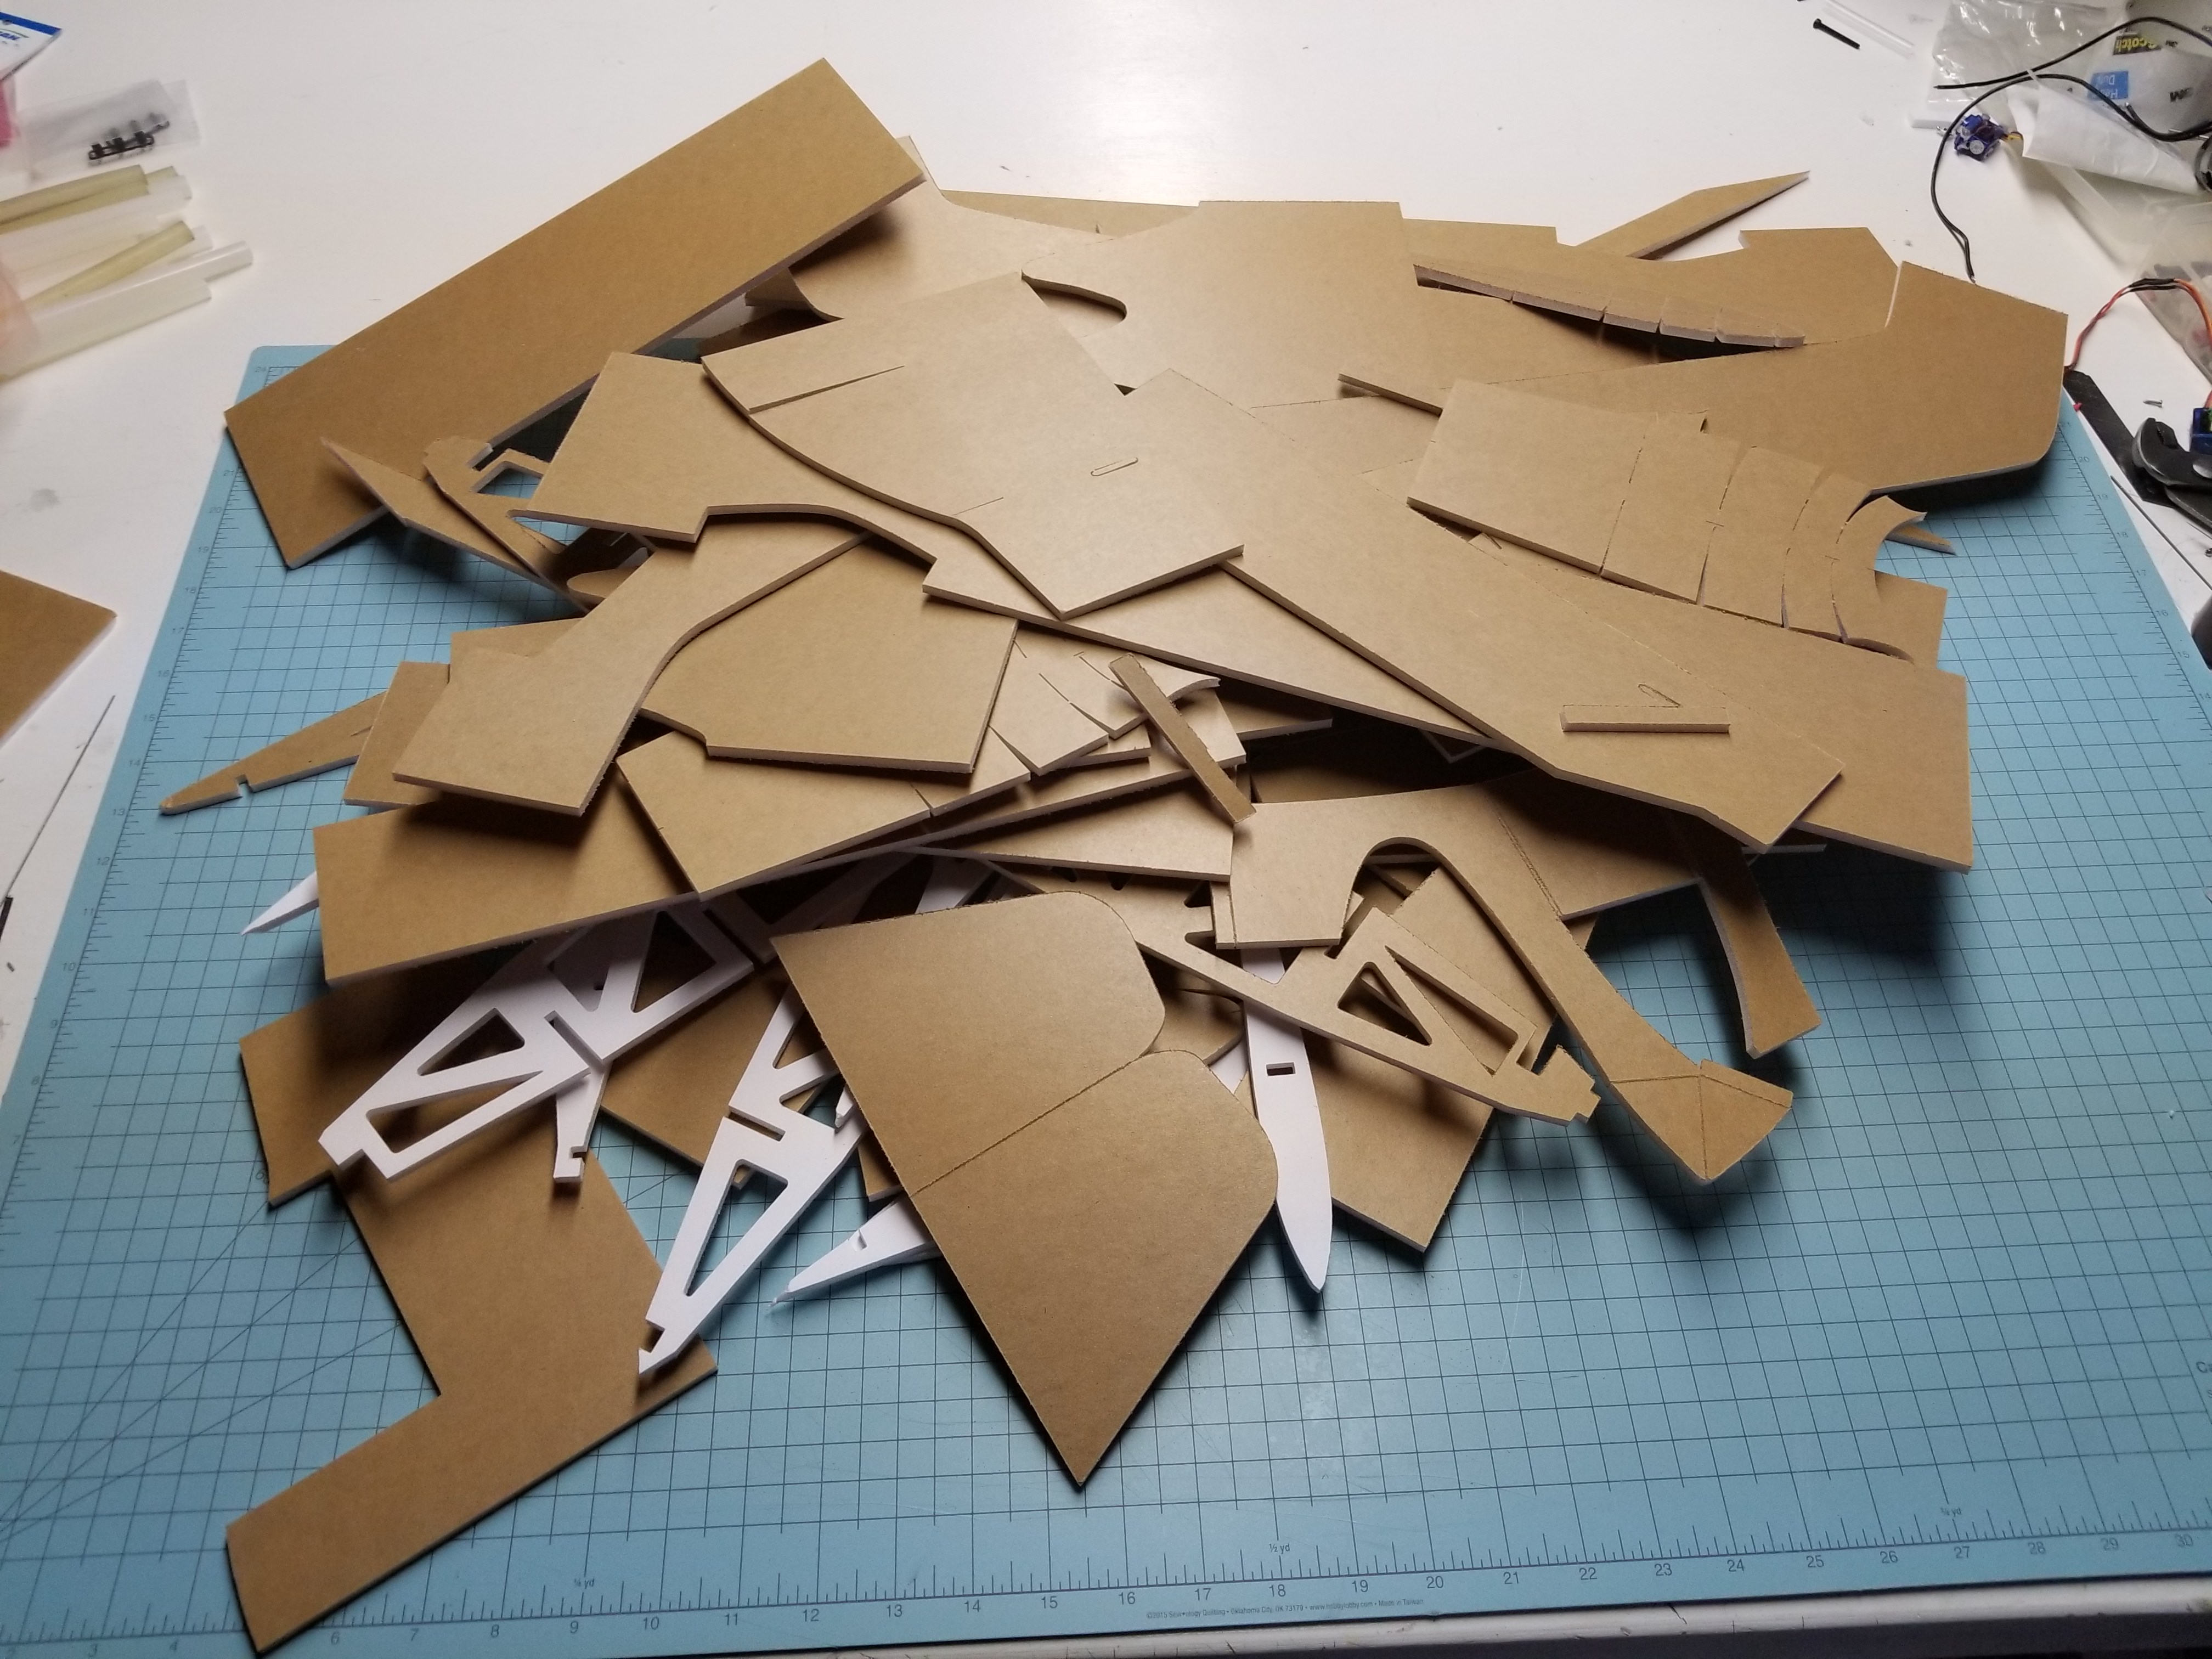
Dying an early death is all good. I need the parts to build the final version and only have 5 days to do it.
Got all the parts cut out already and will spend a couple evenings building, making notes, and final plans tweaking. After flying it, I'm not concerned about any aerodynamic issues. Mostly I'll be making more battery room for CG adjustment, beefing up the motor pod attachment points and focusing on parts fitment for the best look.
Flew quite well aside from being too nose heavy, and a bit touchy in the roll axis. Note to self. Land plane and adjust CG before attempting flat spins.
https://youtu.be/dpCq73Z9HaQ
Dying an early death is all good. I need the parts to build the final version and only have 5 days to do it.
Got all the parts cut out already and will spend a couple evenings building, making notes, and final plans tweaking. After flying it, I'm not concerned about any aerodynamic issues. Mostly I'll be making more battery room for CG adjustment, beefing up the motor pod attachment points and focusing on parts fitment for the best look.
PsyBorg
Wake up! Time to fly!
That looked awesome in the air. (when it was not blending into the clouds or snow hehe) I think you have a winner there once you get the throws and CG dialed in. Great job. :applause: With that body doing all the lifting I may even be able to fly one of these. Did you get to do any slow flight to see how it does or was this a one shot deal after getting fancy?
Oh and welcome back I thought we lost you for a while. You been MIA for an extended period. Happy Holidays
Oh and welcome back I thought we lost you for a while. You been MIA for an extended period. Happy Holidays
That looked awesome in the air. (when it was not blending into the clouds or snow hehe) I think you have a winner there once you get the throws and CG dialed in. Great job. :applause: With that body doing all the lifting I may even be able to fly one of these. Did you get to do any slow flight to see how it does or was this a one shot deal after getting fancy?
Oh and welcome back I thought we lost you for a while. You been MIA for an extended period. Happy Holidays
Yeah, I think it fly very nicely with the proper CG and correct throws. It should fly very slowly, there is a ton of wing area, and the build isn't very heavy. WCL is around 5 or under lol. Could have repaired this one and completed more flights, but I'm on a time crunch and want to get the next version done so I stripped it for parts.
I'll give the next version a better set of test flights to show what the plane can do.
Yeah, Apple harvest was crazy this year. We didn't finish picking until the end of November. I get too easily distracted by the internet, and need to take breaks if things get too busy in the real world.
Here's the first section of the build log. I'll be adding more in successive posts as I get more work done on the plane. I'll probably also try and compile all of it into a single PDF just in case my image hosting source dies again. Curse you photobucket.
Required Supplies:
Hot Glue
CA Glue
CA Activator (Optional I suppose)
Spray Adhesive
Clear Laminating Sheet, or other flexible thin plastic
6x Sheets Dollar Tree Foam or Equivalent
4x Paint Sticks
2x BBQ Skewers
4x Swappable Size Servo Horns
4x-7x 9g Servos (3x are optional for functional Rudders and Steerable Tail Wheel)
Appropriate Number of Servo Pushrods
2x C Pack (2215/09) or Equivalent Motors - Bigger would allow for larger Props, smaller would work, but would look funny.
2x 9-10" Props
2x 30A ESC's
Battery bay has a decent amount of room. Should fly on a single 2200mah 3s, but has room for up to a 5000mah 4s.
2x FT Swappable Style Firewalls (Will Require Trimming)
The usual razor blades, bits of sandpaper, pliers, screwdrivers, ruler etc...
3D Printer is optional if you want some specific functional and cosmetic parts to enhance your aircraft.
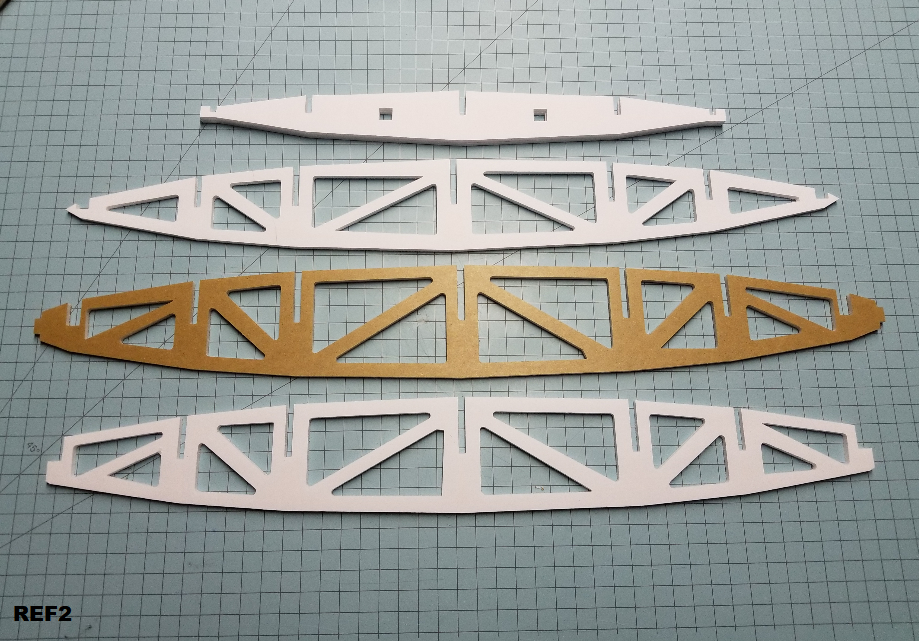
Step 1, gather the shown internal structural parts and glue them together. The wing ribs pictured will actually be the same size. I decided to trim them down after I started building, so don't worry about any of that.
REF1
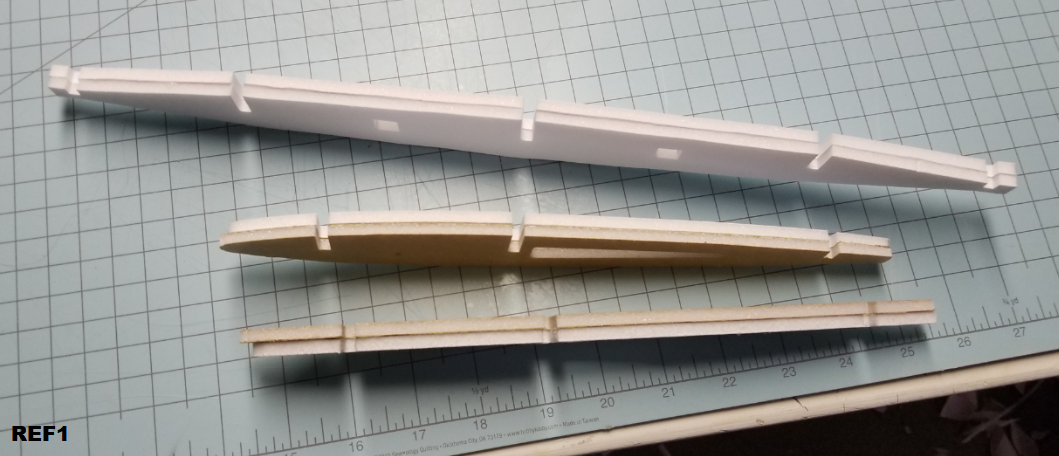
The 4 "Wing" spars shown go in the following order. Doubled up spar at the top of the picture is for the back of the plane.
REF2
All of the wing ribs simply slot into the spars. Don't glue anything together until you have all the wing ribs slotted into place.
REF3
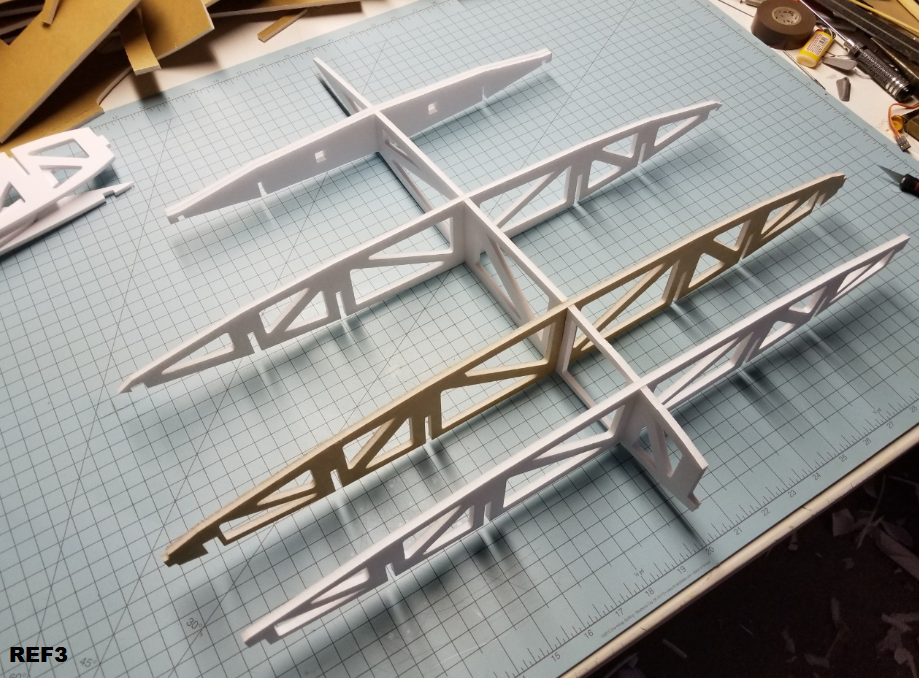
Here they all are. The two smallest outer wing ribs can be put in place now, but it may be better to wait so you don't beat them up while skinning.
REF4
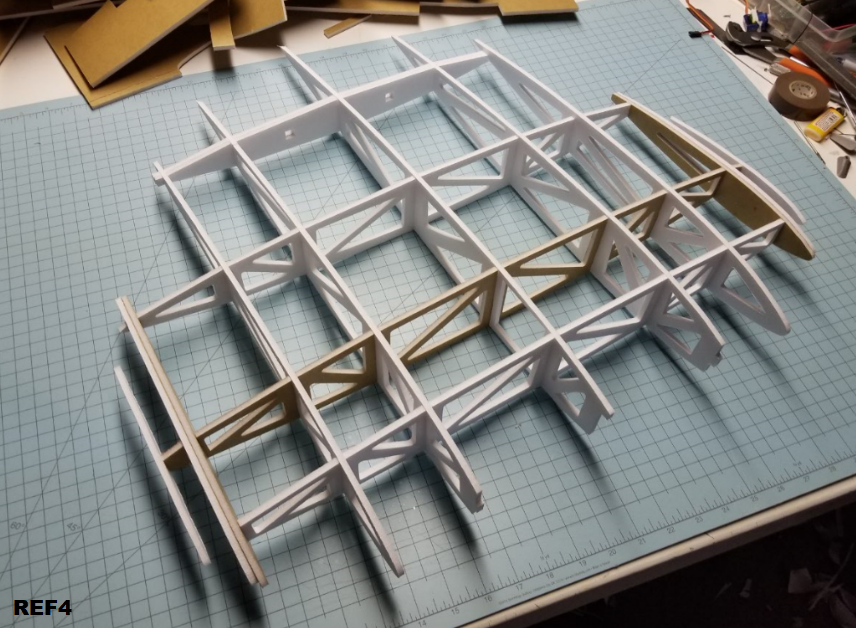
Just smear a bit of hot glue into the joints. It doesn't take much. Take your time and make sure that everything stays in it's proper slot as you glue. I like to work from the middle rib out.
REF5
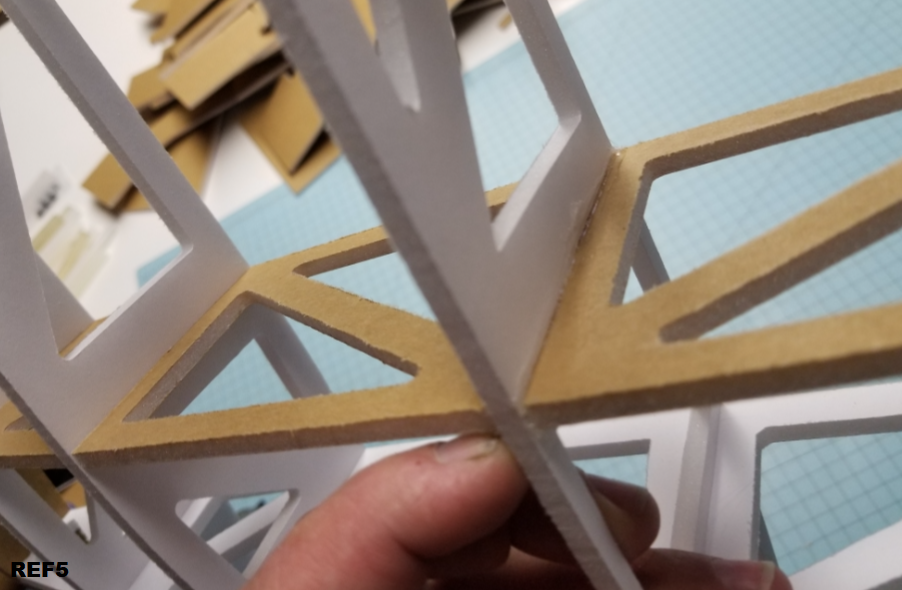
Grab 3 of the top skin pieces. They will be going down like so.
REF6
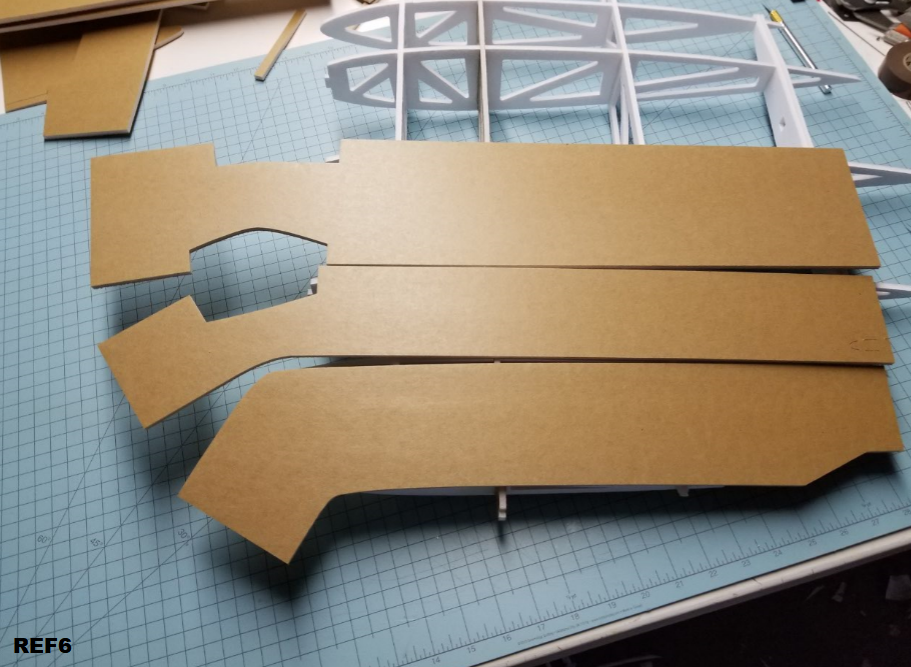
Remove the paper from one side of each of the 3 pieces. You can see how it makes almost the perfect curve for most of the length.
REF7
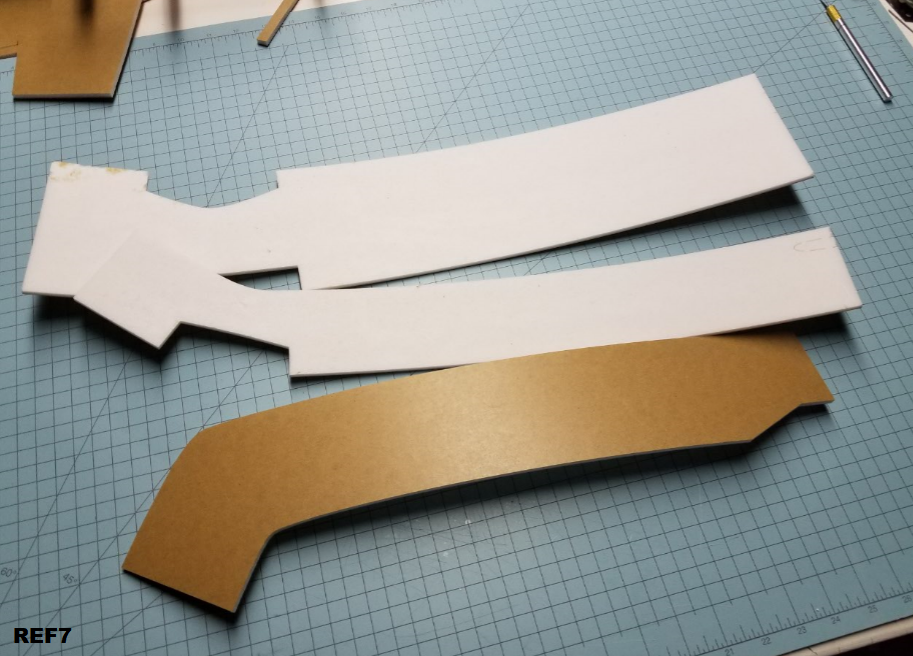
Pre bend the curved sections to establish the proper curve for the tips. If you're using the Water Resistant foam, I've found this is quite easy to do by hand.
REF8
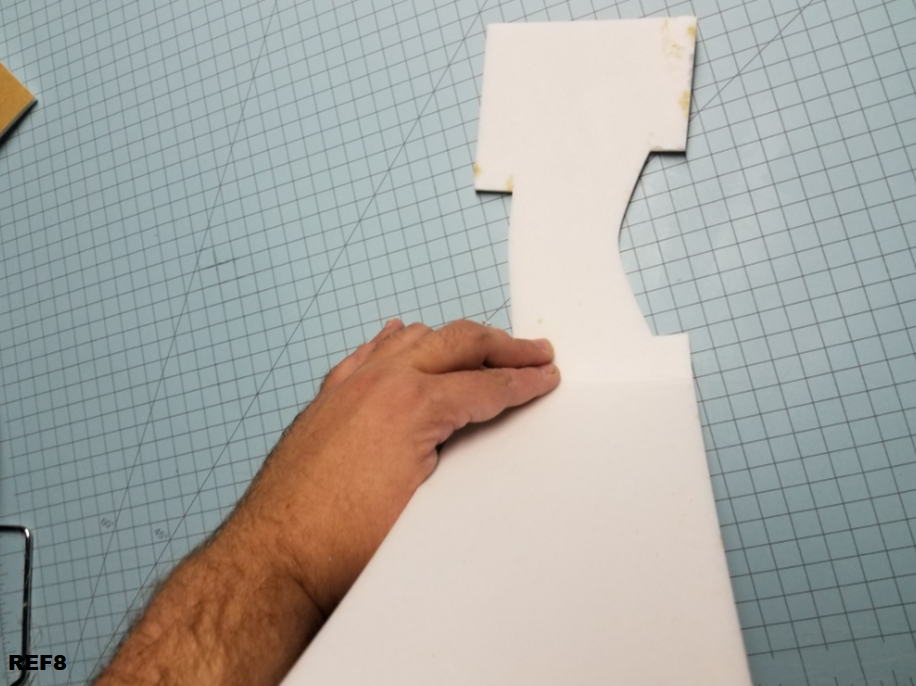
If you're not as practiced at bending foam, or are using the white stuff, a ruler can be a big help to slowly get the right curve.
REF9
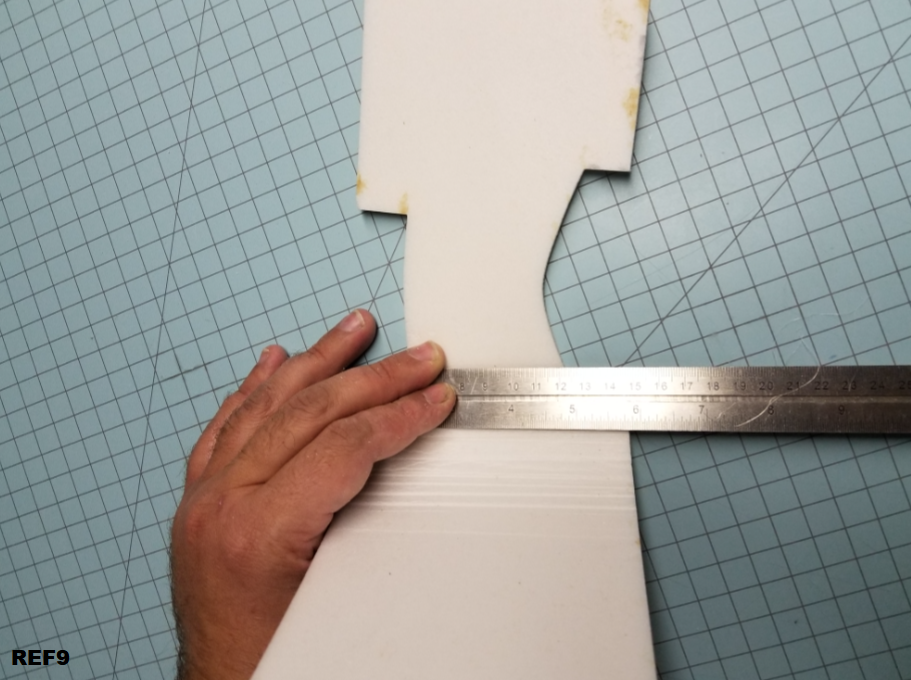
Here's the first piece all pre-bent.
REF10
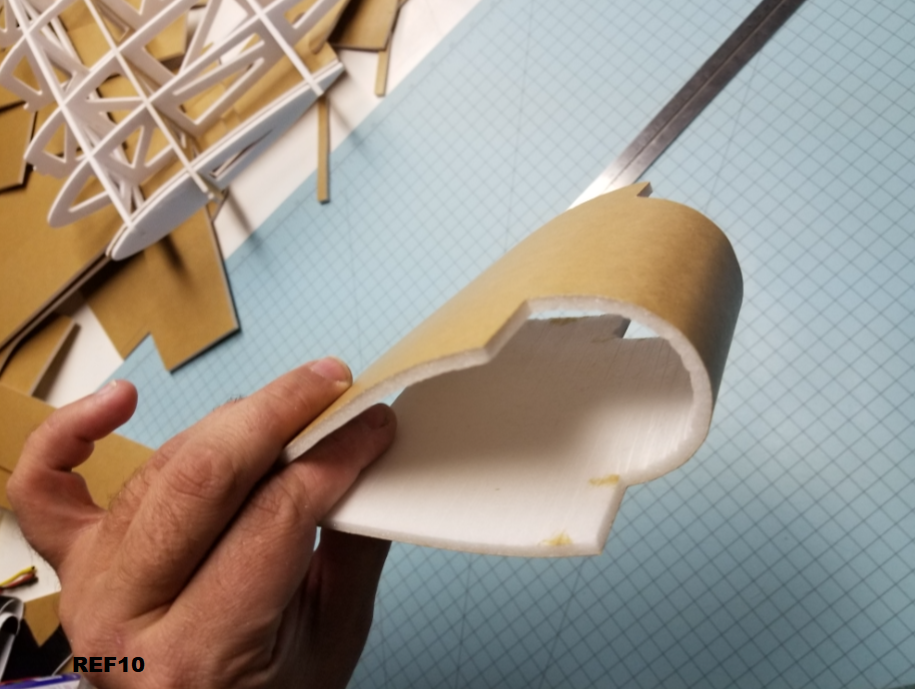
It will be glued in place like so. Split between wing ribs on the side, and over the top of one half of the doubled spar in the back.
REF11
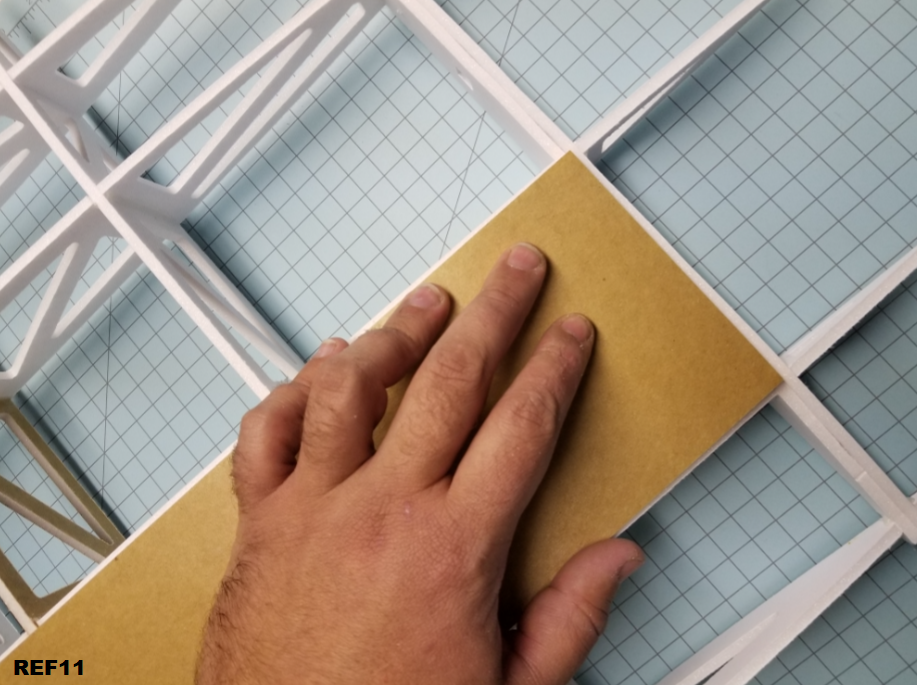
For the first skin section, I prefer to only add glue under the red lines. Keeps the sides clean of glue globules, and you can go back from the underside and add more glue after the piece is in place. Go slow, the better you align things now, the better your plane will look at the end.
REF12
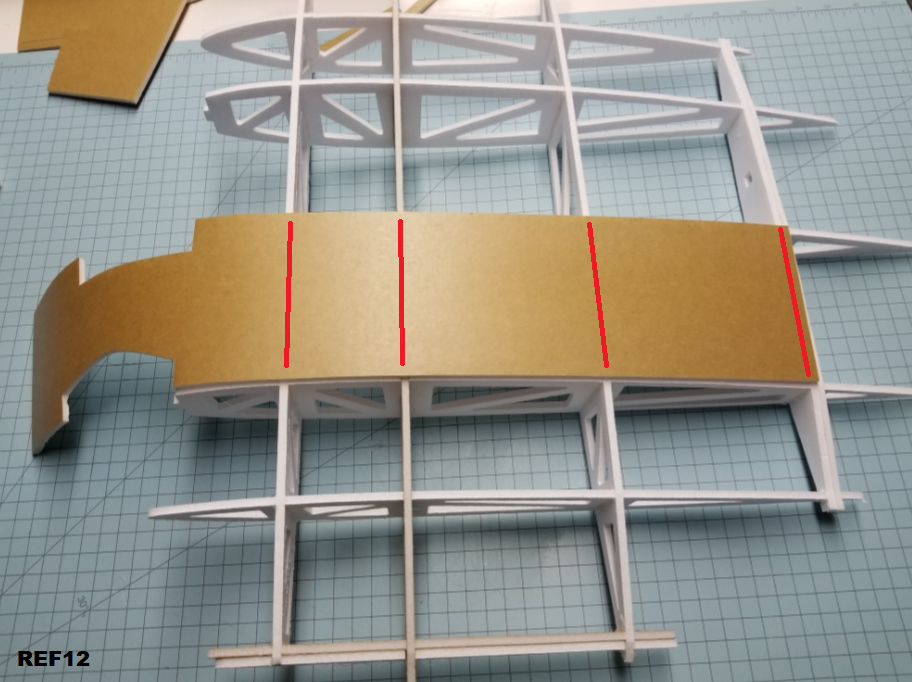
Here I'm adding glue from the underside, and using the table to hold the curves down. This isn't a complicated process, but you need to be patient, and wait until the glue cools fully before letting go of things.
REF13
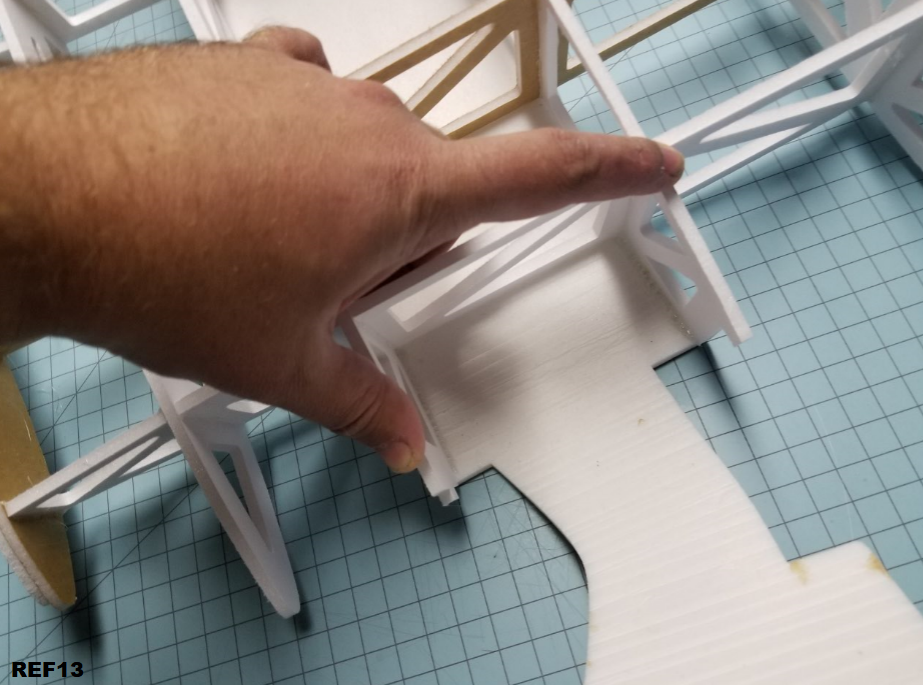
Before finishing gluing down the first curve, now would be a good time to glue in the little step pieces. These will give the bottom skins something to rest on when you get to that point.
REF14
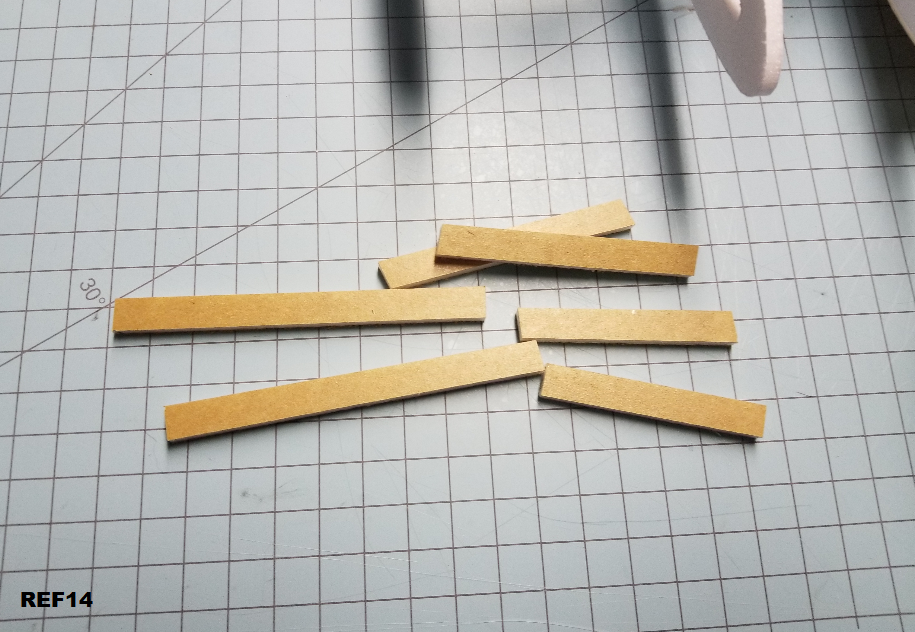
Here's the steps glued onto the back of the 1st spar.
REF15
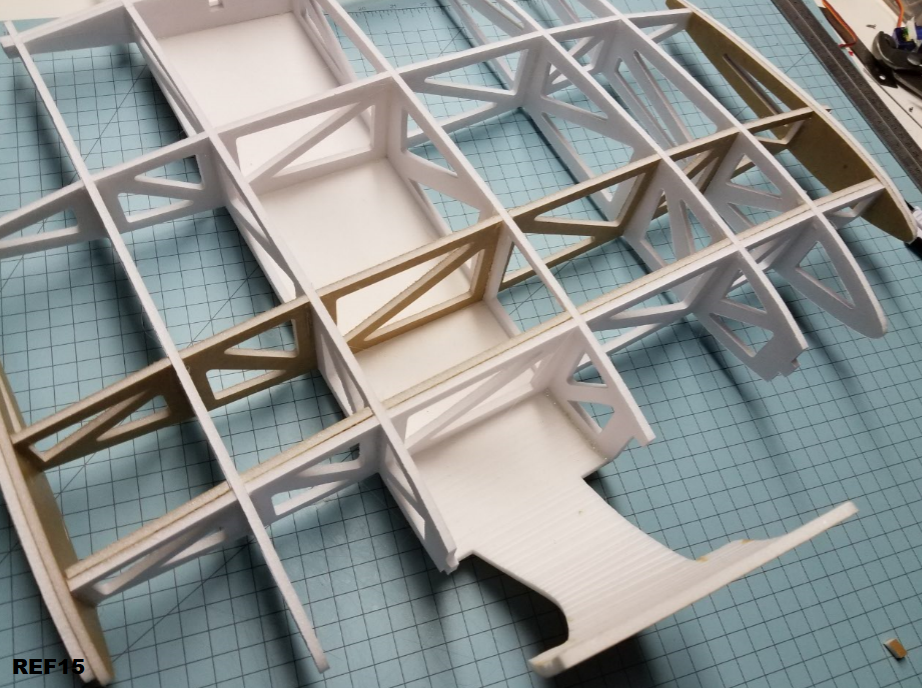
Here's how you want the underside of your curve to line up. Once again, go slowly here, and hold down the parts until the glue dries.
REF16
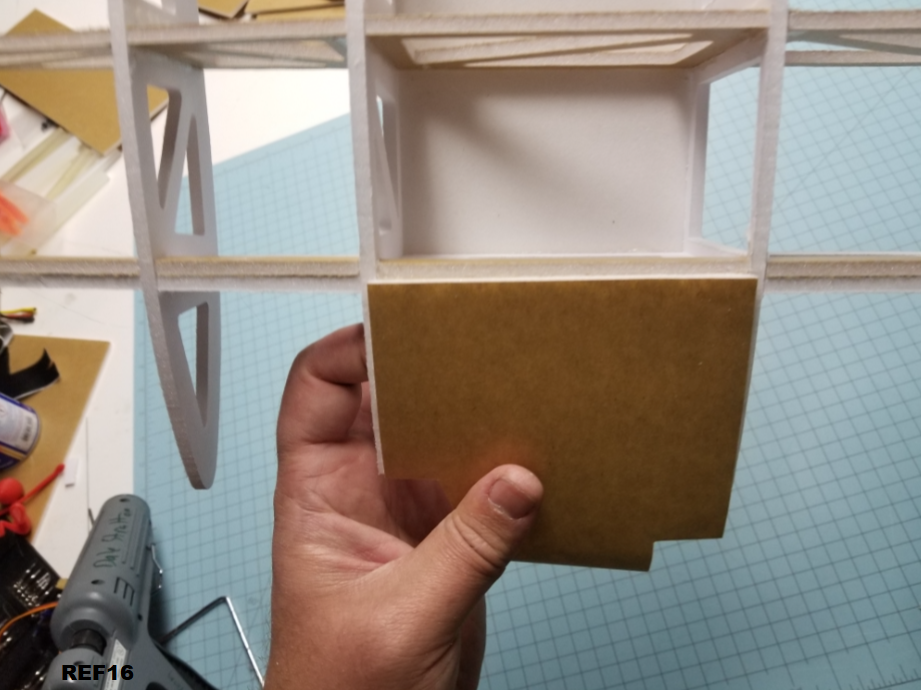
Curve of the 1st skin section as it should look after being glued down.
REF17

View from the Top
REF18
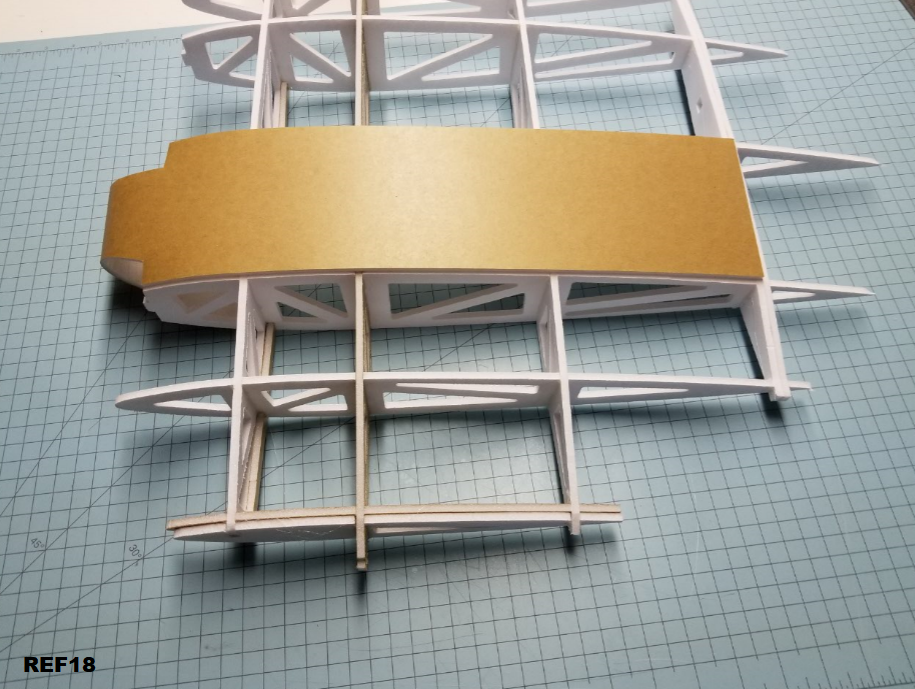
Repeat all the steps for the next skin piece
REF19
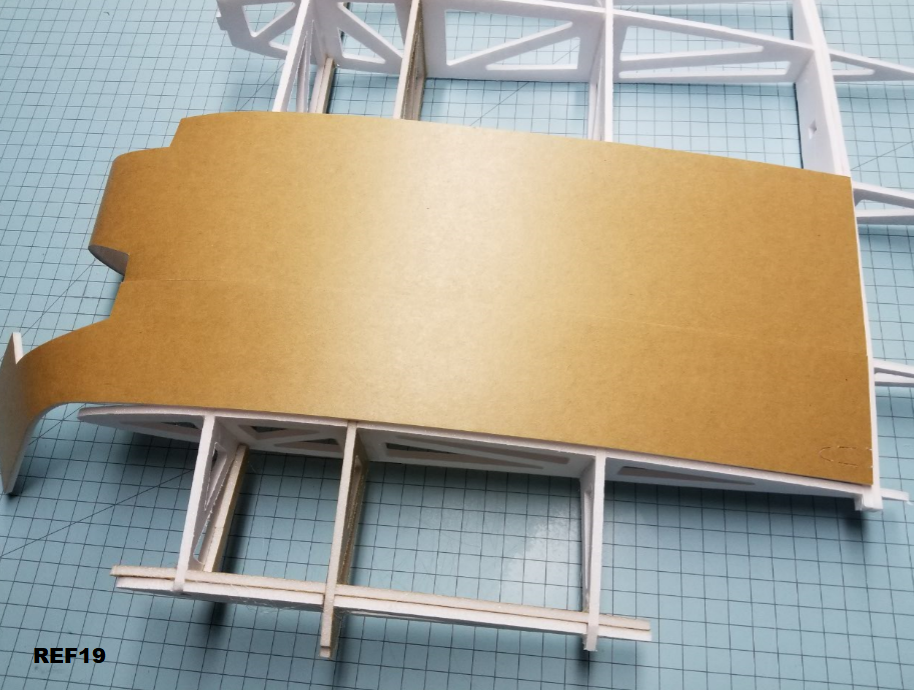
Here's where I like to add glue for the first bit.
REF20
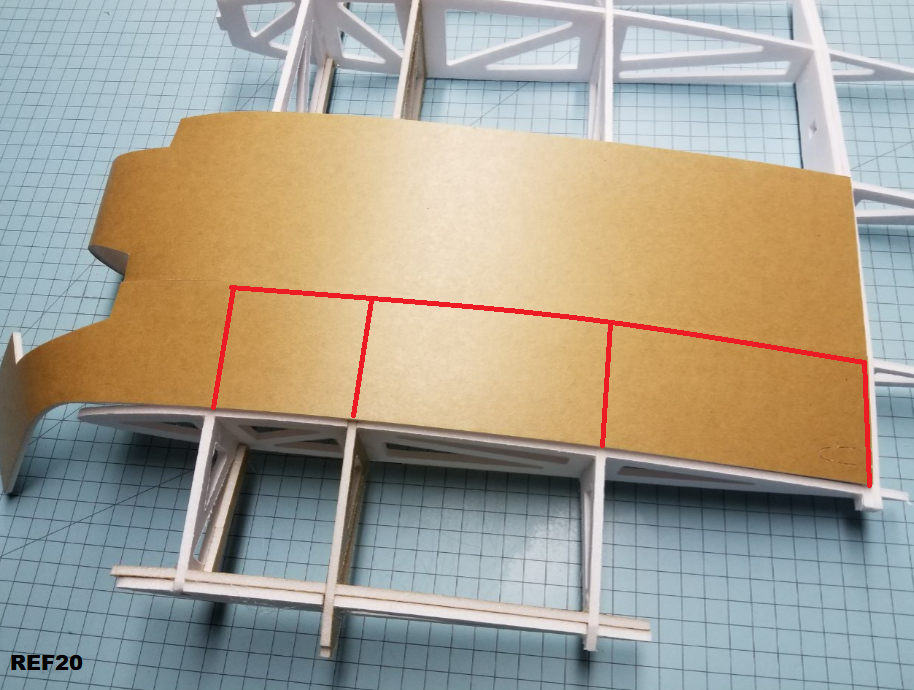
Try and get the skin sections pushed up as close to each other as possible.
REF21
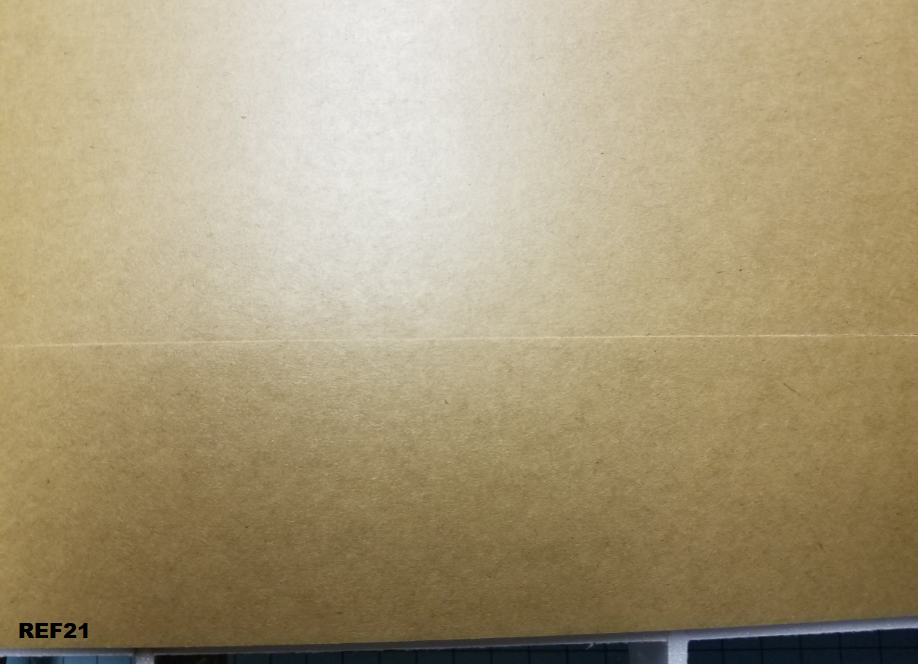
Any gaps or unevenness can be filled with hot glue or tape, but the better job you do here will really make your plane look better. If something is just slightly misaligned, you can run your finger down the seam to even things out.
I'm not trying to scare anyone away from trying this build, it's more about patience than anything. I think your plane could have some really ugly seams and still fly just fine.
REF22
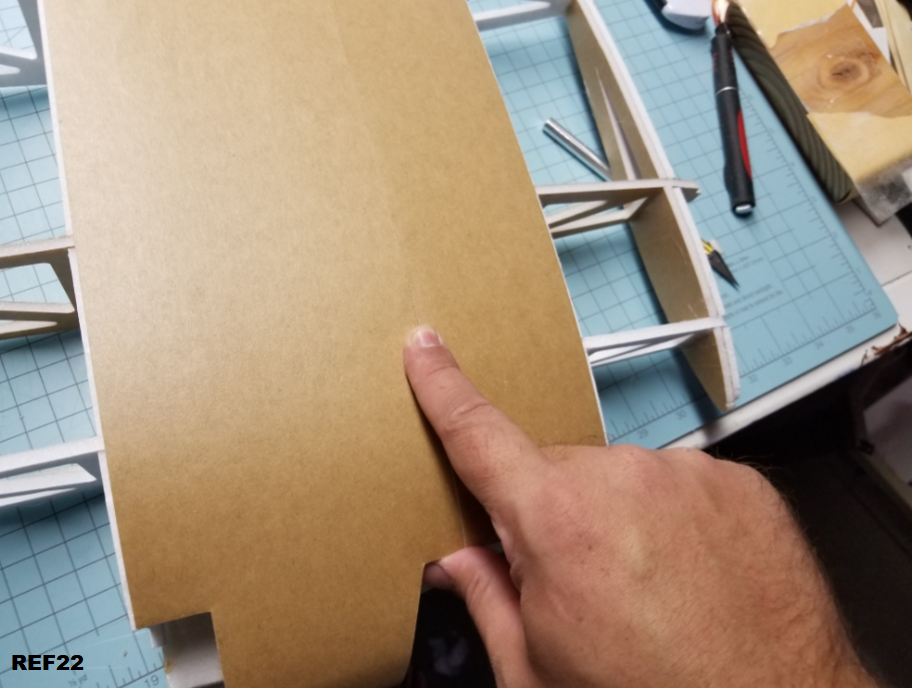
Front View after everything has been glued in the same manner as the first skin.
REF23
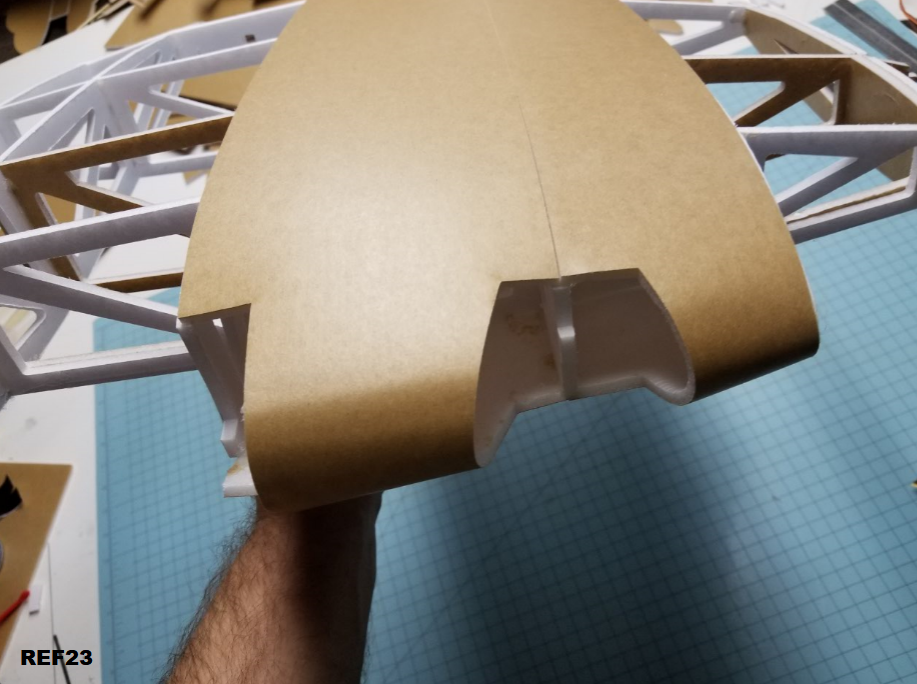
3rd skin section is mostly the same, but you'll want to trim the bulge of foam created after pre-bending. Use a razor blade or a sanding block.
REF24
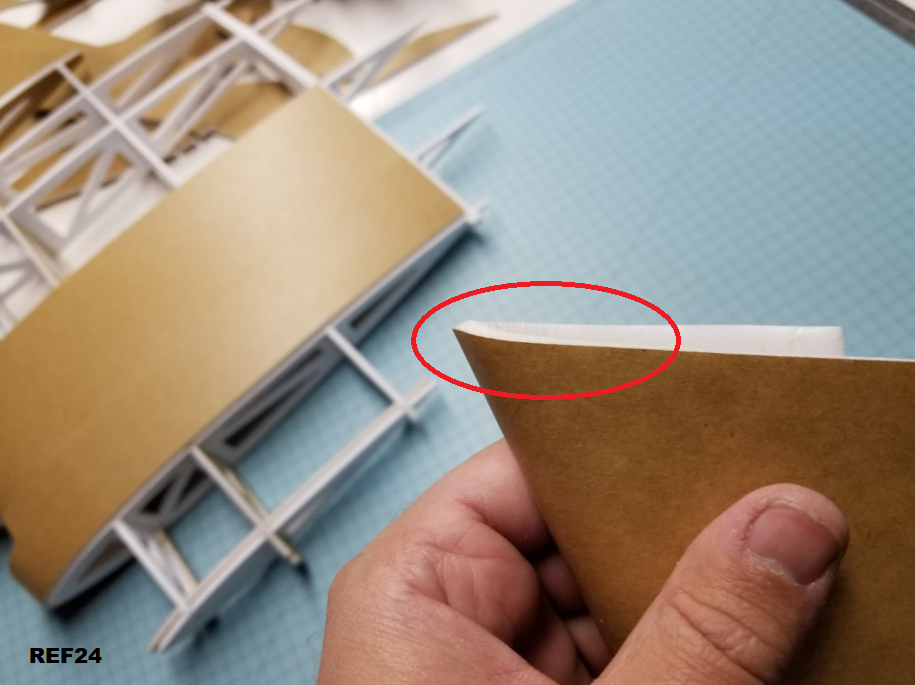
Foam bulge trimmed off
REF25
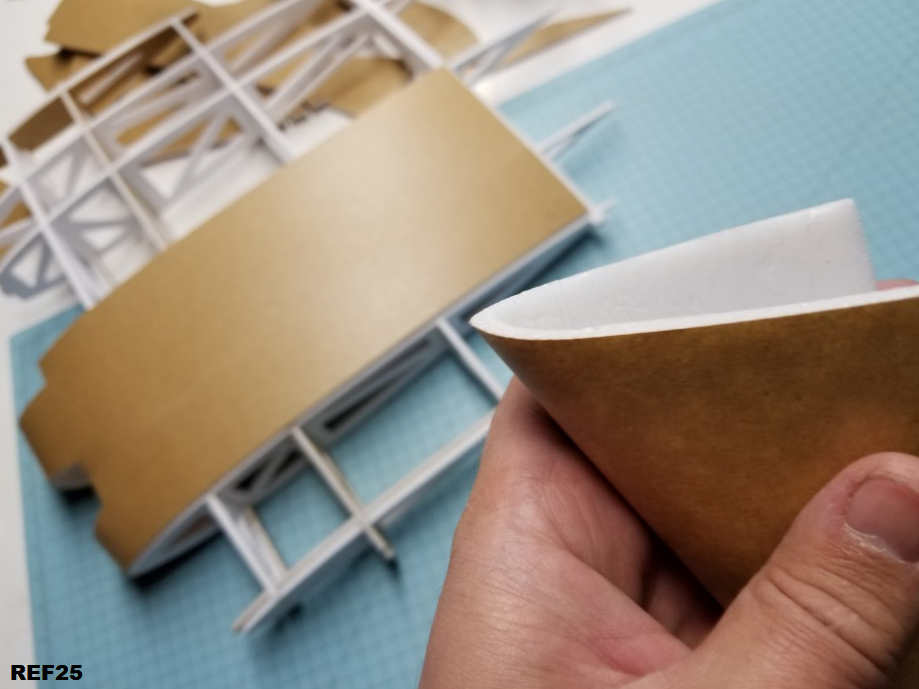
Glue the flat area of the 3rd Section in place the same as the first two. Here's a shot of what glue joints on the underside should look like. Doesn't take much.
REF26
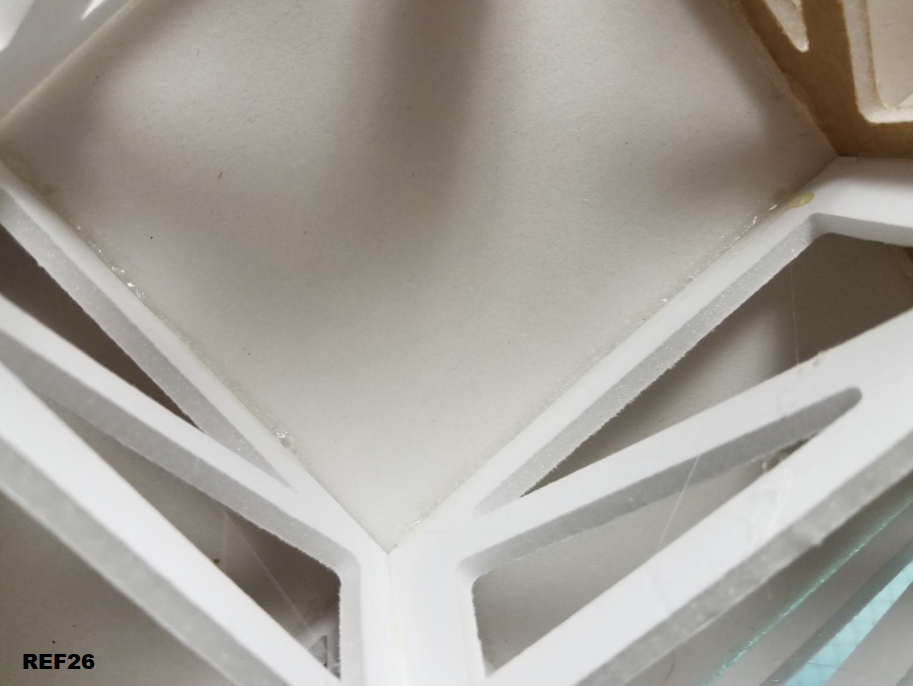
After the main portion of the skin is glued down, I like to do the curve in sections. Helps to get a clean bend all the way around the rib.
REF27
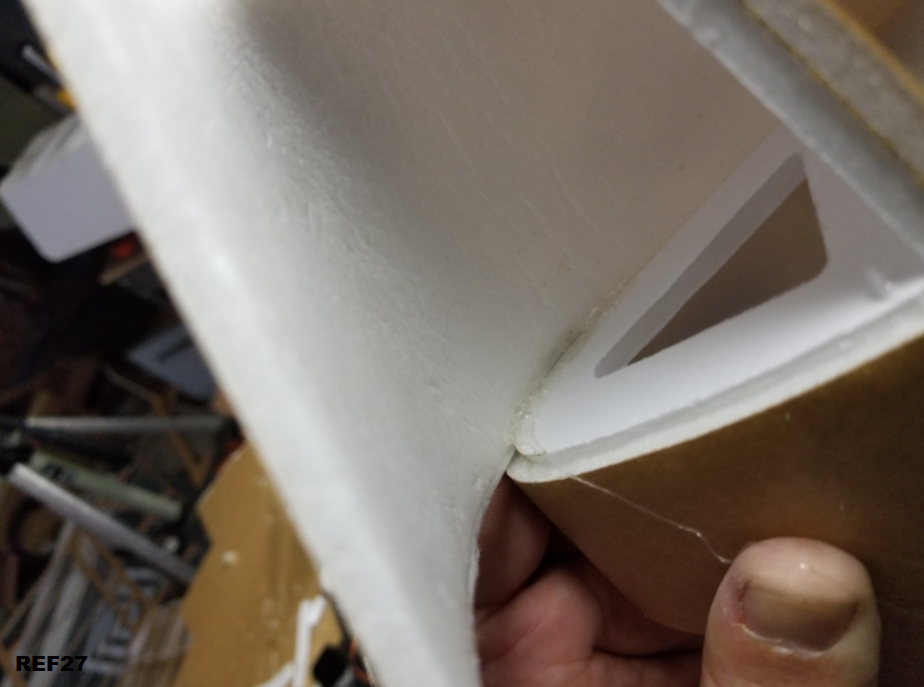
Here's what it can look like if you really take your time.
REF28
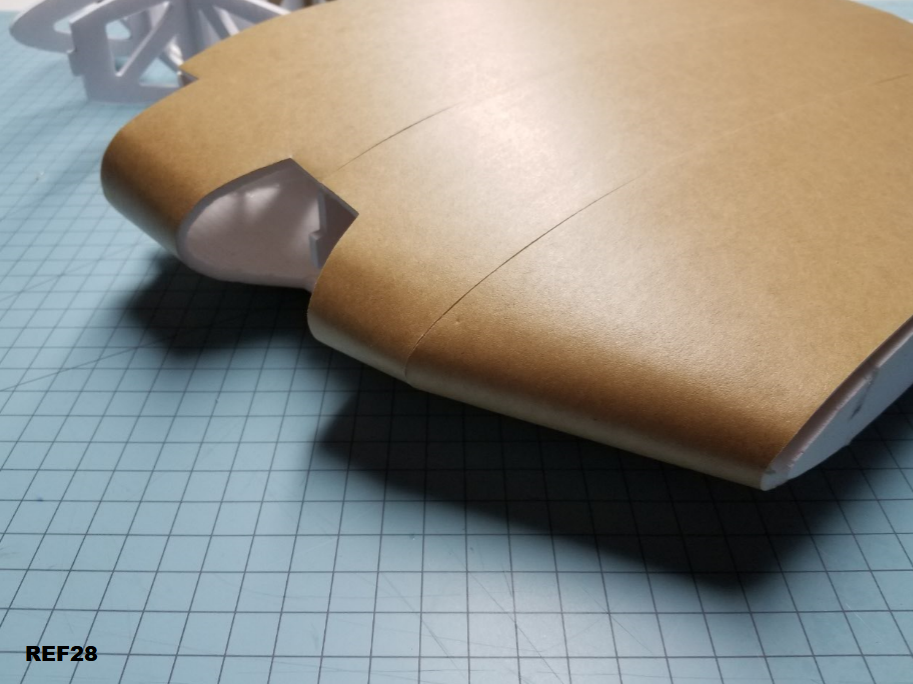
I like to get a good bit of glue on the outer section of this third skins curve. I usually apply it in layers, so you don't get too much and melt all the foam. The excess glue here is to make sure that the motor mount area is as strong as possible. This plane is very light, so this is a good place where some extra weight does more good than harm.
REF29
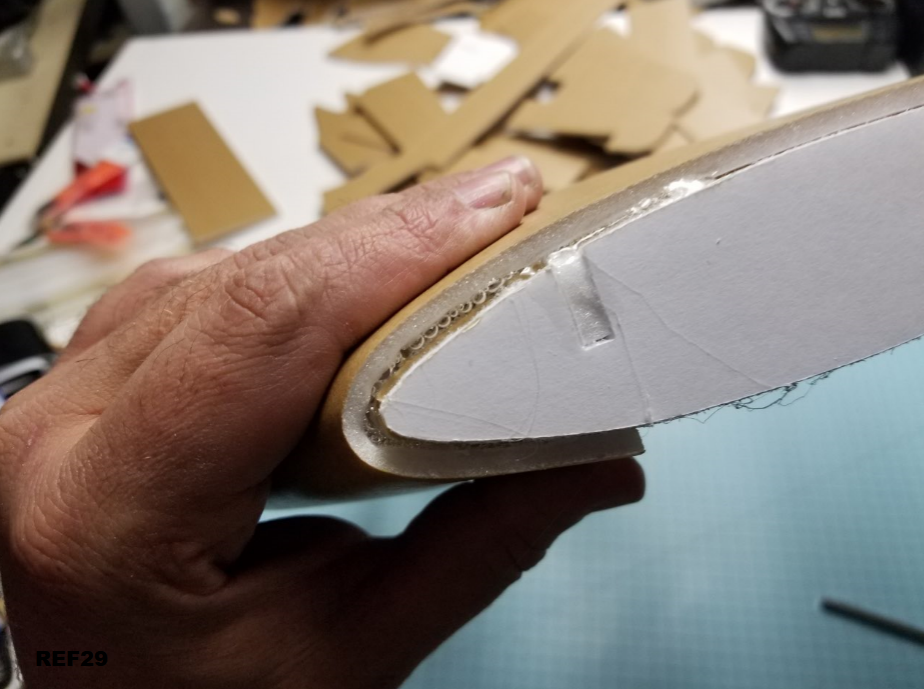
Here's all 3 of the first half of the upper skin sections all glued down.
REF30
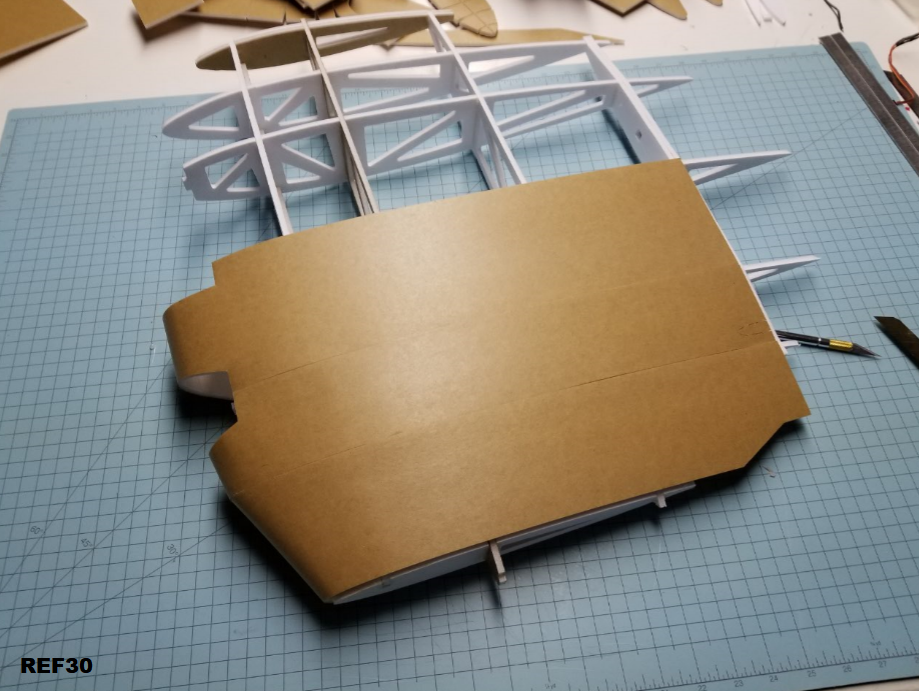
Repeat all the previous skinning steps for the other side.
REF31

Required Supplies:
Hot Glue
CA Glue
CA Activator (Optional I suppose)
Spray Adhesive
Clear Laminating Sheet, or other flexible thin plastic
6x Sheets Dollar Tree Foam or Equivalent
4x Paint Sticks
2x BBQ Skewers
4x Swappable Size Servo Horns
4x-7x 9g Servos (3x are optional for functional Rudders and Steerable Tail Wheel)
Appropriate Number of Servo Pushrods
2x C Pack (2215/09) or Equivalent Motors - Bigger would allow for larger Props, smaller would work, but would look funny.
2x 9-10" Props
2x 30A ESC's
Battery bay has a decent amount of room. Should fly on a single 2200mah 3s, but has room for up to a 5000mah 4s.
2x FT Swappable Style Firewalls (Will Require Trimming)
The usual razor blades, bits of sandpaper, pliers, screwdrivers, ruler etc...
3D Printer is optional if you want some specific functional and cosmetic parts to enhance your aircraft.
Step 1, gather the shown internal structural parts and glue them together. The wing ribs pictured will actually be the same size. I decided to trim them down after I started building, so don't worry about any of that.
REF1
The 4 "Wing" spars shown go in the following order. Doubled up spar at the top of the picture is for the back of the plane.
REF2
All of the wing ribs simply slot into the spars. Don't glue anything together until you have all the wing ribs slotted into place.
REF3
Here they all are. The two smallest outer wing ribs can be put in place now, but it may be better to wait so you don't beat them up while skinning.
REF4
Just smear a bit of hot glue into the joints. It doesn't take much. Take your time and make sure that everything stays in it's proper slot as you glue. I like to work from the middle rib out.
REF5
Grab 3 of the top skin pieces. They will be going down like so.
REF6
Remove the paper from one side of each of the 3 pieces. You can see how it makes almost the perfect curve for most of the length.
REF7
Pre bend the curved sections to establish the proper curve for the tips. If you're using the Water Resistant foam, I've found this is quite easy to do by hand.
REF8
If you're not as practiced at bending foam, or are using the white stuff, a ruler can be a big help to slowly get the right curve.
REF9
Here's the first piece all pre-bent.
REF10
It will be glued in place like so. Split between wing ribs on the side, and over the top of one half of the doubled spar in the back.
REF11
For the first skin section, I prefer to only add glue under the red lines. Keeps the sides clean of glue globules, and you can go back from the underside and add more glue after the piece is in place. Go slow, the better you align things now, the better your plane will look at the end.
REF12
Here I'm adding glue from the underside, and using the table to hold the curves down. This isn't a complicated process, but you need to be patient, and wait until the glue cools fully before letting go of things.
REF13
Before finishing gluing down the first curve, now would be a good time to glue in the little step pieces. These will give the bottom skins something to rest on when you get to that point.
REF14
Here's the steps glued onto the back of the 1st spar.
REF15
Here's how you want the underside of your curve to line up. Once again, go slowly here, and hold down the parts until the glue dries.
REF16
Curve of the 1st skin section as it should look after being glued down.
REF17
View from the Top
REF18
Repeat all the steps for the next skin piece
REF19
Here's where I like to add glue for the first bit.
REF20
Try and get the skin sections pushed up as close to each other as possible.
REF21
Any gaps or unevenness can be filled with hot glue or tape, but the better job you do here will really make your plane look better. If something is just slightly misaligned, you can run your finger down the seam to even things out.
I'm not trying to scare anyone away from trying this build, it's more about patience than anything. I think your plane could have some really ugly seams and still fly just fine.
REF22
Front View after everything has been glued in the same manner as the first skin.
REF23
3rd skin section is mostly the same, but you'll want to trim the bulge of foam created after pre-bending. Use a razor blade or a sanding block.
REF24
Foam bulge trimmed off
REF25
Glue the flat area of the 3rd Section in place the same as the first two. Here's a shot of what glue joints on the underside should look like. Doesn't take much.
REF26
After the main portion of the skin is glued down, I like to do the curve in sections. Helps to get a clean bend all the way around the rib.
REF27
Here's what it can look like if you really take your time.
REF28
I like to get a good bit of glue on the outer section of this third skins curve. I usually apply it in layers, so you don't get too much and melt all the foam. The excess glue here is to make sure that the motor mount area is as strong as possible. This plane is very light, so this is a good place where some extra weight does more good than harm.
REF29
Here's all 3 of the first half of the upper skin sections all glued down.
REF30
Repeat all the previous skinning steps for the other side.
REF31
You sir, are a mad genius. :applause:
More like glutton for punishment than mad genius. Tried something new with this plane, adapting paper card models to foam. Didn't go as smoothly as I hoped. Foam does not bend like paper, and card models have a bazillion parts.
I cut and built something like 8 different planes worth of parts before getting to the final rendition I'm working on now. All the nice curves and such you can find in paper models all need to be redone, with only the general idea being useful. Would have been faster and easier to skin by hand first with posterboard then make CAD drawings for final testing.
Fortunately, I think I've come up with some tricks to make getting the proper profiles for skin sections correct. I'll have to do another plane in the same style but I hope after that I'll be able to share a tutorial for designing planes with scale curves.

Congratulation on the build success.
and a Beautiful job on the build log so far.
Thanks. It's not too crazy of a plane difficulty wise, but the deviation from standard FT techniques was enough that I figured lots of pictures and explanation would be helpful.
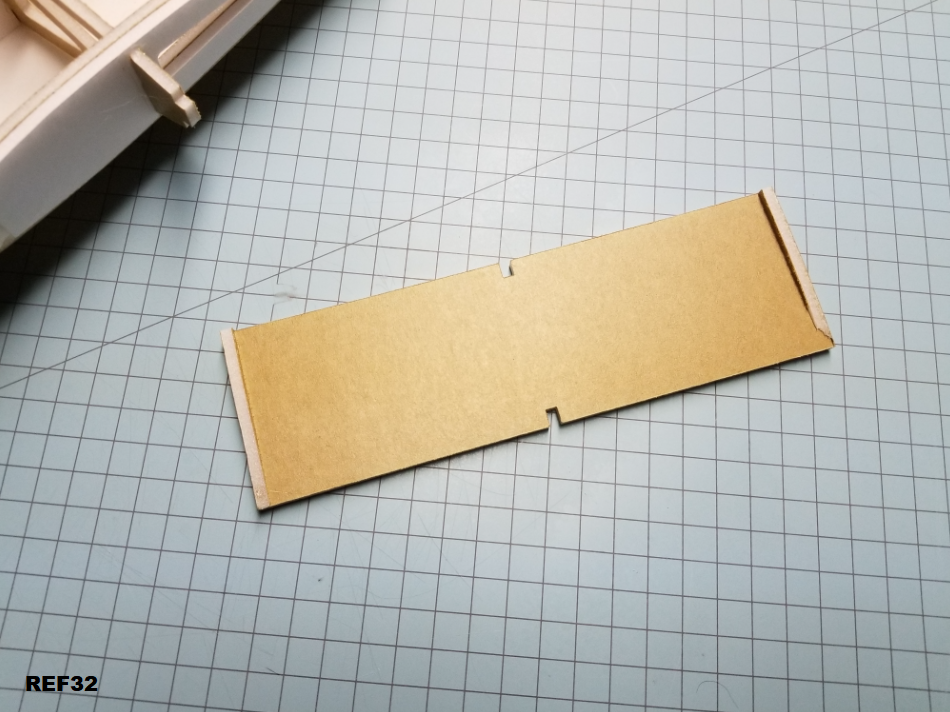
Next, the battery tray. Remove excess foam, and glue the sides up like so:
REF32
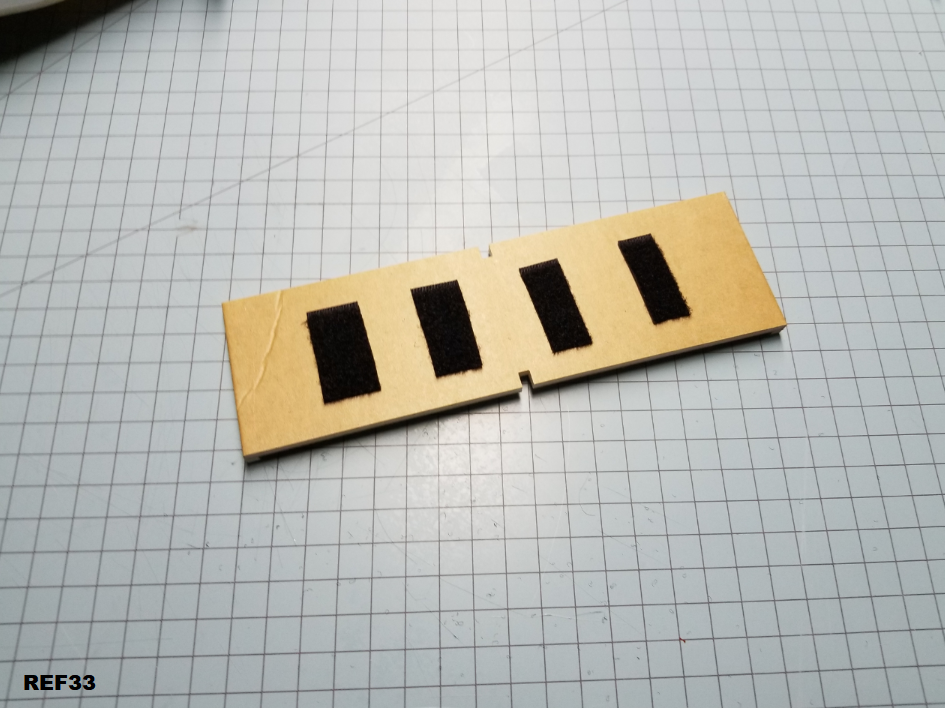
Flip it over and use your attachment method of choice. I like velcro, straps would work as well. Yep, it's crinkled. I stepped on it.
REF33
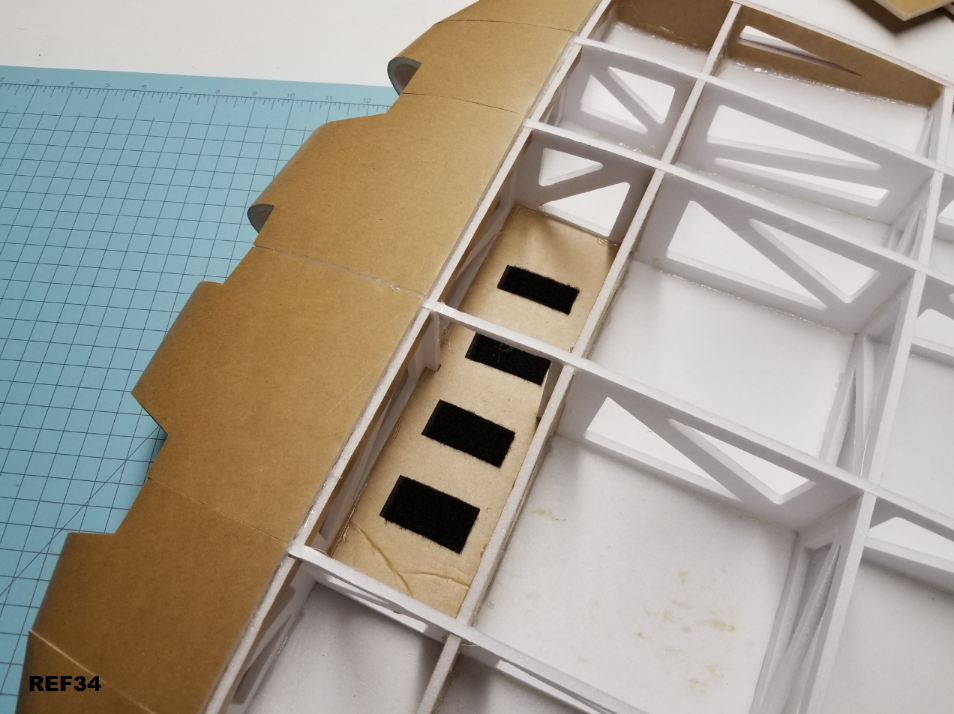
Slide into the battery area and glue in place. Think I'll alter the size of the tray a bit to make it easier to get into place.
REF34
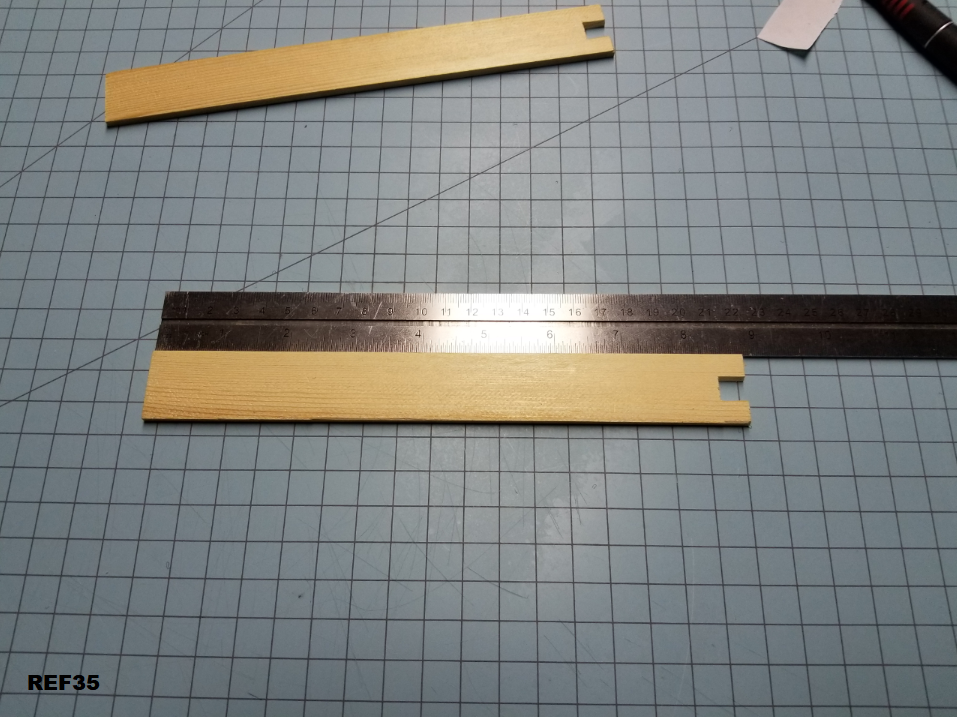
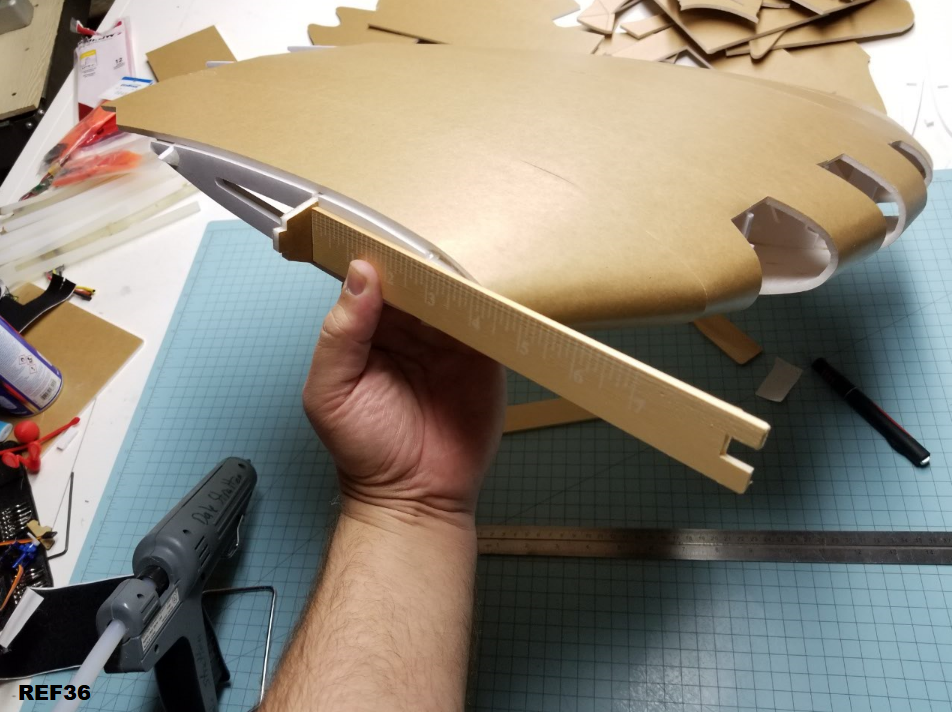
Cut the paint stick to length. 8.75". I'll include a guide on the plans. You can also trim it to width if you have a super wide stick. These ones from the dollar store are 1" wide. The notches cut out of the front are to accommodate the long shaft that sticks out of the back of the C pack motor. You may not have to do this.
REF35
This is how it will glue up. Make sure it's straight. If the back end of your stick is square, you're probably pretty safe just butting it up against the spar. I'll include lines on the plans for that last rib to aid in alignment.
You're looking for the paint stick to be exactly inline with the body of the plane. If you're off a bit, no big deal, just try and make sure that both sides are the same.
REF36
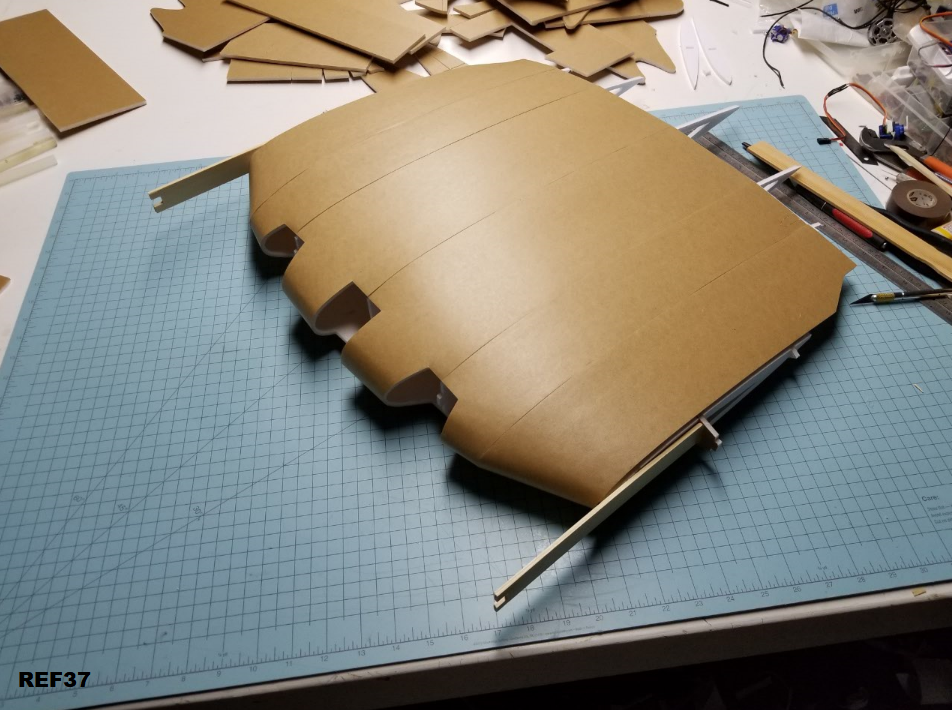
Here's both sticks glued in place.
REF37
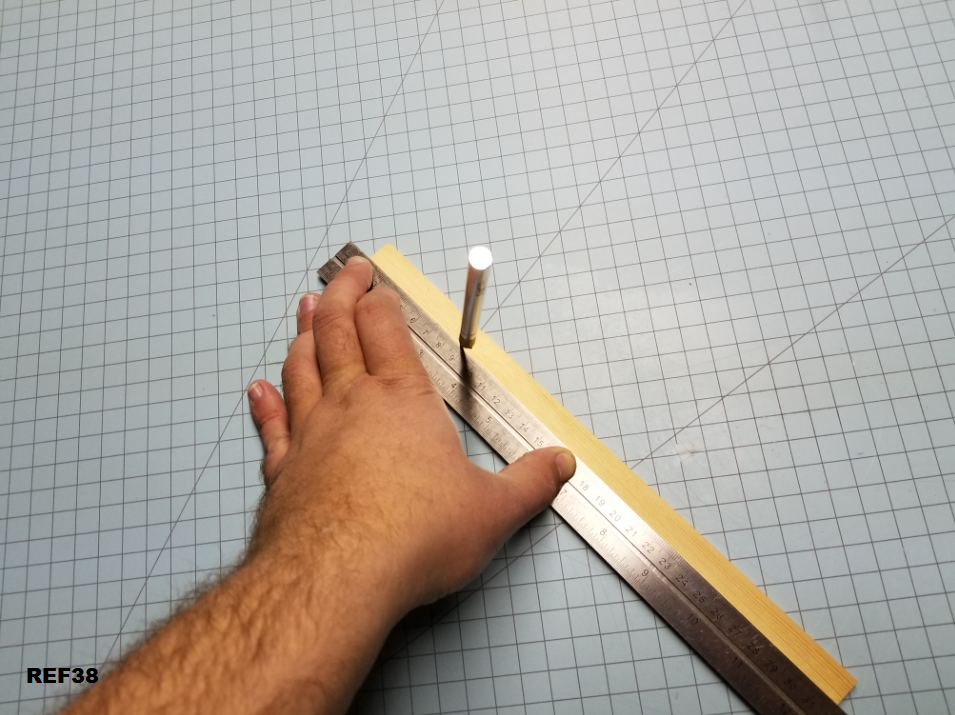
Next split off a section from another paint stick. This is actually quite easy to do by just running a razor blade down the length. I cut my stick here in half, but it would probably have been better to go with a little less. Check out reference pictures 52 & 53 to see why. You can leave it wide, but it may interfere with the final wing rib, which will then require modification.
REF38
You're going to want to cut that split section into a couple pieces.
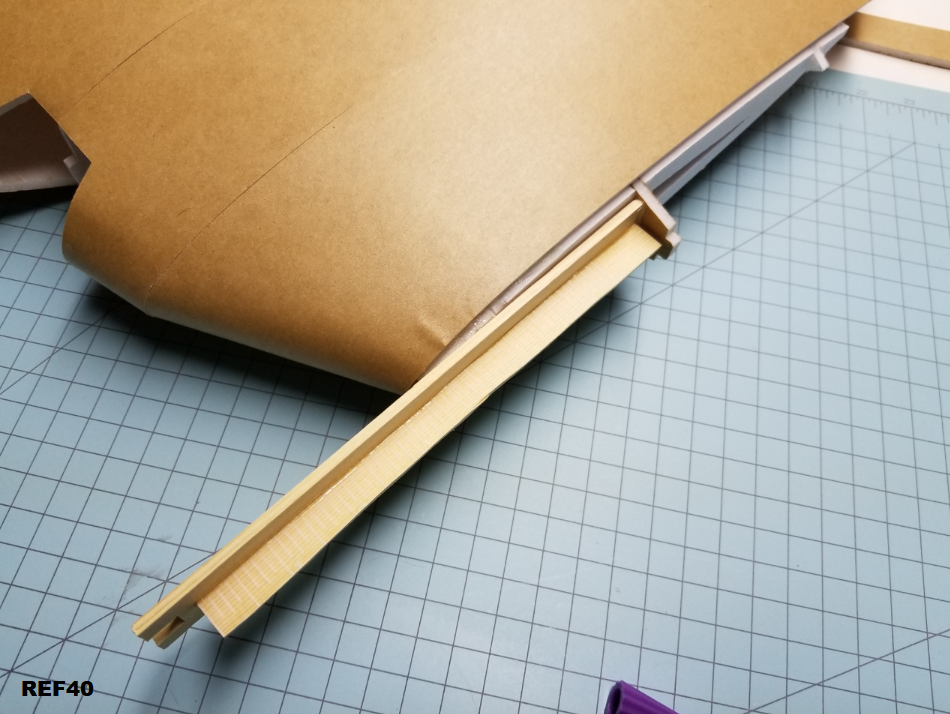
REF39
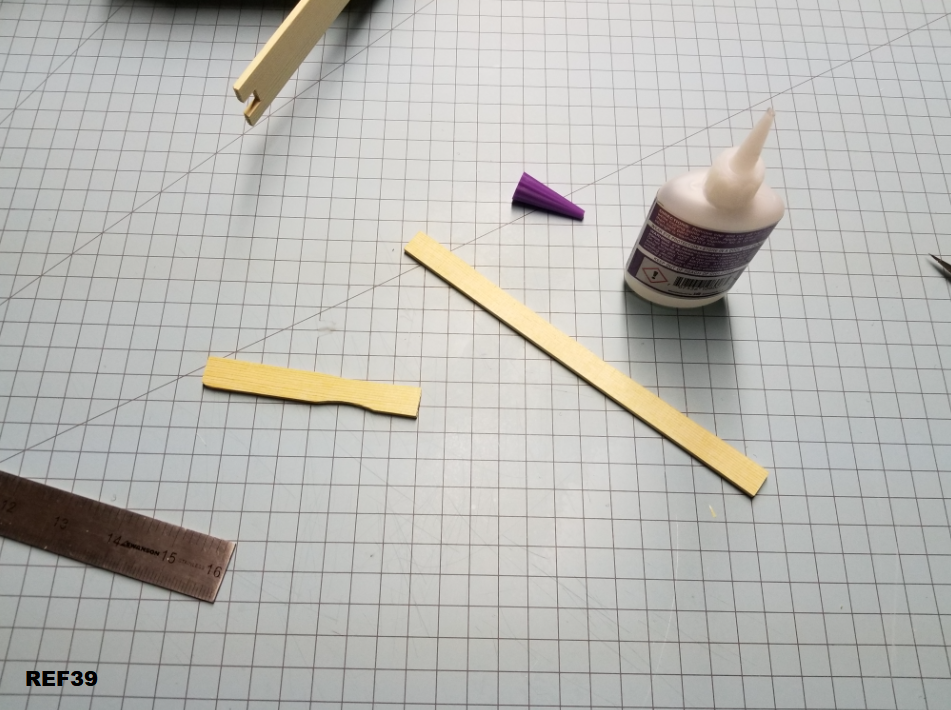
I didn't really measure, just cut off enough to do something like this. I used CA to glue these pieces together. Be careful if you have aerosol activator. One bit of mispray bubbled my foamboard. Fortunately, that spot will be covered up by the motor pod skin.
REF40
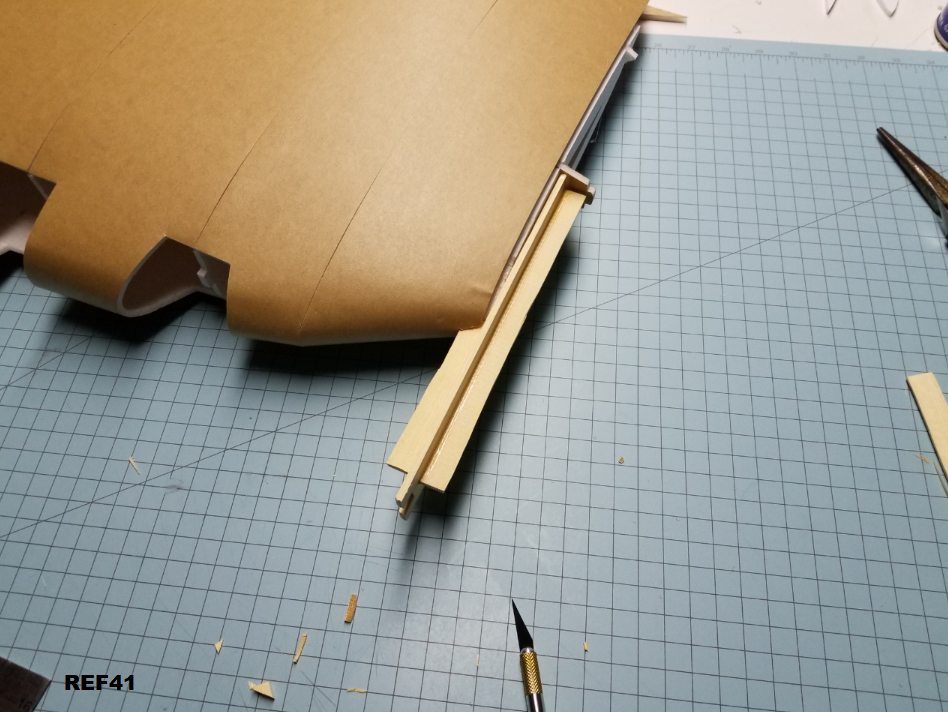
And the other side. As you can see, I cut a bit of the foam away so I could slide the piece in further. No clue if that's necessary, It's quite likely strong enough even if you don't fit it in. I suppose if you decided to put giant motors on your plane, that a stronger arrangement might be in order. Maybe make some tabs and slots for the paint stick pieces.
REF41
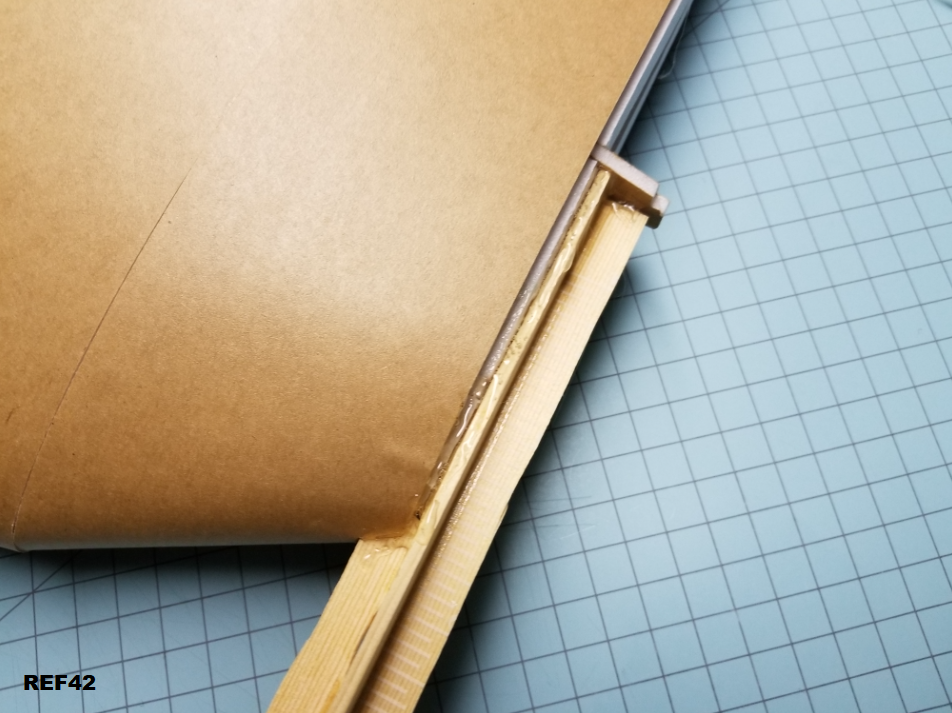
Squirted some hot glue into the cracks on both sides for good measure.
REF42
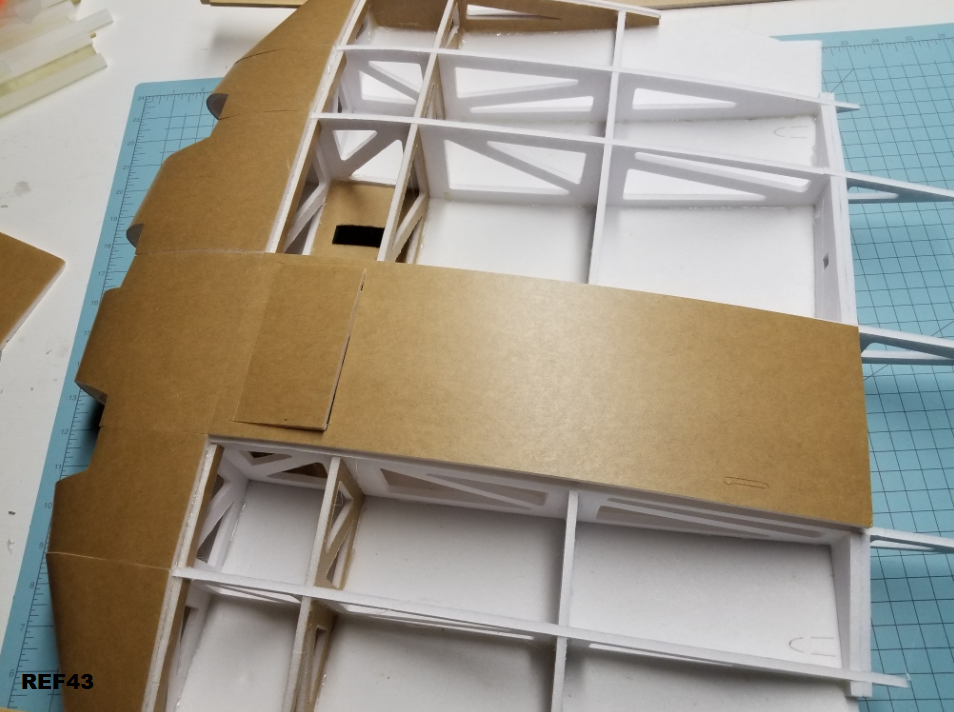
Next, the bottom skin pieces. I'll include battery doors on both middle sections in the plans so you can choose which side you want to use. Or both. I'd make a hot glue hinge on that door to strengthen it up.
Glue it on the same way you did with the upper skin pieces. Remove paper from the back side.
All of the bottom skin pieces are just slightly over length. So butt them up against the folded over front skin pieces. The back can be trimmed afterwards if needed.
REF43
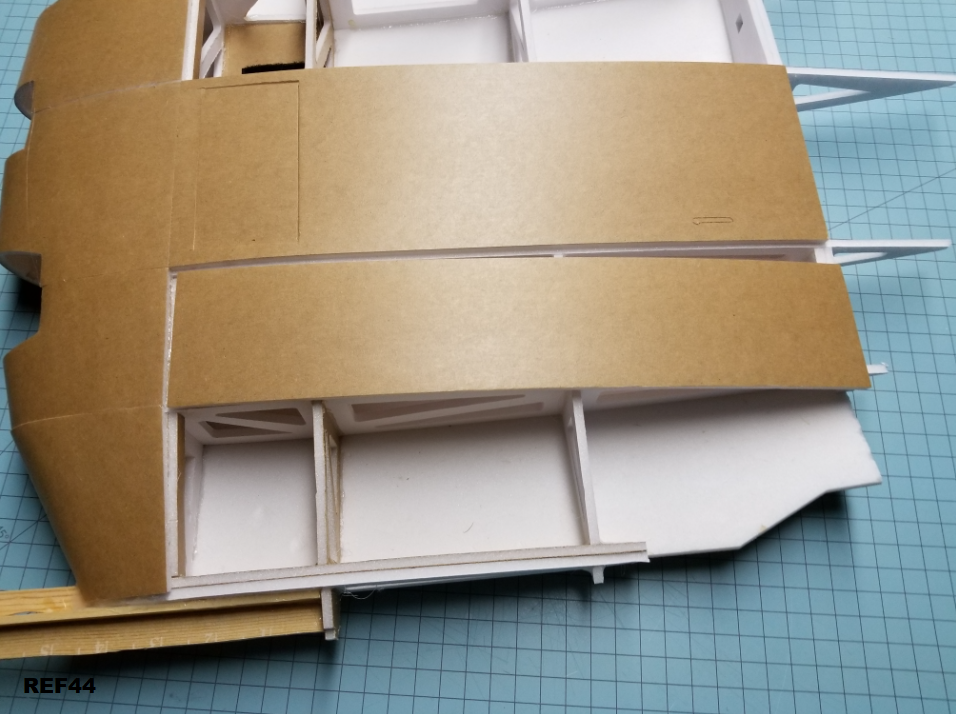
Glue in the next piece. This piece is curved a bit on either side. I didn't really have a good way to mark it, but you'll be able to tell when you do a test fit. One direction will be flush, the other will leave a gap. Use whatever orientation gives the best fit.
REF44
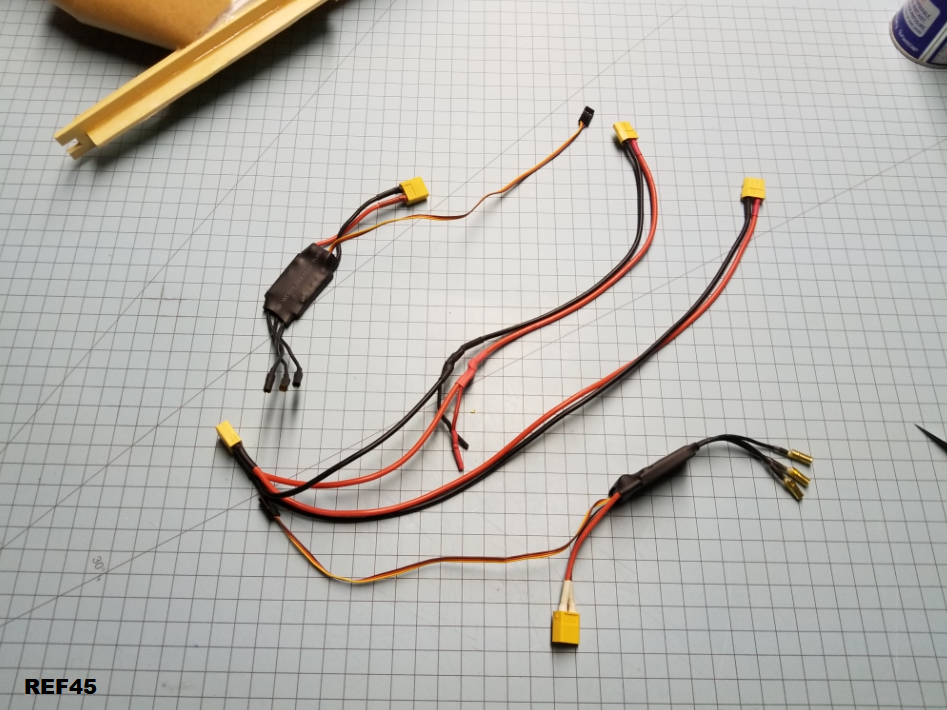
And, that's about as far as you'll want to go before adding some electronics. I chose to use a splitter power cable as I had one handy, but you could run two batteries if you wanted.
REF45
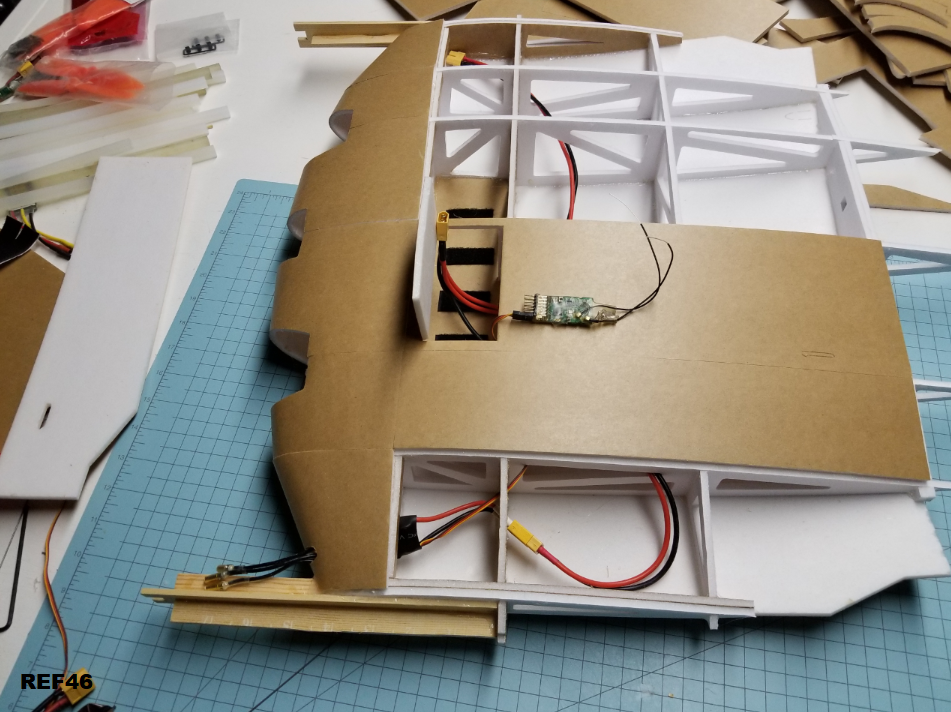
There is a ton of room inside this plane, so you can route stuff wherever you want. If you want to solder on longer motor wires, you could run the ESC wires through the pod. I chose to come cut a hole instead as it's faster, and very easy to swap motor direction this way. If you're concerned about cooling for your setup, you could place the ESC behind the actual engine air ducts if you wanted. I'm not going to run any cooling for this build. There's lots of room inside the plane, and the 30A esc's have lots of headroom for C pack motors.
REF46
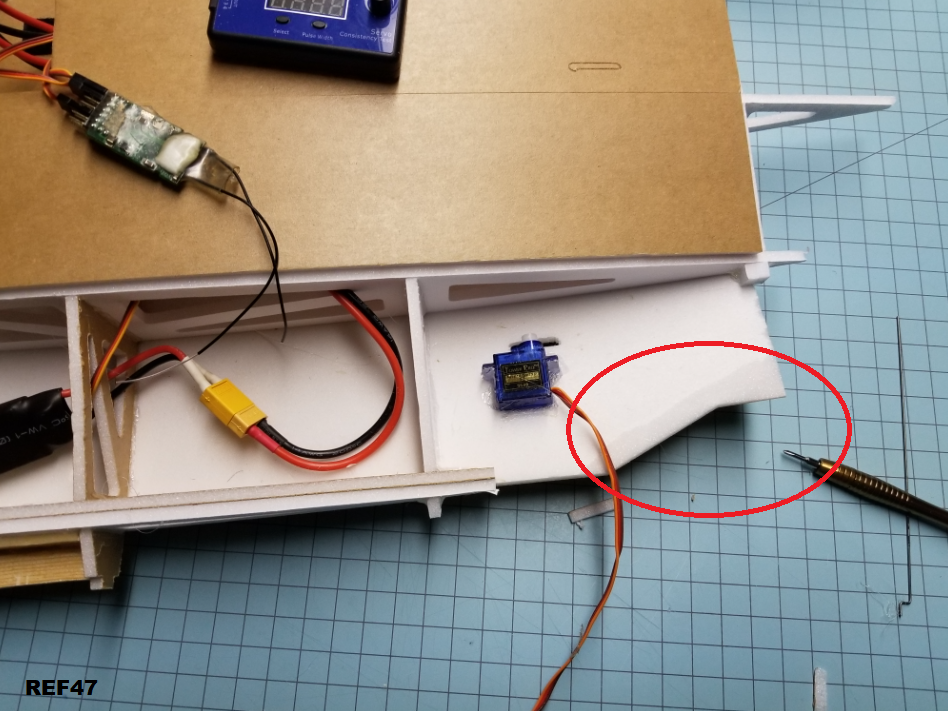
Next, glue in a servo like so. It won't be in exactly this position on the plans, but it'l be close. Changed it after I installed mine. Also make note of the bevel I put on the skin piece circled in red. I cut that bevel a little deep. Stuff will fit better later on if you leave half of the foam thickness for the bevel.
REF47
Do both sides.
REF48
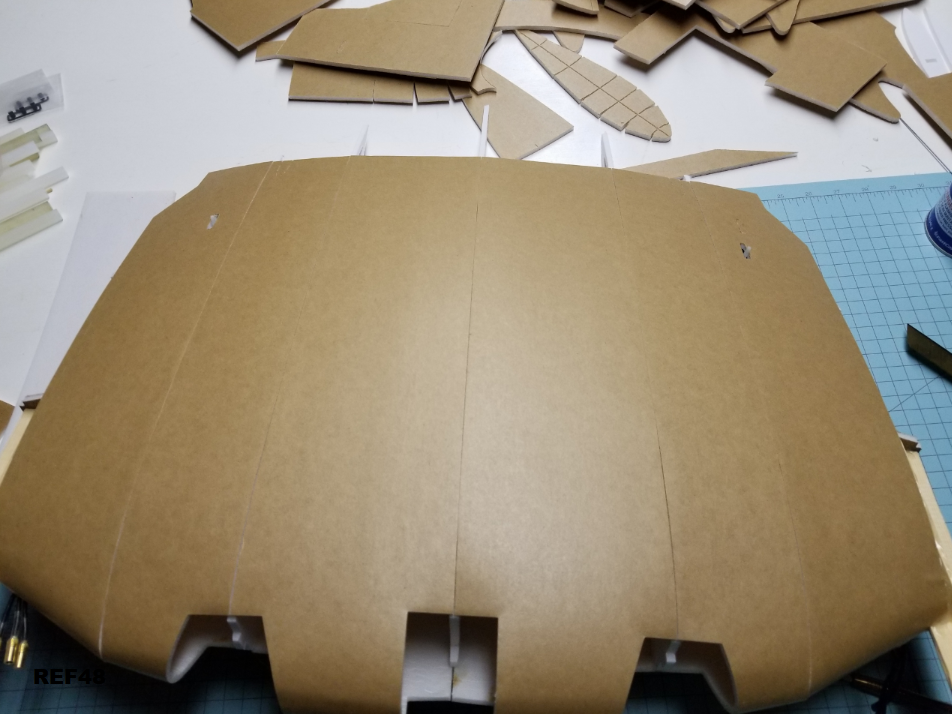
Once your ESC's, wires, and servos are in place, we can put on the 3rd bottom skin piece. It is also beveled. Ignore the other servo hole. Wasn't sure when I cut the parts if I wanted stuff on the top or bottom.
REF49
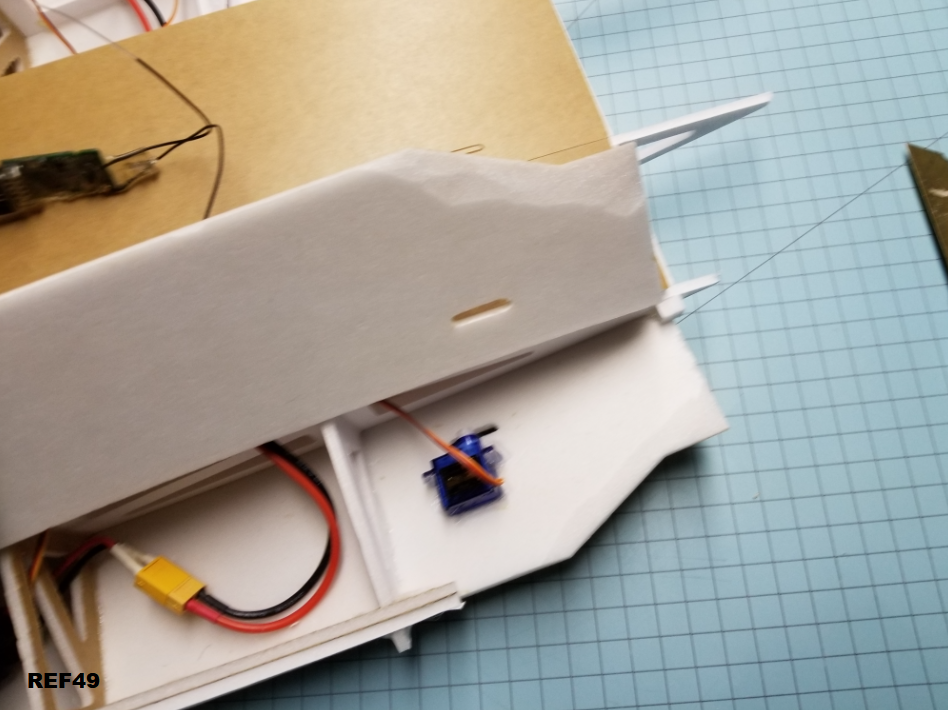
Glue the skin piece down like normal, except for the red areas. I find it's easier to add glue here after the piece has already been fastened in place.
REF50
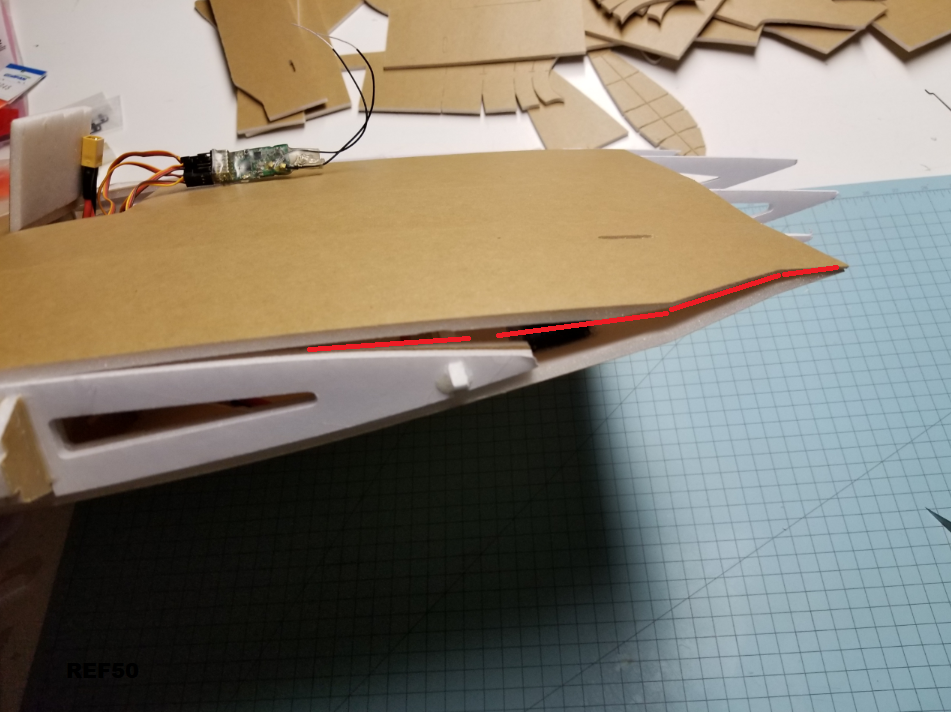
And here's why I like to wait. You want to make sure the skins don't curl up or down on the ends. You want them to be straight and inline with each other when all of the bottom pieces are on.
REF51
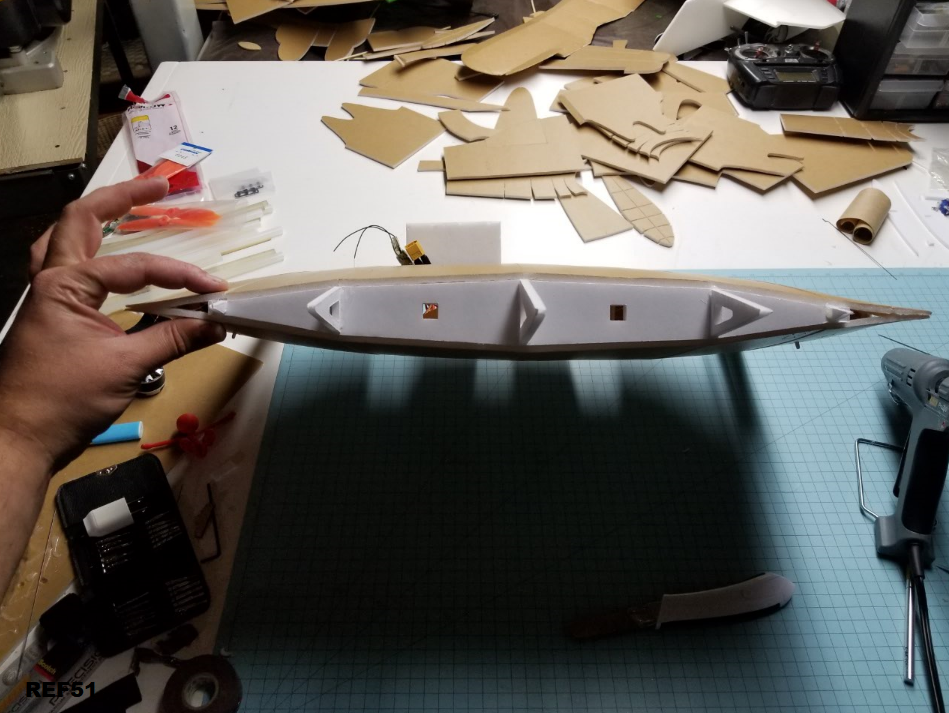
After all the bottom skin pieces are in place, you can add the final wing rib. I had to modify mine a bit with the tip of my hot glue gun to clearance the paint stick parts that I left a bit wide.
REF52
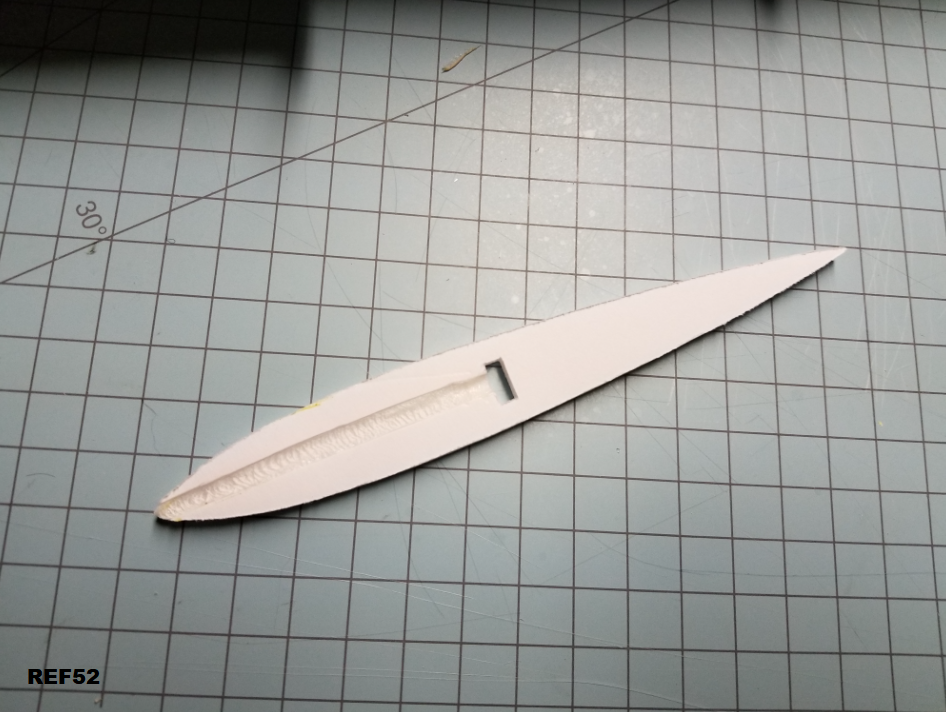
Here it is glued in place. Do both sides.
REF53
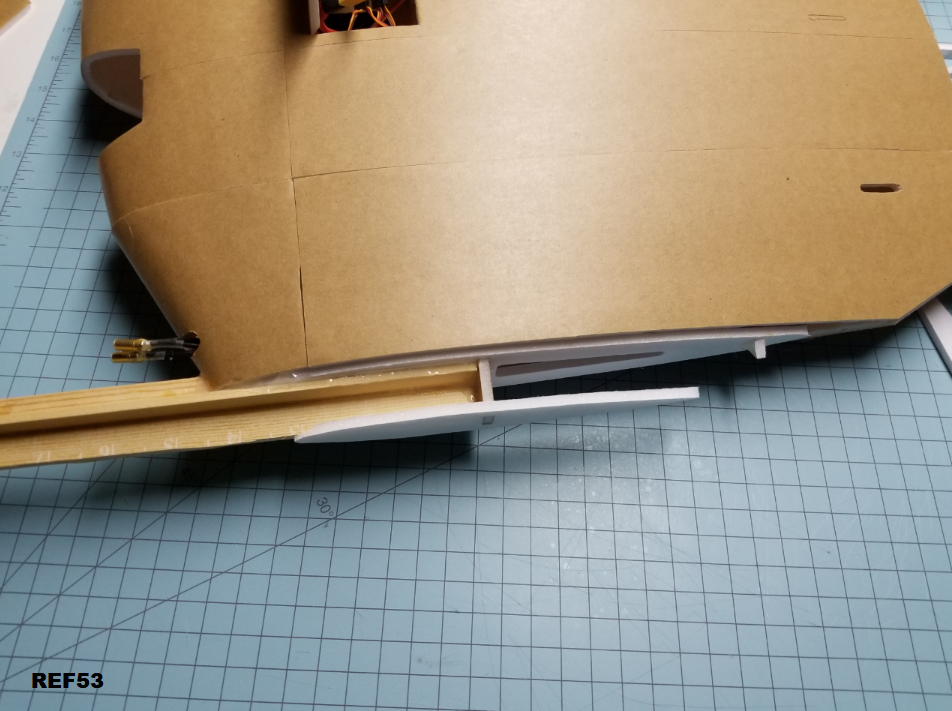
Next, the last 4 skin pieces. All 4 are identical.
REF54
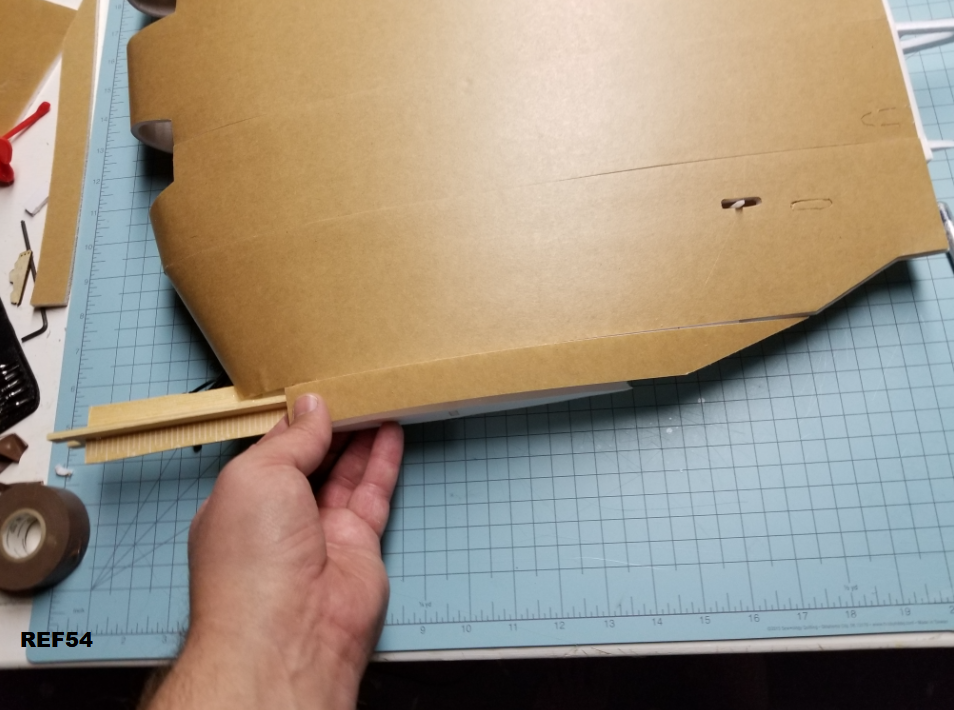
Bevel and clearance like so. You may have to do more or less depending on the size of your paint stick.
REF55
Glue into place.
REF56
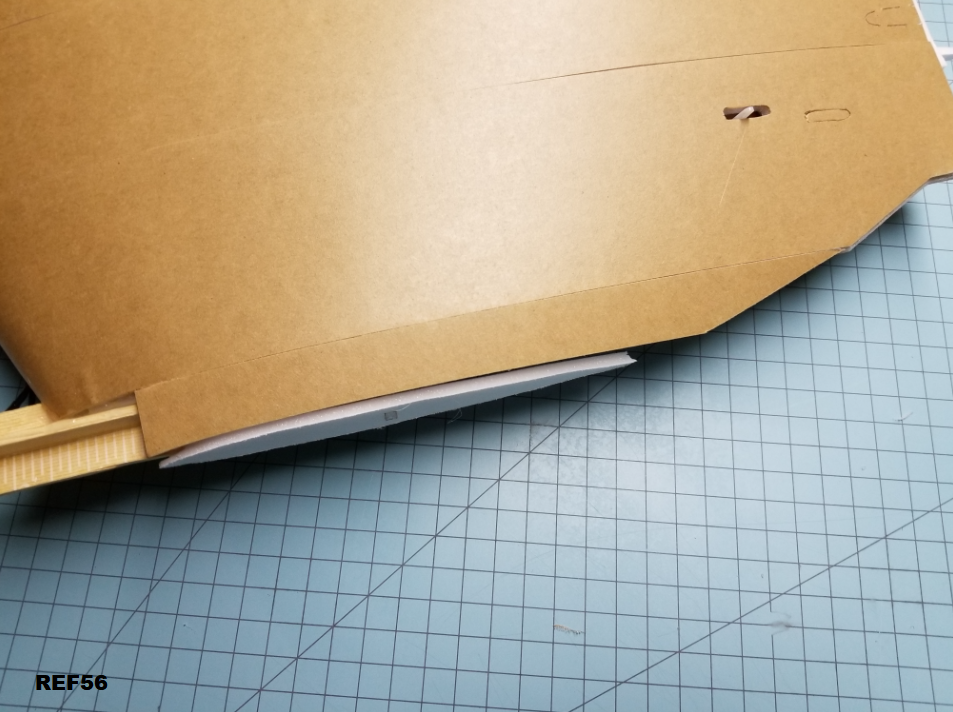
You can add a bit more glue to the underside if needed. Also note that I beveled the edge.
REF57
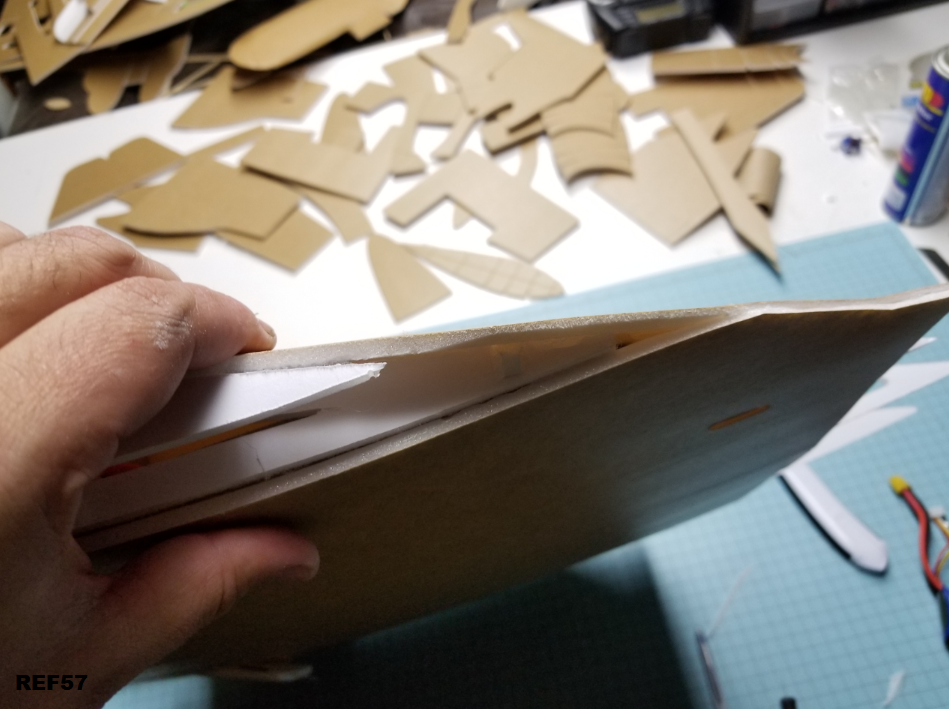
Flip the plane over and do the bottom. Here it is all beveled up.
REF58
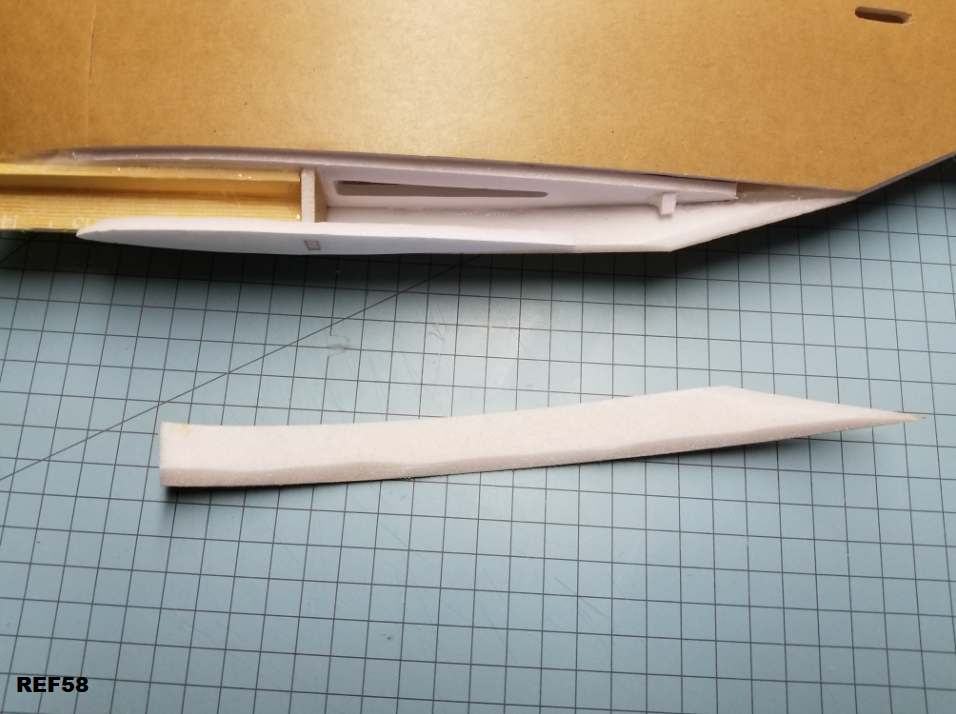
Do both sides.
REF59
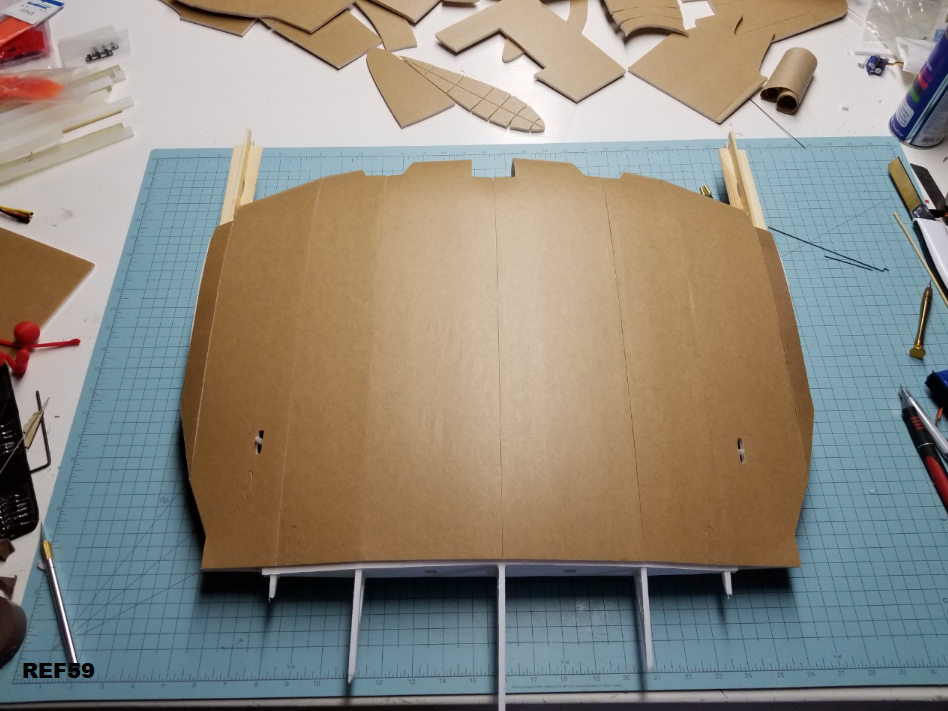
Next up are the tail section skin pieces.
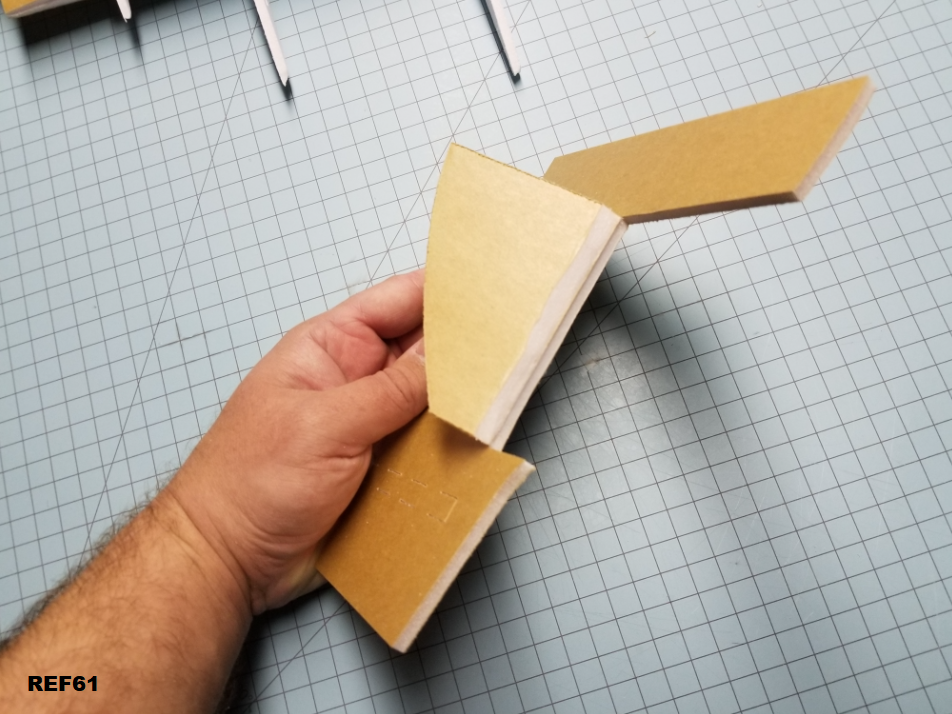
REF60
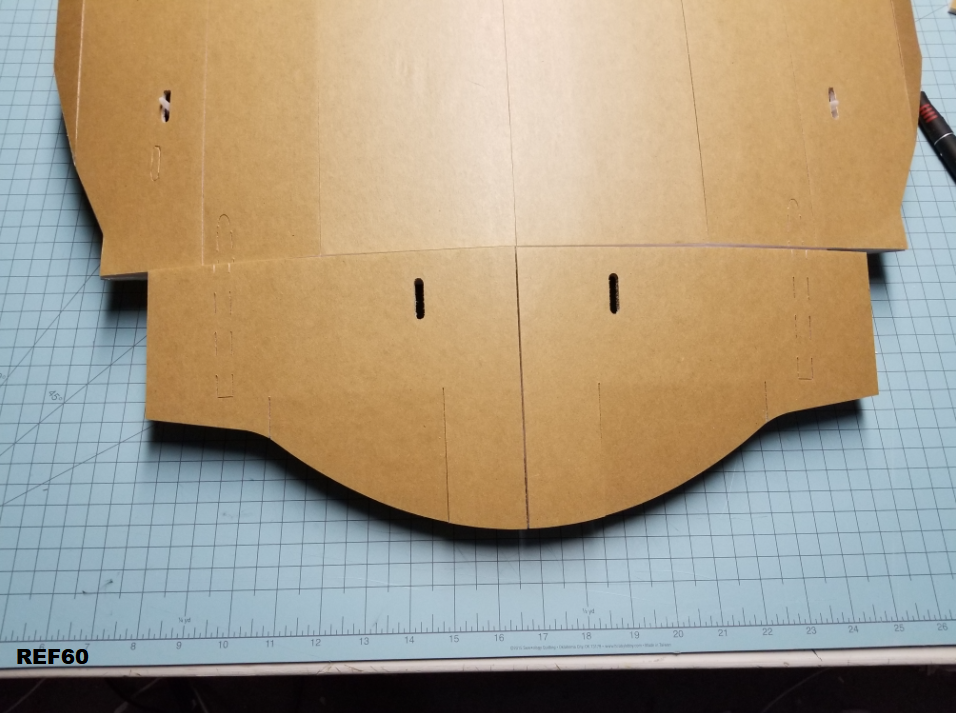
Bevel the hinge, and smear in a small amount of hot glue to reinforce it.
REF61
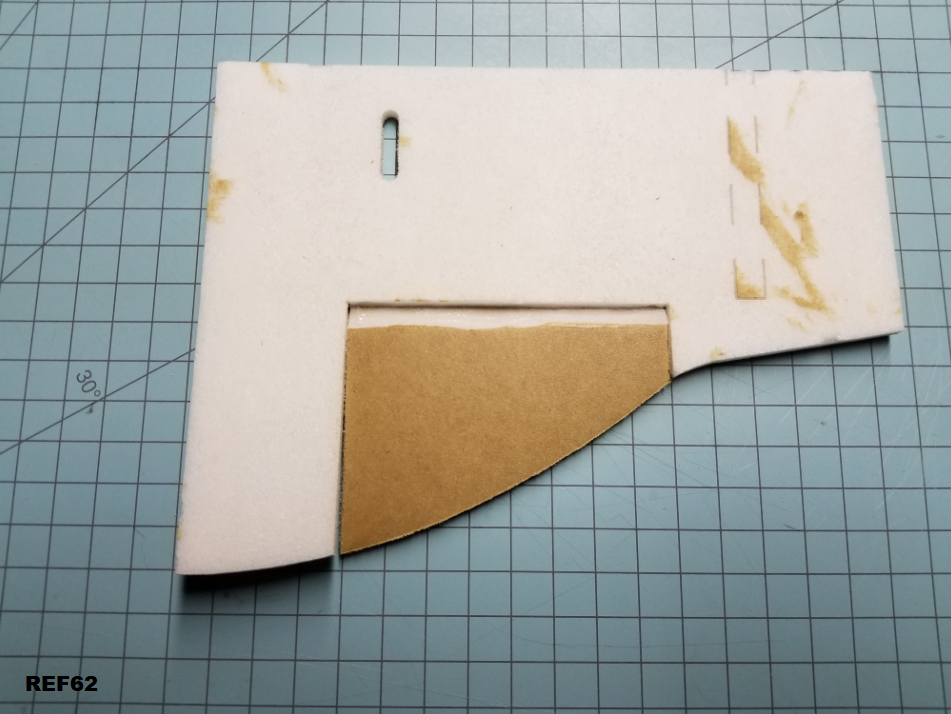
Remove the paper from the back side like so.
REF62
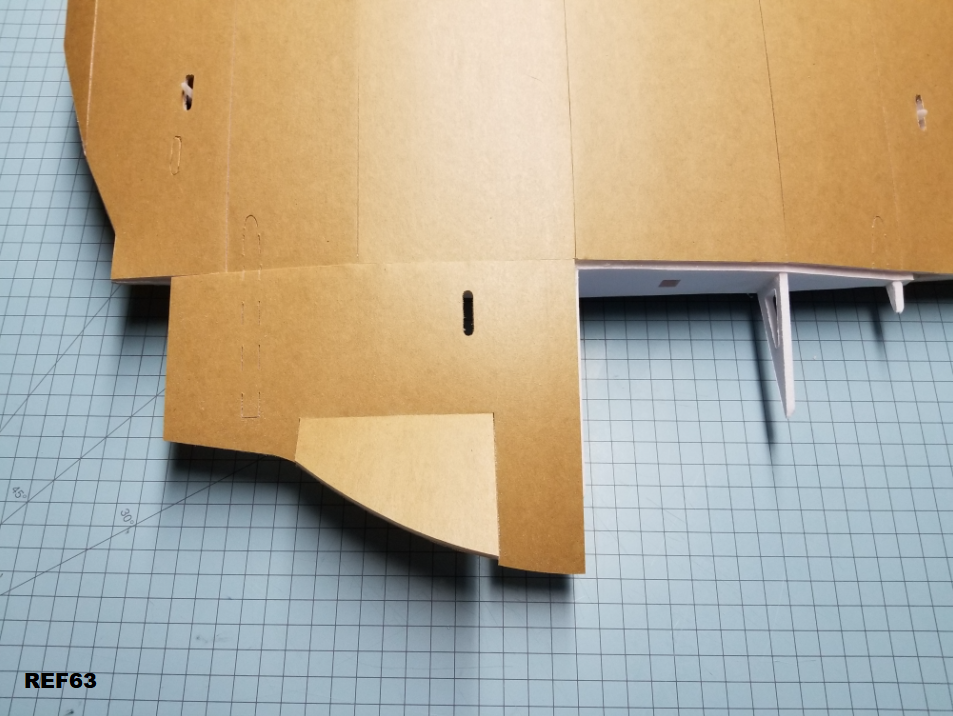
Glue in place.
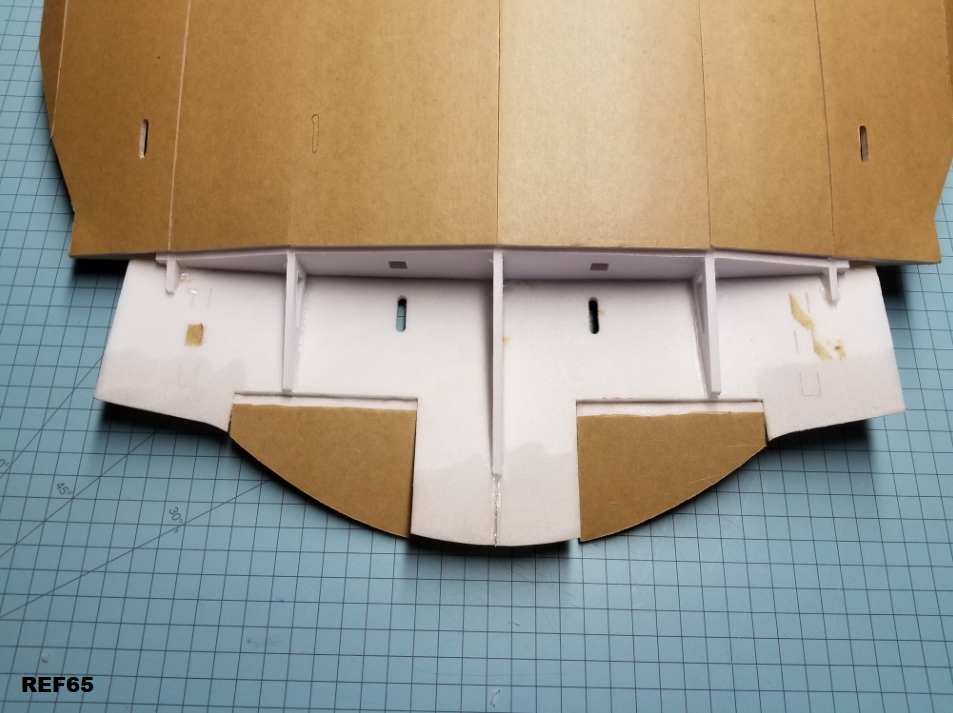
REF63
REF64
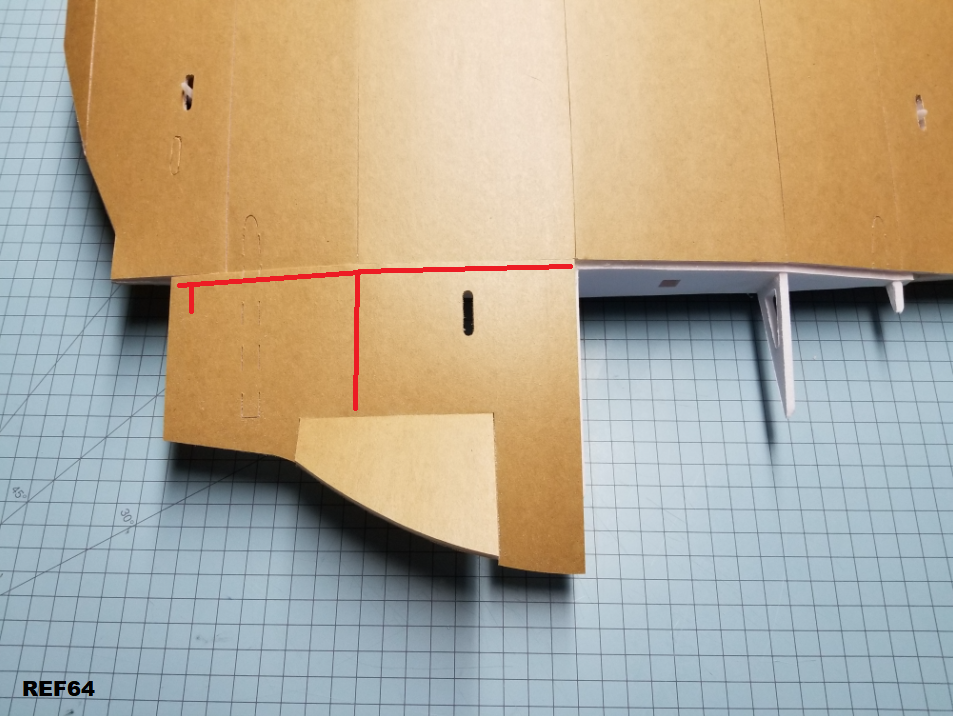
You can add addition glue from the bottom side if needed. Also note the bevels I've added to the foam.
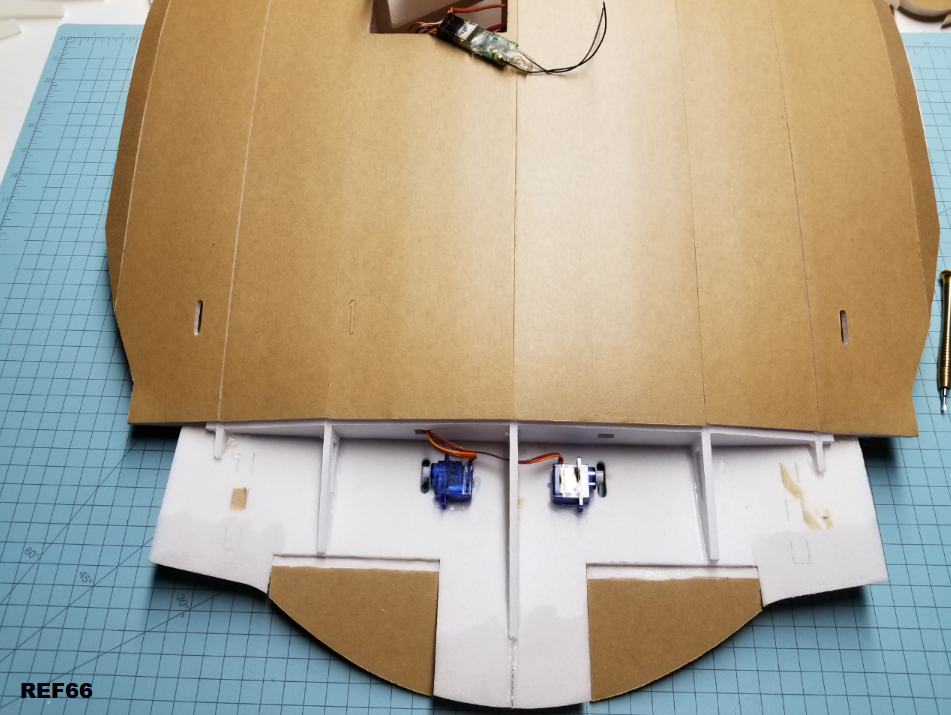
REF65
Install servos like so. I just dropped the wires together through the holes in the spars up to my receiver.
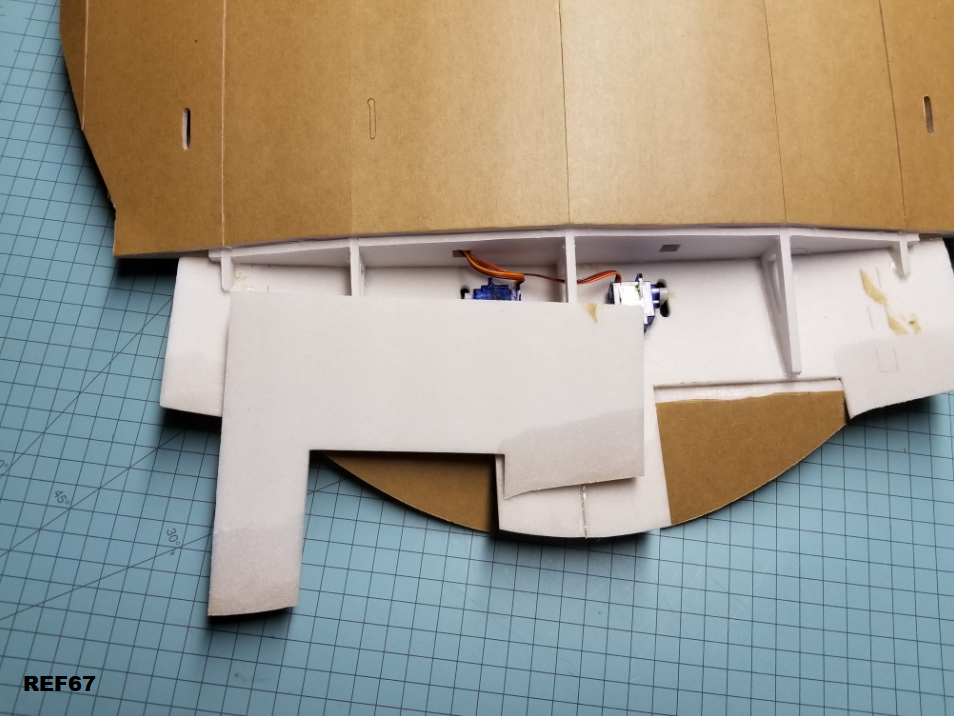
REF66
Once the servos are in place, it's time for the bottom tail skin sections. They are beveled just like the top.
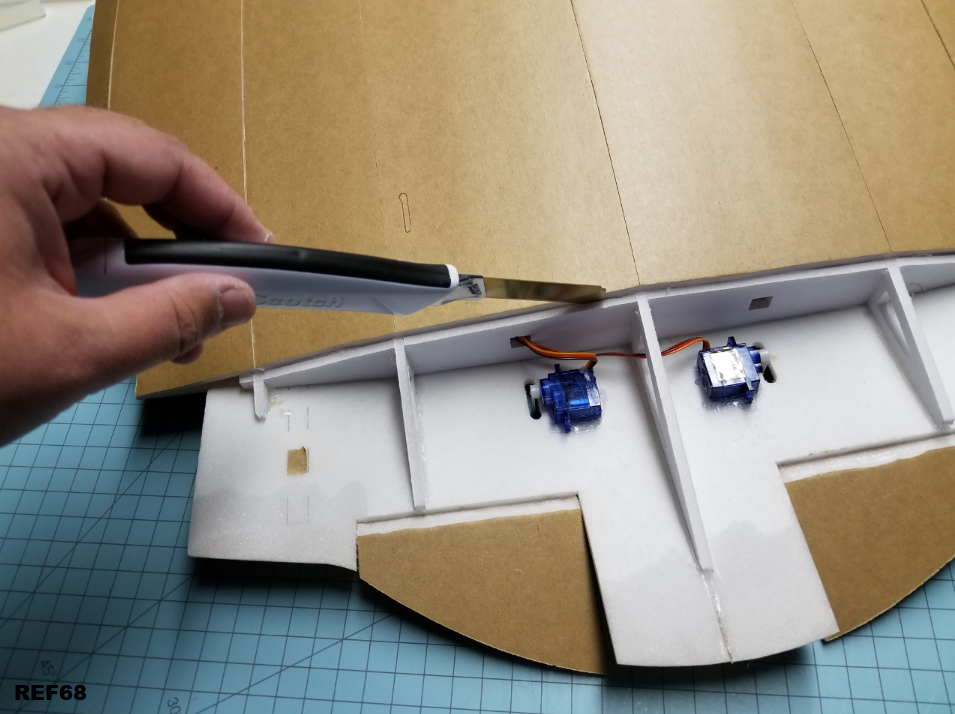
REF67
If needed, you can trim away the excess left from the other bottom skin sections. Depending on how much glue you used on the rear spar, fitting the blade between those two pieces makes a nice guide so you get straight cuts.
REF68
It's easiest to glue this in place in two steps. Red first, then green.
REF69
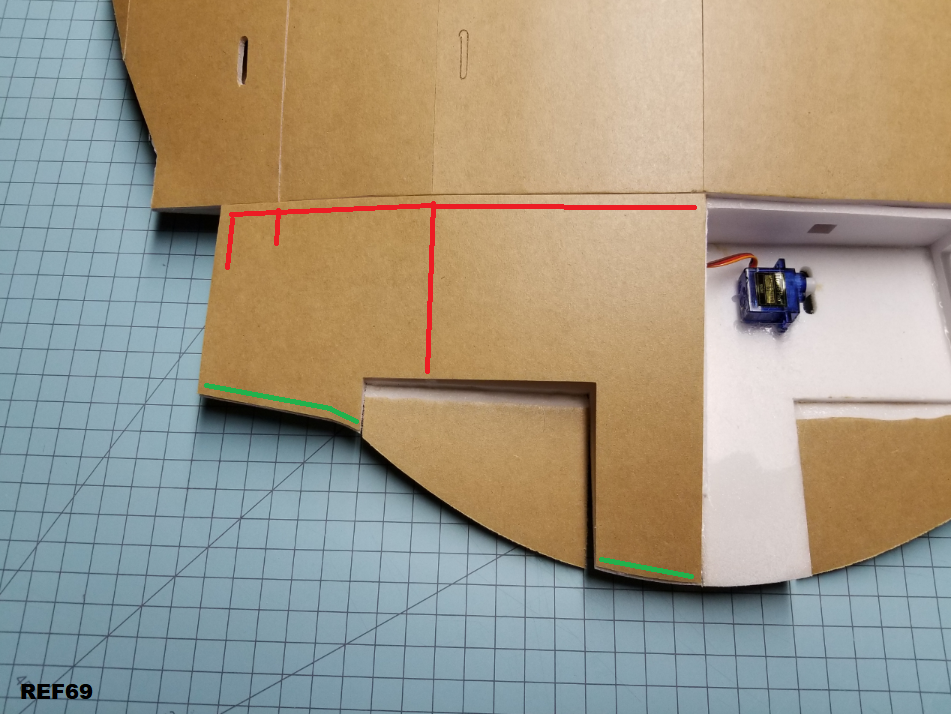
Glue on both sides.
REF70
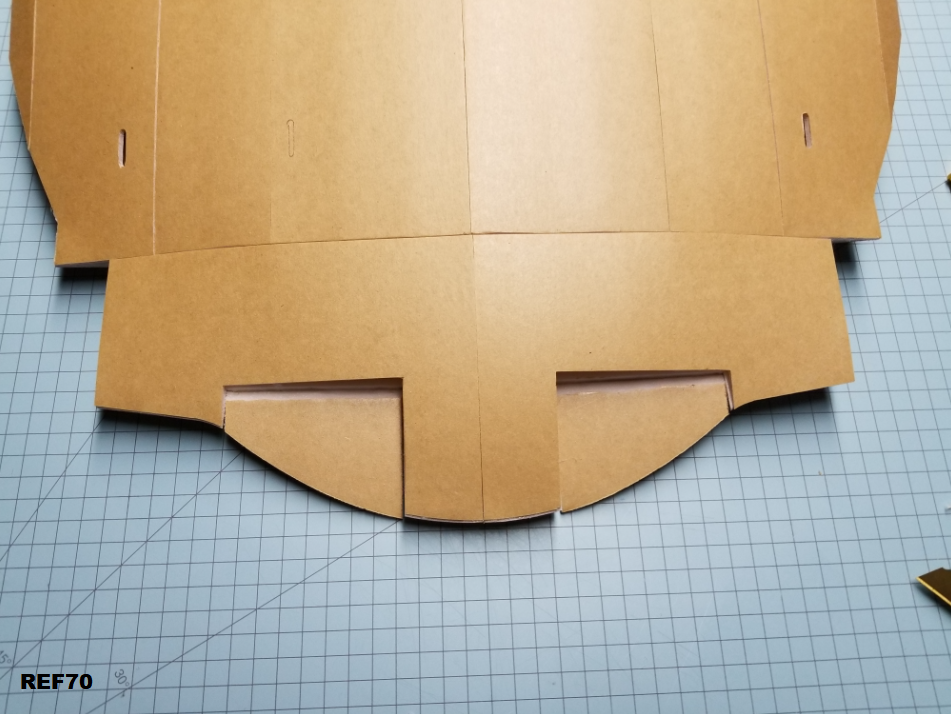
Next, grab the taileron thingy. Remove paper, bevel and reinforce hinge with glue, then bevel all the show areas. I may have gone overboard with the red lines. That's where I add glue and fold over.
REF71
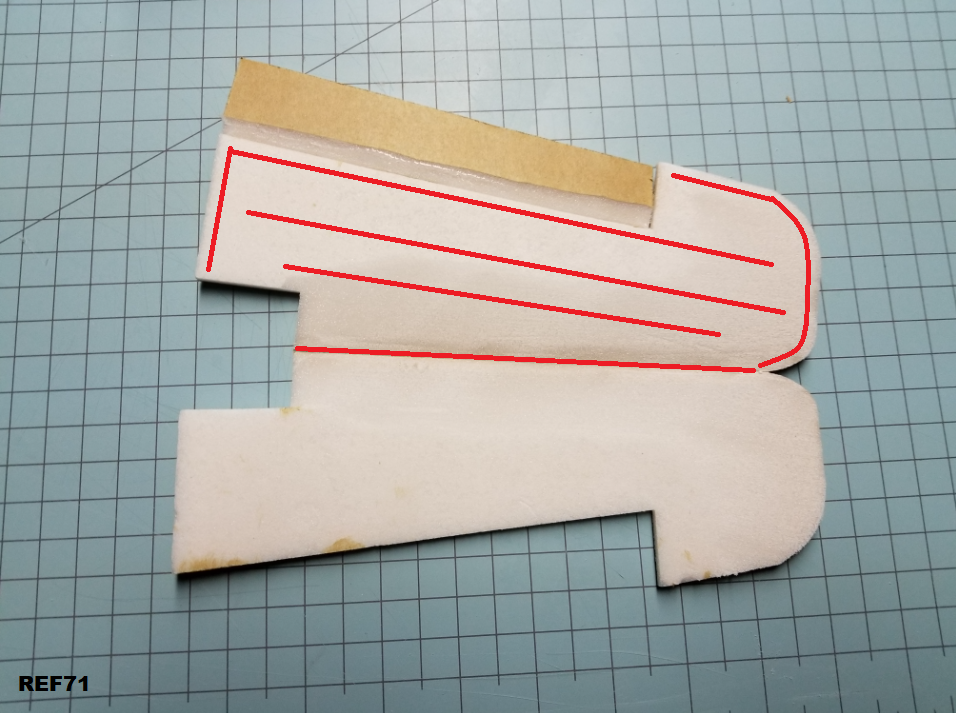
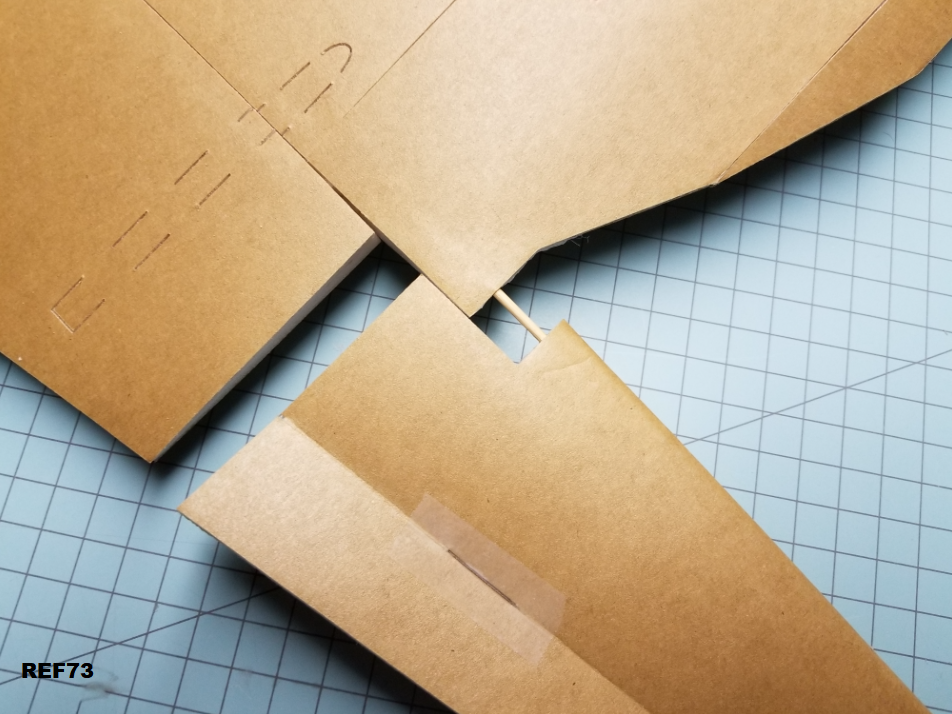
Once you've glued the pieces together you can start fitting them to the main body. I like to use BBQ skewers here to add additional strength.
REF72

Two short pieces is probably enough. Do a bunch of test fitting to ensure stuff slides together well, then glue together. You want the side tail pieces to stick straight out from the body. If you mess up and one side droops a bit, just make sure the other matches. Don't worry about a perfect fitup either. On the real plane there is a decent gap in the skin between the main plane and these sections.
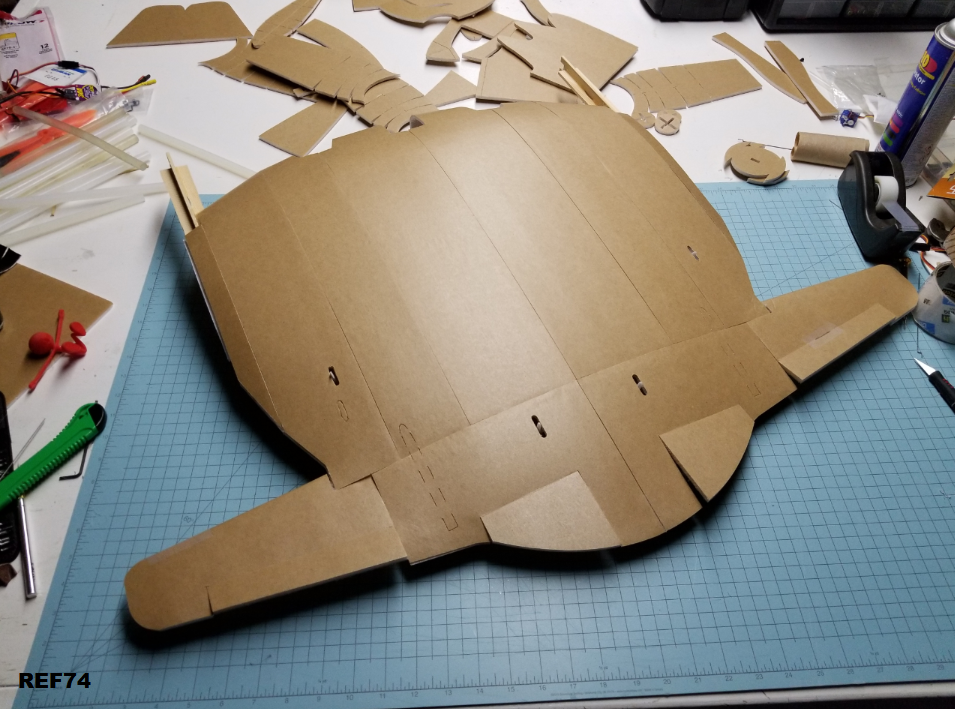
REF73
Do both sides.
REF74
REF32
Flip it over and use your attachment method of choice. I like velcro, straps would work as well. Yep, it's crinkled. I stepped on it.
REF33
Slide into the battery area and glue in place. Think I'll alter the size of the tray a bit to make it easier to get into place.
REF34
Cut the paint stick to length. 8.75". I'll include a guide on the plans. You can also trim it to width if you have a super wide stick. These ones from the dollar store are 1" wide. The notches cut out of the front are to accommodate the long shaft that sticks out of the back of the C pack motor. You may not have to do this.
REF35
This is how it will glue up. Make sure it's straight. If the back end of your stick is square, you're probably pretty safe just butting it up against the spar. I'll include lines on the plans for that last rib to aid in alignment.
You're looking for the paint stick to be exactly inline with the body of the plane. If you're off a bit, no big deal, just try and make sure that both sides are the same.
REF36
Here's both sticks glued in place.
REF37
Next split off a section from another paint stick. This is actually quite easy to do by just running a razor blade down the length. I cut my stick here in half, but it would probably have been better to go with a little less. Check out reference pictures 52 & 53 to see why. You can leave it wide, but it may interfere with the final wing rib, which will then require modification.
REF38
You're going to want to cut that split section into a couple pieces.
REF39
I didn't really measure, just cut off enough to do something like this. I used CA to glue these pieces together. Be careful if you have aerosol activator. One bit of mispray bubbled my foamboard. Fortunately, that spot will be covered up by the motor pod skin.
REF40
And the other side. As you can see, I cut a bit of the foam away so I could slide the piece in further. No clue if that's necessary, It's quite likely strong enough even if you don't fit it in. I suppose if you decided to put giant motors on your plane, that a stronger arrangement might be in order. Maybe make some tabs and slots for the paint stick pieces.
REF41
Squirted some hot glue into the cracks on both sides for good measure.
REF42
Next, the bottom skin pieces. I'll include battery doors on both middle sections in the plans so you can choose which side you want to use. Or both. I'd make a hot glue hinge on that door to strengthen it up.
Glue it on the same way you did with the upper skin pieces. Remove paper from the back side.
All of the bottom skin pieces are just slightly over length. So butt them up against the folded over front skin pieces. The back can be trimmed afterwards if needed.
REF43
Glue in the next piece. This piece is curved a bit on either side. I didn't really have a good way to mark it, but you'll be able to tell when you do a test fit. One direction will be flush, the other will leave a gap. Use whatever orientation gives the best fit.
REF44
And, that's about as far as you'll want to go before adding some electronics. I chose to use a splitter power cable as I had one handy, but you could run two batteries if you wanted.
REF45
There is a ton of room inside this plane, so you can route stuff wherever you want. If you want to solder on longer motor wires, you could run the ESC wires through the pod. I chose to come cut a hole instead as it's faster, and very easy to swap motor direction this way. If you're concerned about cooling for your setup, you could place the ESC behind the actual engine air ducts if you wanted. I'm not going to run any cooling for this build. There's lots of room inside the plane, and the 30A esc's have lots of headroom for C pack motors.
REF46
Next, glue in a servo like so. It won't be in exactly this position on the plans, but it'l be close. Changed it after I installed mine. Also make note of the bevel I put on the skin piece circled in red. I cut that bevel a little deep. Stuff will fit better later on if you leave half of the foam thickness for the bevel.
REF47
Do both sides.
REF48
Once your ESC's, wires, and servos are in place, we can put on the 3rd bottom skin piece. It is also beveled. Ignore the other servo hole. Wasn't sure when I cut the parts if I wanted stuff on the top or bottom.
REF49
Glue the skin piece down like normal, except for the red areas. I find it's easier to add glue here after the piece has already been fastened in place.
REF50
And here's why I like to wait. You want to make sure the skins don't curl up or down on the ends. You want them to be straight and inline with each other when all of the bottom pieces are on.
REF51
After all the bottom skin pieces are in place, you can add the final wing rib. I had to modify mine a bit with the tip of my hot glue gun to clearance the paint stick parts that I left a bit wide.
REF52
Here it is glued in place. Do both sides.
REF53
Next, the last 4 skin pieces. All 4 are identical.
REF54
Bevel and clearance like so. You may have to do more or less depending on the size of your paint stick.
REF55
Glue into place.
REF56
You can add a bit more glue to the underside if needed. Also note that I beveled the edge.
REF57
Flip the plane over and do the bottom. Here it is all beveled up.
REF58
Do both sides.
REF59
Next up are the tail section skin pieces.
REF60
Bevel the hinge, and smear in a small amount of hot glue to reinforce it.
REF61
Remove the paper from the back side like so.
REF62
Glue in place.
REF63
REF64
You can add addition glue from the bottom side if needed. Also note the bevels I've added to the foam.
REF65
Install servos like so. I just dropped the wires together through the holes in the spars up to my receiver.
REF66
Once the servos are in place, it's time for the bottom tail skin sections. They are beveled just like the top.
REF67
If needed, you can trim away the excess left from the other bottom skin sections. Depending on how much glue you used on the rear spar, fitting the blade between those two pieces makes a nice guide so you get straight cuts.
REF68
It's easiest to glue this in place in two steps. Red first, then green.
REF69
Glue on both sides.
REF70
Next, grab the taileron thingy. Remove paper, bevel and reinforce hinge with glue, then bevel all the show areas. I may have gone overboard with the red lines. That's where I add glue and fold over.
REF71
Once you've glued the pieces together you can start fitting them to the main body. I like to use BBQ skewers here to add additional strength.
REF72
Two short pieces is probably enough. Do a bunch of test fitting to ensure stuff slides together well, then glue together. You want the side tail pieces to stick straight out from the body. If you mess up and one side droops a bit, just make sure the other matches. Don't worry about a perfect fitup either. On the real plane there is a decent gap in the skin between the main plane and these sections.
REF73
Do both sides.
REF74


Michael9865
Elite member
Wow, fantastic job!
Got the final version pretty much wrapped up. Have parts 3D printing, and a bunch of work to do on the rest of the build log.
Userofmuchtape&glue
Posted a thousand or more times
I LOVE what you are doing here localfeind.
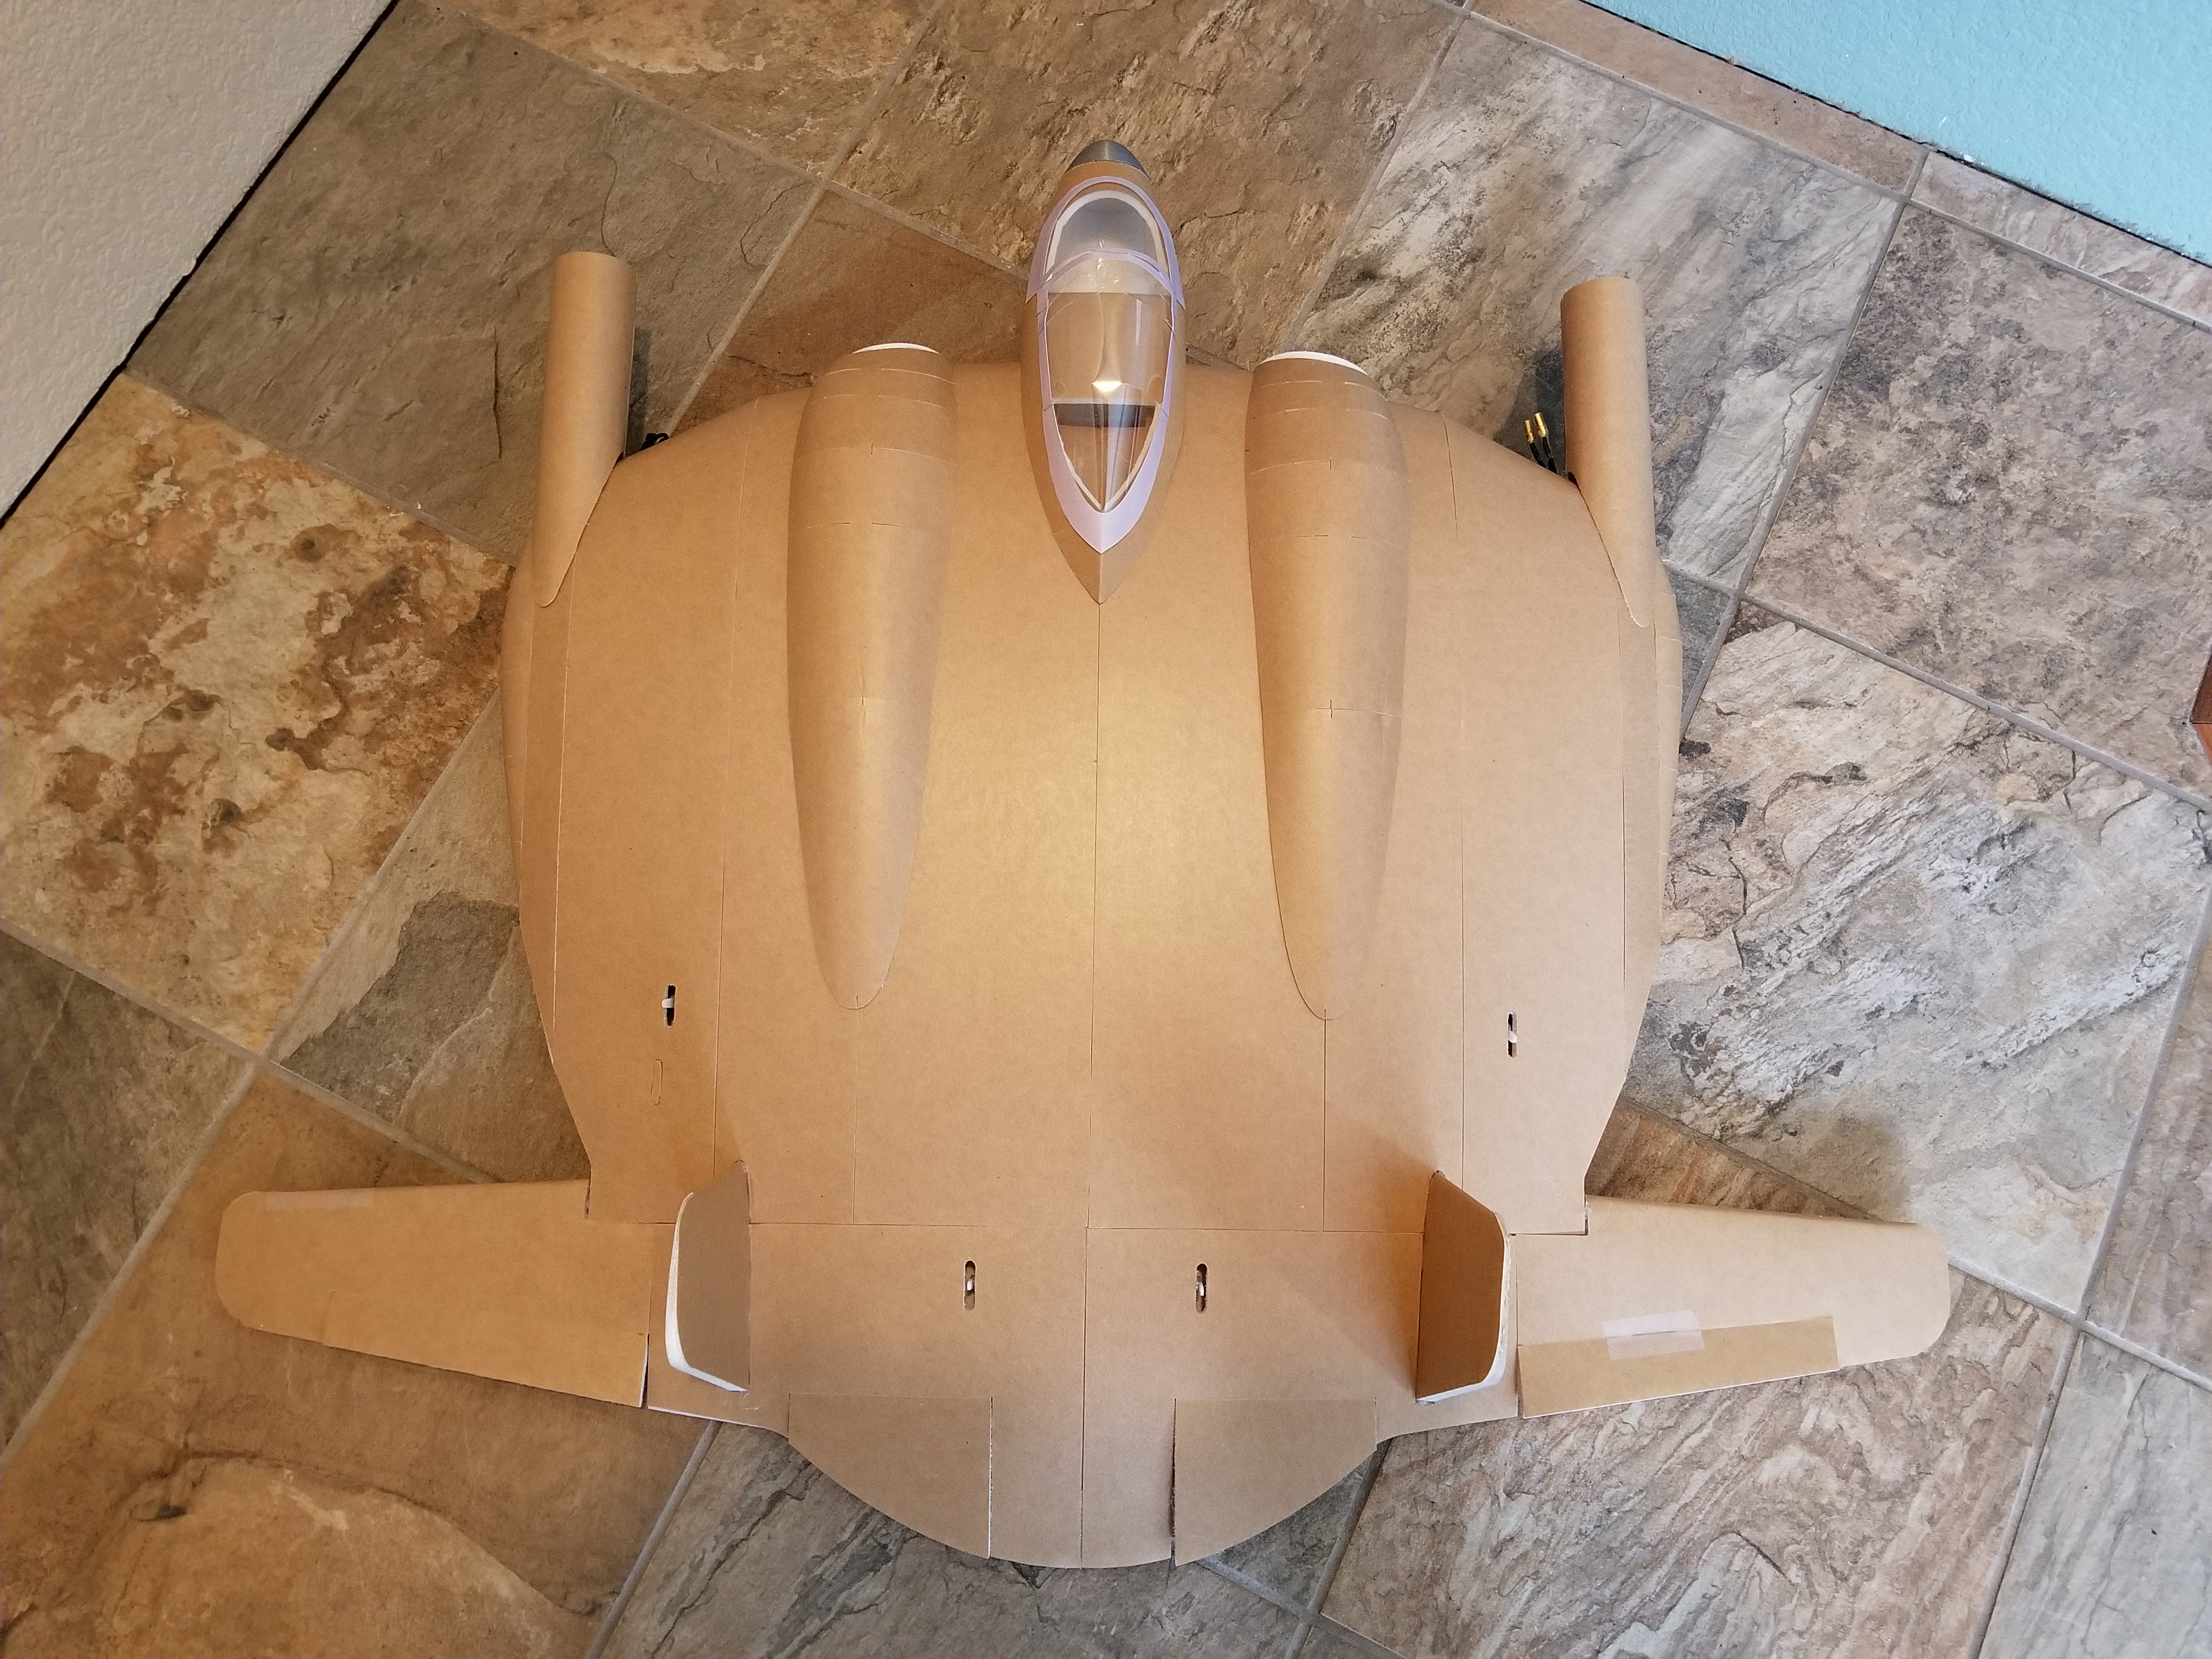
That cockpit look amazing! What do you think about doing a set of plans for hand cutting, and getting rid of the holes etc.
It would be heavier, but easer to hand cut.
That cockpit look amazing! What do you think about doing a set of plans for hand cutting, and getting rid of the holes etc.
It would be heavier, but easer to hand cut.
I LOVE what you are doing here localfeind.
That cockpit look amazing! What do you think about doing a set of plans for hand cutting, and getting rid of the holes etc.
It would be heavier, but easer to hand cut.
I made the cuts in the ribs look like that because I could, as it's not a problem for my CNC machine.
You could go without the holes, though it's a decent amount of weight saved. A better option would be to cut the holes, but don't worry about them being pretty. It's all inside the plane anyway.
You could also use something like a hole saw:
Userofmuchtape&glue
Posted a thousand or more times
Yep righto. Yeah if you have a CNC, the temptation to add things like that would be high!
All ready to fly, but it's raining...


Similar threads
- Replies
- 6
- Views
- 1K
- Replies
- 53
- Views
- 8K
- Replies
- 56
- Views
- 11K