
I have finally managed to get myself building the Squadron 13's P-61!

I have been drooling over most models of this plane and it has been on my radar for a while. I am finally started building the plane! After having a conversation with Jack (@Niez13 ) on the AviationRCNoob Podcast Episode 33 (Sept 18th) I was laying out the sheets, when and RC friend surprised me and laser cut a Kit for me to start from. To that friend: Many Thanks! After looking through the pieces, I realized how fortunate that was. as some are quite delicate. Don't let that discourage you though. This build has all the call signed of a Master series build, to get the edge of your table ready and follow along if you are building along
After punching the laser cut pieces out and ensuring I had all the pieces, I went to Jack's build log here and pictures on The Squadron's P-61 page
if I learned nothing from talking to Jack and reviewing the plans and notes it is:
History of the P-61


Reserved
here is some more history to watch:
FS Plane Specs.
Specifications (P-61B-20-NO)
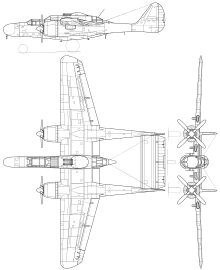
Northrop P-61B Black Widow 3-view drawing
Data from Jane's Fighting Aircraft of World War II,,[44] Northrop P-61 Black Widow.[45]
General characteristics
RC Plane Specs (from 13th Squadron Page)
What I will likely do different:
Black DTFB
Metal Gear Servos, and 2204 2300kv motors with 5x4.5x3 dalprops that I have around.
I plan to FPV in the Cockpit and try and scale build and light a cockpit.
I have been drooling over most models of this plane and it has been on my radar for a while. I am finally started building the plane! After having a conversation with Jack (@Niez13 ) on the AviationRCNoob Podcast Episode 33 (Sept 18th) I was laying out the sheets, when and RC friend surprised me and laser cut a Kit for me to start from. To that friend: Many Thanks! After looking through the pieces, I realized how fortunate that was. as some are quite delicate. Don't let that discourage you though. This build has all the call signed of a Master series build, to get the edge of your table ready and follow along if you are building along
After punching the laser cut pieces out and ensuring I had all the pieces, I went to Jack's build log here and pictures on The Squadron's P-61 page
if I learned nothing from talking to Jack and reviewing the plans and notes it is:
*NOTE* - Roll tail boom pieces with tape and leave overnight.
History of the P-61


Reserved
here is some more history to watch:
Specifications (P-61B-20-NO)
Northrop P-61B Black Widow 3-view drawing
Data from Jane's Fighting Aircraft of World War II,,[44] Northrop P-61 Black Widow.[45]
General characteristics
- Crew: 2–3 (pilot, radar operator, optional gunner)
- Length: 49 ft 7 in (15.11 m)
- Wingspan: 66 ft 0 in (20.12 m)
- Height: 14 ft 8 in (4.47 m)
- Wing area: 662.36 sq ft (61.535 m2)
- Airfoil: Zaparka[46]
- Empty weight: 23,450 lb (10,637 kg)
- Gross weight: 29,700 lb (13,472 kg)
- Max takeoff weight: 36,200 lb (16,420 kg)
- Fuel capacity: 640 US gal (2,400 l) internal and up to four 165 US gal (625 l) drop tanks
- Powerplant: 2 × Pratt & Whitney R-2800-65W Double Wasp 18-cylinder air-cooled radial piston engines, 2,250 hp (1,680 kW) each
- Propellers: 4-bladed Curtiss Electric constant-speed feathering propellers, 12 ft 2 in (3.72 m) diameter
- Maximum speed: 366 mph (589 km/h, 318 kn) at 20,000 ft (6,100 m)
- Range: 1,350 mi (2,170 km, 1,170 nmi)
- Ferry range: 1,900 mi (3,100 km, 1,700 nmi) with four external fuel tanks
- Service ceiling: 33,100 ft (10,100 m)
- Rate of climb: 2,540 ft/min (12.9 m/s)
- Time to altitude: 20,000 ft (6,100 m) in 12 minutes
- Wing loading: 45 lb/sq ft (220 kg/m2)
- Power/mass: 0.15 hp/lb (0.25 kW/kg)
- Guns: ** 4 × 20 mm (.79 in) Hispano AN/M2 cannon in ventral fuselage, 200 rounds per gun
- 4 × .50 in (12.7 mm) M2 Browning machine guns in remotely operated, full-traverse upper turret, 560 rpg
- Bombs: for ground attack, four bombs of up to 1,600 lb (726 kg) each or six 5-in (127 mm) HVAR unguided rockets could be carried under the wings. Some aircraft could also carry one 1,000 lb (454 kg) bomb under the fuselage.
- SCR-720 (AI Mk.X) search radar
- SCR-695 tail warning radar
RC Plane Specs (from 13th Squadron Page)
- Motor: (2) 1806 2280kV Brushless Motor
- ESC: (2) 20A
- Battery: 3s 850mah - 1000mah
- Wingspan: 48 inches (1219.2mm)
- Center of Gravity: 1 3/4 inches (44.4 mm) from leading edge.
- Propellers: (2) 5x4.5 - 6x4.5 (5x4.5 recommended for 3 blade, 6x4.5 recommended for 2 blade)
- Other: Y-Harness needed,
- Differential Thrust
What I will likely do different:
Black DTFB
Metal Gear Servos, and 2204 2300kv motors with 5x4.5x3 dalprops that I have around.
I plan to FPV in the Cockpit and try and scale build and light a cockpit.


