Solved Willy Nillies (to be released) Eaglet 250

Turbojoe

Elite member
This is pretty much a kit pre-release thread. I won't delve into my almost 40 year love for the original Goldberg Eaglet 50 as it could get very long....
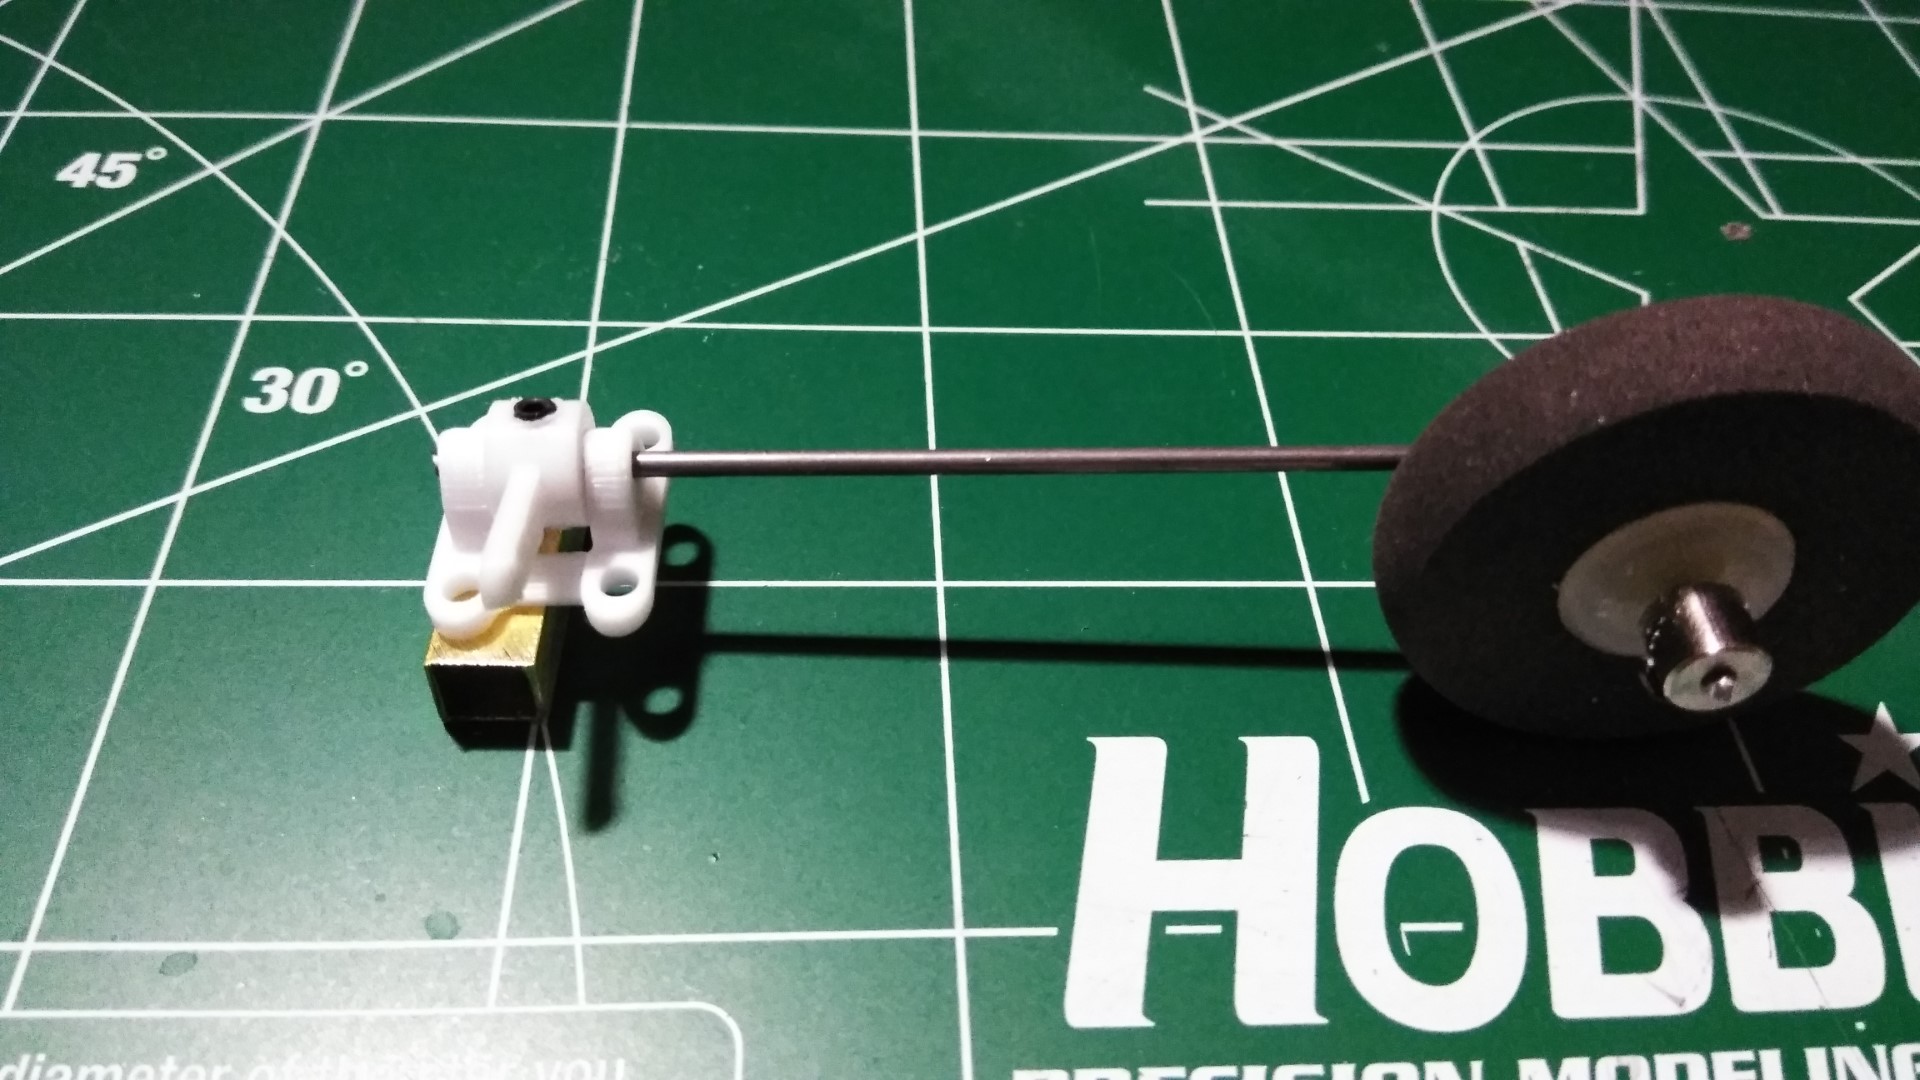
Final nose gear.jpg
Side shot.jpg
Side shot.jpg

There is virtually no information released for the Eaglet 250 yet and even the picture on the Willy Nillies website is for the original Eaglet 50. LINK. That hasn't stopped me from polluting the build off thread with what I've been doing in preparation for the kit release so I figured it best to start a specific thread for this to be released 250 sized version kit of the Eaglet 50.

I am the keeper of my daughters Creality Ender 3 3D printer. I've printed out a lot of files from Thingiverse but I've just recently tried my hand at design using TinkerCad. Because I just can't build an Eaglet without tricycle landing gear (and I don't know if the to be released Willy Nillies kit is designed for such) I drew up the steerable nose gear and after MANY tried and failed attempts I have a final design that I intend to use when I get my kit. I was having so much fun getting acquainted with TinkerCad that I also designed a "slip fit" servo mount plate for elevator/rudder/steering sized for the same 3.7 gram servos sold on the Willy Nillies website.. Once in the needed position the plate can then be CA'd in place. I could only base the width dimensions on my already built Willy Nillies Super Sport at 39 mm width. I can easily adjust my file as needed though to fit any as built fuse width. Until I get the already ordered kit in late December I'm kinda lost as to what else I can 3D design and print for it and it's killing me! :eek:

My very first Eaglet 50 was built in the very early 1980's. Right around 1980 or so. No pictures of that build unfortunately. My next Eaglet 50 build was a project to build the kit using as little ply as possible and mostly balsa. I still have the unbuilt original kit that I only used for templates. The all balsa build was a HUGE success! There's a video of the maiden of that build on YouTube somewhere. :unsure: I'll likely cover my new Eaglet 250 just like my last Eaglet 50 all balsa built in a faux Air Force Thunderbirds scheme. (weird because I'm ex Naval aviation)

I'm now like a crack addict waiting for his next fix in anticipation of the Eaglet 250. Hopefully just a few more weeks now. ..........

Joe
 

TooJung2Die

Master member
Adding a picture of my scratch all balsa built Eaglet 50. Flys great on a 450 size motor...
Joe, that photo of yours is why I decided to order the Eaglet 250. How are we going to survive while waiting for the kits to arrive? Shipping the third week of December! Arrgh! The inhumanity! :eek::censored:
I like the hardware you're printing. I don't have a 3D printer because I can't think of a compelling reason to own one. Everything I need is already manufactured... I thought. I'm beginning to see there are advantages to designing your own components.
 

TooJung2Die

Master member
That servo tray is a great design. I am leary every time I hot glue a servo to foam....right up until I have to dig the bugger out for a new home hehe.
Have you tried squirting some rubbing alcohol on the hot glue first? Alcohol releases the grip on hot glue. That's why I always use hot glue on electronics (unless there is a nice plywood tray). Hot glue peels off pretty easy when you wet it with any kind of alcohol and makes recycling the parts easier.
 

Turbojoe

Elite member
Thanks Doug. I'd been resisting trying to learn more with TinkerCad but had an idea, got a wild hair and sat down and started work. Both items as posted are after many failures now at version 7. They're both as close to a proof of concept as I can estimate that they may need to be but the basic design is done and can be easily modified in TinkerCad to fit as needed when I get the kit. Can't wait!

Joe
 

Turbojoe

Elite member
A few guys have expressed concern that my nose gear may not hold up in a crash/hard landing. I do my best NOT to land nose first BUT I went ahead and beefed up the mount. The picture on the left is the last one. The picture on the right is the latest version. Looking at the pictures it should be quite obvious how much stronger this last one is. If you manage to break this (or even the last one) with such a lightweight aircraft then maybe planes aren't for you and you should probably take up R/C boats instead. LOL. ;)

I don't yet have the Eaglet 250 kit in my hands so who knows. What I've designed may not even fit! Even if it does I have no intentions of marketing the parts. Doug at Willy Nillies has been so good to all of us here. If he's interested in offering the gear as a kit option for the Eaglet or any others he comes up with I'd be more than happy to give him my files.
IMG_20191207_161303.jpg

Joe
IMG_20191207_161244.jpg
IMG_20191207_161303.jpg
 

Turbojoe

Elite member
I'm going absolutely nuts right now waiting for the Eaglet 250. I spent almost 10 hours yesterday making ridiculously minuscule adjustments to my (my daughters) Creative Ender 3 firmware XYZ Axes and printing (using tons of filament along the way only to find I was off just enough to irritate me and Law enforcement. Lets hope they are taken down....
 

Turbojoe

Elite member
I didn't want to wait so I ordered a Hummer 250. This way, i have an excuse to order one of the new kits early in the new year!!:cool:

I'm trying HARD not to add a second to my Eaglet 250 order.

Retirement on Social Security is all that is left for me after the "economic downturn" of 2008 obliterated my 401K and eliminated my great paying job at the time. Too gruesome to relay the gruesome financial details here but I hope EVERY low life scum sucking P.O.S. investor that created that 2008 mess burns in HELL!

OK. Back to R/C. I keep wanting to add another Eaglet 250 to my order. I've been playing with and learning to do many things on TinkerCad and have been applying them to (warped ideas in MY head) designs that so far function well. Until I get a kit in my hands in a week or two I won't know if my ideas actually work.

Too close to Christmas right now. Rather than buy another (well priced) kit I need to spend money on my grandchildren for Christmas first. One is in Florence just south of me. Two others are in Japan. This could get expensive........

Joe
 
Last edited:

chris398mx

Master member
I'm trying HARD not to add a second to my Eaglet 250 order.

Retirement on Social Security is all that is left for me after the "economic downturn" of 2008 obliterated my 401K and eliminated my great paying job at the time. Too gruesome to relay the gruesome financial details here but I hope EVERY low life scum sucking P.O.S. investor that created that 2008 mess burns n HELL!

OK. Back to R/C. I keep wanting to add another Eaglet 250 to my order. I've been playing with and learning to do many things on TinkerCad and have been applying them to (warped ideas in MY head) designs that so far function well. Until I get a kit in my hands in a week or two I won't know if my ideas actually work.

Too close to Christmas right now. Rather than buy another (well priced) kit I need to spend money on my grandchildren for Christmas first. One is in Florence just south of me. Two others re in Japan. This could get expensive........

Joe
Completely understand!! Priorities. This too for me, is why the foamboard planes are so appealing. I am going to start build a larger Balsa plane for a Saito 91 I bought used, but i fear when i am done I wont want to fly it the same way as i have the foam planes because of the huge investment in time and money.
 

Willy Nillies

Elite member
We are going as fast as we can Joe. Quality is very important. We appreciate your patience as hard as it is! :)

You are making some very neat stuff! I'll see if I can clip part of the firewall/fuselage drawing so you can have some measurements to play with. We werent planning on a steerable nosewheel, but, if one can be developed that is inexpensive, easy and light we would definitely consider including them in the kit or worse case offer them as an upgrade part. Chances are it could be used on the Falcon and Skylark also.... possibly others.

We have an Ender 3pro that we've been making alot of parts on lately and have ordered 2 more to start producing some parts we think everyone will love!

Sincerely,
Doug and Becky
WillyNillies.com
 

Turbojoe

Elite member
How much did you pay for your printer, I am looking for a good 3D printer, and looking at about 350-400 hundred as much as even 600-800 dollars, not sure what level one needs and what advantages one gets for going higher.

My daughter bought it about this time last year from Amazon for if I remember right it was $179.00 on special sale. It's now $206.00 at Amazon. LINK

I honestly don't know what the difference is between that one and the Pro version. All I see is that the Pro has the removable bed plate. Mine came with that and it's not a pro. I certainly wouldn't pay all that extra just for that option. I'm sure there's more but I'm real happy with our "base model".

Joe
 

Turbojoe

Elite member
Doug,

Can you post what the differences are between the base and the Pro? It's got to be more than just the bed plate.

Joe
 

rockyboy

Skill Collector
Mentor
I don't know what differences there are between the two versions of this printed, but I do know 2 people (including a hobby shop owner) who have purchased and love using this printer. As a builder of a couple DIY printer kits, I was jealous of how quickly their tuning process seemed to go - they had usable prints very quickly with stock settings instead of having to calculate and tweak stepper motor feed settings for a couple days...
 

Willy Nillies

Elite member
Doug,

Can you post what the differences are between the base and the Pro? It's got to be more than just the bed plate.

Joe
Hi Joe,

1. 40×40 aluminum extrusion for the Y-axis base - much more sturdy and eliminates a lot of slop
2. Upgraded Meanwell Power Supply Unit (PSU), which is thinner, quieter, and all-around better than the version featured on the original Ender 3.
3. C-MAG magnetic printing bed
4. The first version of the Ender 3 had a board fan at the top of the printer’s base, which made is susceptible to falling bits of a filament. On the Ender 3 Pro, the manufacturer has placed this fan at the bottom of the 3D printer.

We've had very good luck with ours right out of the box. Only had to spend about half an hour to get it to the precision we wanted.

Sincerely,
Doug and Becky
WillyNillies.com
 

Turbojoe

Elite member
Thanks Doug. I'm very happy with our base Ender 3 but for someone buying their first printer the $50.00 extra for the Pro sounds like a good investment.

Joe