Hughes H-1 w/ Racing Wings

nagromnewo

New member
And for the cubic wing loading: Keep in mind, that the density of air doesn´t scale down.

A Piper Cub, a plane which pilot students are still trained on, has in real a wing-loading of ~ 30 kg/sq.m, that are 300 g/sq.dm!

A RC plane with this wing load will never ever fly, not to speak of using it as a trainer. So calculating real wing loads down might give you an impression, how the model will behave, but even the fastest RC warbirds are - compare to their real conterparts - nothing more than sailplanes.

That's why you use wing cube loading that I linked to. WCL does scale. WL does not.

Owen
 

JohnRambozo

Posted a thousand or more times
I test fit a paper cowl over the cowl formers. My first try isn't practical. It would require so many precision cuts to get a smooth appearance that it would drive even the most patient builder to the brink of sanity only to have it explode on the first less than perfect landing.

I'm going to remake it in 3 basic shapes, rather than try to capture ever nuance of the scale design. The most important details are the curve from the opening to the widest part of the cowl, then the taper from the widest part back toward the fuse where the cowl overlaps the start of the fuse. That way it will be much easier to manage.

It will be comprised of:

  • A curve of sanded foam board. 3 layers should be just right.
  • A short cylinder for the widest section.
  • A cone from the back of the cylinder just overlapping the fuse.

The more I think about the fuse, I think its going to be best to have some flat area on the bottom and some internal foam structure to push the wings through. But I don't want it to just look like the FT Spitfire with a cowl and different wings and tail feathers. That H-1 look depends on a round fuse with a smooth taper to the back.

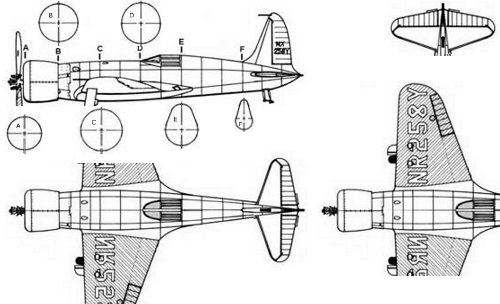
I compared a slightly different 3 view of the racer to the plans I was basing my design on and I like the shape of the other 3 view better. The cowl is a little more beefy and it actually has former shapes at more practical locations.

This one:

zhLscBT.jpg

I flipped the h.stab and wings for consistency. There was a very noticeable difference when I compared the two sides in the drawing. I scaled everything up and am starting over with the plans. Let's call it Development Stage 2. The wings and tail I was using are very close to scale and don't require any changes, but the fuse is needing a rework. Once I'm happy with the fuse, I'll remake the wings and tail just because I like the subtle differences in this 3 view. A very slightly more pronounce curve to the front of the v.stab and a little more sweeping angle to the h.stab.

Here's what I'll be more or less tracing:

M87RNPg.jpg
 
Last edited:

nagromnewo

New member
I think I would have found a plastic bottle with a round bottom to use for the cowl and then just scale the plane to suit.

Owen
 

Robin

Member
Another idea for building the fuse might be this one, I used for building a laird super solution (but from balsa):

Cut the profile of the fuse from foam and lay it flat to a building board. Add the formers, but cut in half. So you could build the two halves of the fuse without worrying that it might be warped. Additionally, as you have a flat profile to start from, you can easily determine the AoA and cut a hole in it for a safe mounting of the wings.

The formers could take several stringers to get the three-dimensional shape of the fuse, which afterwards could be covered with Oracover.

Or you could try this: Build the fuse like explained above, but from Ply. The gaps between the single formers should be the width of standard insulation foam (in Germany, 10 cm). This foam cut be pressed between the formers and cut in shape using a hot wire. Afterwards the segments can be glued together (and be covered with something, to give strength to the quite cavernous foam).
 

JohnRambozo

Posted a thousand or more times
Another idea for building the fuse might be this one, I used for building a laird super solution (but from balsa):

Cut the profile of the fuse from foam and lay it flat to a building board. Add the formers, but cut in half. So you could build the two halves of the fuse without worrying that it might be warped. Additionally, as you have a flat profile to start from, you can easily determine the AoA and cut a hole in it for a safe mounting of the wings.

The formers could take several stringers to get the three-dimensional shape of the fuse, which afterwards could be covered with Oracover.

Or you could try this: Build the fuse like explained above, but from Ply. The gaps between the single formers should be the width of standard insulation foam (in Germany, 10 cm). This foam cut be pressed between the formers and cut in shape using a hot wire. Afterwards the segments can be glued together (and be covered with something, to give strength to the quite cavernous foam).

I've seen your Gee Bee. I know you take your time to make your planes look immaculate. I'm not sure I'm ready for that level of perfection. :)

Honestly, I'm trying to simplify the design just enough to make it accessible to a wide range of building skill levels while still keeping a good scale look. So I'm doing as much FT-style building as possible.
 

nerdnic

nerdnic.com
Mentor
Everything is looking good so far! And I agree, the less complicated you make it the better. But that's the challenge to you as a designer, make it look great and easy to build all while flying awesome. If either of those 3 areas is off balance it makes for a bad overall design/plane.
 

Robin

Member
I've seen your Gee Bee. I know you take your time to make your planes look immaculate. I'm not sure I'm ready for that level of perfection. :)

Honestly, I'm trying to simplify the design just enough to make it accessible to a wide range of building skill levels while still keeping a good scale look. So I'm doing as much FT-style building as possible.

Thanks.

These proposals were just my 5 cents, cause I thought you were still in search for ideas, how to build the fuse.

I really appreciate your strategy!
 

JohnRambozo

Posted a thousand or more times
Thanks.

These proposals were just my 5 cents, cause I thought you were still in search for ideas, how to build the fuse.

I really appreciate your strategy!

I'm happy to have you suggestions. I'm just explaining my choices. Thanks for all of your input.
 

JohnRambozo

Posted a thousand or more times
Everything is looking good so far! And I agree, the less complicated you make it the better. But that's the challenge to you as a designer, make it look great and easy to build all while flying awesome. If either of those 3 areas is off balance it makes for a bad overall design/plane.

Thanks nerdnic. I will post updates soon. I have made good progress on the fuse redesign accounting for the wing placement and have pinpointed some key shapes in the fuse with minimal formers and a flat belly. I'm going to borrow your method of keeping the fuse connected at the top, then adding a flat bottom piece in after. The curve goes below the center line to give the suggestion of a complely round shape but the flat belly will be much stronger and more manageable from a building standpoint.

I'm approaching the holy trinity of FT-style R/C. (Great Looks, Ease of Building and Awesome Flying) I hope to achieve all three equally.
 
Last edited:

jayz 84

Posted a thousand or more times
Cant wait till the finish plane Johnrambozo. With that wing area it should track and roll fast. Plan on posting plans or you gonna tease us making me have to buildout my own?..

And nerdnic im taking your advice with my build starting over. ( the less complicated you make it the better. But that's the challenge to you as a designer, make it look great and easy to build all while flying awesome. If either of those 3 areas is off balance it makes for a bad overall design/plane.) Was gonna full scale my rarebear plane. But then its not a easy build but i still have ideas to make it look scale. But built like a FT plane. Great advice
 

JohnRambozo

Posted a thousand or more times
Cant wait till the finish plane Johnrambozo. With that wing area it should track and roll fast. Plan on posting plans or you gonna tease us making me have to buildout my own?..

And nerdnic im taking your advice with my build starting over. ( the less complicated you make it the better. But that's the challenge to you as a designer, make it look great and easy to build all while flying awesome. If either of those 3 areas is off balance it makes for a bad overall design/plane.) Was gonna full scale my rarebear plane. But then its not a easy build but i still have ideas to make it look scale. But built like a FT plane. Great advice

I'm slowed up a bit until I can afford more servos, but I'm still working on the fuse and yes there will be plans. That's also what's taking so long - making sure all of my measurements are accurate and up to FT quality standards.
 

jayz 84

Posted a thousand or more times
Thats great man cant wait to see it. And i know what you mean on how time consuming getting the plans just right
 

JohnRambozo

Posted a thousand or more times
Thats great man cant wait to see it. And i know what you mean on how time consuming getting the plans just right

The plans are coming along. I updated the first post. I have some revisions to do to the formers then I'll be able to testfit the build.
 

jayz 84

Posted a thousand or more times
Coming along very nice johnrambozo looks great. Im about the same point on my rare bear build tring to figure out the formers. And nerdnic you are right about the tail its fun getting them just right
 

JohnRambozo

Posted a thousand or more times
Coming along very nice johnrambozo looks great. Im about the same point on my rare bear build tring to figure out the formers. And nerdnic you are right about the tail its fun getting them just right

Thanks jayz. I finally have all the formers and cowl shapes drawn. I'll be printing and cutting the new fuse, formers and cowl this week. If all goes well, I'll be fitting the poster board very soon!
 

jayz 84

Posted a thousand or more times
So your doing the skin with poster board. I cant make up my mind between poster board or foam board with paper off the inside
 

JohnRambozo

Posted a thousand or more times
So your doing the skin with poster board. I cant make up my mind between poster board or foam board with paper off the inside

I go back and forth. I don't like the flimsyness of poster board and it dents easily. Maybe I'll do a mix. Depapered foam (is that a word?) from the midway mark down for some rigidity and posterboard on top. I plan to make the cowl easily removable just in case it explodes on a bad landing, too. Then again, maybe just foam reinforcement behind the wings for gripping during a launch so you don't crush the poster board... decisions decisions.